13 Kitchen Counter Organization Ideas for a Clearer Surface
Kitchen counters have a way of becoming catch-all zones. Between the coffee maker, mail pile, and that random spice jar, it's easy to lose sight of your workspace.
But a clear counter doesn't mean bare—it means intentional. A weekend refresh is all you need to transform your counters into something both functional and inviting.
These 13 ideas are designed to be doable in a day, with a relaxed, conversational approach that fits your real life. Let's walk through each one, from simple swaps to clever solutions that keep your kitchen looking put-together without feeling sterile.
1. Start with a Clean Slate
A clear countertop is like a deep breath for your kitchen. Before you start organizing, take everything off the counters—every single item. Wipe down all surfaces with a gentle cleaner so you’re working with a fresh, clean base.
Then sort your pile into three groups: keep, relocate, or toss. This simple reset makes every next step easier and more effective.
Why It Works
Starting from zero prevents you from just shuffling clutter around. You’ll see exactly what you actually use and what’s just taking up space. A clean slate also lets you reimagine your counter layout without being influenced by old habits.
Best For
This idea is perfect for anyone feeling overwhelmed by counter clutter, especially if you’ve been avoiding tackling the mess. It’s also great for a weekend refresh when you have an hour to reset your space.
Styling Tip
As you wipe down surfaces, notice the natural light and counter space you uncover. Keep that feeling of openness in mind when you decide what to put back. Only return items you reach for daily—like your coffee maker or knife block—and find new homes for the rest.
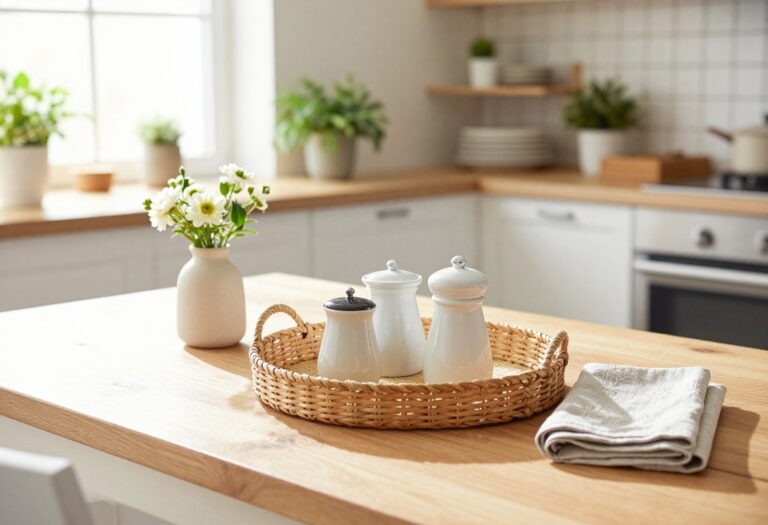
2. Use a Large Tray for Daily Essentials

A large tray might seem like a simple addition, but it can instantly transform a cluttered counter into a curated vignette. Think of it as a landing zone for your morning coffee ritual—mugs, a French press, a small jar of sugar, all sitting together on a wooden or ceramic tray. The tray defines the space, so even when things get a little messy during a busy morning, it still looks intentional.
It also makes cleaning a breeze: just lift the tray and wipe down the counter underneath. For a weekend refresh, swapping out the tray or rearranging what's on it takes five minutes and gives your kitchen a whole new feel.
Why It Works
- A tray creates a visual boundary that groups scattered items into one cohesive unit. Instead of seeing a dozen separate objects, your eye sees a single, styled composition. This reduces visual clutter and makes the counter feel more spacious.
- Plus, the tray protects your countertop from spills and scratches, and you can easily move the whole setup if you need extra workspace.
Best For
This idea is perfect for the stretch of counter next to your coffee maker or kettle, where you tend to accumulate pods, spoons, and sweeteners. It also works beautifully near the stove for your everyday cooking oils, salt, and pepper. If you have a small kitchen, a tray can turn a narrow counter into a functional coffee station without taking over the whole surface.
Styling Tip
Choose a tray that contrasts with your countertop for a pop of texture—a dark wood tray on light marble, or a sleek metal tray on butcher block. Keep the items on the tray to three to five essentials, like your coffee canister, a small plant, and a couple of mugs. Add a tiny vase with a single bloom for a fresh touch that feels effortless, not fussy.
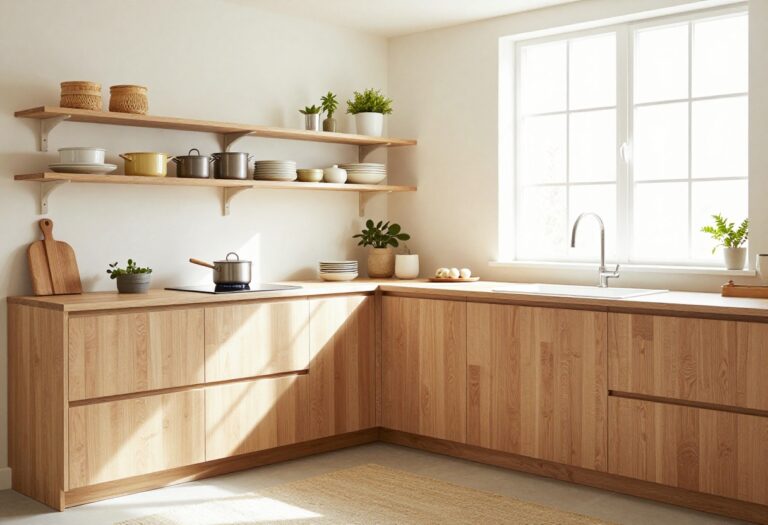
3. Add a Slim Shelf for Vertical Storage
Counter space is precious, especially in a busy kitchen. A narrow shelf mounted just above the counter gives you a spot to keep everyday items within reach without sacrificing your work surface. It’s a simple weekend project that instantly adds character and function to your cooking zone.
Why It Works
This shelf makes use of empty wall space that’s often ignored. By keeping small jars, spices, or favorite cookbooks up off the counter, you free up room for meal prep and reduce visual clutter. It’s a low-commitment change that delivers a noticeable payoff.
Best For
Kitchens with limited counter space or awkward gaps between the counter and upper cabinets. It’s also ideal for renters who want to add storage without drilling into tile—look for adhesive or tension-mounted shelves.
Styling Tip
Stick to a slim profile—no deeper than 6 inches—so it doesn’t feel bulky. Style it with a mix of functional items like a salt cellar and a small plant or ceramic spoon rest. Keep the color palette neutral to blend in, or go for a brass or black shelf to add a subtle accent.
4. Incorporate a Small Lazy Susan
Corner counters can feel like dead zones—hard to reach, easy to ignore. A small lazy Susan changes that by turning an awkward spot into a handy station for everyday essentials. Whether it's nestled next to the stove or tucked into a tight corner, this spinning tray keeps oils, vinegars, and condiments within easy reach without cluttering your main workspace.
It's a simple, weekend-friendly tweak that instantly makes your kitchen feel more functional and less chaotic.
Why It Works
A lazy Susan eliminates the need to dig around for that bottle behind the salt shaker. With a quick spin, everything is accessible, so you can grab what you need mid-cooking without breaking your flow. It also groups similar items together, which cuts down on visual clutter and makes your counter look intentionally styled.
Best For
This idea shines on corner counters, narrow countertops, or the small area right beside the stove or sink. It's also a smart solution for renters who can't install permanent shelves or racks—just set it down and go.
Styling Tip
Choose a lazy Susan in a natural material like bamboo or acacia wood to add warmth, or go with a sleek acrylic version for a modern, barely-there look. Keep the items on it cohesive—think matching bottles or jars—so the whole setup feels curated rather than random. A small plant or salt cellar can finish the vignette.
5. Hang Utensils on a Rail System

There's something about a wall-mounted rail that instantly makes a kitchen feel more like a chef's workspace. It's not just about storage—it's about turning everyday tools into part of the decor. A sleek metal rail with a few hooks lets you hang your most-used spatulas, ladles, and tongs right where you need them, freeing up drawer space and adding a touch of industrial charm.
Why It Works
A rail system keeps frequently used utensils visible and accessible, so you're not digging through a drawer every time you need to flip a pancake. It also makes use of vertical wall space, which is especially valuable in smaller kitchens where counter and drawer real estate is limited.
Best For
This idea works great for any kitchen, but it's a game-changer for small kitchens or rental spaces where you can't make permanent changes. It's also perfect for anyone who loves to cook and wants their tools within arm's reach without cluttering the counter.
Styling Tip
Go for a matte black or brass rail to add a modern touch. Choose hooks that match the finish, and group utensils by type—wooden spoons together, metal spatulas together—for a clean, curated look. Leave a little breathing room between items so the rail doesn't look overcrowded.
6. Store Cutting Boards Vertically
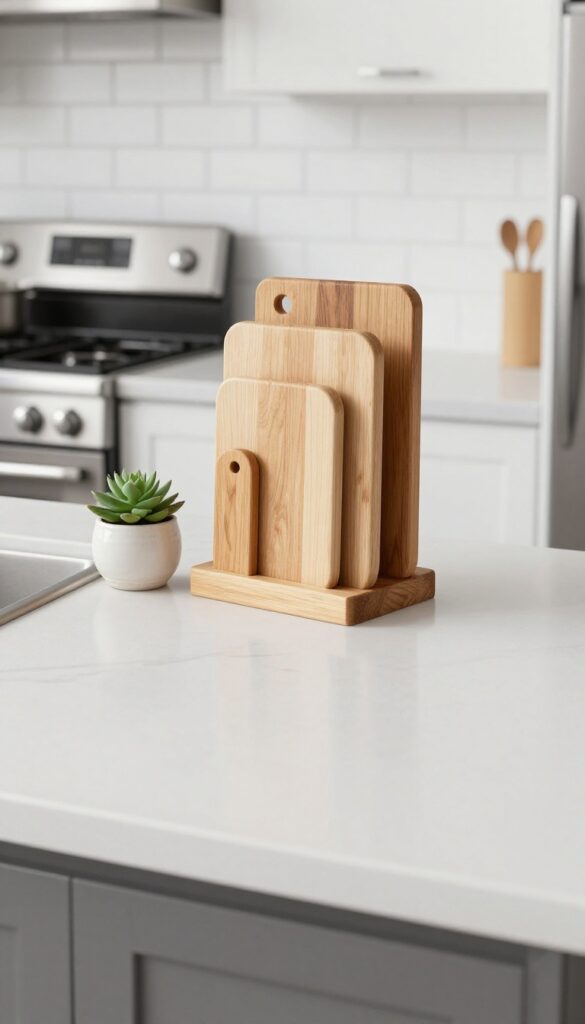
Piling cutting boards flat in a cabinet is a classic space-waster. They slide around, get scratched, and you always have to pull out the whole stack to grab the one at the bottom. A vertical stand changes all that by turning your boards into an organized, easy-to-grab display.
It frees up drawer and shelf space while adding a warm, natural layer to your countertop.
Why It Works
Vertical storage keeps boards separated so they dry faster and stay cleaner. It also eliminates the dreaded shuffle-and-tumble routine every time you need a board. Plus, the stand itself becomes a sculptural element that breaks up counter clutter.
Best For
This works well in medium to large kitchens where you have a few inches of open counter near the backsplash. It’s especially handy if you own multiple boards in different sizes and want them instantly accessible while cooking.
Styling Tip
Choose a wooden stand to echo butcher-block accents or a slim acrylic one for a nearly invisible look. Place it between the sink and stove so you can grab a board mid-recipe without reaching across the counter. Tuck a small plant or salt cellar next to it for a finished vignette.
7. Keep a Small Trash or Compost Bin Nearby
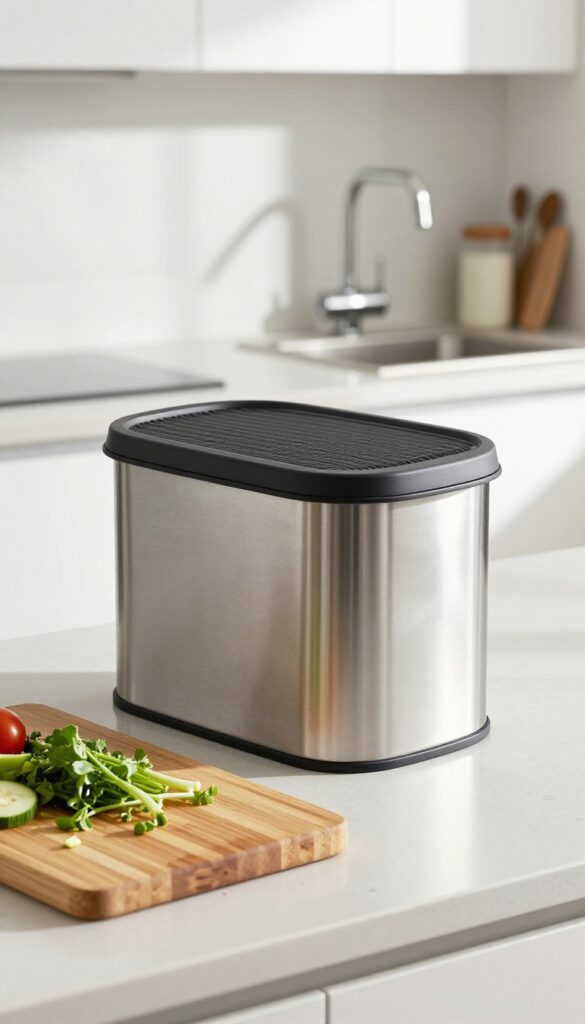
Picture this: you're chopping veggies for dinner, and instead of making multiple trips to the main trash can, you simply sweep peels and ends into a sleek countertop bin. It's one of those small changes that instantly streamlines your cooking flow. A mini compost pail or tiny trash can right next to your cutting board makes food prep feel effortless, and the right design can even double as a decorative accent.
Why It Works
Having a dedicated bin within arm's reach eliminates the need to juggle messy scraps or pause your chopping rhythm. It keeps your main counter clear of clutter and makes cleanup a one-step process. Plus, if you compost, it encourages you to actually use that system instead of tossing everything in the trash.
Best For
This idea is perfect for anyone who cooks frequently and wants to reduce counter clutter during meal prep. It's also great for eco-conscious households looking to make composting more convenient. If you have limited counter space, look for a slim, wall-mounted option or a bin that tucks under the counter edge.
Styling Tip
Choose a bin that complements your kitchen's aesthetic—stainless steel for a modern look, ceramic for a farmhouse feel, or bamboo for a natural touch. Place it on a small tray or mat to catch any drips, and consider a bin with a charcoal filter to keep odors at bay. Match the finish to your faucet or hardware for a cohesive look.
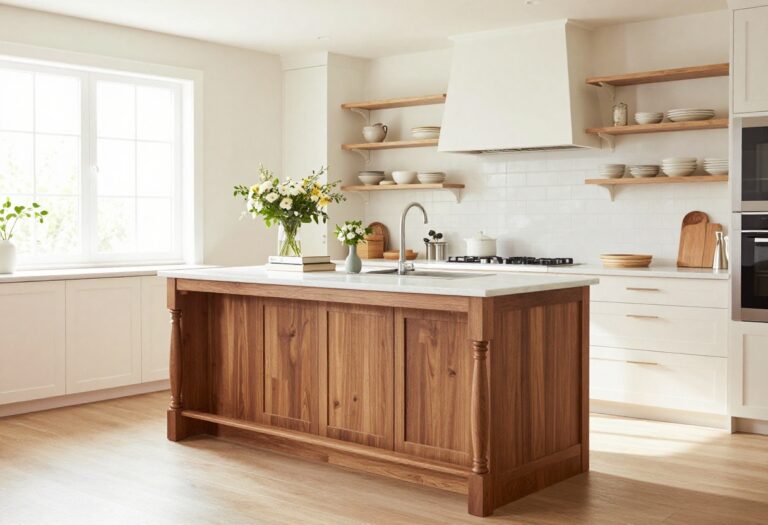
8. Display a Few Cookbooks on a Stand
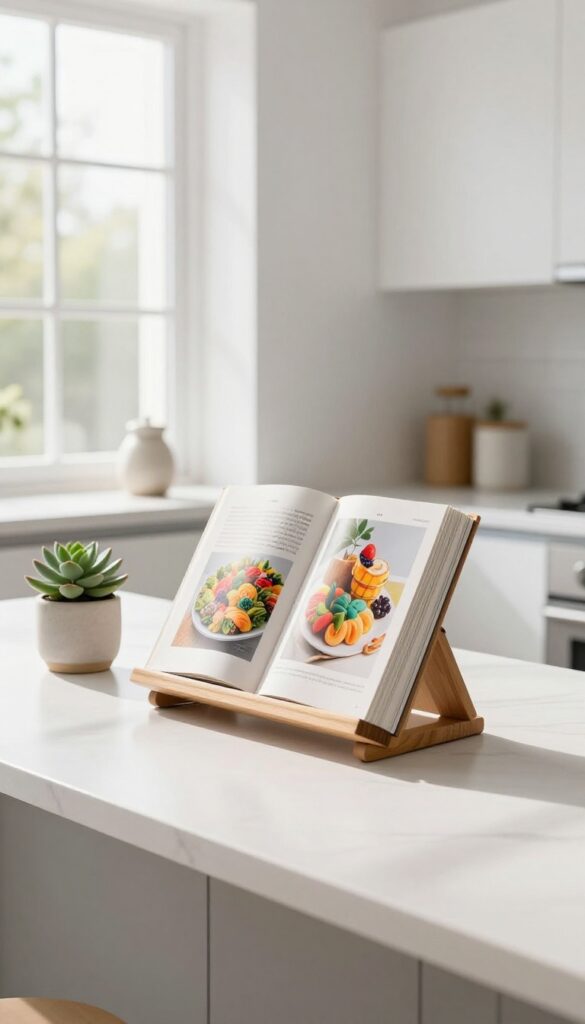
Cookbooks are often stuffed into cabinets or stacked in piles, but they can double as decor. Propping up one or two favorites on a small easel or book stand turns them into a functional focal point. It’s a quick weekend swap that adds personality and keeps your go-to recipes right at eye level.
Why It Works
A cookbook on a stand breaks up the monotony of counter clutter and introduces a vertical element. It’s practical because you can flip to the page you need without holding the book open with a can of beans. Plus, it gives your kitchen a lived-in, curated feel without much effort.
Best For
This idea works well on a kitchen island, a breakfast bar, or a stretch of counter near the stove. It’s especially great if you have a small collection of beautiful cookbooks or a single spiral-bound favorite you reference often.
Styling Tip
Choose a stand with a slim profile in wood, brass, or black metal to match your hardware. Prop open a page with a colorful recipe or a pretty photo, and place a small plant or a salt cellar next to it for balance. Rotate the book every few weeks to keep the look fresh.
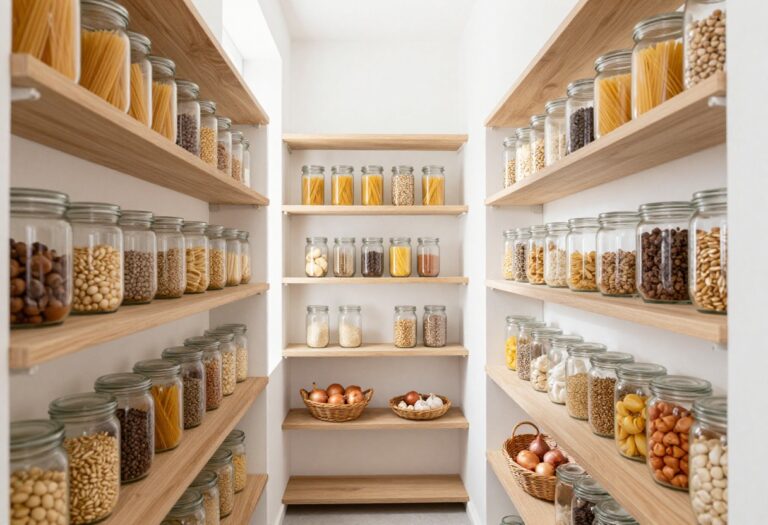
9. Use Canisters for Staples
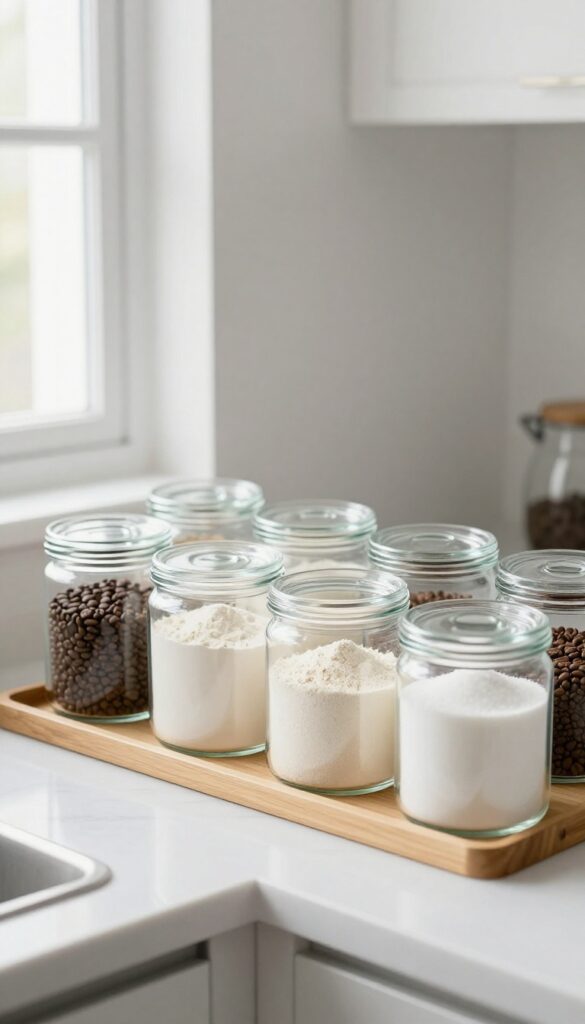
Glass or ceramic canisters for flour, sugar, or coffee beans look neat and keep ingredients fresh. Label them for a cohesive look.
Why It Works
Swapping bulky bags and boxes for uniform canisters instantly clears visual clutter. The airtight seals also keep your staples fresher longer, so you're not just organizing—you're reducing waste.
Best For
This idea shines in kitchens where you bake often or make coffee daily. It's also perfect for open shelving, where pretty canisters double as decor.
Styling Tip
Stick to one material—all glass or all ceramic—for a cohesive look. Use a label maker or chalk labels to keep things clear, and group canisters by function (baking, breakfast, etc.) on a tray or dedicated shelf.
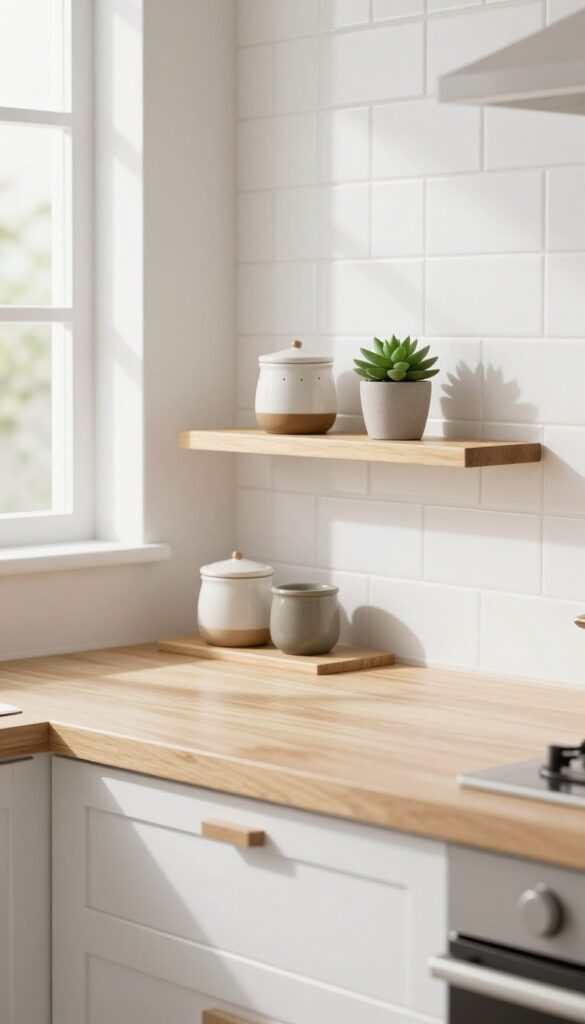
10. Add a Small Plant for Life

A tiny pot of herbs or a cute succulent can do wonders for a kitchen counter. It breaks up all the hard edges and appliances, adding a soft, living touch that makes the space feel welcoming. Plus, it’s one of the easiest ways to bring in color without a big commitment.
Why It Works
Plants naturally soften the look of a kitchen and improve air quality. A small herb pot is also practical—snip fresh basil or mint while cooking, and you’ve got both decor and function in one spot.
Best For
This works on any counter, but it’s especially nice near a window or on a corner that gets a bit of light. If you’re short on space, a single succulent on a windowsill or next to the coffee maker is perfect.
Styling Tip
Choose a simple ceramic pot in a neutral tone like terracotta, cream, or matte black. Group it with a small cutting board or a salt cellar for a styled vignette. Just keep the plant trimmed so it doesn’t take over your workspace.
11. Install a Magnetic Knife Strip
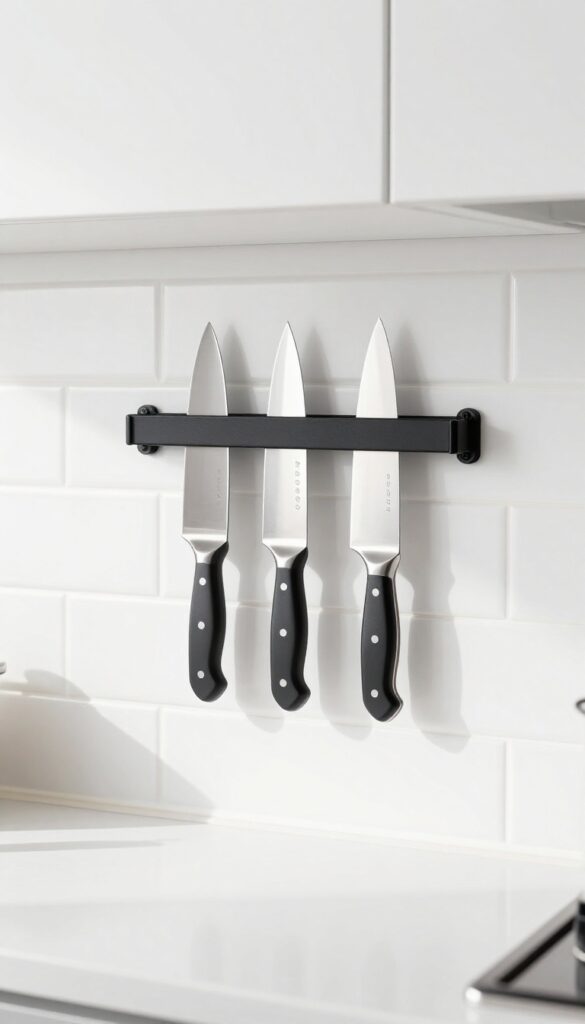
Mounting a magnetic knife strip on your backsplash or wall instantly frees up drawer and counter space while putting your blades on display. It gives your kitchen a sleek, industrial-chic look that feels both purposeful and stylish. Plus, you can grab the knife you need without rummaging through a cluttered drawer—a small win that makes a big difference during meal prep.
Why It Works
Knife blocks take up valuable counter real estate and can trap crumbs and bacteria. A magnetic strip keeps knives clean, dry, and within easy reach, reducing clutter and improving hygiene. It also turns your knife collection into a visual feature that adds character to the room.
Best For
This idea works great in small kitchens where every inch of counter space matters, or in open-plan layouts where you want to keep the counters clear for a cleaner look. It's also perfect for anyone who cooks often and wants quick access to their most-used tools.
Styling Tip
Choose a strip that matches your hardware finish—brass, matte black, or stainless steel—for a cohesive look. Arrange knives by size, with the most-used ones in the middle, and leave a little breathing room between them so the strip doesn't look crowded.
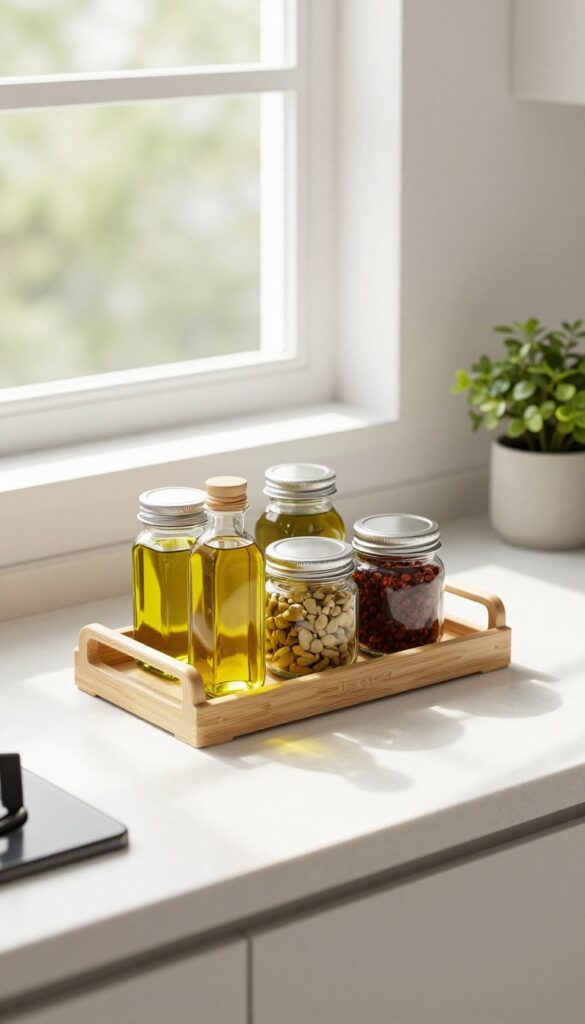
12. Use a Tiered Stand for Spices or Oils
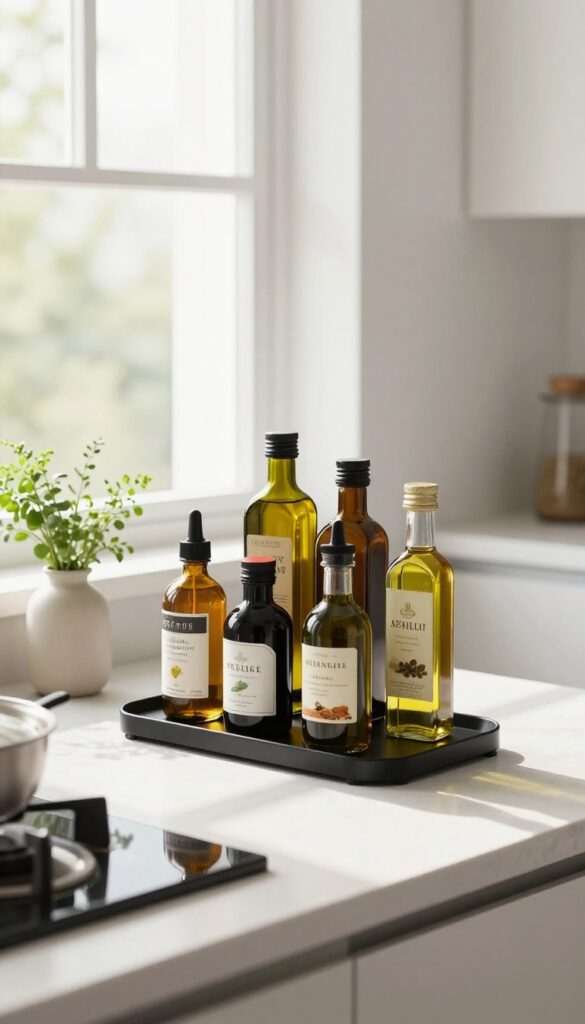
A tiered stand is one of those small upgrades that instantly makes your counter feel more intentional. By lifting bottles and jars off the flat surface, it creates a mini display that’s both functional and easy on the eyes. Whether you’re a daily cook or just want your coffee station to look polished, this little change brings a sense of order without any major commitment.
Why It Works
When bottles sit in a single row, the ones in the back often get forgotten. A tiered stand solves that by angling everything forward so you can see each label at a glance. It also reclaims vertical space, meaning you can store more items in the same footprint—perfect for tight countertops.
Best For
This idea shines next to the stove where you keep cooking oils and everyday spices, or beside a coffee station for syrups and pods. It’s also great for anyone who wants a quick weekend refresh without drilling holes or rearranging cabinets.
Styling Tip
Choose a stand with a finish that complements your hardware—brass or matte black for a modern touch, or bamboo for a warm, natural feel. Group bottles by height or color for a cohesive look, and leave a little breathing room around the stand so it doesn’t feel crowded.
13. Create a Coffee or Tea Station
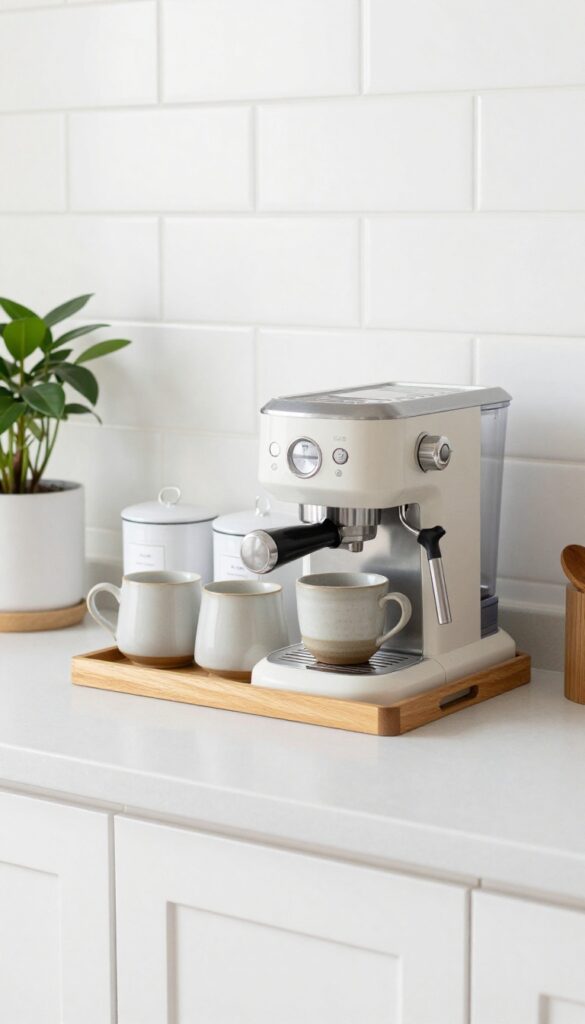
Carving out a dedicated spot for your morning brew does more than just clear counter space—it sets a calm, intentional tone for your day. Even a tiny corner can become a cozy ritual zone with the right tray, a few canisters, and your favorite mugs within easy reach. The goal is to make your coffee or tea routine feel like a small luxury, not a cluttered scramble.
Why It Works
Grouping all your coffee or tea supplies in one spot prevents them from spreading across the entire counter. A tray catches stray grounds and drips, while canisters hide pods, bags, and sweeteners behind a uniform look. The result is a visually calm surface that still keeps everything you need at your fingertips.
Best For
This idea works well for anyone who makes coffee or tea daily and wants to streamline their morning. It's especially helpful in kitchens where counter space is limited but you still want a dedicated beverage zone that feels intentional rather than cramped.
Styling Tip
Stick to a small tray that leaves room for your machine and a couple of mugs. Use matching canisters for coffee, tea, and sugar, and add a small plant or a pretty spoon rest for a welcoming touch. Keep the color palette simple—white, wood, and a single accent color keeps it from feeling busy.
FAQ
How do I keep my kitchen counters organized long-term?
Adopt a 'one in, one out' rule for counter items. Do a quick 5-minute tidy each evening, and reassess every season to remove anything that's drifted onto the counters.
What should I never store on my kitchen counters?
Avoid storing appliances you rarely use, paper clutter, and bulky items that block your workflow. Keep only daily essentials and decorative pieces that earn their spot.
Can I organize my counters without spending money?
Absolutely. Repurpose trays, baskets, or jars you already own. Group similar items together and use vertical space with existing shelves or hooks.
How do I choose a color scheme for counter accessories?
Stick to two or three complementary colors that tie into your kitchen's palette. Neutral tones like white, wood, and black are versatile, while a pop of green from a plant adds freshness.
What's the best way to organize a small kitchen counter?
Prioritize vertical storage with shelves or magnetic strips. Use trays to contain items, and keep only the essentials visible. A lazy Susan can maximize corner space.
Conclusion
A clearer kitchen counter is within reach—just a weekend away. These 13 ideas prove that organization doesn't have to be rigid or boring. It's about making your space work for you while still feeling like home.
Pick a few ideas that resonate, give them a try, and enjoy the calm that comes with a tidy surface. Your kitchen will thank you, and so will your morning coffee routine.