9 Kitchen Utensils Organization Ideas for Faster Meal Prep
A cluttered kitchen counter can turn a simple dinner into a frustrating scramble. When every spatula, whisk, and ladle has a designated spot, meal prep flows so much smoother.
These nine ideas focus on keeping utensils accessible without sacrificing style, because a kitchen should feel warm and lived-in, not sterile. Whether you have a sprawling cooktop or a tiny galley, small changes in how you store your tools can save minutes and sanity.
Let's explore ways to bring order to the chaos, one utensil at a time.
1. Drawer Dividers That Actually Fit Your Tools
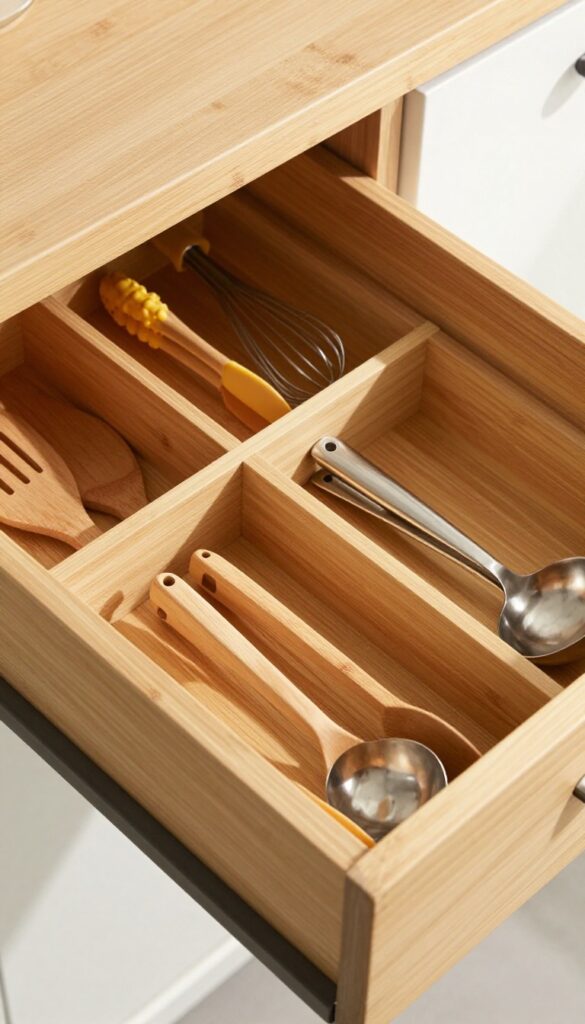
Deep kitchen drawers are a blessing, but they can quickly turn into a chaotic jumble of utensils. The secret to keeping them organized is using adjustable wooden dividers that create custom compartments for each tool. This approach not only saves time during meal prep but also adds a warm, handcrafted feel to your kitchen.
With everything in its place, you'll enjoy a sense of calm every time you open a drawer.
Why It Works
Dividers prevent utensils from sliding around and getting tangled, so you can grab what you need without rummaging. The natural wood material adds texture and warmth, making the drawer feel like a curated piece of furniture rather than a storage bin.
Best For
Deep drawers in standard base cabinets, especially those near the stove or prep zone. Ideal for households with a large collection of cooking tools that need to stay accessible.
Styling Tip
Mix different wood tones for a collected-over-time look. Pair light bamboo dividers with dark walnut drawer liners, and group utensils by function—spatulas together, tongs together, whisks together. Add a small jar of wooden spoons on the counter to echo the natural theme.
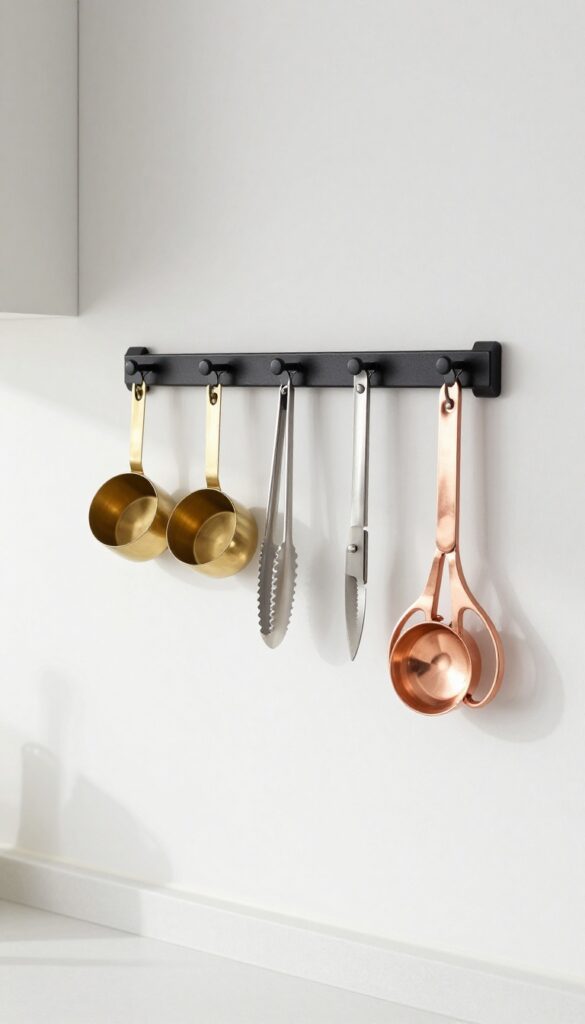
2. A Hanging Rail Near the Stove for Daily Favorites
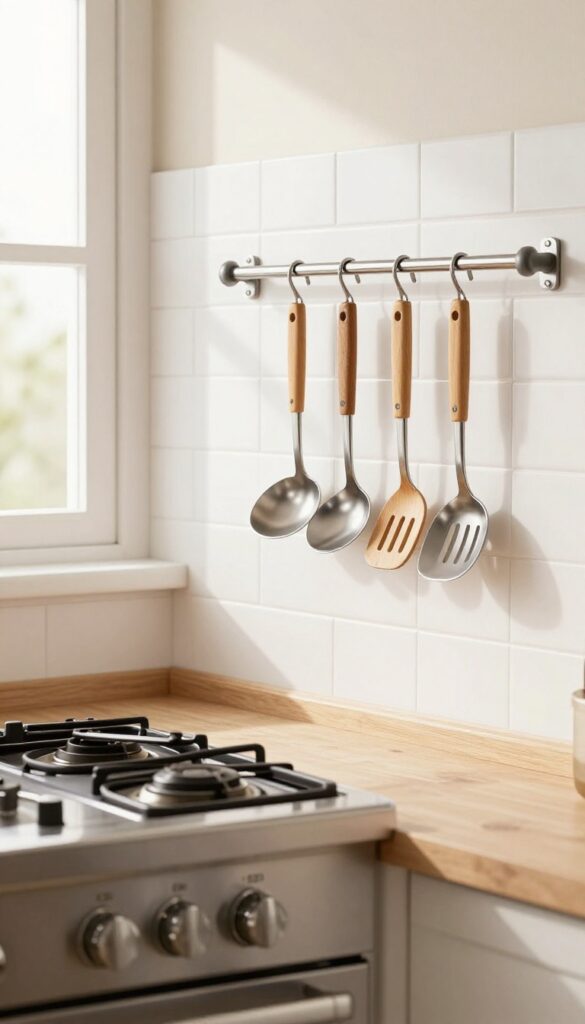
There's a certain charm to having your go-to tools right where you need them—no drawer digging, no rummaging. A slim metal rail mounted on the backsplash or under a cabinet creates an instant command center for your most-used utensils. The S-hooks let you hang ladles, slotted spoons, and tongs in a neat row, turning practical storage into a warm, lived-in display.
It feels professional yet cozy, like a chef's kitchen that still welcomes family breakfasts.
Why It Works
By keeping utensils within arm's reach of the stove, you cut down on motion during cooking—grab, use, hang back. The rail frees up drawer space for less frequently used items and keeps countertops clutter-free. Plus, the visual rhythm of hanging tools adds texture and a touch of rustic elegance to the cooking zone.
Best For
Small to medium kitchens where counter and drawer space is tight, especially for cooks who rely on the same few utensils daily. It also works beautifully in open-plan kitchens where the stove area is visible from the living space, adding a curated, intentional look.
Styling Tip
Choose a rail in brushed brass or matte black to complement your hardware and faucet. Mix metal S-hooks with wooden-handled utensils for warmth. Leave a little breathing room between hooks so tools don't clump—spacing them about 4 inches apart keeps the line clean and easy to grab.
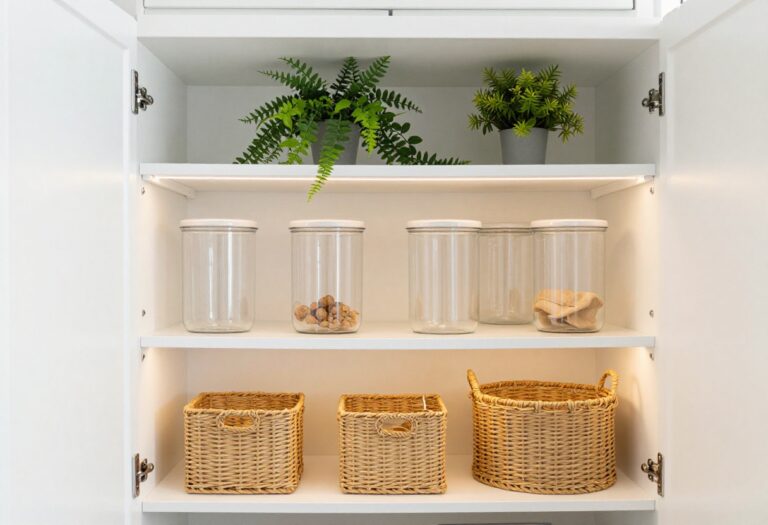
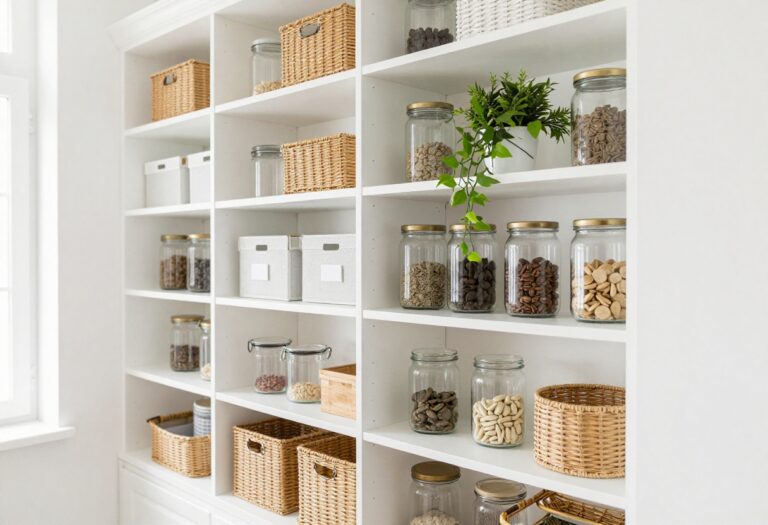
3. Mason Jar Caddies for Small Gadgets
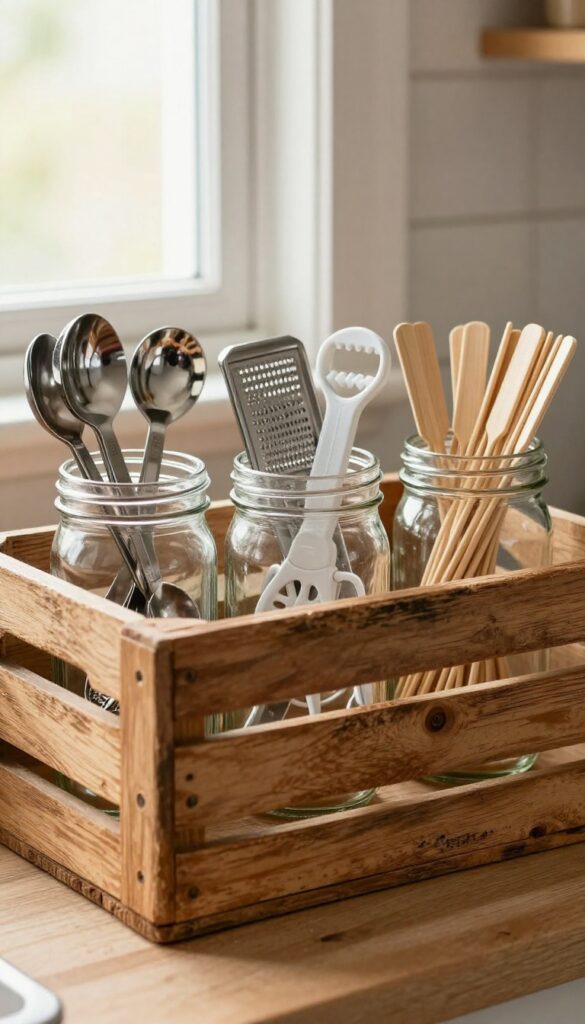
Picture this: a weathered wooden crate sitting on your counter, filled with pint-sized mason jars that each hold a specific tool. One jar is dedicated to measuring spoons, another to peelers and zesters, and a third to wooden skewers and cocktail picks. The jars are easy to grab, easy to see through, and they add a rustic, farmhouse charm that makes your kitchen feel warm and lived-in.
It's a simple system that turns chaos into character.
Why It Works
Mason jars are inexpensive and widely available, and their transparency means you can instantly spot the tool you need without rummaging. Grouping small gadgets by category in separate jars keeps them from tangling or getting lost in a drawer. The caddy itself corrals everything into one portable unit, so you can move it to your prep area or tuck it away when not in use.
Best For
This idea shines in kitchens with open shelving or limited drawer space, especially if you love a rustic or farmhouse aesthetic. It's also ideal for home cooks who frequently use small tools like measuring spoons, peelers, and skewers and want them within arm's reach during meal prep.
Styling Tip
Choose a wooden crate with a natural or whitewashed finish to keep the look warm and cohesive. Fill jars with a mix of sizes—pint jars for longer tools like skewers, half-pints for smaller items like measuring spoons. Add a sprig of dried lavender or rosemary to one jar for a subtle, earthy accent that ties into the lived-in vibe.
4. A Tiered Spice Rack for Utensil Separation
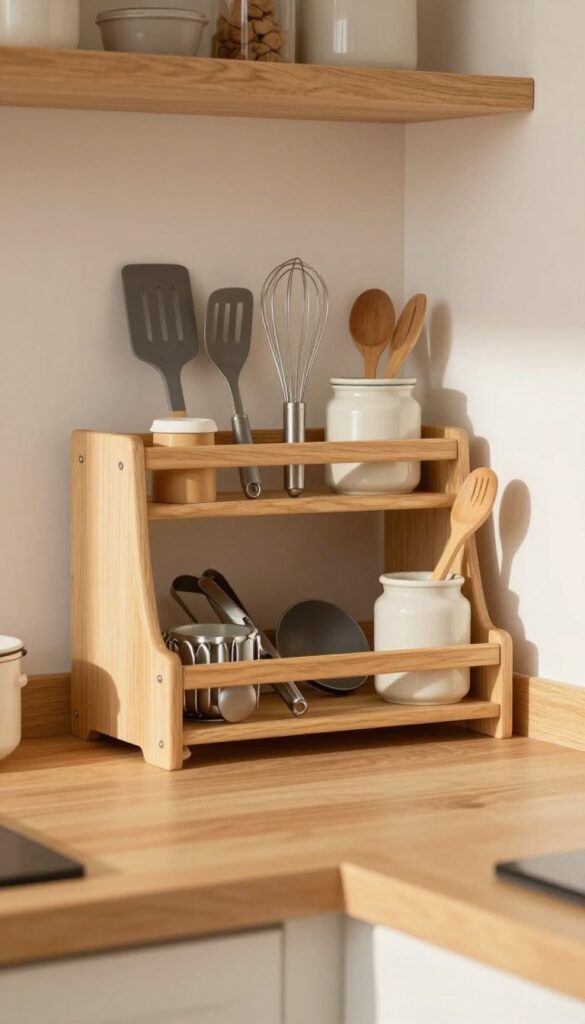
That jumbled drawer of spatulas, whisks, and tongs can make meal prep feel chaotic before you even start. A small tiered shelf on the counter changes everything—it groups utensils by type, with baking tools on the top tier and cooking tools below. The layered look adds vertical storage without taking up much space, and it turns everyday tools into a tidy, warm display.
In a lived-in kitchen, this setup feels both practical and inviting, like a little station where everything has its place.
Why It Works
By separating utensils into zones, you cut down on rummaging and keep your counter organized. The vertical design makes use of unused air space, so you free up drawer room for other essentials. Plus, seeing your tools at a glance speeds up cooking and adds a cozy, curated feel.
Best For
This idea shines in medium to large kitchens where you have a stretch of counter near the stove or prep area. It's especially helpful for home cooks who use a variety of utensils daily and want quick access without clutter.
Styling Tip
Choose a tiered shelf with a warm wood or matte black finish to match your kitchen's vibe. Group utensils by color or material—copper tools on one tier, bamboo on another—for a cohesive look. Add a small ceramic jar for wooden spoons to soften the edges.
5. Pegboard Wall Art That Doubles as Storage
A blank kitchen wall can feel like a missed opportunity, especially when you're constantly digging through drawers for the right spatula or whisk. Enter the pegboard: a humble workshop staple that's been given a warm, lived-in makeover. Painted in a soft sage or dusty blush and mounted over a butcher-block counter, it becomes a display of your most-used tools—wooden spoons, copper measuring cups, a little herb clipper—all within arm's reach.
The beauty is in the mix: a few small shelves for a tiny plant or a favorite cookbook, hooks at varying heights, and the freedom to rearrange whenever the mood strikes.
Why It Works
Pegboards keep your daily tools visible and accessible, cutting down the time you spend rummaging. Because you can shift hooks and shelves in seconds, the layout adapts to new gadgets or changing cooking habits without any drilling or commitment.
Best For
This idea shines in small to medium kitchens where counter and drawer space is tight, especially along an empty wall near the prep zone. It's also a smart solution for renters who want customization without permanent changes—just a few screws and you're set.
Styling Tip
Stick to a limited color palette for the tools and accessories you hang—think warm woods, matte black, and brass—so the board feels curated rather than chaotic. Add a single trailing plant on a top shelf to soften the look and tie it into the rest of the room.
6. Pull-Out Drawer Inserts for Deep Cabinets

Deep lower cabinets often become a black hole for awkward kitchen tools. Instead of bending down to blindly rummage through a jumble of rolling pins, potato mashers, and mixing spoons, a pull-out tray transforms that cavernous space into an organized, accessible station. The warm, lived-in feel comes from seeing everything at a glance—no more forgotten gadgets lurking in the back.
Just a smooth slide-out drawer that brings your tools right to you.
Why It Works
Pull-out inserts maximize every inch of deep cabinets without requiring major renovation. They turn wasted vertical space into layered storage, so bulky items sit neatly in their own compartments. The sliding mechanism also prevents the inevitable clatter and frustration of digging through a dark cabinet, making meal prep faster and more enjoyable.
Best For
This idea is ideal for lower cabinets that house larger utensils, baking sheets, or small appliances. It works especially well in kitchens where counter space is limited and you need quick access to frequently used tools.
Styling Tip
Choose natural wood or soft white inserts to keep the look warm and cohesive. Line the bottom with a textured drawer liner in a neutral tone—like woven seagrass or a subtle grid pattern—to add a touch of organic texture that ties into the lived-in aesthetic.
7. A Rustic Crock for Everyday Tools
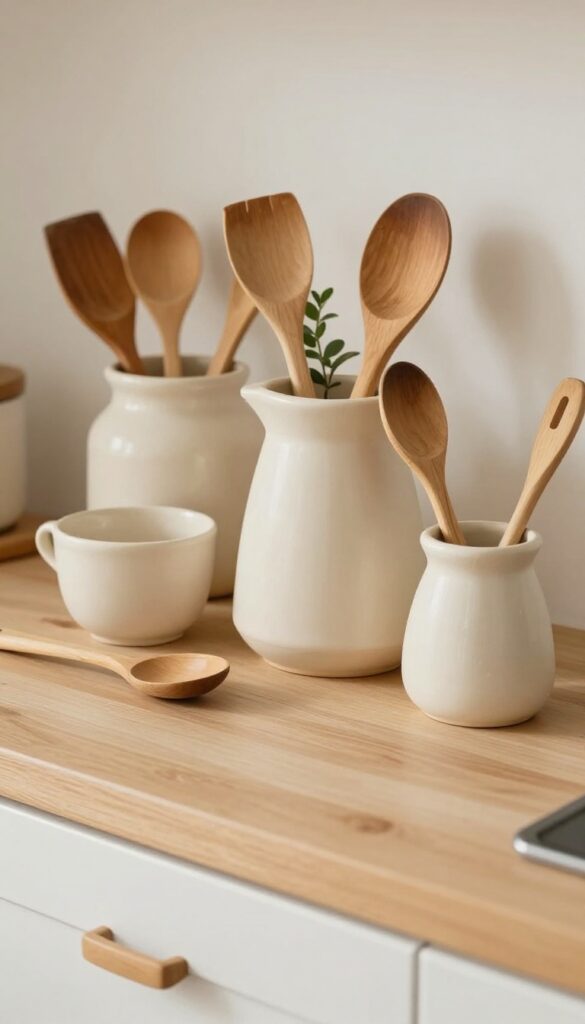
Picture a generous stoneware crock sitting on your counter, filled with the wooden spoons and spatulas you reach for every single day. It’s not just about storage—it’s about creating a warm, lived-in focal point that makes your kitchen feel inviting. The earthy texture of the crock softens the hard edges of appliances and adds a touch of rustic charm, while keeping your go-to tools within arm’s reach.
This simple swap turns a cluttered drawer into a visual anchor that feels both intentional and effortless.
Why It Works
A crock eliminates the daily rummage through a utensil drawer, saving you seconds that add up during meal prep. The open display also encourages you to keep only the tools you truly use, cutting down on clutter. Plus, the natural materials—ceramic, stoneware, or glazed clay—bring warmth and texture that balance the sleek surfaces of modern kitchens.
Best For
This idea shines in busy family kitchens where cooking happens daily, or in open-plan spaces where the counter is visible from the living area. It’s especially effective on a stretch of counter between the stove and sink, the natural prep zone. If your kitchen leans farmhouse, cottage, or eclectic, the crock will feel right at home.
Styling Tip
Choose a crock with a matte finish in a neutral tone like cream, sage, or slate to keep the look grounded. Arrange utensils by height—tall wooden spoons in back, shorter spatulas and tongs in front—so the crock looks curated, not crammed. For extra character, tuck in a small plant or a few dried eucalyptus stems among the handles.
8. Under-Shelf Baskets for Extra Hanging Space
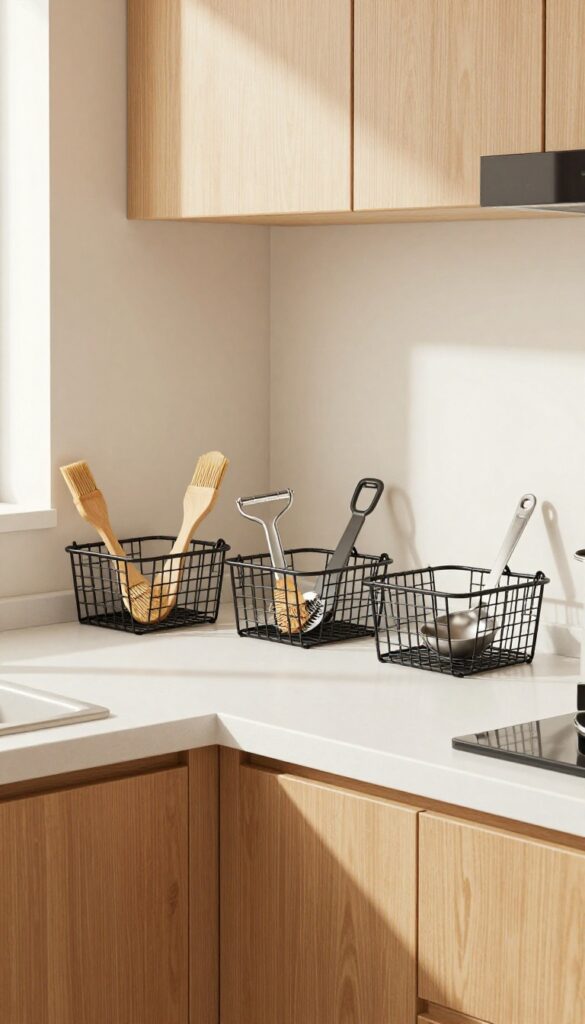
Clip-on wire baskets turn the underside of your cabinets into prime real estate for lightweight tools. Think pastry brushes, vegetable peelers, and measuring spoons—things you grab often but hate digging for. The open wire design keeps everything visible and within arm’s reach, while the baskets themselves add a subtle industrial touch that softens when paired with warm wood tones or creamy countertops.
Why It Works
Under-shelf baskets make use of dead space that usually goes unnoticed. By hanging tools below cabinets, you free up drawer and countertop area without sacrificing accessibility. The wire construction allows air circulation, so damp brushes dry quickly and won’t trap crumbs or moisture.
Best For
This idea shines in small kitchens where every inch counts, especially above the sink or prep zone. It’s also perfect for renters who can’t drill into cabinets—most baskets clip on without tools or permanent changes.
Styling Tip
Stick with a single finish, like black or silver wire, to keep the look cohesive. Group baskets in a row for a clean line, and avoid overcrowding—leave a little breathing room so the tools don’t look cluttered. For a warmer feel, choose baskets with a matte bronze or copper coating.
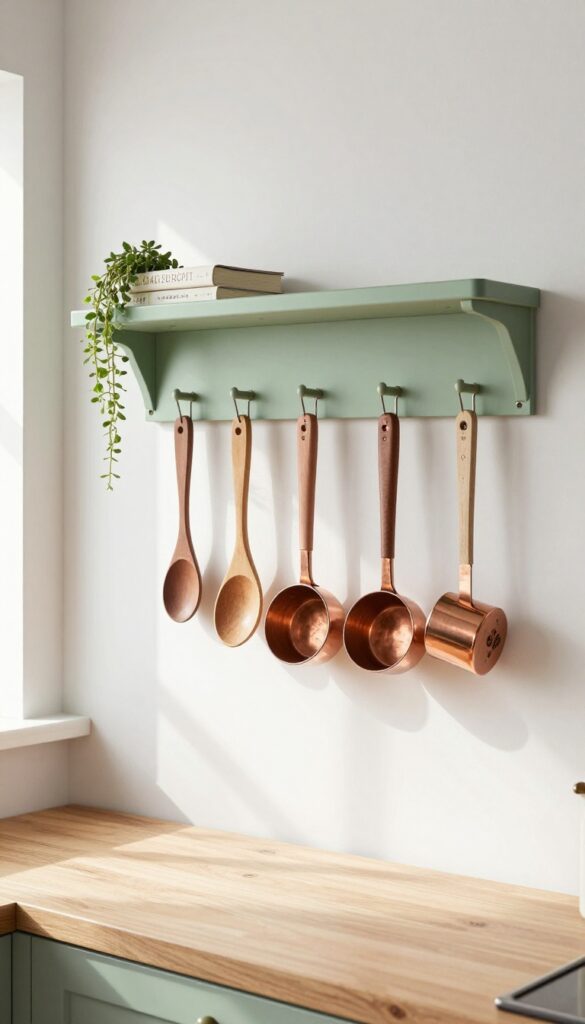
9. A Magnetic Strip for Metal Utensils
Think about all those metal measuring cups, tongs, and kitchen shears that currently live in a jumbled drawer. A magnetic strip on the wall or inside a cabinet door turns them into a tidy, accessible display. The look is clean and modern, but the warm brass or copper tones of the utensils keep it from feeling cold.
It's one of those ideas that makes you wonder why you didn't do it sooner.
Why It Works
It frees up drawer space and eliminates digging for the right tool. The magnetic hold keeps everything in place and visible, so you can grab what you need without rummaging. Plus, it adds a layer of visual interest to an otherwise blank wall.
Best For
This is perfect for any kitchen with metal utensils, especially if you have limited drawer space or want to keep frequently used items within easy reach. It works well on a backsplash, the side of a cabinet, or inside a cabinet door.
Styling Tip
Choose a strip that contrasts with your wall color—black on white, or brass on navy—to make the utensils pop. Arrange them by size or frequency of use, and leave a little breathing room between items so it doesn't look cluttered.
FAQ
What is the best way to organize kitchen utensils on a budget?
Start with drawer dividers or repurpose items like mason jars and small baskets. You can also use a simple crock or a pegboard for a low-cost, customizable solution.
How do I keep utensils clean when storing them openly?
Wipe down utensils after each use and ensure they are fully dry before storing. For hanging racks, choose a spot away from the stove to minimize grease splatter.
Can I use these ideas in a small kitchen?
Absolutely. Many ideas, like magnetic strips, under-shelf baskets, and pegboards, are designed to maximize vertical space and work well in compact kitchens.
What materials are best for utensil storage?
Wood, ceramic, and metal are durable and easy to clean. Wood adds warmth, ceramic feels rustic, and metal offers a sleek, modern look. Choose based on your kitchen's style.
How often should I reorganize my utensil storage?
Reassess every few months or when you notice clutter building up. As your cooking habits change, adjust the layout to keep the most-used tools accessible.
Conclusion
Organizing your kitchen utensils doesn't have to be a chore—it can actually make cooking feel more intentional and enjoyable. By choosing solutions that match your space and style, you create a kitchen that works for you, not against you. Start with one or two ideas that speak to your daily routine, and build from there.
A well-arranged utensil drawer or a charming crock by the stove can transform your meal prep from frantic to fluid. Here's to faster, happier cooking in a kitchen that feels like home.