7 Gluten Free Lemon Bar Recipes for Bright Desserts
Lemon bars are the kind of dessert that disappears fast—bright, tangy, and just sweet enough. When you're short on time but want something that feels special, a good lemon bar recipe is a lifesaver. These 7 gluten free versions keep things quick and practical, so you can whip up a batch without fuss.
Each recipe here brings something different to the table, from classic buttery shortbread to fun twists like coconut or berry swirls. Whether you're baking for a party, a potluck, or just a Tuesday treat, you'll find a lemon bar that fits the moment. No complicated techniques or hard-to-find ingredients.
Just straightforward recipes that deliver bright, sunny flavor every time. Let's get baking.
1. Classic Gluten Free Lemon Bars with Shortbread Crust

A perfect lemon bar hits that sweet-tart spot, and this gluten free version doesn't compromise on texture or flavor. The almond flour shortbread crust bakes up buttery and crisp, providing a sturdy base for the bright, silky lemon filling. Whether you're making them for a bake sale or a simple weekend treat, these bars are as straightforward as they are satisfying.
Ingredients
- For the crust: 1 ½ cups almond flour
- ¼ cup coconut flour
- ¼ cup granulated sugar
- ½ cup cold unsalted butter, cut into small cubes
- ¼ teaspoon salt
- For the filling: 4 large eggs
- 1 ½ cups granulated sugar
- ⅓ cup fresh lemon juice (about 3 lemons)
- 2 tablespoons lemon zest
- ¼ cup gluten free all-purpose flour
- Powdered sugar for dusting
Instructions
- Preheat oven to 350°F. Line an 8×8-inch baking pan with parchment paper.
- Make the crust: In a food processor, combine almond flour, coconut flour, sugar, and salt. Add cold butter cubes and pulse until mixture resembles coarse sand.
- Press the crust mixture evenly into the prepared pan. Bake for 15-18 minutes until lightly golden. Let cool slightly.
- While crust cools, make the filling: In a medium bowl, whisk eggs and sugar until smooth. Add lemon juice, lemon zest, and gluten free flour; whisk until well combined.
- Pour filling over the warm crust. Bake for 20-25 minutes until the filling is set and edges are lightly browned. Cool completely at room temperature, then refrigerate for at least 2 hours.
- Dust with powdered sugar before cutting into squares. Use a sharp knife wiped clean between cuts for neat edges.
Serving Tip
For the cleanest slices, chill the bars thoroughly and use a sharp knife dipped in hot water, wiping dry between cuts. Serve cold or at room temperature; they keep well in the fridge for up to 5 days.
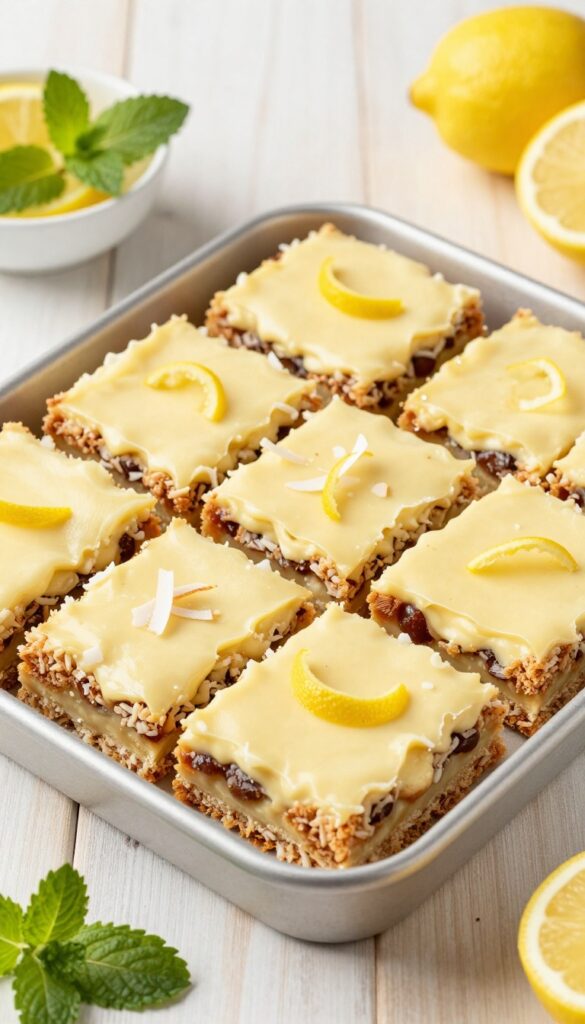
2. Coconut Lemon Bars with Toasted Coconut Topping
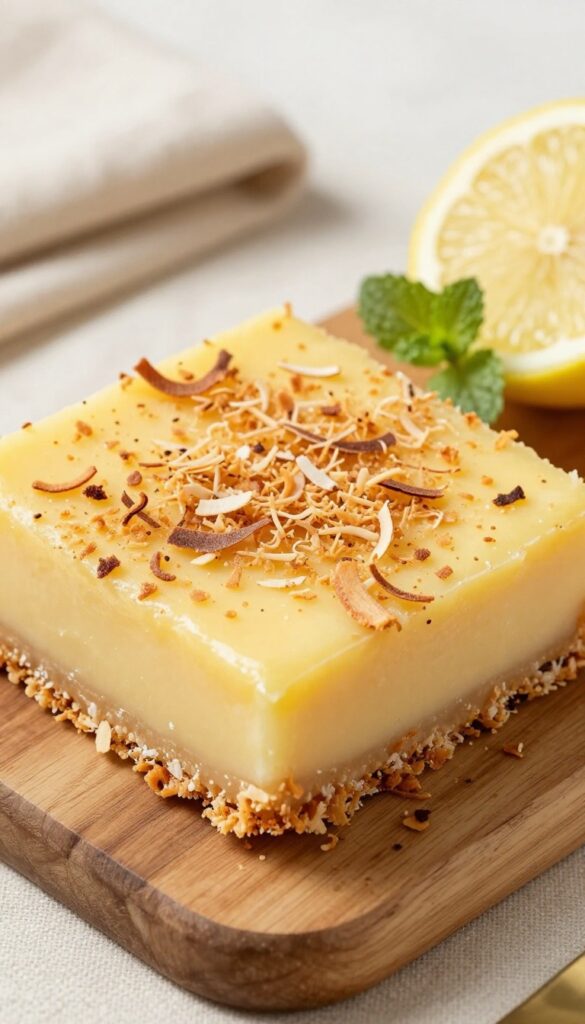
For a tropical escape in dessert form, these coconut lemon bars swap the usual butter crust for one made with coconut flour, giving them a tender, nutty base that complements the bright lemon filling. The toasted coconut topping adds a satisfying crunch and a hint of caramelized flavor, making each bite feel like a mini vacation. They're quick to assemble and perfect for anyone who loves a little texture with their citrus.
Ingredients
- 1 cup coconut flour
- 1/4 cup coconut oil, melted
- 2 tablespoons maple syrup
- 1/4 teaspoon salt
- 4 large eggs
- 1 cup granulated sugar
- 1/2 cup fresh lemon juice (about 3 lemons)
- 2 tablespoons lemon zest
- 1/4 cup coconut flour (for filling)
- 1/2 teaspoon baking powder
- 1/2 cup shredded unsweetened coconut, toasted
Instructions
- Preheat oven to 350°F and line an 8×8-inch baking pan with parchment paper.
- In a bowl, mix 1 cup coconut flour, melted coconut oil, maple syrup, and salt until a crumbly dough forms. Press evenly into the bottom of the pan.
- Bake the crust for 10 minutes, until lightly golden. Remove and set aside.
- In a large bowl, whisk eggs and sugar until smooth. Add lemon juice, zest, 1/4 cup coconut flour, and baking powder; whisk until well combined.
- Pour the lemon mixture over the hot crust. Bake for 20-25 minutes, until the filling is set and the edges are lightly browned.
- Let cool completely in the pan, then refrigerate for at least 1 hour before slicing.
- Just before serving, sprinkle toasted coconut over the top. Cut into bars.
Serving Tip
For the best texture, chill the bars thoroughly before slicing—this helps the coconut flour crust hold together. Store leftovers in the fridge for up to 4 days, and add the toasted coconut just before serving to keep it crunchy.
3. Vegan Gluten Free Lemon Bars with Cashew Cream
Creamy, tangy, and completely dairy-free—these lemon bars are proof that vegan desserts can be just as luscious as the classic. A cashew-based filling delivers that signature velvety texture without any eggs or cream, while the oat flour crust stays crisp and sturdy. They're perfect for potlucks, picnics, or any time you want a bright, crowd-pleasing treat that happens to be plant-based.
Ingredients
- For the crust: 1 ½ cups oat flour (certified gluten-free)
- ¼ cup coconut oil, melted
- 3 tablespoons maple syrup
- ¼ teaspoon salt
- For the filling: 1 ½ cups raw cashews, soaked in hot water for 1 hour and drained
- ½ cup fresh lemon juice (about 3 lemons)
- ⅓ cup maple syrup
- ¼ cup coconut cream (from a can of full-fat coconut milk, chilled)
- 2 tablespoons cornstarch or arrowroot powder
- 1 teaspoon lemon zest
- ¼ teaspoon turmeric (for color, optional)
Instructions
- Preheat the oven to 350°F (175°C). Line an 8×8-inch baking pan with parchment paper.
- Make the crust: In a medium bowl, stir together oat flour, melted coconut oil, maple syrup, and salt until a crumbly dough forms. Press firmly and evenly into the prepared pan.
- Bake the crust for 12-15 minutes, until lightly golden. Let cool slightly while preparing the filling.
- Make the filling: In a high-speed blender, combine soaked cashews, lemon juice, maple syrup, coconut cream, cornstarch, lemon zest, and turmeric. Blend until completely smooth, scraping down sides as needed.
- Pour the filling over the warm crust and spread evenly. Tap the pan gently to release air bubbles.
- Bake for 20-25 minutes, until the edges are set and the center jiggles slightly. Cool completely at room temperature, then refrigerate for at least 3 hours (or overnight) until firm.
- Slice into bars and serve chilled. Store leftovers in the refrigerator for up to 5 days.
Serving Tip
For the cleanest slices, use a sharp knife wiped clean between cuts. Dust with a little powdered sugar or top with fresh berries just before serving for a pretty finish.
4. Lemon Blueberry Swirl Bars
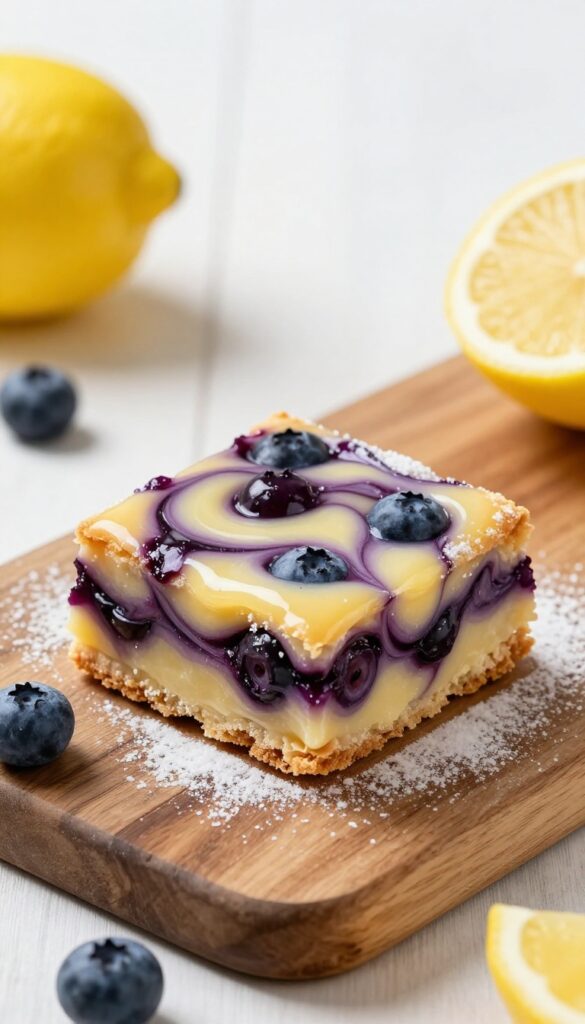
Swirling jammy blueberries into the tangy lemon filling creates a gorgeous marbled effect and adds a fruity pop. This recipe is perfect when you want something a little extra without much fuss. Fresh or frozen berries work equally well, so you can make these year-round.
Ingredients
- 1 ½ cups gluten-free all-purpose flour
- ½ cup powdered sugar
- ½ teaspoon salt
- ½ cup cold butter, cubed
- 1 cup granulated sugar
- 2 tablespoons gluten-free all-purpose flour
- 3 large eggs
- ⅓ cup fresh lemon juice
- 1 tablespoon lemon zest
- ½ cup fresh or frozen blueberries
- 1 tablespoon granulated sugar (for berries)
Instructions
- Preheat oven to 350°F. Line an 8×8-inch baking pan with parchment paper.
- In a medium bowl, whisk together 1 ½ cups flour, powdered sugar, and salt. Cut in cold butter using a pastry blender or fingers until mixture resembles coarse crumbs.
- Press the crust mixture evenly into the prepared pan. Bake for 15 minutes, until lightly golden. Set aside to cool slightly.
- In a large bowl, whisk together 1 cup granulated sugar and 2 tablespoons flour. Add eggs, lemon juice, and lemon zest; whisk until smooth.
- In a small bowl, toss blueberries with 1 tablespoon sugar. Gently fold into the lemon filling.
- Pour the filling over the warm crust. Bake for 20-25 minutes, until the center is set and edges are lightly browned.
- Cool completely in the pan on a wire rack, then refrigerate for at least 2 hours before slicing. Lift out using parchment and cut into bars.
Serving Tip
For clean slices, use a sharp knife and wipe it clean between cuts. Dust with powdered sugar just before serving for a pretty finish.
5. Lemon Bars with Almond Flour Crust and Lavender
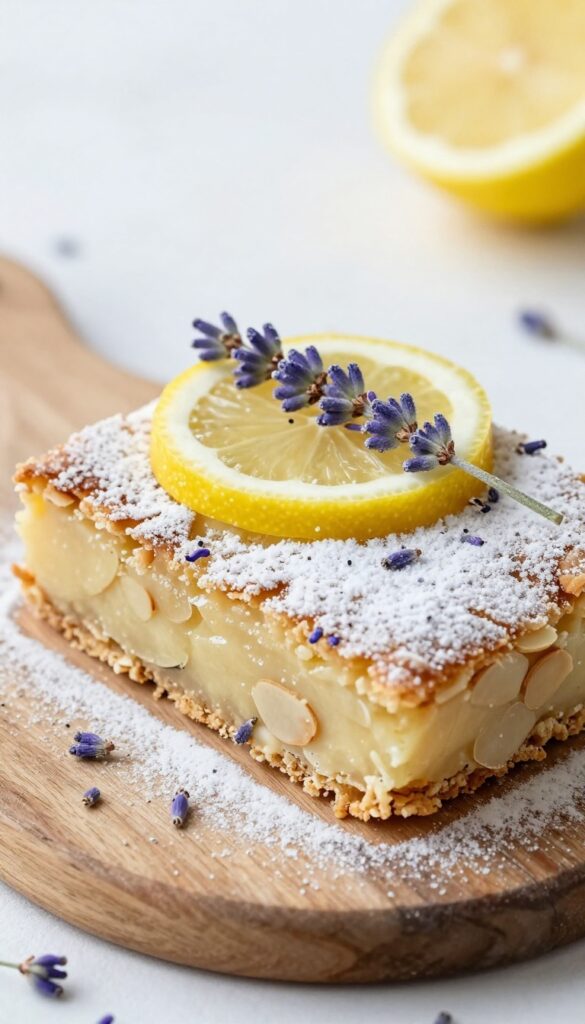
A whisper of lavender in the crust turns these lemon bars into something unexpectedly elegant. The almond flour base adds a nutty richness that plays beautifully with the bright citrus filling. They're quick to assemble and feel special enough for a spring brunch or a simple afternoon treat.
Ingredients
- 1 ½ cups almond flour
- ¼ cup coconut flour
- ¼ cup granulated sugar
- 6 tablespoons unsalted butter, melted
- 1 teaspoon dried culinary lavender
- 4 large eggs
- 1 ½ cups granulated sugar
- ½ cup fresh lemon juice (about 3 lemons)
- 2 tablespoons lemon zest
- ¼ cup all-purpose gluten-free flour blend
- Powdered sugar for dusting
Instructions
- Preheat oven to 350°F (175°C). Line an 8×8-inch baking pan with parchment paper.
- In a medium bowl, combine almond flour, coconut flour, ¼ cup sugar, melted butter, and dried lavender. Stir until a crumbly dough forms.
- Press the dough evenly into the bottom of the prepared pan. Bake for 12-15 minutes until lightly golden. Let cool slightly.
- In a large bowl, whisk eggs and 1 ½ cups sugar until smooth. Add lemon juice, lemon zest, and gluten-free flour blend; whisk until combined.
- Pour the lemon mixture over the warm crust. Bake for 20-25 minutes until the filling is set and the edges are lightly browned.
- Cool completely at room temperature, then refrigerate for at least 2 hours before slicing. Dust with powdered sugar just before serving.
Serving Tip
For the cleanest slices, chill the bars thoroughly and use a sharp knife wiped clean between cuts. Garnish with a tiny sprig of fresh lavender or a thin lemon slice for a pretty presentation.
6. No-Bake Lemon Coconut Bars
When the temperature climbs and you still crave something bright and citrusy, these no-bake bars are your answer. A chewy date and coconut base provides a naturally sweet foundation, while the creamy lemon cashew topping brings tangy richness without any dairy or gluten. They come together in the food processor and set in the fridge, making them a perfect make-ahead dessert for hot days.
Ingredients
- 1 cup Medjool dates, pitted
- 1 cup unsweetened shredded coconut
- 1/2 cup raw almonds
- 1/4 teaspoon salt
- 1 cup raw cashews, soaked in hot water for 1 hour and drained
- 1/3 cup fresh lemon juice
- 1/4 cup maple syrup
- 1/4 cup coconut oil, melted
- 1 teaspoon lemon zest
- 1/4 teaspoon turmeric (for color, optional)
Instructions
- Line an 8×8-inch baking dish with parchment paper.
- In a food processor, combine dates, shredded coconut, almonds, and salt. Pulse until the mixture sticks together when pressed.
- Press the mixture firmly into the prepared dish. Refrigerate while making the topping.
- In a clean food processor, combine soaked cashews, lemon juice, maple syrup, coconut oil, lemon zest, and turmeric. Blend until completely smooth and creamy, scraping down sides as needed.
- Pour the topping over the crust and spread evenly. Tap the dish gently to release air bubbles.
- Refrigerate for at least 4 hours, or until firm. Slice into bars and serve chilled.
Serving Tip
For clean slices, use a sharp knife dipped in hot water and wiped dry between cuts. These bars keep well in the fridge for up to a week or in the freezer for up to a month.
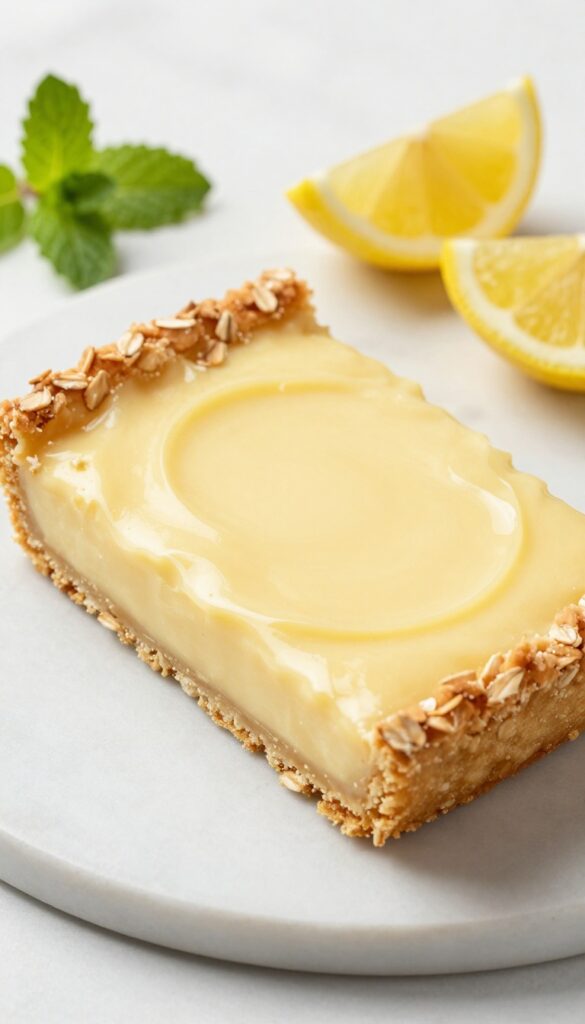
7. Lemon Poppy Seed Bars with Gluten Free Oat Crust
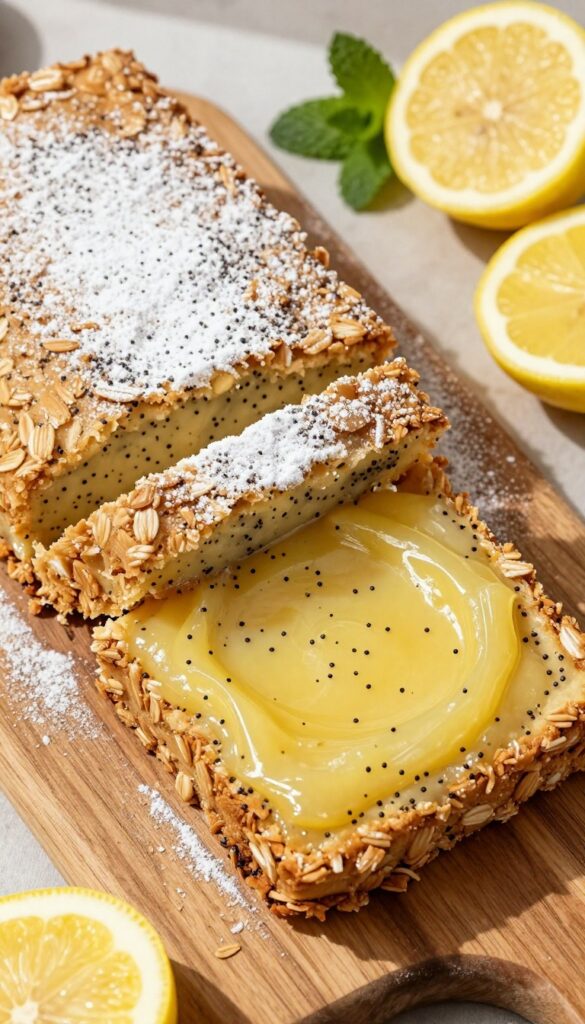
Poppy seeds bring a subtle crunch and a nostalgic bakery feel to these bright lemon bars. The gluten free oat crust is hearty and just sweet enough to balance the tangy, silky filling. They're quick to assemble and perfect for brunch, bake sales, or an everyday treat that feels special.
Ingredients
- 1 ½ cups gluten free oat flour
- 1 cup rolled oats (certified gluten free)
- ⅓ cup packed light brown sugar
- ½ teaspoon salt
- ½ cup cold unsalted butter, cubed
- 4 large eggs
- 1 ½ cups granulated sugar
- ⅓ cup fresh lemon juice
- 2 tablespoons lemon zest
- ¼ cup gluten free all-purpose flour
- 1 tablespoon poppy seeds
- Powdered sugar for dusting
Instructions
- Preheat oven to 350°F. Line a 9×9-inch baking pan with parchment paper.
- In a food processor, pulse oat flour, rolled oats, brown sugar, and salt until combined. Add cold butter cubes and pulse until mixture resembles coarse crumbs.
- Press crust mixture firmly into the prepared pan. Bake for 15 minutes until lightly golden. Let cool slightly.
- In a large bowl, whisk eggs and granulated sugar until smooth. Add lemon juice, lemon zest, gluten free flour, and poppy seeds; whisk until well combined.
- Pour filling over warm crust. Bake for 20-25 minutes until filling is set and edges are lightly browned.
- Cool completely at room temperature, then refrigerate for at least 2 hours before slicing. Dust with powdered sugar just before serving.
Serving Tip
For clean slices, chill the bars thoroughly and use a sharp knife wiped clean between cuts. These keep well in the fridge for up to 5 days, making them a great make-ahead dessert.
FAQ
Can I use regular flour instead of gluten free flour in these recipes?
Yes, you can substitute all-purpose flour 1:1 in most recipes, but the texture may change slightly. For best results, use a good gluten free flour blend that includes xanthan gum.
How do I store gluten free lemon bars?
Store them in an airtight container in the refrigerator for up to 5 days. They also freeze well for up to 3 months—just wrap tightly and thaw in the fridge.
Can I make these lemon bars dairy free?
Absolutely. Use dairy-free butter or coconut oil in the crust, and swap any cream cheese or butter in the filling with vegan alternatives. The vegan recipe in this list is already dairy free.
Why did my lemon bars turn out too soft or runny?
This usually happens if the bars are underbaked or if the lemon filling wasn't cooked long enough to set. Make sure to bake until the center is just set and no longer jiggly.
Can I reduce the sugar in these recipes?
You can reduce sugar by up to 25% without major issues, but keep in mind that sugar helps with texture and setting. For a less sweet bar, try using a sugar substitute like monk fruit or erythritol.
Conclusion
Lemon bars are a bright, cheerful dessert that never goes out of style, and going gluten free doesn't mean sacrificing flavor or texture. With these 7 recipes, you've got options for every occasion—from quick weeknight treats to showstopping party desserts.
Try one this week and see how easy it is to bring a little sunshine to your table. Your family and friends will thank you, and you'll love how simple they are to pull together.

