11 Kitchen Cup Organization Ideas for Easy Reach in Small Spaces
Kitchen cups have a way of multiplying, don't they? Before you know it, your cabinet is a jumble of mugs, tumblers, and espresso cups that never seem to stack neatly.
In a small kitchen, every inch counts, and digging through a pile to find your favorite mug can feel like a daily treasure hunt. The good news is that organizing your cups doesn't require a massive renovation or a ton of space.
With a few smart tweaks, you can turn that chaotic cabinet into a streamlined zone where everything is visible and easy to grab. These ideas focus on making the most of what you have, keeping things practical without sacrificing style.
1. Stack with Purpose Using Cup Stackers
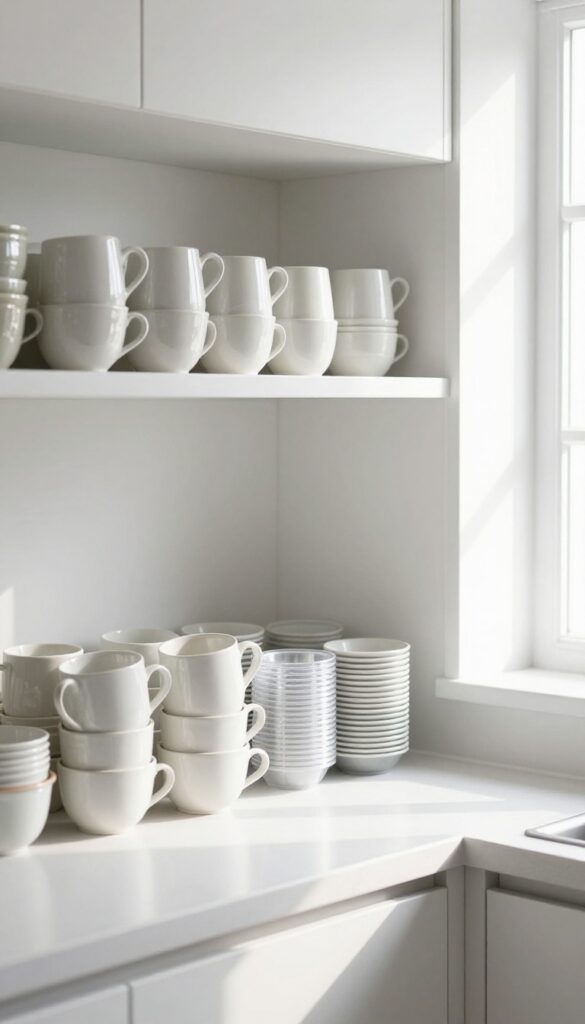
Tired of wrestling with a tower of cups that refuses to let go of its bottom neighbor? Cup stackers are the unsung heroes of small-space kitchens. These clever little rings slip between nested cups, creating a tiny gap that prevents suction.
Suddenly, you can stack cups sky-high without a single one getting stuck. It’s a small change that makes a big difference in how you grab your morning coffee.
Why It Works
Cup stackers maximize vertical storage by allowing safe stacking without the frustration of stuck cups. They’re especially useful in deep cabinets where you’d otherwise waste overhead space. The rings are slim enough not to add bulk, so you keep the same number of cups without sacrificing accessibility.
Best For
This idea shines in small kitchens with limited cabinet height, like in apartments or tiny homes. It’s also great for families who use multiple cups daily and want a quick grab-and-go setup. If you have open shelving, stackers keep your display neat and functional.
Styling Tip
Choose stackers in a neutral color like clear or white to blend in, or go for a pop of color that matches your kitchen accents. Stack cups by size—tallest on bottom—for a stable tower. Pair with a slim shelf riser to double your vertical space even further.
2. Install a Under-Shelf Cup Rack
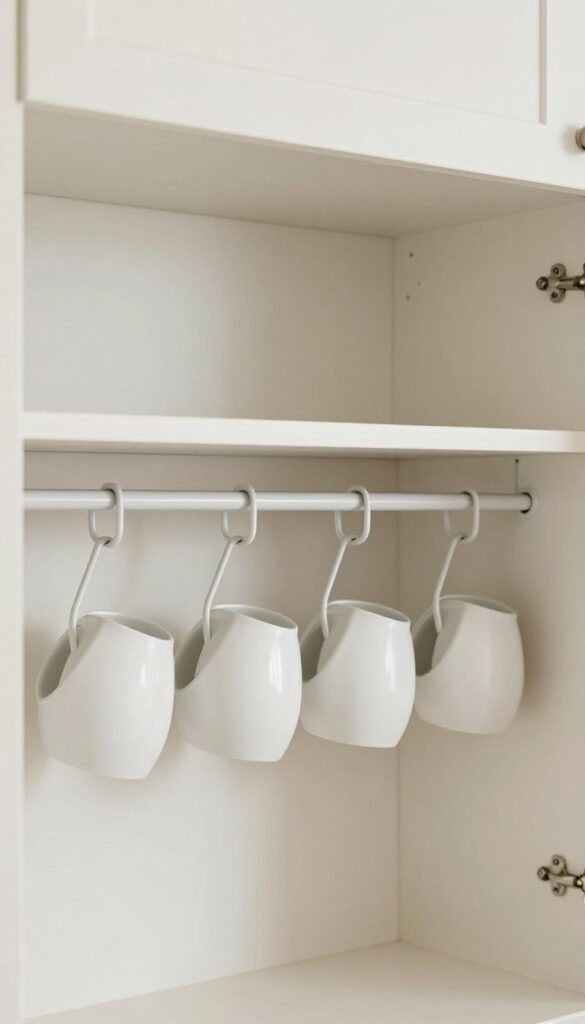
Cabinets with tall shelves often leave a surprising amount of dead space above your coffee mugs. An under-shelf cup rack clips right onto the shelf above, turning that empty gap into a handy hanging row for cups. It’s a small tweak that makes your morning routine smoother and your cabinet feel twice as useful.
Why It Works
This rack uses vertical space that would otherwise go to waste. Cups hang upside down, so they stay dust-free and dry faster after washing. Plus, you can double your storage on a single shelf without adding bulky stacks.
Best For
Renters or anyone who can’t drill into cabinets—most racks install with clips that grip the shelf securely. It’s also perfect for narrow cabinets where a second shelf would feel cramped.
Styling Tip
Stick to matching cups in a neutral tone like matte white or soft gray for a clean, streamlined look. If you prefer a pop of color, choose one accent shade and repeat it across all hanging cups to keep the display intentional.
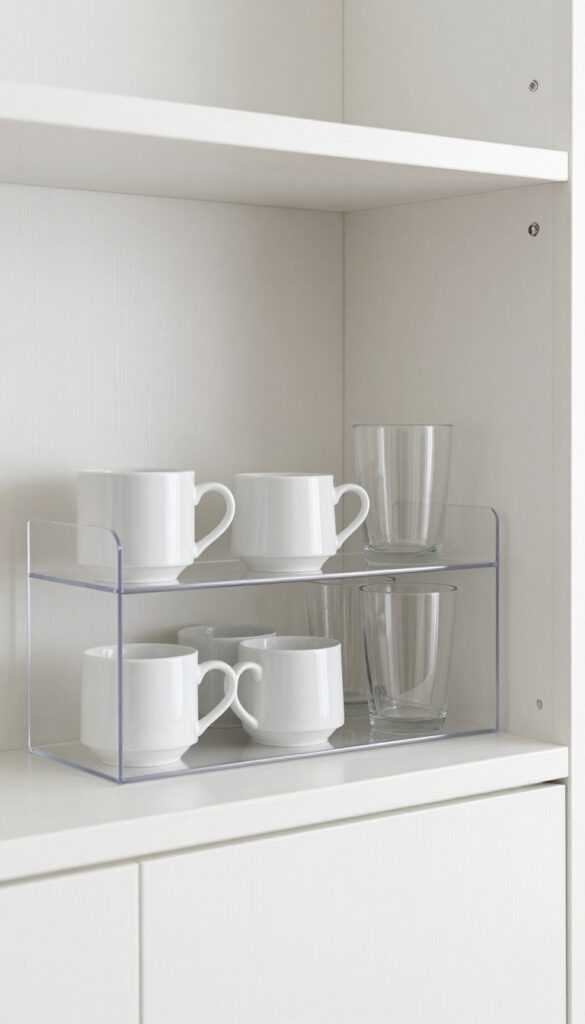
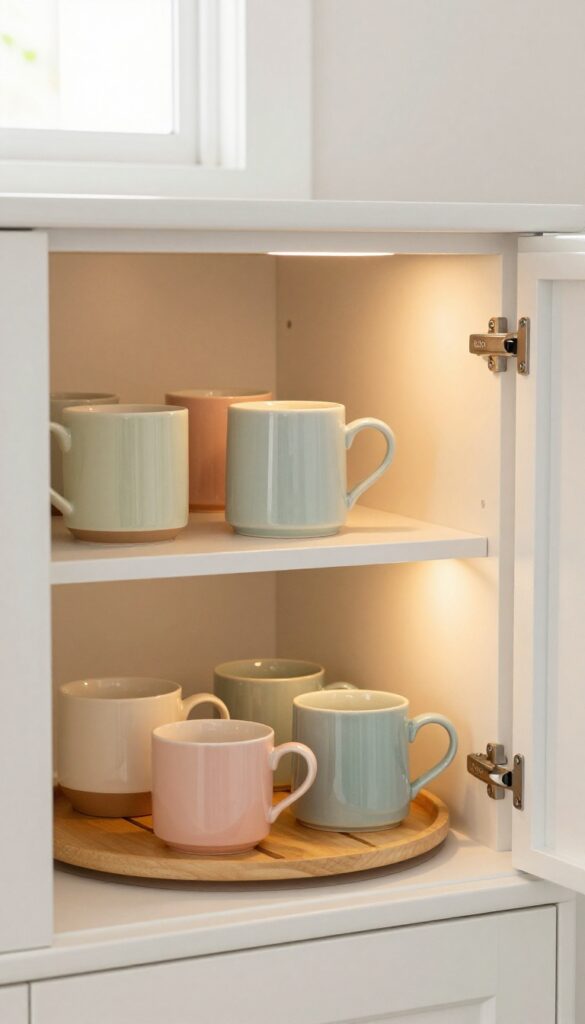
3. Use a Tiered Shelf for Double-Decker Storage
Deep cabinets can be a blessing and a curse. You love the space, but things inevitably get shoved to the back and forgotten. A tiered shelf solves that by creating two levels within one cabinet shelf.
Cups, mugs, and small bowls can sit in front and behind without blocking each other. It's like adding an extra shelf without any drilling or permanent changes.
Why It Works
A tiered shelf doubles your usable vertical space inside a single cabinet shelf. Items in the back are raised so they're visible and easy to grab, so nothing gets lost. This simple add-on makes deep cabinets feel organized and accessible, saving you from digging around or stacking cups precariously.
Best For
This is ideal for deep upper or lower cabinets where single-row storage wastes the back half. It's also great for renters or anyone who can't install permanent shelving. If you have a collection of mugs or small glasses, a tiered shelf keeps them all visible and within reach.
Styling Tip
Choose a wire or acrylic tiered shelf to keep the look airy and light. For a cohesive feel, match the shelf finish to your cabinet hardware or go clear for an almost invisible effect. Group cups by color or size on each level for a neat, curated look that's still practical.
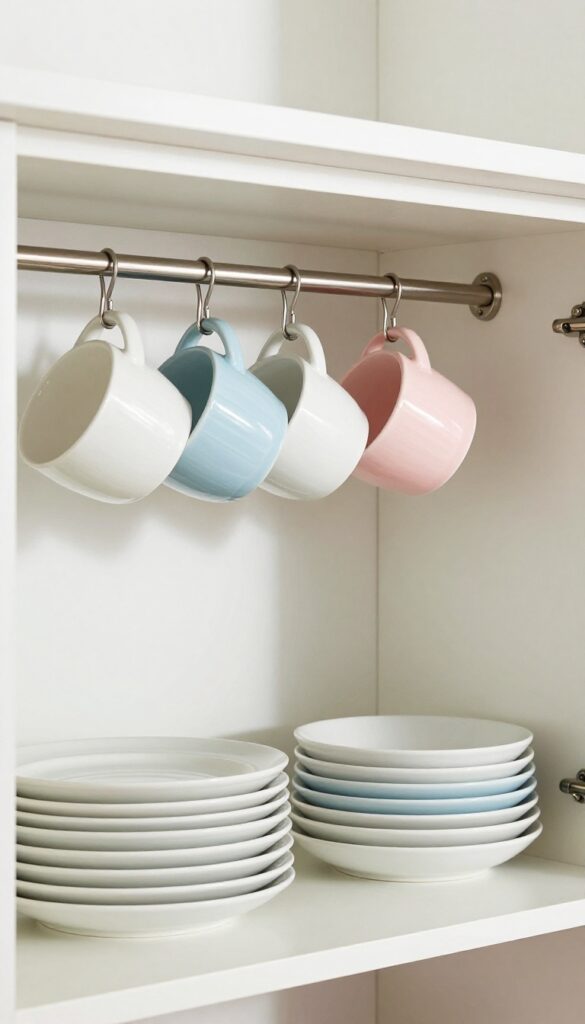
4. Hang Mugs on a Wall-Mounted Rail
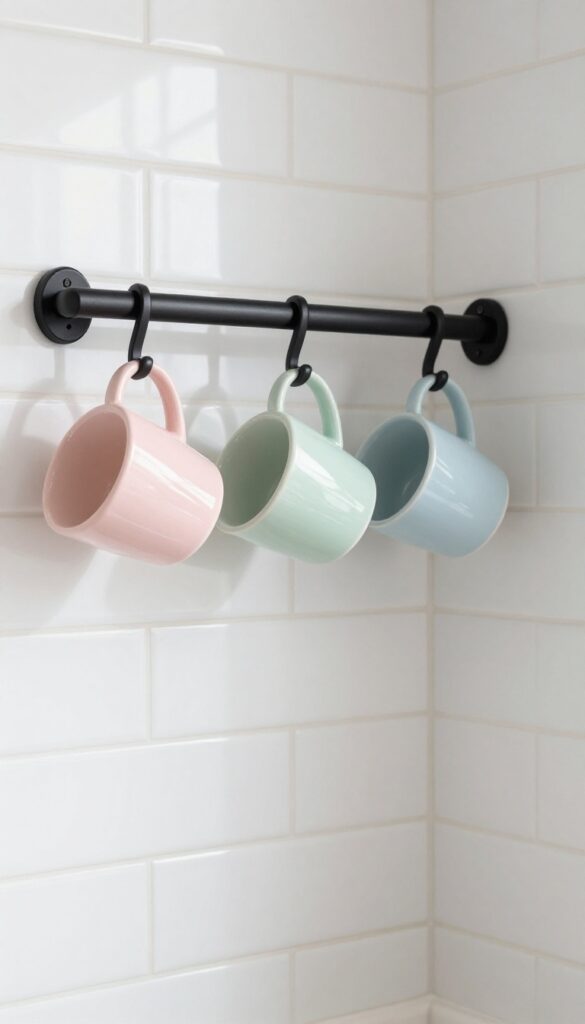
A wall-mounted rail with hooks is a classic space-saver that turns your wall into a display. Hang mugs by their handles for easy reach and a decorative touch. This works especially well in small kitchens where cabinet space is limited, and it adds a cozy cafe vibe.
Why It Works
It frees up cabinet space while keeping your favorite mugs visible and accessible. The rail itself becomes a design feature, and swapping mugs seasonally refreshes the look instantly.
Best For
Tiny kitchens, rental apartments where you can't drill many holes, or any coffee/tea corner that needs personality without clutter.
Styling Tip
Choose a brass or matte black rail to contrast with white subway tile, and group mugs in odd numbers (3 or 5) for visual balance. Leave a few inches of space between each mug so they don't clank.
5. Add a Pull-Out Drawer Inside a Cabinet

Deep lower cabinets can become black holes for cups and mugs. You know the drill—you shove things in, and the ones in the back might as well be in another dimension. A pull-out drawer system changes that completely.
It brings everything forward with a simple glide, so every cup is within easy reach. This is one of those upgrades that feels luxurious but costs less than you'd think, especially if you go the DIY route.
Why It Works
Pull-out drawers eliminate the need to dig into the back of a cabinet. They make use of vertical space that often goes wasted, and they keep cups organized by row. No more stacking and unstacking just to grab a single mug.
Best For
Lower cabinets in small kitchens where every inch counts. It's also a game-changer for anyone with mobility issues or back pain, since you don't have to bend and stretch to reach the back.
Styling Tip
Use clear bin dividers or adjustable peg inserts inside the drawer to keep cups from sliding around. Stick to a uniform mug style for a clean, cohesive look, or group by color for a playful pop.
6. Group Cups by Type in Clear Bins
Clear bins might sound like a pantry solution, but they work wonders for cup organization too. By grouping your mugs, espresso cups, and tumblers in separate transparent containers, you create a system that's both tidy and instantly accessible. The visual lightness of acrylic or plastic bins keeps the cabinet feeling airy, while the separation prevents that dreaded jumble when you're reaching for a specific cup.
In small kitchens where every inch counts, this trick turns a chaotic shelf into a calm, curated station.
Why It Works
Transparency is the secret sauce—you can spot exactly which cup you want without shifting everything around. Bins slide out as a unit, making cleaning a breeze and reducing the chance of accidental knocks. Plus, the physical boundaries keep different cup types from mixing, so your espresso cups don't get buried behind tall tumblers.
Best For
Small kitchens with deep cabinets where cups tend to get lost in the back. Also ideal for households with a mix of cup sizes—like having both delicate teacups and sturdy travel mugs—since bins keep them from colliding.
Styling Tip
Stick to one bin size for a uniform look, or mix small bins for espresso cups and larger ones for mugs. If your cabinets are open, choose bins with a subtle tint (like smoked acrylic) to soften the visual clutter while still seeing contents.
7. Install a Corner Cabinet Lazy Susan
Corner cabinets often become the Bermuda Triangle of the kitchen—things go in and are never seen again. A lazy Susan changes that completely. This simple rotating tray brings every cup and mug within easy reach, so you can finally use that awkward space instead of ignoring it.
For small kitchens, it's a smart, low-cost upgrade that maximizes every inch.
Why It Works
A lazy Susan eliminates the need to dig through dark corners or stack cups precariously. With a quick spin, you can grab any cup without moving a dozen others. It keeps everything visible and accessible, which means less clutter and fewer accidental breakages.
Best For
This is ideal for any corner base cabinet, especially in galley or L-shaped kitchens where storage is tight. It also works well for deep cabinets that make items in the back hard to reach.
Styling Tip
Choose a sturdy lazy Susan with a non-slip surface to keep cups from sliding. For a cohesive look, use matching mugs or stackable cups. Add a small LED puck light inside the cabinet for extra visibility.
8. Use a Pegboard Inside a Cabinet Door
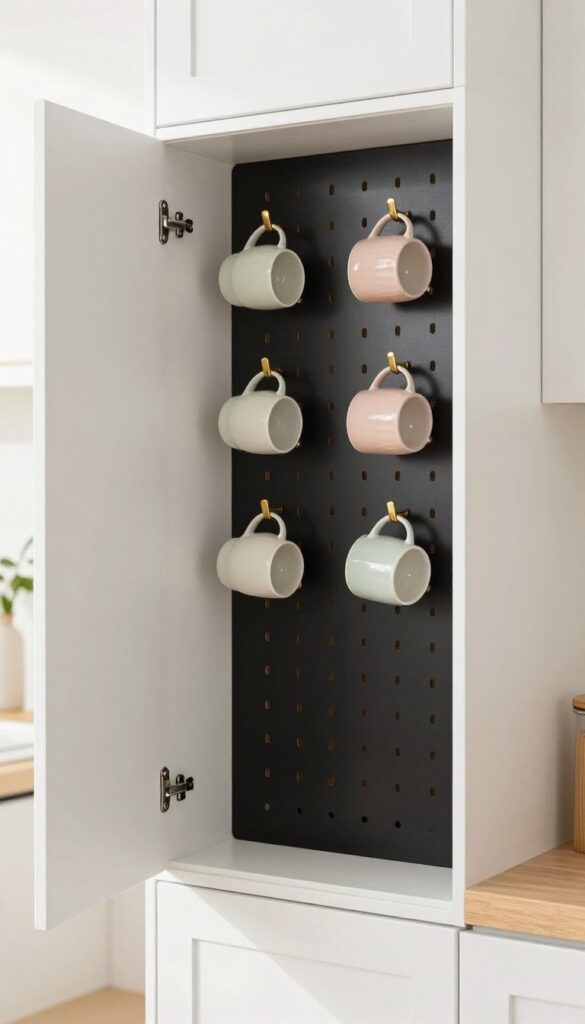
That empty space on the inside of your cabinet door is prime real estate for extra cup storage. By mounting a small pegboard and adding hooks, you can hang lightweight cups within easy reach without taking up any shelf space. It’s a clever, space-saving solution that keeps your kitchen organized and your favorite mugs on display.
Why It Works
Pegboards let you customize the hook layout to fit different cup sizes, and because the door swings open, everything stays hidden when not in use. This setup uses vertical space that would otherwise go to waste, freeing up shelves for other essentials.
Best For
Small kitchens where every inch counts, or for renters who want a non-permanent storage solution. It’s also great for coffee stations or tea corners where you want quick access to daily-use cups.
Styling Tip
Paint the pegboard the same color as your cabinet interior for a seamless look, or choose a contrasting shade like matte black for a subtle pop. Use brass or copper hooks to add a touch of warmth.
9. Stack Cups on a Countertop Cake Stand
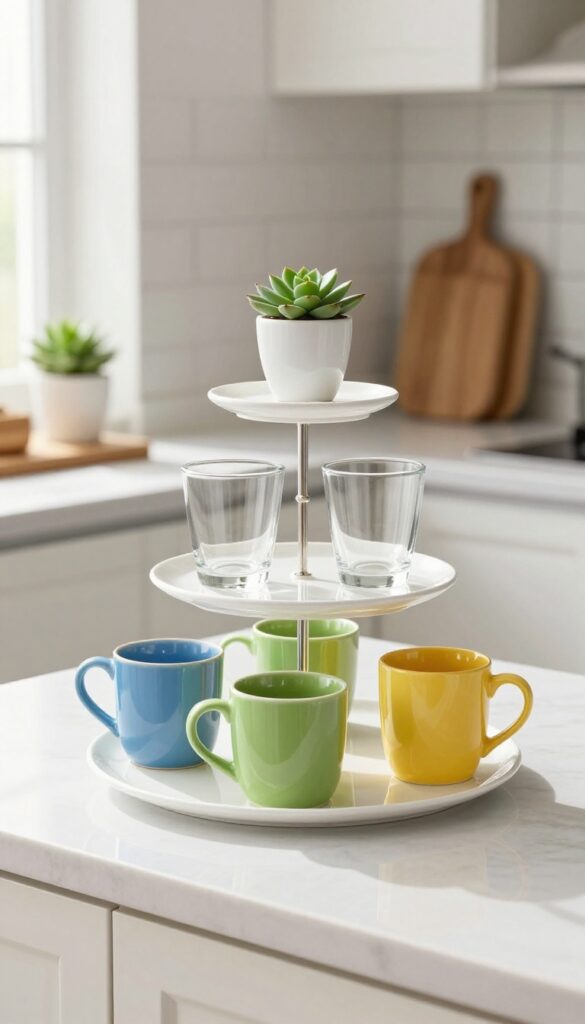
A cake stand isn't just for desserts. Place a multi-tiered version on your counter and it becomes a charming cup holder that saves cabinet space. Stack your most-used mugs and glasses on each level for a display that's both decorative and practical.
It's a small swap that makes your morning coffee routine feel a little more special.
Why It Works
This idea uses vertical space on the counter, keeping cups accessible without cluttering shelves or drawers. The tiers create visual separation, so grabbing the right cup is quick and easy.
Best For
Small kitchens where cabinet space is tight, or for renters who can't install permanent shelving. It also works well for households with a few favorite mugs used daily.
Styling Tip
Choose a cake stand in a neutral tone like white, wood, or brass to blend with your countertop. Group cups by color or size on each tier for a curated look. Add a small plant or a dish of tea bags on the top tier for extra charm.
10. Use a Drawer Divider for Flat Storage

Deep drawers in the kitchen often become a dumping ground for mismatched items. Instead of stacking cups precariously, lay them on their sides in neatly divided compartments. This approach turns wasted vertical space into a tidy, accessible storage solution that feels custom-made for your cookware.
Why It Works
Adjustable dividers keep cups from rolling into each other, so you can grab one without disturbing the rest. Laying cups flat also lets you see every option at a glance, which speeds up morning routines and reduces clutter.
Best For
Small kitchens where every inch counts, especially for tumblers, juice glasses, or espresso cups that don't stack well. It's also great for deep drawers near the coffee station or under a counter where upper cabinets are limited.
Styling Tip
Choose dividers in a natural wood tone or matte black to match your drawer interior. For a cohesive look, line the drawer with a non-slip liner in a neutral hue—this keeps cups stable and adds a subtle textural detail.
11. Hang a Tension Rod Inside a Cabinet
Sometimes the most clever storage solutions are hiding in plain sight—or in this case, inside your cabinet. By installing a simple tension rod horizontally, you can turn a tall, awkward cabinet into a neat hanging display for your cups. It's a trick that feels almost too easy, but once you try it, you'll wonder why you didn't think of it sooner.
The best part? No tools, no drilling, and no permanent changes to your kitchen.
Why It Works
Tension rods are incredibly versatile because they require zero hardware and can be adjusted to fit a range of cabinet widths. Hanging cups by their handles keeps them stable and visible, so you can grab one without shuffling through a stack. This method also frees up valuable shelf space below for plates, bowls, or pantry items, making the most of every inch.
Best For
This idea is perfect for narrow cabinets that are too shallow for standard shelving, or for upper cabinets where you want to keep everyday cups within easy reach. It's also a great solution for renters who can't drill holes or make permanent changes, and for anyone who wants to add a bit of visual interest to an otherwise plain cabinet interior.
Styling Tip
Choose a rod with a sleek finish, like brushed nickel or matte black, to complement your cabinet hardware. For a cohesive look, hang cups in a matching color palette or mix neutrals with one accent hue. If your cabinet has glass doors, arrange the cups with their handles facing outward for a tidy, intentional display.
FAQ
What is the best way to organize cups in a small kitchen?
The best way depends on your space, but combining vertical storage (like stackers or under-shelf racks) with visible storage (like clear bins or wall rails) maximizes accessibility. Prioritize solutions that let you see and grab cups without moving others.
How do I keep cups from getting dusty when stored on open shelves?
Wash cups before use if they've been sitting out. For open shelves, consider using glass-front cabinets or storing cups upside down on a rack. Alternatively, rotate your cup collection regularly to minimize dust buildup.
Can I use these ideas in a rental kitchen without damaging walls?
Yes, many ideas are renter-friendly. Tension rods, adhesive hooks, and under-shelf racks require no drilling. For wall-mounted rails, use removable adhesive strips designed for heavy loads.
Always check weight limits and follow instructions.
How do I organize oddly shaped cups like stemware or travel mugs?
For stemware, use a hanging stemware rack under a shelf. For travel mugs, store them with lids off in a bin or on a dedicated shelf. Consider using a mug tree for tall mugs or a drawer with dividers for shorter ones.
What should I do if my cups are all different sizes and don't stack well?
Group similar sizes together and use bins or dividers to keep them separated. For non-stackable cups, consider hanging them on a rail or storing them on a tiered shelf. Avoid forcing them to stack, as it can lead to chipping.
Conclusion
Organizing your cups doesn't have to be complicated or expensive. With a little creativity and the right tools, you can turn a cluttered cabinet into a streamlined space that makes your morning routine smoother. The key is to choose solutions that fit your specific kitchen layout and cup collection.
Remember, the goal is easy reach and a tidy look.
Start with one or two ideas that resonate with your space, and build from there. Your cups will thank you, and so will your sanity during those busy mornings. Happy organizing!