10 Kitchen Table Organization Ideas for Less Clutter
Your kitchen table has a way of collecting everything—mail, keys, kids' homework, random gadgets. Before you know it, there's no room left for an actual meal. But with a few smart storage moves, you can keep that surface clear and inviting.
The trick is to give every item a designated home, either on the table itself or just within arm's reach. Think trays, baskets, and organizers that corral the chaos without looking like you're trying too hard.
These 10 ideas are all about blending practicality with a relaxed, lived-in look. No strict rules, just simple swaps that make your table work harder for you.
1. A Central Tray for Everyday Essentials
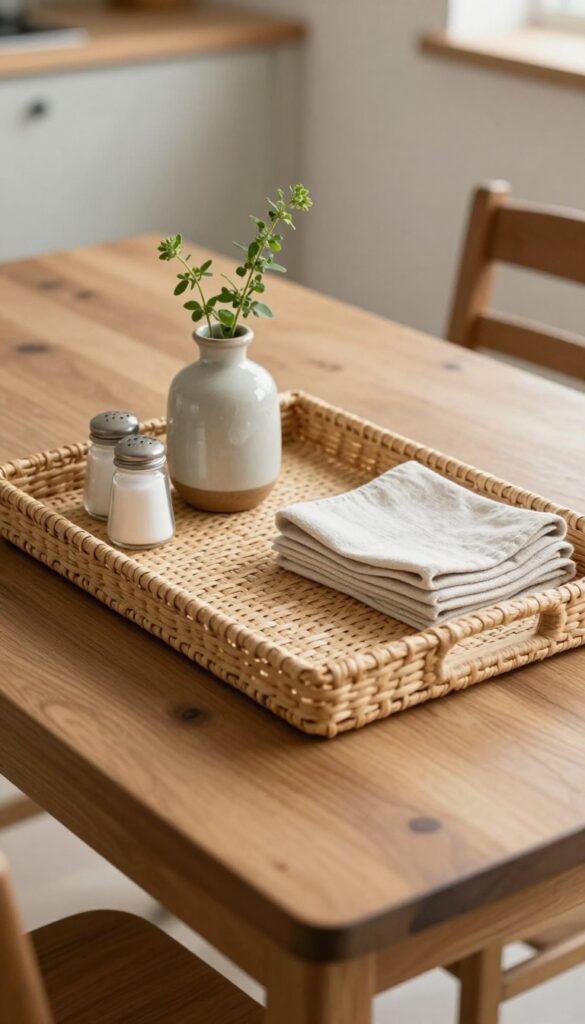
Your kitchen table tends to collect all sorts of odds and ends—mail, keys, random snacks. Instead of letting them spread out into a cluttered mess, corral them with one simple trick: a large decorative tray. It gives everything a designated spot, keeps the table looking intentional, and makes clearing it for meals a breeze.
Plus, it’s an easy way to add a little style to your everyday setup.
A tray acts like a home base for the items you reach for most. Drop your salt and pepper shakers, a small vase with fresh herbs, and a stack of cloth napkins right in the center. When you need the full table for dinner or a project, just lift the whole tray and set it aside.
It’s a low-effort habit that keeps your kitchen table looking polished without feeling fussy.
Best Materials
- Wood trays bring warmth and work well with farmhouse or rustic kitchens. Metal or wire trays feel more modern and pair nicely with industrial accents. For a soft, coastal vibe, try a woven seagrass or rattan tray.
- Stick with natural tones or a neutral hue so the tray blends in rather than screams for attention.
Styling Tip
- Keep the tray contents minimal—three or four items max. A small ceramic vase with a single stem, a set of everyday salt and pepper shakers, and a napkin holder is plenty. If you have a favorite candle or a small plant, swap one in to change the look seasonally.
- The goal is containment, not clutter.
Size And Placement
Choose a tray that’s large enough to hold your essentials but leaves a few inches of bare table around it. Center it on the table or offset it slightly for a more relaxed feel. If your table is long, you can even use two smaller trays at each end for a balanced, symmetrical look.
2. Lazy Susan for Condiments and Oils
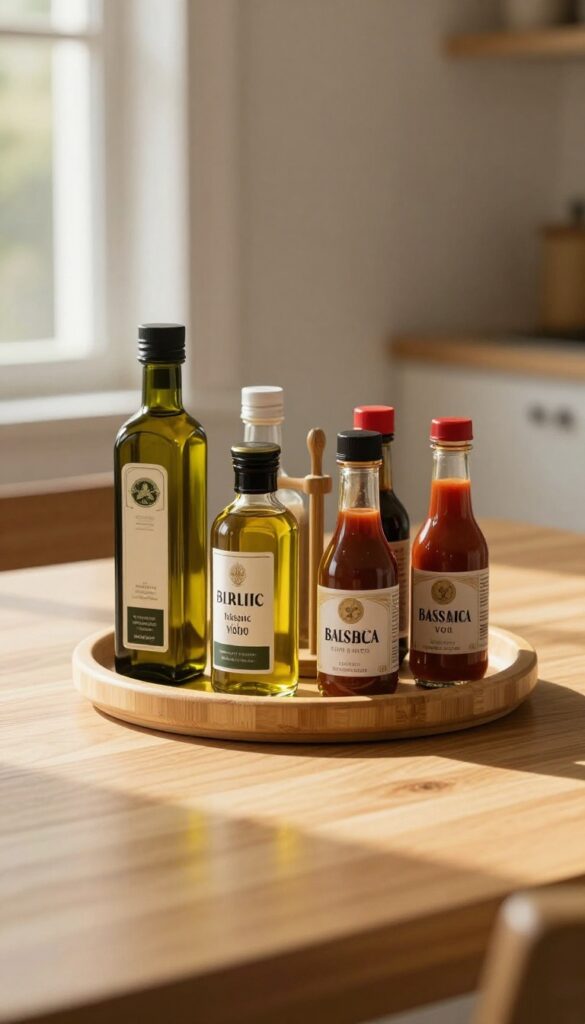
That cluttered corner of the kitchen table where bottles of olive oil, vinegar, and hot sauce pile up? It doesn't have to be that way. A slim lazy Susan is one of those small tweaks that makes a huge difference in how your table looks and functions.
It keeps everything within easy reach, spins so nothing gets lost behind something else, and adds a touch of diner-style charm that feels both nostalgic and practical.
Placing a lazy Susan on your kitchen table is like giving your daily cooking essentials their own little carousel. No more digging through a jumble of bottles to find the balsamic. Just a quick spin and there it is.
The key is choosing the right size—too big and it overwhelms the table, too small and it doesn't hold enough. A 12-inch diameter works well for most tables, leaving room for placemats or a centerpiece. Look for one with a low profile so it doesn't block sightlines across the table.
Materials matter too: a wood or bamboo lazy Susan brings warmth, while a clear acrylic one disappears visually. For a pop of personality, go with a bright ceramic or a metal one in a fun color. Place it near the center of the table, slightly off to the side if you eat there regularly, so it feels intentional and not in the way.
Best Materials For A Tabletop Lazy Susan
- Wood and bamboo are top choices because they blend with most table finishes and add natural texture. Acrylic is great for a minimalist look—it keeps the focus on the bottles themselves. Ceramic or stoneware options add a handmade feel and come in glazes that can tie into your kitchen's color palette.
- Metal lazy Susans, especially in brass or matte black, lean industrial and work well in modern or farmhouse spaces. Avoid plastic if you can—it tends to look cheap and can scratch over time.
Arrangement Tips For A Functional Spin
- Group your most-used items together: olive oil, vinegar, soy sauce, and hot sauce. Place taller bottles toward the center and shorter ones around the edge so they don't tip over when you spin. If you have multiple oils, keep them in similar bottles for a cohesive look.
- A small ramekin or salt cellar can sit in the middle for salt and pepper. Don't overcrowd it—leave a little breathing room so items don't knock into each other. This setup works best on a table that's used for casual meals or as a prep station, not a formal dining table.
Styling The Surrounding Table Area
- Balance the lazy Susan with a simple centerpiece or a small plant on the opposite side of the table. A low ceramic vase with dried eucalyptus or a small succulent keeps the look grounded. If your table is against a wall, consider a small tray or coaster set nearby for hot pots.
- Keep the rest of the table clear to avoid visual clutter. The lazy Susan should feel like a purposeful accent, not a catch-all. A linen runner or placemats in a neutral tone help define the dining zone without competing.
3. Under-Table Drawer Inserts
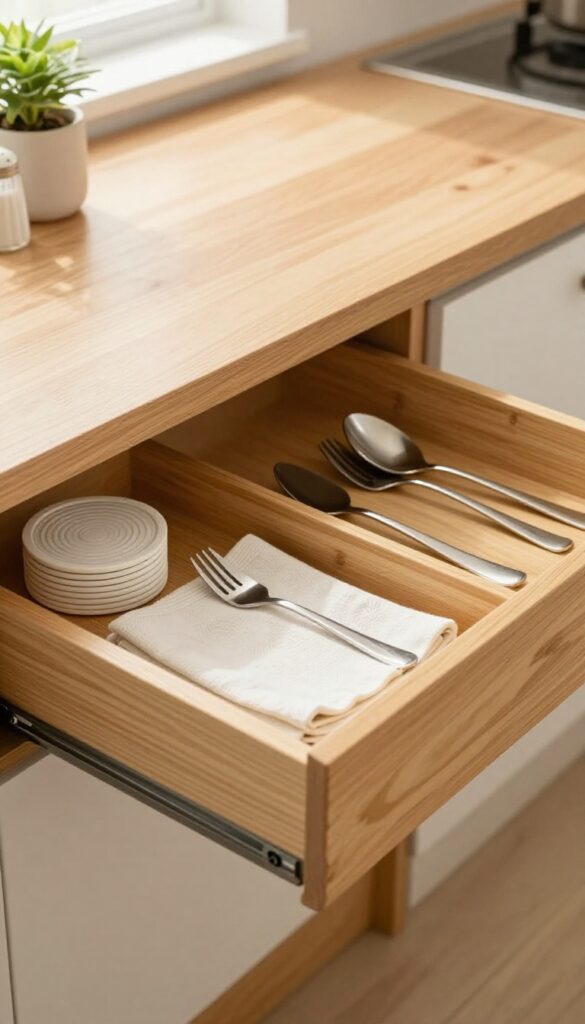
That big kitchen table is a magnet for clutter—mail, random keys, and wayward pens. But if your table has a built-in drawer, you’ve got a secret weapon for keeping the surface clear. Adding divided inserts transforms that drawer into a tidy home for cutlery, coasters, and napkins.
No drawer? No problem. A slim caddy clipped to the table’s edge works just as well and keeps everything within easy reach.
Drawer inserts are a low-cost, high-impact way to organize your table’s hidden storage. They prevent utensils from sliding around and make it easy to grab what you need without rummaging. For tables without a drawer, look for a caddy that hooks onto the apron—perfect for stashing everyday items like salt and pepper shakers or cloth napkins.
This idea works especially well in eat-in kitchens or dining nooks where you want to keep the table clear for meals but still have essentials close by.
Best Materials
Bamboo inserts are a warm, natural choice that blends with most table finishes. Plastic or metal dividers are more affordable and easy to clean, while felt liners add a soft touch and protect your drawer from scratches. For the edge-mounted caddy, look for one in wood or metal that matches your table’s hardware.
Layout Tip
Group items by frequency of use: keep forks and spoons in the front section, coasters and napkins in the back. If you’re using a caddy, place it on the side where you usually sit so it’s always handy. Avoid overcrowding—leave a little room so you can easily grab items without jamming.
Finishing Touch
Add a small tray or ceramic dish inside the drawer for loose items like toothpicks or rubber bands. This keeps tiny things from escaping under the dividers and adds a decorative pop. A matching salt cellar or small vase on the table ties the organized look together.
4. Wall-Mounted Shelf Above the Table
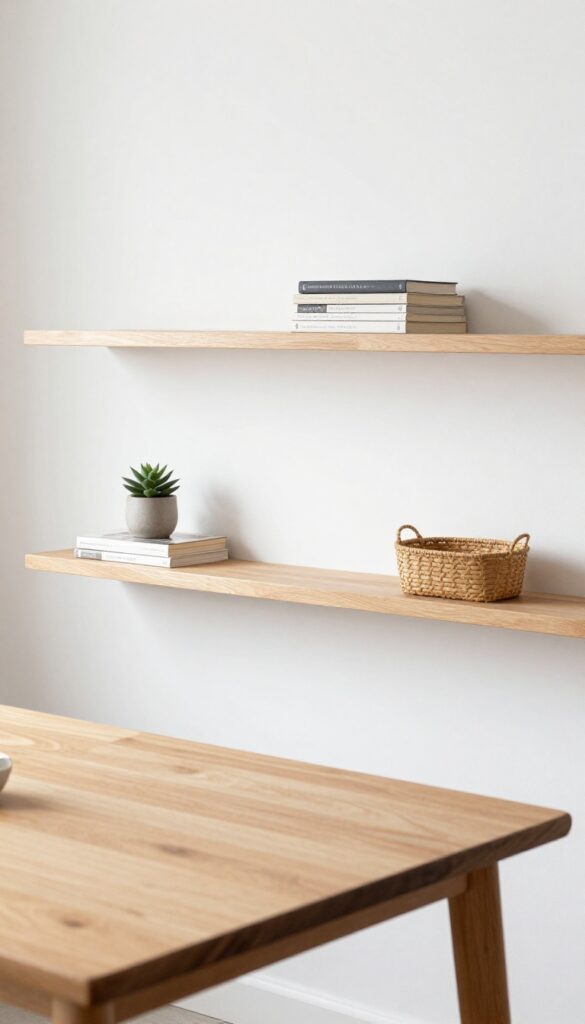
A narrow shelf floating just above your kitchen table is one of those sneaky storage wins that looks like it was always meant to be there. It keeps cookbooks, a small plant, or a catch-all basket for mail and keys within arm’s reach without eating into your precious tabletop real estate. The best part?
It turns a blank wall into a functional focal point that feels intentional, not cluttered.
Install a shelf about a foot above the table surface—high enough to avoid bumping your head but low enough to grab a recipe mid-cook. Use it to store daily essentials: a stack of favorite cookbooks, a tiny succulent, or a slim basket for stray mail and grocery lists. The shelf keeps the table clear for meals and projects while adding a layer of visual interest to the room.
Go for a wood tone that matches your table for a seamless look, or choose a contrasting metal or painted finish to make the shelf pop. Keep the styling minimal—one or two items with breathing room between them—so the shelf feels airy, not overloaded.
Best Materials
Solid wood shelves (like oak or walnut) bring warmth and durability, while floating metal shelves offer a sleek, industrial contrast. If your table is rustic, go with reclaimed wood; for a modern table, a matte black or white shelf keeps things crisp. Avoid glossy finishes that show every smudge—matte or satin is easier to maintain in a kitchen.
Shelf Styling Tip
Stick to a simple vignette: one stack of books, one small plant, and one functional item like a ceramic spoon rest or a tiny vase. Leave about two-thirds of the shelf empty to prevent a cluttered look. Use a low, trailing plant (like pothos) to soften the shelf’s edge and draw the eye upward without overwhelming the space.
Small-space Fix
In a tiny kitchen or breakfast nook, choose a shelf that’s no wider than the table itself to keep proportions balanced. Mount it securely with brackets or a hidden floating shelf system—safety is key since you’ll be reaching for items regularly. If the table is pushed against a wall, the shelf can extend the full width of the table for maximum storage.
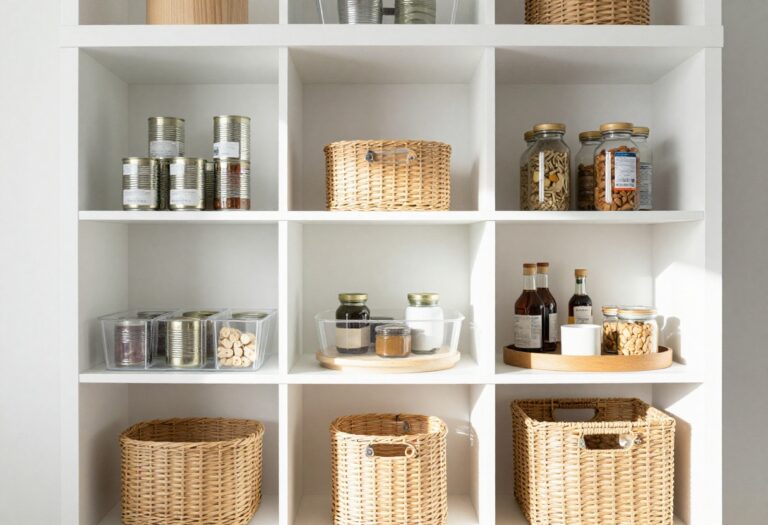
5. Baskets for Bulkier Items
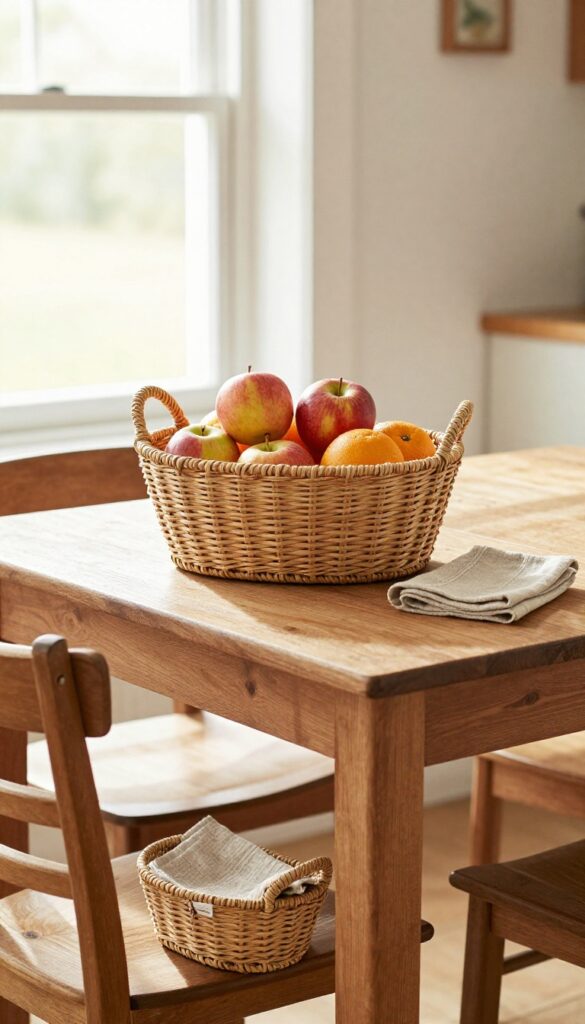
A kitchen table can quickly become a landing pad for everything from mail to groceries, but a few well-placed baskets can turn that chaos into charm. Woven baskets add natural texture and warmth, making the space feel cozy rather than cluttered. They're perfect for corralling bulkier items like fruit, bread, or extra napkins, keeping them within easy reach but visually tidy.
The beauty of using baskets is that they hide clutter in plain sight. A large, open-weave basket on the table can hold a mix of apples and oranges, while a smaller one on a nearby chair can store cloth napkins or a loaf of bread. The key is to choose baskets that complement your kitchen's style—think natural seagrass for a farmhouse look or dark rattan for a modern touch.
Place them where they're functional but not in the way, like at the end of the table or on an empty chair. This way, you keep essentials accessible without sacrificing style.
Best Materials
Natural fibers like seagrass, rattan, or bamboo work best because they add organic texture and are durable enough for daily use. For a more polished look, consider painted or stained baskets that match your color scheme. Avoid plastic or shiny materials, as they can feel cheap and clash with the warm, relaxed vibe you're aiming for.
Placement Tips
- Think about traffic flow. A basket on the table center works well for fruit, but if your table is small, tuck a basket on a nearby chair or a sideboard. For extra napkins, use a shallow basket that sits flat on the table edge.
- The goal is to keep items handy without blocking sightlines or making the table feel crowded.
Styling Note
- Mix basket textures with other elements on the table, like a ceramic vase or wooden cutting board. This creates visual interest without looking busy. If using multiple baskets, vary their sizes and weaves to avoid a matchy-matchy feel.
- A little contrast goes a long way in making the setup feel curated, not cluttered.
6. Placemat Pockets for Each Setting
You know those placemats that are just flat pieces of fabric? They do their job, but they miss a chance to earn their keep. Enter the placemat with built-in pockets or clips—a simple swap that keeps forks, knives, and napkins right where you need them.
No more hunting for a stray spoon or folding napkins into origami shapes just to keep them from sliding off. Each setting stays neat, and setting the table becomes a one-step grab-and-go.
Pocket placemats work best when you choose materials that match your kitchen’s vibe. For a farmhouse feel, go with linen or cotton in neutral tones like oatmeal or sage. If your kitchen leans modern, try wipeable vinyl or cork with clean edges.
The pockets should be deep enough to hold a standard dinner fork and knife without bulging, but not so deep that utensils disappear. Look for designs with a single long pocket across the top or two smaller pockets on the sides—both keep the layout balanced. To style them, pair each placemat with a simple ceramic plate and a cloth napkin tucked into the pocket.
The result is a table that feels ready for dinner even when no one’s eating. For a finishing touch, add a small vase or a single candle in the center to anchor the whole look.
Best Materials
- Cotton and linen are classic choices—they’re soft, washable, and come in endless colors. For a more durable option, look for placemats made from recycled PET or oilcloth. These wipe clean easily and hold up to daily use.
- If you want a natural texture, try bamboo or seagrass placemats with stitched-on pockets. They add warmth and pair well with wooden tables.
Storage Tip
Store the placemats flat or rolled in a drawer near the table. If you have a buffet or sideboard, keep them stacked with the pockets facing the same direction so utensils stay in place. For small kitchens, hang them on a peg rail with clips—each placemat can hold its own set of utensils, making it easy to grab and go.
Finishing Touch
Add a small napkin ring or a leather strap to each placemat for an extra polished look. Choose a color that contrasts with the placemat, like a dark brown strap on a light linen mat. This tiny detail makes the setting feel intentional without adding clutter.
7. A Slim Caddy for Daily Papers
Mail, bills, and to-do lists have a way of piling up fast. Instead of letting them scatter across the table, corral them in a slim upright caddy that takes up almost no space. The trick is choosing one with a stylish finish—think warm wood, matte black, or woven rattan—so it feels like decor, not clutter.
A dedicated spot for daily papers keeps the table clear for meals and projects. This caddy works best when placed near the edge of the table or against a wall, where it stays accessible without dominating the surface. Go for a design with multiple slots or a small drawer to separate urgent items from reading material.
Best Materials
Natural materials like bamboo or rattan add warmth and blend easily with most table settings. For a more modern look, try a slim metal caddy in brass or black. Avoid plastic—it can feel too utilitarian and cheapens the overall aesthetic.
Styling Tip
Keep the caddy from looking cluttered by limiting what goes inside. Reserve it for current mail, one notepad, and a pen. Add a small plant or a votive candle next to it to anchor the arrangement and make it feel intentional.
Where To Place It
Set the caddy at the far end of the table or on a nearby console if space is tight. If your table doubles as a workspace, place it within arm’s reach but off to the side so it doesn’t interfere with dining or cooking prep.
8. Hanging Organizer Under the Table
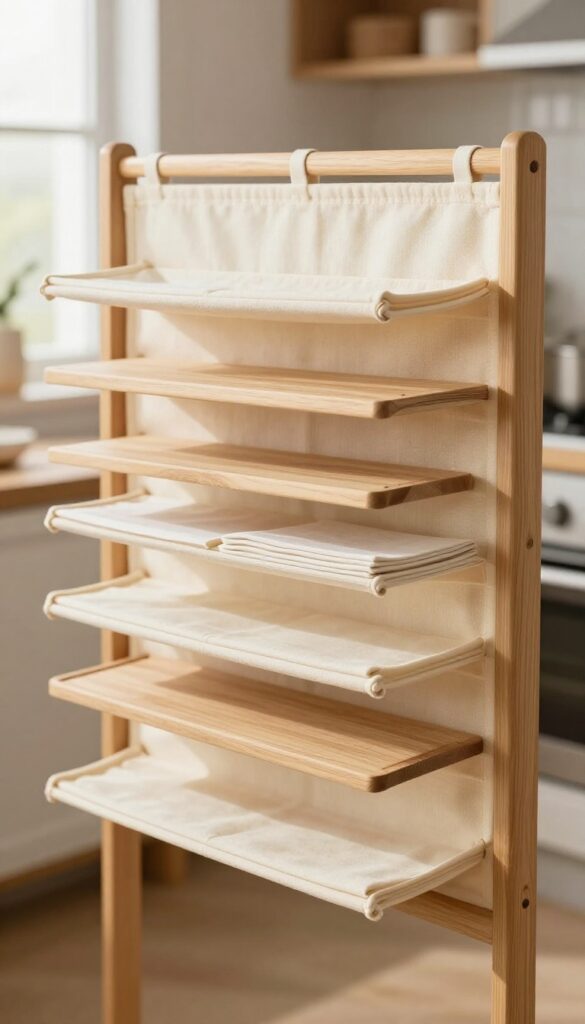
Your kitchen table isn't just for meals—it's prime real estate for hidden storage. A hanging organizer attached underneath the tabletop keeps placemats, trivets, and small cutting boards within easy reach but completely out of sight. It's one of those clever ideas that makes you wonder why you didn't think of it sooner, especially if you're short on drawer space.
This solution works best with a table that has a solid underside and enough clearance for the organizer to hang freely without bumping knees. Fabric pouches with multiple pockets are great for corralling flat items, while wire baskets offer a more open look and can hold bulkier pieces like folded cloth napkins or silicone trivets. Installation is usually as simple as screwing in a few hooks or using adhesive strips if you want to avoid drilling.
The key is to keep the organizer shallow so it doesn't interfere with legroom. It's a perfect trick for small dining areas, breakfast nooks, or even a desk where you want to stash supplies without visual clutter.
Best Materials
Canvas or linen fabric organizers blend in nicely with most table styles and add a soft texture contrast. For a more industrial look, go with a wire or metal grid basket that you can spray-paint to match your hardware. Avoid anything too bulky or stiff—you want the organizer to hang flat and not sag under weight.
Installation Tip
- Measure the under-table clearance first. You need at least 4 inches between the tabletop and the bottom of the organizer so it doesn't drag on items stored below. Use small L-brackets or heavy-duty adhesive hooks rated for the weight you plan to hang.
- If your table has an apron, you can also attach the organizer to that for extra stability.
Styling Note
Keep the items inside neatly rolled or stacked so the organizer doesn't bulge. Stick to a neutral or muted color palette for the fabric to maintain a clean, uncluttered look. If your table is visible from the living area, choose an organizer that complements your overall decor—think earthy tones or subtle patterns.
9. Tiered Stand for Snacks and Fruit
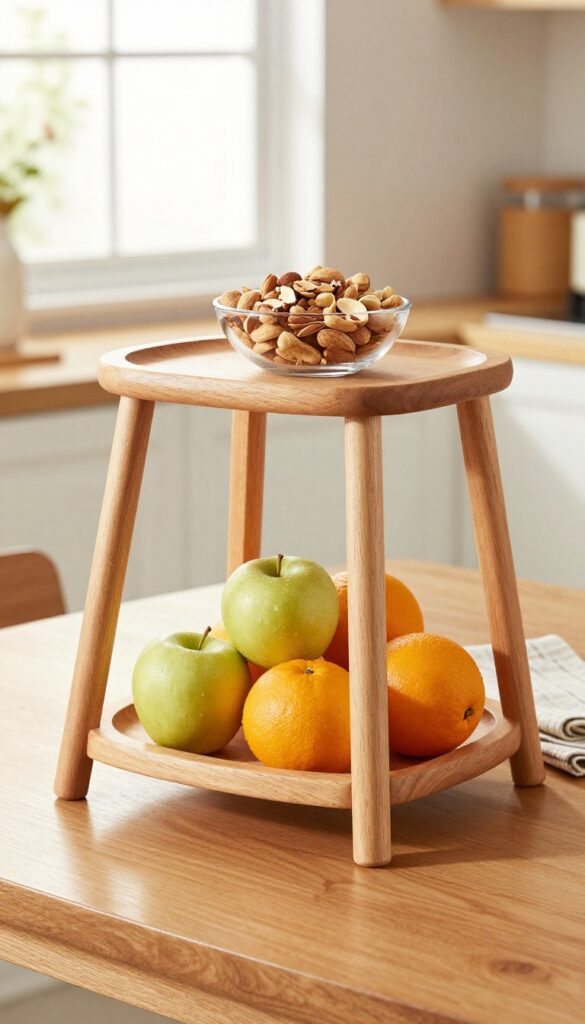
A two-tiered stand is one of those little upgrades that makes your kitchen table feel more intentional. Instead of letting fruit roll around or snack bags pile up, you get a neat, vertical display that’s both practical and pretty. It works just as well for a quick breakfast as it does for a casual get-together, and it keeps the table surface clear for actual meals.
A tiered stand is a simple way to break up the flat surface of a table and add a little height. It draws the eye upward and makes even a small bowl of apples or a stack of crackers feel like part of the decor. Choose a stand that matches your kitchen’s vibe—wood for warmth, wire for airiness, or ceramic for a clean look.
Place it near the center of the table or slightly off to one side, and let it do double duty as both storage and centerpiece.
Best Materials
Wooden stands bring a natural, farmhouse feel and work well with warm-toned tables. Metal wire stands feel lighter and more modern, plus they let you see through to the lower tier. For a sleek, minimalist look, go with a ceramic or stoneware stand in a neutral color like white, beige, or soft gray.
Layout Tip
Keep the lower tier for heavier items like apples or oranges, and use the upper tier for lighter snacks such as nuts, dried fruit, or small pastries. This keeps the stand stable and makes it easy to grab from either level. If your table is small, choose a compact stand that doesn’t overpower the space.
Finishing Touch
Add a small cloth napkin or a wooden coaster under the stand to anchor it visually and protect your table. You can also tuck a few fresh herbs or a small succulent on the top tier for a pop of green that ties the whole look together.
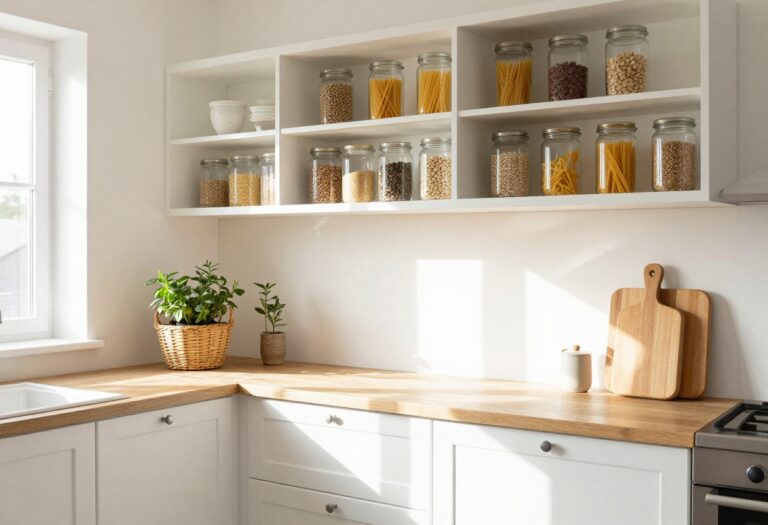
10. Clear Glass Canisters for Dry Goods
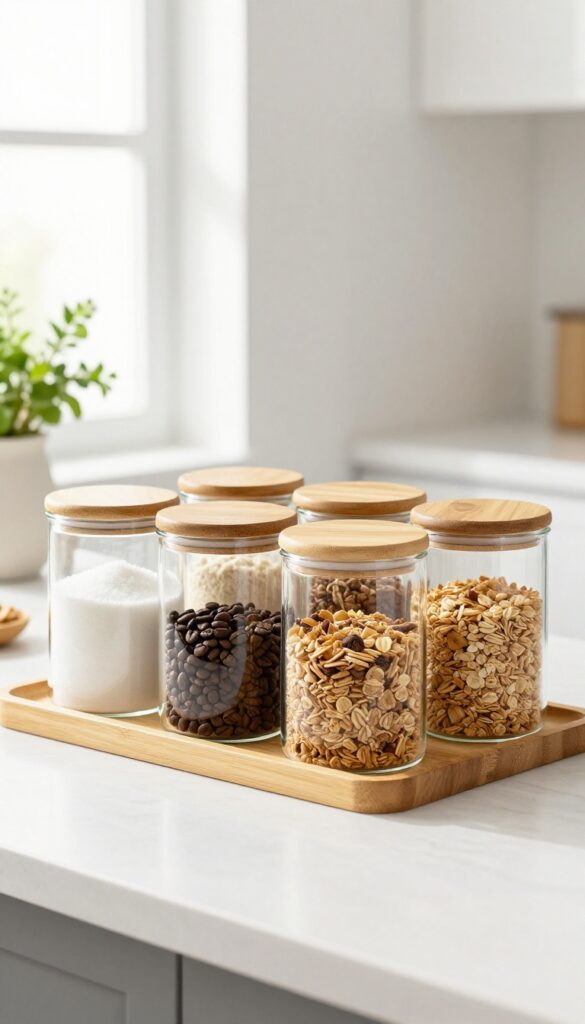
There’s something about a row of clear glass canisters that instantly makes a kitchen table feel more intentional. Instead of hiding your sugar, flour, or tea bags in the pantry, bring them out into the open. They become part of the decor—functional, yes, but also visually calming.
The transparency lets you see exactly what you have, so you’re never digging around for that last tea bag. Plus, it keeps everyday ingredients right where you need them, whether you’re baking a quick batch of cookies or brewing your morning coffee.
Clear glass canisters turn your kitchen table into both a workspace and a display. The key is choosing canisters with a uniform shape and size—think classic apothecary jars or simple cylinders with airtight lids. Fill them with pantry staples you use daily: sugar, flour, coffee beans, loose-leaf tea, or even snacks like granola and nuts.
Arrange them in a neat row or cluster them on a small tray to keep them from sliding around. This setup works especially well on a breakfast table or a kitchen island where you prep and eat. The visual effect is clean and organized, and it cuts down on clutter because everything has a designated spot.
Plus, it’s a budget-friendly upgrade—you can find matching canisters at most home stores or even thrift them for a fraction of the cost.
Best Materials
- Stick with clear glass for the main body—it’s classic, easy to clean, and shows off the contents beautifully. Look for canisters with airtight lids made of bamboo, stainless steel, or brushed nickel. Bamboo adds a warm, natural touch, while metal lids give a more modern, sleek look.
- Avoid plastic lids, which can feel cheap and don’t seal as well. If you want a cohesive look, choose all the same lid material and finish.
Layout Tip
- Group canisters by height or use a tiered stand to create visual interest. Place the tallest ones in the back or center, then step down in size. Leave a little breathing room between each jar so they don’t feel cramped.
- A small tray underneath catches any stray crumbs and makes the arrangement feel intentional. If your table doubles as a dining surface, keep the canisters to one end or against a wall so they don’t interfere with meal prep.
Styling Detail
- Add a small chalkboard label or a simple tag tied with twine to each canister. It looks charming and helps everyone in the family find what they need. You can also pop a fresh herb sprig or a cinnamon stick inside for a subtle scent and color pop.
- Just make sure the lids seal tightly to keep everything fresh. This little touch makes the table feel styled, not just stored.
FAQ
How do I keep my kitchen table from getting cluttered again?
Create a daily reset habit: spend two minutes each evening clearing the table and returning items to their designated spots. Use trays and caddies to make this quick and easy.
What's the best way to organize a small kitchen table?
Focus on vertical storage like wall shelves or hanging organizers. Keep only the essentials on the table itself, and use a small tray to group them together.
Can I use these ideas on a dining table too?
Absolutely. Many of these ideas, like lazy Susans, tiered stands, and placemat pockets, work just as well on a dining table for everyday meals or special occasions.
How do I choose a tray that fits my table?
Pick a tray that's about one-third the width of your table. This leaves enough room for place settings while keeping items contained. Choose a material that complements your decor, like wood, metal, or ceramic.
What if my table has no drawers or shelves nearby?
No problem. Use a slim caddy on the table itself, or attach a hanging organizer under the tabletop. You can also place a small basket on a nearby chair to hold overflow items.
Conclusion
A clutter-free kitchen table doesn't require a complete overhaul—just a few intentional choices. By giving everyday items a designated spot, you'll reclaim your table for meals, work, or just a cup of coffee.
Start with one or two ideas that fit your space and routine. Small changes add up, and soon you'll wonder how you ever lived with the chaos.