11 Dream Kitchen Ideas Luxury Modern Homes Can Inspire
Luxury modern kitchens often feel like they belong in a magazine—sleek, polished, and a little untouchable. But the best ones have a secret: they’re designed to be lived in. Warmth, texture, and everyday comfort are what make a kitchen truly dreamy, not just expensive finishes.
You don’t need a full renovation to borrow ideas from high-end homes. Small shifts—like swapping hardware, adding a cozy rug, or changing your lighting—can bring that same inviting energy into your space.
Let’s walk through 11 ideas that balance style with real-life practicality. Each one is meant to feel achievable, whether you’re planning a big remodel or just refreshing a few details.
1. A Warm Wood Island That Anchors the Room
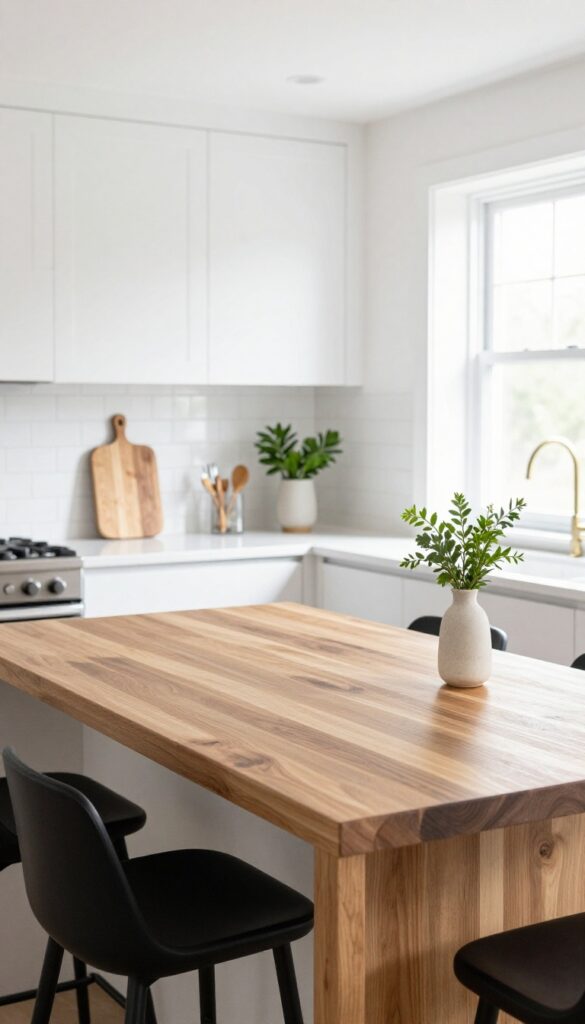
A kitchen island doesn't have to be another slab of cold stone. Swapping marble or quartz for a warm wood surface instantly changes the whole mood of the space. It brings in texture, softens the modern lines, and makes the kitchen feel like the heart of the home rather than a showroom.
The trick is balancing that warmth with lighter elements so the room stays airy and bright.
A wood island works best when it's the only heavy wood piece in the kitchen. Pair it with pale quartz or butcher block countertops on the perimeter, and keep the backsplash light—think white subway tile or a soft veined marble. The contrast keeps the wood from feeling too dark or rustic.
For seating, simple counter stools in metal or light wood let the island shine without competing. This setup gives you that lived-in, gathered feel without sacrificing the sleekness of a modern kitchen.
Best Wood Species
Go for woods that show grain and character—white oak, walnut, or teak are great choices. They're durable enough for daily chopping and wiping, and they patina beautifully over time. Avoid overly glossy finishes; a matte oil or satin seal keeps the surface looking natural and warm.
Styling The Top
Keep the island top clear of clutter so the wood texture stays the focal point. A simple wooden cutting board, a small vase with fresh herbs, or a ceramic fruit bowl is enough. For seating, choose stools with slim profiles in black, brass, or light wood to maintain the open feel.
Maintenance Tip
Wood islands need a little more care than stone. Wipe spills quickly, use trivets for hot pans, and reapply oil or sealant every few months. It's a small effort for the cozy, grounded vibe it brings to the kitchen.
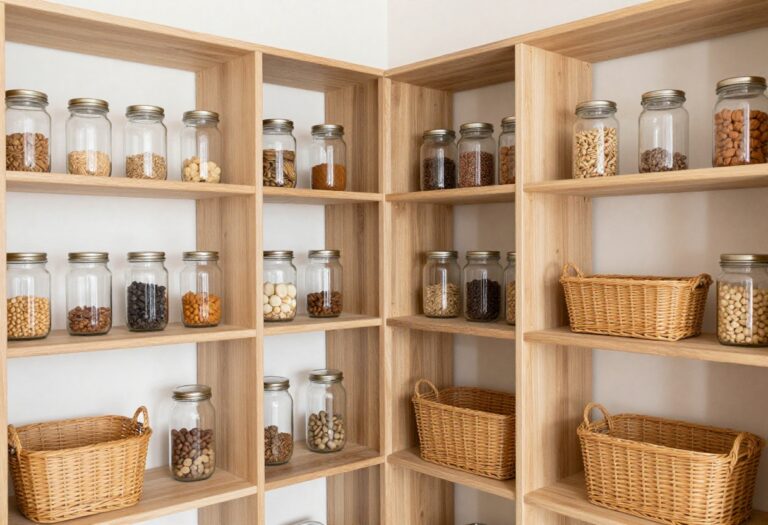
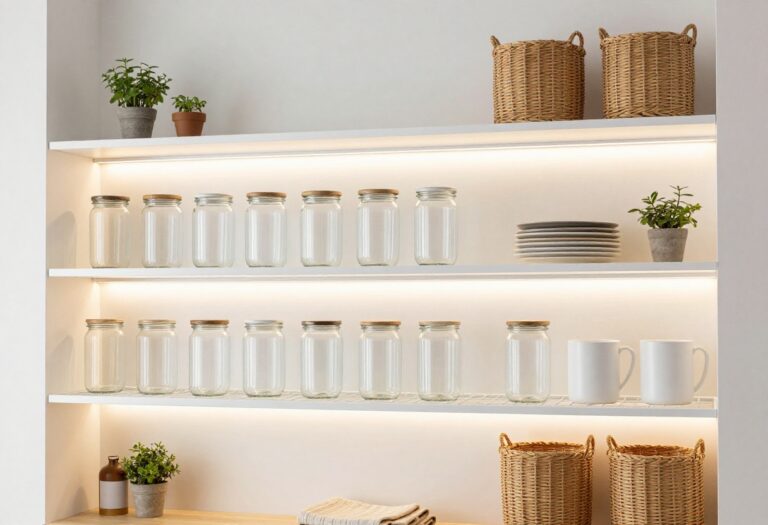
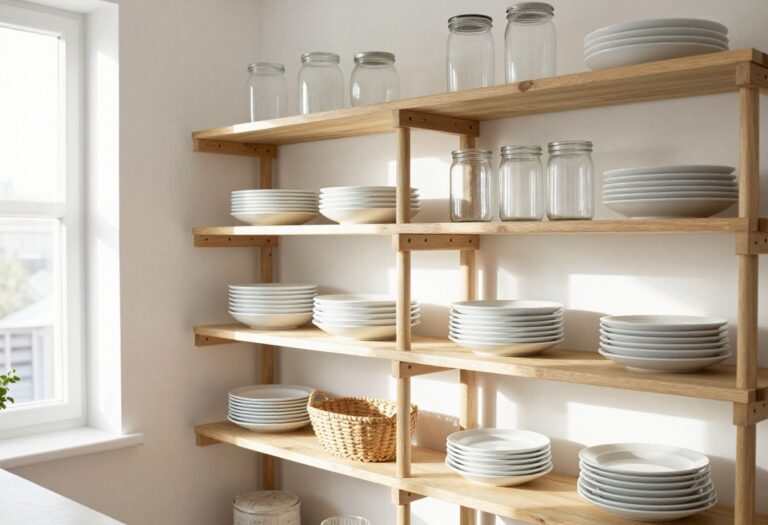
2. Open Shelving with a Curated, Not Cluttered, Look
Open shelving gets a bad rap for collecting dust and visual noise, but in luxury kitchens, it's all about restraint. The trick is to display only a few intentional pieces—things you actually reach for daily. This keeps the look airy, warm, and lived-in, not like a showroom.
Open shelving in a luxury kitchen isn't about cramming every dish and mug into view. Instead, it's a chance to show off a few carefully chosen items that add personality without overwhelming the space. Think a stack of linen napkins, a simple ceramic pitcher, or a small potted herb.
The key is to keep it practical: store items you use often, so the shelves stay functional and fresh. Limit yourself to three to five objects per shelf, and vary heights and textures for visual interest. A warm wood or matte black bracket can soften the look and tie into your kitchen's overall palette.
Best Materials For Warmth
Stick with natural materials like solid oak, walnut, or matte black steel for the shelves themselves. These add warmth and contrast against white or neutral cabinetry. Avoid glossy or high-contrast finishes that feel cold or overly modern.
Shelf Styling Tip
Group items in odd numbers and mix everyday ceramics with a single natural element, like a small trailing plant or a wooden cutting board. Keep the color palette tight—whites, warm neutrals, and one accent hue—so the display feels cohesive, not chaotic.
Layout And Placement
Install open shelves on a single wall or flanking a range hood, not across the entire kitchen. This creates a focal point without making the room feel cluttered. Leave plenty of negative space around each shelf to let the items breathe.
3. A Statement Range Hood That Doubles as Art
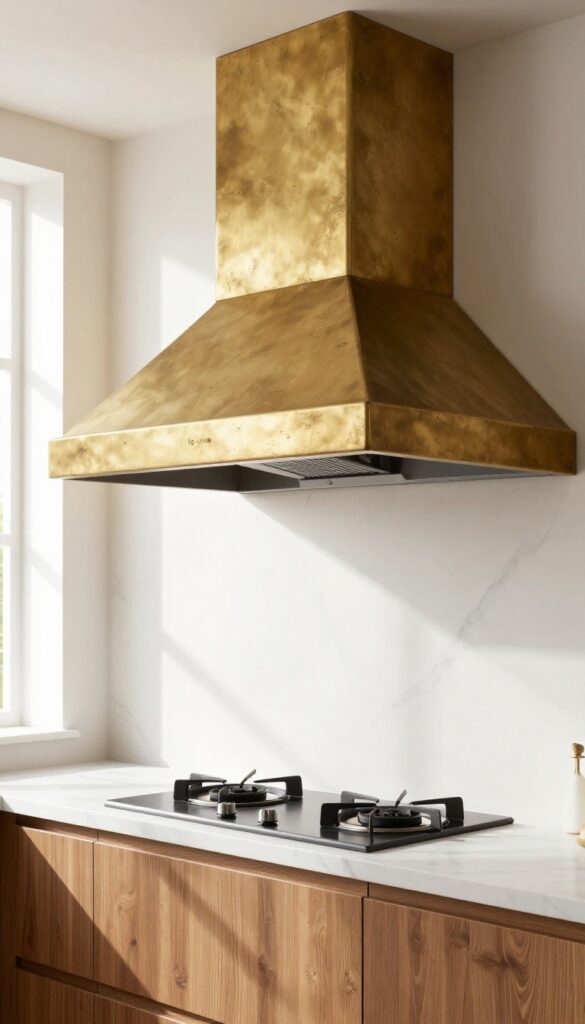
Your range hood doesn't have to be a boring metal box that just blends into the background. In fact, making it the star of the kitchen is one of the easiest ways to add personality without sacrificing an inch of counter space. A sculptural hood in brass, matte black, or textured plaster draws the eye upward and instantly gives the room a custom, collected feel.
It's the kind of detail that makes a kitchen feel intentional and lived-in, not like a showroom.
Think of your range hood as the jewelry for your kitchen. When you choose one with a bold shape or unexpected finish, it becomes a functional sculpture that anchors the whole cooking zone. The best part?
It doesn't take up any extra floor space, so even smaller kitchens can pull off this look. Whether you go for a sleek brass canopy, a matte black chimney, or a hand-troweled plaster hood, the key is to let it stand out against a simpler backdrop. Keep the surrounding cabinets and backsplash relatively neutral so the hood can do its thing without visual clutter.
Best Materials For A Sculptural Hood
- Brass adds warmth and a touch of glamour, especially when it develops a natural patina over time. Matte black feels modern and grounded, pairing well with wood tones and white marble. Textured plaster brings an artisan, earthy vibe that softens the kitchen's hard surfaces.
- For a more industrial look, consider raw steel or copper, but be prepared for them to age and change character.
Sizing And Placement Tips
Your hood should be at least as wide as your cooktop, ideally a few inches wider for better capture. Hang it 24 to 30 inches above a gas range and 18 to 24 inches above an electric one. If you have high ceilings, a longer chimney or a custom drywall surround can help the hood feel proportional and intentional.
Finishing Touch: Lighting Integration
Many statement hoods come with integrated under-hood lighting, but you can also add a small pendant or two on either side for extra task lighting and ambiance. Warm LED bulbs (2700K to 3000K) will keep the space feeling cozy and highlight the hood's texture and shape without harsh glare.
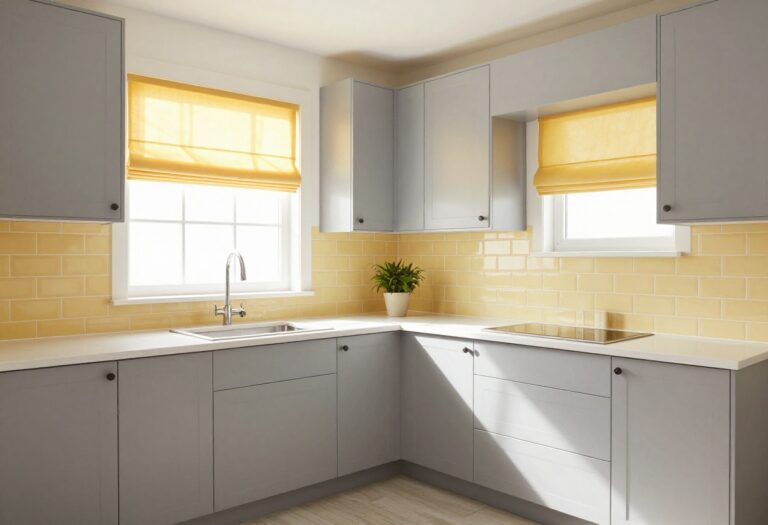
4. Mixed Metal Finishes for a Collected Vibe
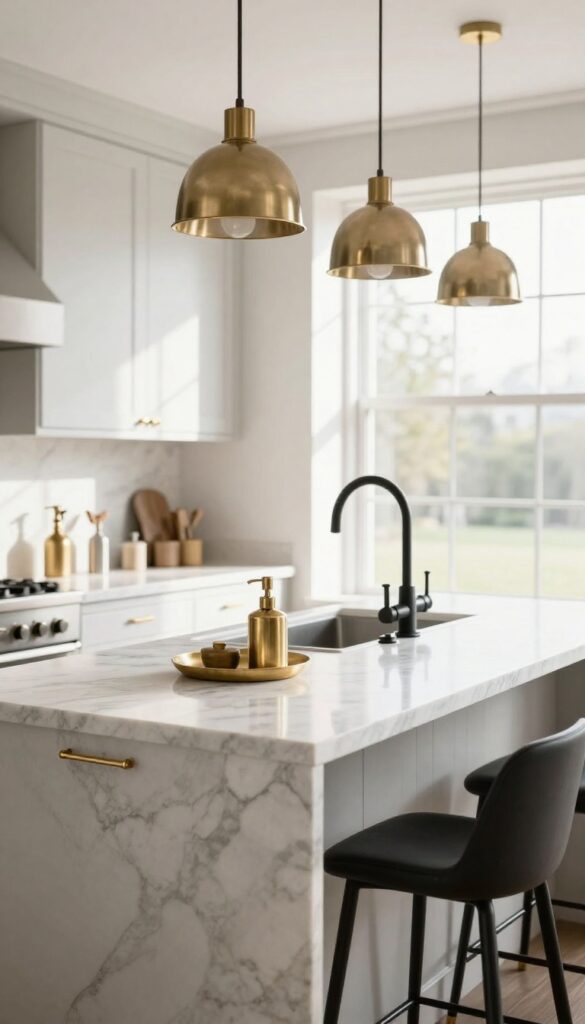
Gone are the days when every metal in a kitchen had to match. Today’s luxury kitchens feel more like curated spaces, where brass, chrome, and black finishes live together in harmony. The trick is to pick two or three finishes and repeat them intentionally across hardware, lighting, and faucets.
This approach adds depth and a warm, lived-in feel that never looks fussy.
Mixing metals is one of the easiest ways to add personality to your kitchen without a full renovation. It creates visual interest and a collected-over-time look that feels both luxurious and approachable. The key is balance: choose a dominant finish (like brushed brass) and use the others as accents.
For example, pair brass cabinet pulls with a matte black faucet and chrome pendant lights. Repeat those finishes in small doses—a brass soap dispenser, black bar stools, chrome appliance handles—to tie the look together. Stick to warm or cool undertones to keep the palette cohesive.
Best Finishes To Pair
Start with a neutral base like satin brass, polished nickel, or matte black. Then add one accent finish, such as unlacquered brass for warmth or chrome for a crisp contrast. Avoid mixing more than three finishes, and keep undertones consistent—warm brass with warm black, cool chrome with cool stainless steel.
Where To Repeat Each Metal
Use your dominant finish on larger surfaces like cabinet hardware and light fixtures. Reserve the secondary finish for plumbing fixtures and the third for small decor like canisters, towel bars, or a pot filler. This repetition creates a rhythm that feels intentional, not random.
Finishing Touch
Add a single statement piece in a contrasting metal, like a brass faucet against a black sink or chrome shelves against brass hardware. This small surprise keeps the eye moving and makes the kitchen feel custom and collected.
5. A Cozy Seating Nook with Built-In Bench
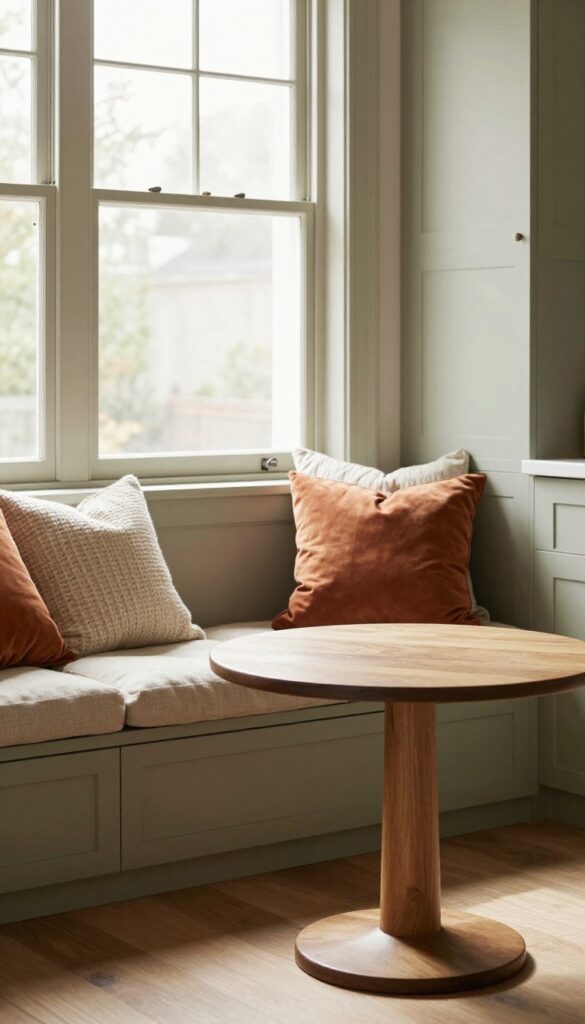
A built-in bench tucked under a window or along a wall can transform an awkward corner into your favorite spot in the kitchen. It’s not just about squeezing in extra seating—it’s about creating a place that feels intentional and inviting. With plush cushions, a small table, and soft pillows, this nook becomes perfect for quick breakfasts, coffee breaks, or just watching the rain while you wait for pasta to boil.
This idea works especially well in kitchens with unused alcoves, bay windows, or long blank walls. The bench itself can be custom-built or made from stock cabinets with a custom top—either way, it adds storage underneath and a cozy, lived-in feel above. Pair it with a round or rectangular table that fits the space, and you’ve got a breakfast spot that feels both practical and charming.
Best Colors
Stick with warm, earthy tones for the cushions and pillows to keep the nook feeling cozy. Think soft beige, warm gray, muted terracotta, or olive green. If your kitchen has white cabinets, a bench painted in a slightly deeper shade—like a soft sage or charcoal—adds contrast without feeling heavy.
Layout Tip
Measure the depth of your bench carefully—18 to 22 inches is comfortable for seating, but you’ll want at least 12 inches of legroom between the bench edge and the table. If the nook is tight, skip the table legs on the bench side and use a wall-mounted or pedestal table instead.
Cozy Detail
Add a few throw pillows in different textures—linen, velvet, or knitted cotton—to make the nook feel instantly inviting. A small pendant light or a swing-arm sconce above the table turns it into a well-lit spot for reading or morning coffee.
6. Layered Lighting with Warm Dimmer Controls

Lighting can make or break a kitchen, but it's often an afterthought. The trick isn't just adding more fixtures—it's layering them for different moments. Skip the single overhead light and think in zones: task lighting for prep, ambient light for dining, and accent lights to highlight textures.
Warm dimmer controls tie it all together, letting you shift from bright meal prep to soft dinner ambiance with a simple slide. This approach keeps the space functional without sacrificing the cozy, lived-in feel that makes a kitchen the heart of the home.
A single ceiling fixture leaves shadows on your countertops and a flat, uninspired glow. Instead, combine three layers: pendant lights over the island for a focal point, under-cabinet strips to eliminate shadows on your work surfaces, and a dimmer switch to adjust the mood. Stick with warm bulbs at 2700K—cooler temperatures can feel sterile, while warm light makes the room inviting.
This setup works in any kitchen size, from a compact galley to an open-plan layout, and it's surprisingly affordable to install.
Best Fixtures For Each Layer
- For pendants, choose glass or metal shades that direct light downward—avoid wide globes that create glare. Under-cabinet LED strips are easy to install with adhesive backing; look for ones with a color temperature switch so you can match your pendants. For ambient light, consider a flush-mount fixture or a small chandelier on a dimmer.
- The key is consistency: all bulbs should be the same warm tone to avoid a mismatched look.
Dimmer Placement And Control
- Install dimmers on all layers separately so you can control each zone independently. A smart dimmer system lets you adjust from your phone or set schedules—great for waking up to a softly lit kitchen. If you're on a budget, a simple slide dimmer for the overhead light and plug-in dimmers for under-cabinet strips work just as well.
- Test the dimming range: some LEDs flicker at low levels, so choose dimmable bulbs and check compatibility.
Styling The Warm Glow
Layer your lighting to highlight textures: let pendants cast a warm pool over a marble island, under-cabinet strips illuminate a textured subway tile backsplash, and a dimmed overhead light soften the edges. Add a few small lamps on the counter for extra warmth—a ceramic or brass base works beautifully. Avoid mixing too many fixture styles; stick to one finish (like brushed brass or matte black) for a cohesive look.
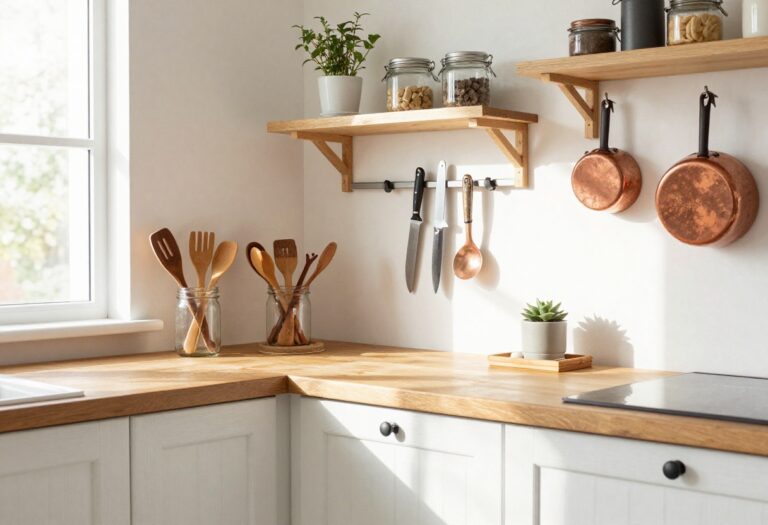
7. A Butcher Block Countertop Section for Prep
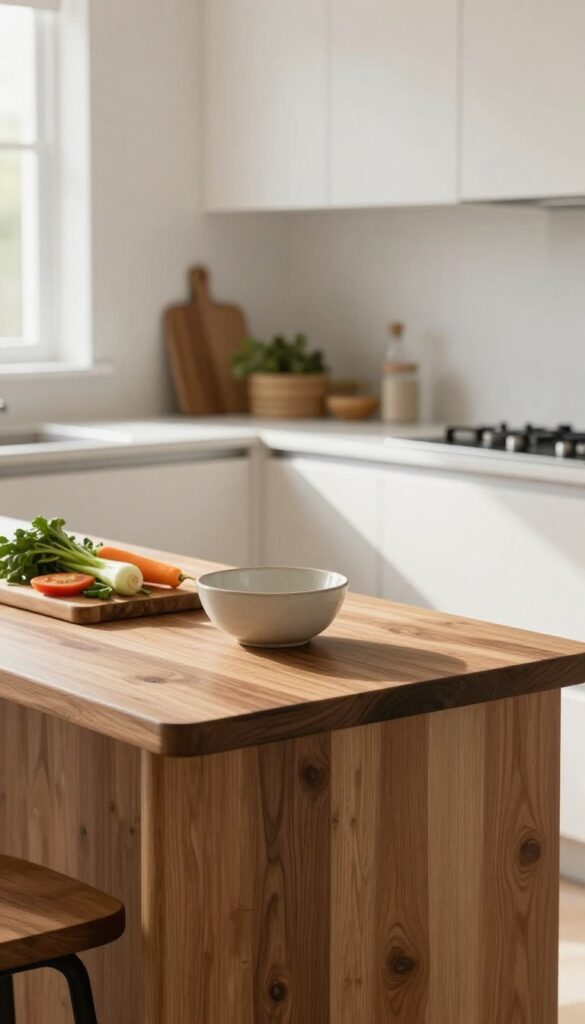
Adding a butcher block section to your countertops brings warmth and practicality into a modern kitchen. Unlike all-stone surfaces that can feel cold and hard, butcher block introduces a natural wood element that softens the overall look. It’s a dedicated zone for chopping, slicing, and food prep that also adds visual contrast and texture.
A butcher block countertop section is more than just a prep area—it’s a design statement that makes your kitchen feel lived-in and welcoming. The wood grain adds organic texture against sleek stone or quartz, creating a balanced, layered look. This idea works especially well in luxury kitchens where you want to avoid an overly sterile aesthetic.
Place it on a kitchen island or as a section of your perimeter countertop near the sink or stove for easy access.
Best Materials
- Choose a hardwood like maple, walnut, or oak for durability and rich color. Maple is light and classic, walnut adds a warm, dark tone, and oak offers a prominent grain. Look for end-grain butcher block for extra toughness and a beautiful checkerboard pattern.
- Avoid soft woods like pine that dent easily.
Layout Tip
Position the butcher block section near your main prep zone—ideally between the sink and stove. On an island, dedicate one side to butcher block and the other to stone or quartz for a seamless work triangle. Make sure the section is at least 24 inches wide for comfortable chopping space.
Finishing Touch
Keep the wood protected with a food-safe mineral oil or beeswax finish. Reapply every few months to maintain the warm glow and prevent drying. Pair with a simple wooden cutting board or a knife block to reinforce the practical, lived-in feel.
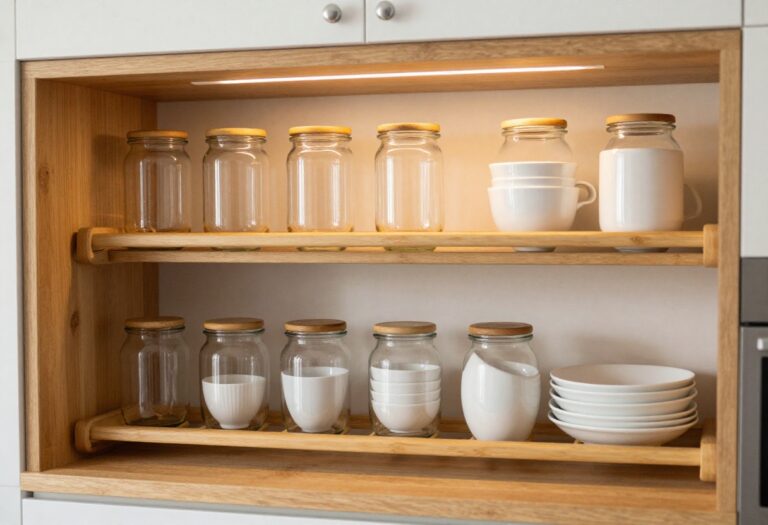
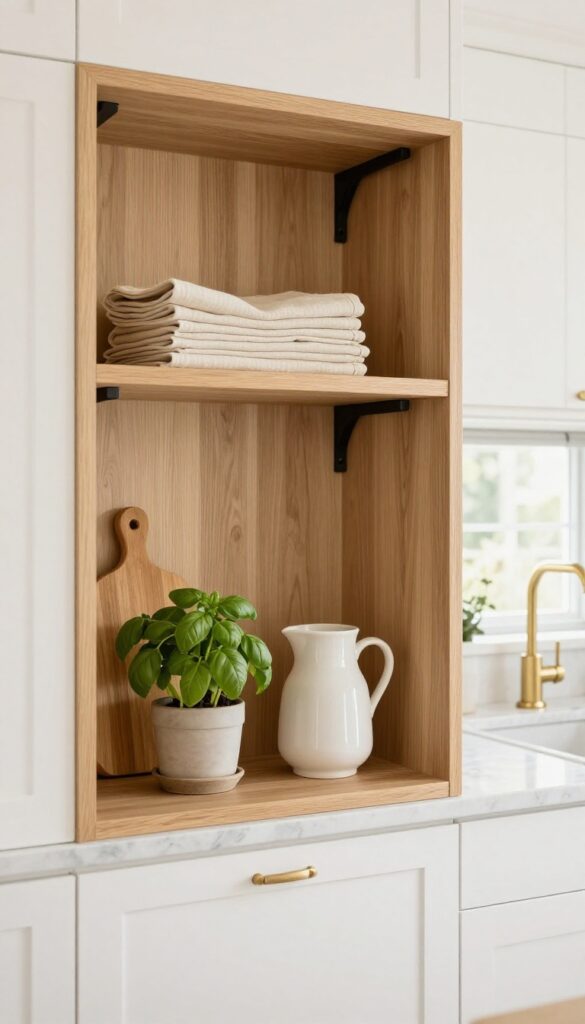
8. Glass-Front Cabinets with Soft Interior Lighting
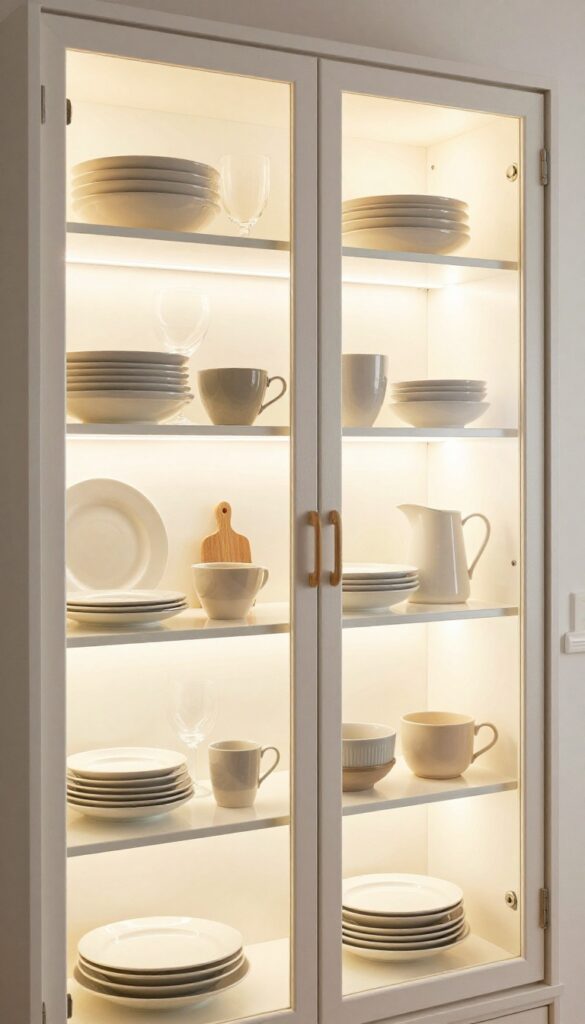
Glass-front upper cabinets strike a balance between openness and storage, letting you show off curated dishware while keeping everyday items out of sight below. The key is to treat those shelves like a display—think matching white plates, simple glassware, or a few ceramic pieces in neutral tones. When you add warm LED strips inside, the whole cabinet glows softly, making the kitchen feel deeper and more inviting without being overly dramatic.
Glass-front cabinets work best when the contents feel intentional, not cluttered. Stick to a cohesive color palette—cream, beige, or soft gray—and repeat shapes for visual rhythm. The interior lighting should be warm white (around 2700K) to avoid a clinical look.
Install the strips on the top edge of each shelf so light washes down evenly. This setup makes even basic dishes look special and adds a cozy, lived-in glow that feels both practical and stylish.
Shelf Styling Tip
- Group items in odd numbers and vary heights. Stack plates flat, lean a small cutting board, and place a ceramic pitcher or vase as a focal point. Leave about 30% of the shelf empty to avoid a packed look.
- Rotate seasonal pieces—like amber glass in fall or pastel ceramics in spring—to keep the display fresh without buying new things.
Lighting Tip
- Use dimmable LED tape with a color temperature between 2700K and 3000K. Wire it to a switch near the cabinet or use a smart plug for voice control. For a subtle effect, place the strip behind a small lip so the light source is hidden and only the glow shows.
- Avoid cool white or blue tones—they make dishes look sterile.
Best Materials
- Choose clear glass (not frosted) for maximum visibility. Pair with simple wood or painted frames in matte finishes—oak, walnut, or soft sage green work well. If you have open shelving elsewhere, glass-front cabinets offer a similar display feel but keep dust off your dishes.
- Metal frames in brass or black add a modern touch, but keep hardware minimal.
9. A Large Apron Sink with a Gooseneck Faucet
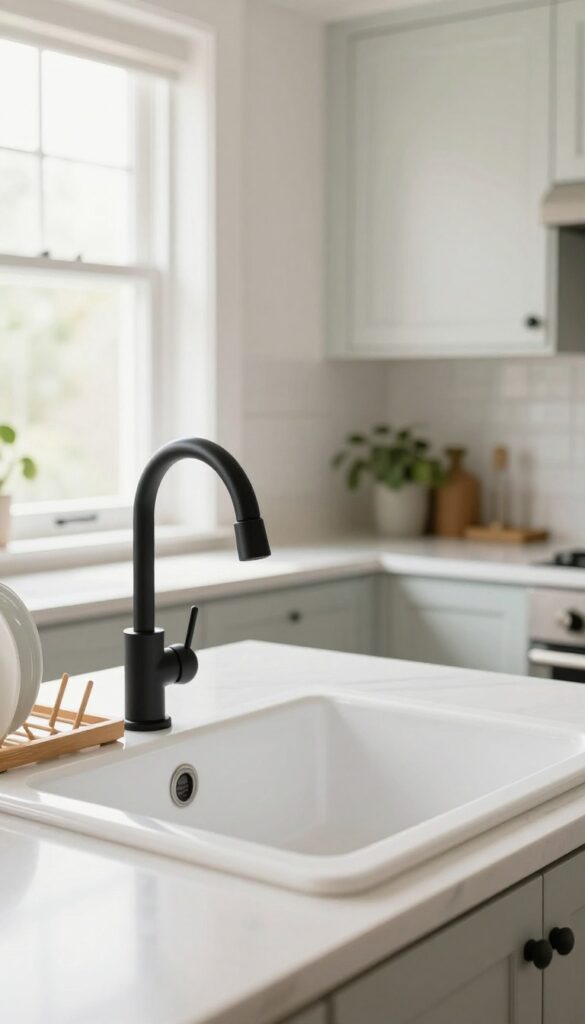
A deep apron sink instantly changes the feel of a kitchen—it’s both a workhorse and a statement piece. The exposed front, often in fireclay or stainless steel, brings a touch of farmhouse charm without going overboard. Pair it with a high-arc gooseneck faucet, and you’ve got a setup that makes washing large pots and pans feel effortless.
The contrast between the sink’s clean lines and the faucet’s graceful curve adds a layer of visual interest that feels both practical and polished.
A large apron sink is one of those upgrades that makes daily tasks genuinely easier. The deep basin can handle everything from soaking baking sheets to rinsing bulky produce. Fireclay offers a smooth, glossy finish that resists stains and chips, while stainless steel gives a more industrial, durable look.
Whichever you choose, the exposed front becomes a focal point—so keep the area around it uncluttered. A gooseneck faucet with a pull-down sprayer adds flexibility, making it simple to direct water exactly where you need it. To soften the utilitarian edge, place a wooden drying rack beside the sink.
The natural wood tones warm up the space and create a lived-in feel. Stick with a single, well-crafted rack rather than a pile of dish towels to keep the look intentional.
Best Materials
Fireclay is the top pick for a classic farmhouse vibe—it’s non-porous, easy to clean, and comes in warm whites or soft grays. If you prefer a more modern edge, brushed stainless steel resists scratches and hides water spots well. For the faucet, choose a solid brass or matte black finish to add contrast against lighter sinks.
Styling Tip
- Keep the counter around the sink minimal. A small soap dispenser, a single plant, and that wooden drying rack are all you need. Let the sink and faucet be the stars.
- Add a textured runner in front of the sink—something like a striped cotton or a flat-weave wool—to define the work zone and add warmth underfoot.
Finishing Touch
Install a gooseneck faucet with a spring coil for extra character. The coil adds a subtle industrial detail that balances the farmhouse sink. If your kitchen leans more traditional, a smooth curved gooseneck in polished nickel or chrome keeps things elegant and easy to wipe down.
10. Natural Stone Backsplash with Movement
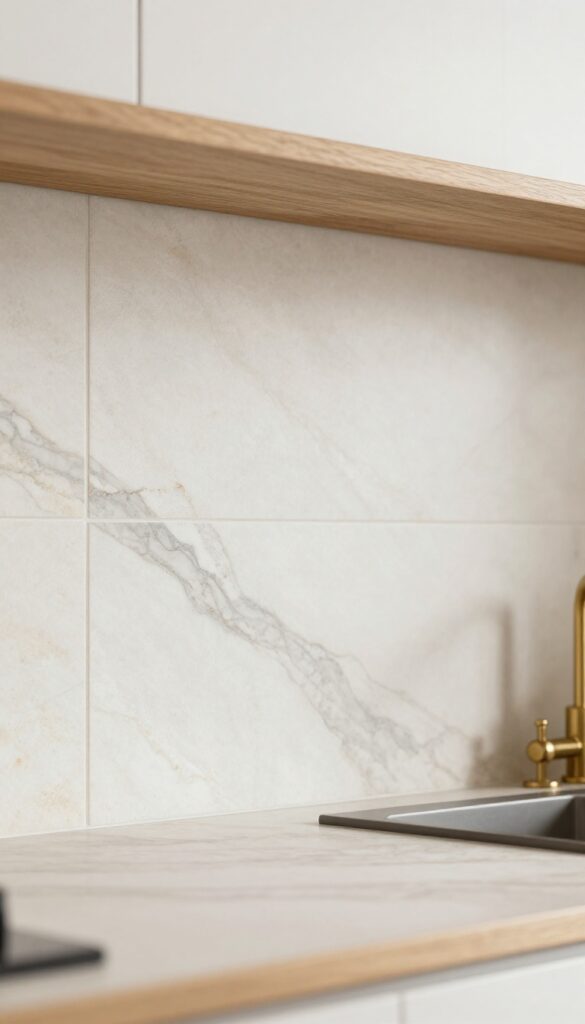
A kitchen backsplash does more than protect your walls—it sets the tone for the whole room. Natural stone with subtle veining brings a quiet elegance that feels warm and lived-in, not cold or showroom-perfect. Marble or quartzite in soft neutrals adds texture and depth without overwhelming the space, making it a practical choice for everyday cooking and gathering.
Choose a marble or quartzite backsplash with subtle veining. It adds elegance without being too busy. Use large slabs or subway tiles for a clean look that’s easy to wipe down.
The key is letting the stone’s natural movement shine—think soft gray veins on a creamy white background or gentle gold streaks on warm beige. This approach keeps the kitchen feeling grounded and inviting, not sterile.
Best Stone Choices
Carrara marble offers classic gray veining that blends with almost any cabinet color. For something more durable, quartzite like Taj Mahal or White Macaubas resists heat and scratches while still looking organic. Avoid heavily patterned stones if you want a calm backdrop—stick to low-contrast veining that reads as texture, not chaos.
Layout And Installation
Large format slabs (like 4×8 feet) create a seamless look with fewer grout lines, which is both stylish and easy to clean. If your budget is tighter, subway tiles in a stacked or herringbone pattern work beautifully with natural stone. Just make sure the tiles are rectified for tight joints and use a matching grout color to keep the focus on the stone.
Styling For Warmth
Balance the stone’s cool elegance with warm wood open shelving or brass fixtures. A few ceramic canisters or a small vase with dried eucalyptus on the counter add softness. Keep the area around the backsplash uncluttered so the veining remains the star—this is where the lived-in feel comes from, not from stuffiness.
11. A Hidden Pantry with Sliding Barn Doors
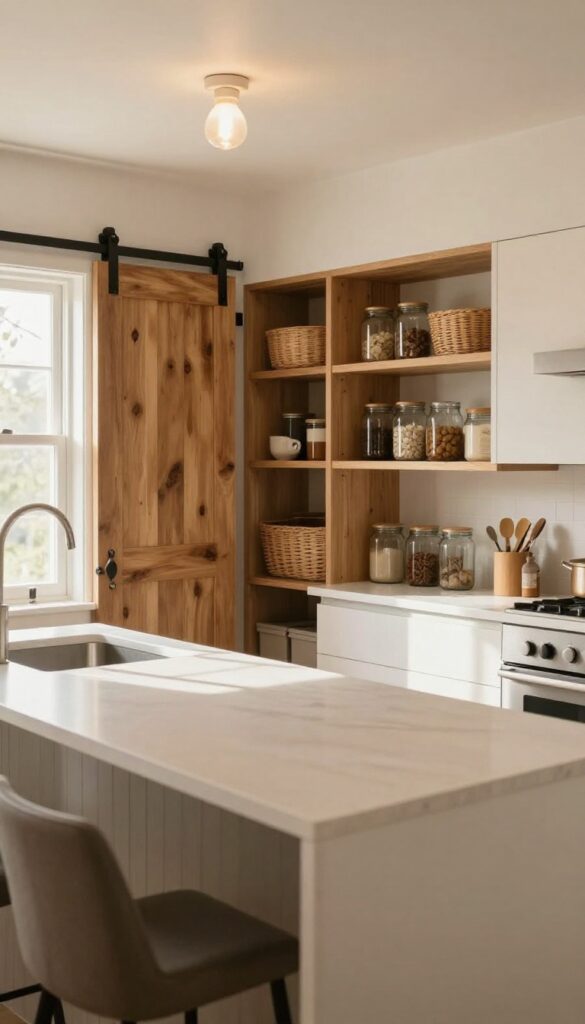
A walk-in pantry tucked behind sliding barn doors adds serious function without sacrificing style. The door becomes a focal point, while the pantry keeps countertops clear and clutter hidden. It's a practical upgrade that feels custom and polished, whether your kitchen leans farmhouse, modern, or somewhere in between.
Sliding barn doors save space since they don't swing out, making them ideal for tight kitchens or awkward layouts. Inside, open shelving and woven baskets keep everything organized and easy to grab. The door itself can be a warm wood tone for a cozy feel or matte black for a sleek contrast.
This setup works especially well in open-plan homes where the pantry is visible from the living area.
Best Materials For The Door
Reclaimed wood adds character and warmth, while a smooth MDF slab painted in a deep charcoal or soft white keeps things clean and modern. For a rustic touch, go with a distressed oak or pine. If you prefer an industrial vibe, a black steel frame with wire mesh panels looks sharp and lets you see inside.
Storage And Organization Inside
- Maximize vertical space with floor-to-ceiling open shelves. Use clear jars for dry goods and labeled baskets for snacks, spices, or small packets. A narrow cart or pull-out drawers on the bottom make heavy items like cans and bottles easy to access.
- Keep the most-used items at eye level for quick grabbing.
Finishing Touches That Make It Feel Intentional
Add a small pendant light or battery-operated puck lights inside so you can see everything. A coat of chalkboard paint on one wall lets you jot down grocery lists or meal plans. Even a simple hook on the door for a favorite apron or reusable bags adds a lived-in, practical charm.
FAQ
How can I make my modern kitchen feel warmer?
Add natural materials like wood, linen, and stone. Use warm lighting with dimmers, and incorporate soft textiles such as a runner or seat cushions. Small touches like open shelving with ceramics also help.
What are affordable ways to get a luxury kitchen look?
Swap out hardware for brass or matte black, add under-cabinet lighting, and paint cabinets in a soft neutral. A new backsplash or a statement light fixture can also elevate the space without a full remodel.
Should I mix metals in my kitchen?
Yes, mixing metals adds depth and a curated feel. Stick to two or three finishes—like brass, chrome, and black—and repeat them in hardware, faucets, and lighting for a cohesive look.
What type of lighting is best for a dream kitchen?
Layer different types: ambient (overhead), task (under-cabinet), and accent (inside glass cabinets). Use warm bulbs around 2700K and install dimmers to adjust the mood from bright prep to cozy dining.
How do I keep open shelving from looking messy?
Limit what you display to items you use daily, like plates, glasses, or jars. Stick to a cohesive color palette and leave some empty space. Group similar items together for a curated, not cluttered, look.
Conclusion
Bringing a touch of luxury into your kitchen doesn’t mean sacrificing comfort. The most inspiring modern homes prove that warmth and practicality can coexist with sleek design. Start with one or two ideas that feel right for your space, and let your kitchen evolve naturally.
Remember, the goal is a room that feels both beautiful and lived-in. Whether it’s a wooden island, a cozy nook, or layered lighting, small changes can make your kitchen the heart of your home—just the way it should be.