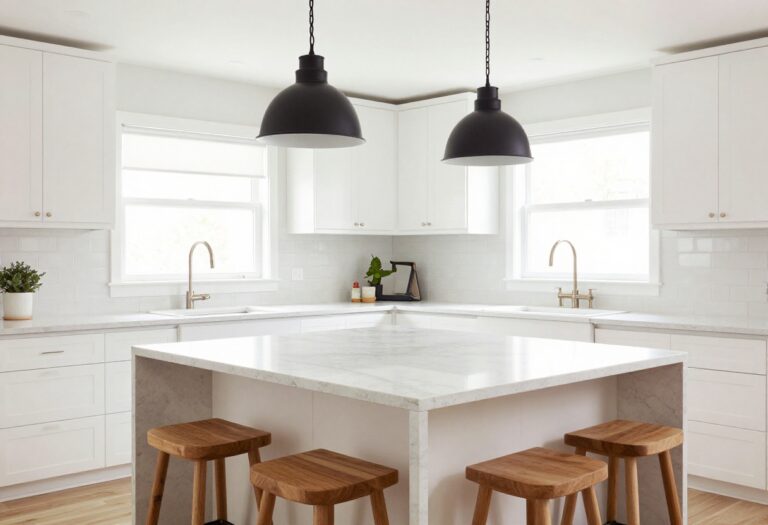
13 Apartment Kitchen Ideas Rental Homes Can Use Easily
Rental kitchens often come with a few built-in challenges: limited counter space, outdated cabinets, and that one drawer that refuses to open smoothly. But just because you can't paint the walls or swap out the countertops doesn't mean you're stuck with a boring, cluttered space.
With a little creativity and some renter-friendly tweaks, you can turn your apartment kitchen into a spot that feels both organized and inviting. The trick is to focus on storage-smart solutions that add personality without breaking your lease or your budget.
From clever vertical storage to temporary upgrades that peel off when you move, these 13 ideas are designed to work with what you've got—not against it.
1. Hang a Pegboard for Instant Vertical Storage
Kitchens in rental apartments often come with limited cabinet space and awkward empty walls. Instead of fighting for drawer room, look up. A pegboard turns bare wall into a flexible storage system that keeps your most-used tools visible and within arm's reach.
It's an easy weekend project that doesn't require permanent changes, and it adds a workshop-chic vibe that feels intentional rather than makeshift.
Mounting a pegboard is one of the smartest ways to reclaim vertical real estate in a rental kitchen. You can hang pots, pans, utensils, measuring cups, and even small cutting boards without drilling into cabinets or sacrificing counter space. The beauty of a pegboard is its adaptability: as your cooking habits change, you simply move the hooks around.
Plus, it becomes a design feature when styled thoughtfully—think of it as functional wall art. For renters, adhesive strips or removable hanging rails can hold lightweight pegboards without damaging paint, so you can take it down when you move out.
Best Materials
- Go for a wooden pegboard if you want warmth and a natural feel, or choose a white metal version for a clean, modern look. Wood works beautifully with warm-toned kitchens, while metal suits industrial or minimalist spaces. Avoid plastic pegboards—they tend to warp and look cheap.
- A 2×3-foot board is a good starting size for most rental kitchens.
Layout Tip
Place the pegboard on the wall between countertops and upper cabinets, or inside a cabinet door for hidden storage. Group items by use: keep cooking utensils near the stove, measuring spoons near the prep area, and pots within easy reach of the sink. Leave some empty space so the board doesn't look cluttered.
Styling Detail
Paint the pegboard to match your wall color for a seamless look, or contrast it with a bold hue like navy or mustard. Add small baskets on hooks for storing garlic, onions, or tea towels. A few trailing plants in small pots on the top row soften the industrial edge and bring life to the setup.
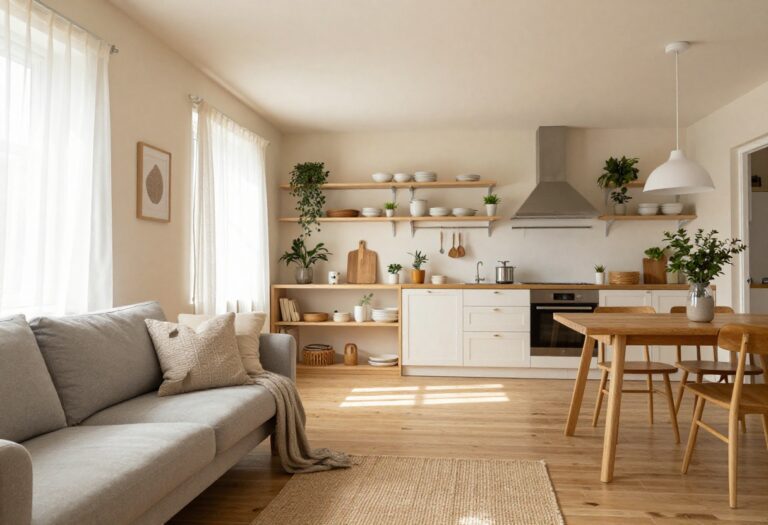
2. Swap Cabinet Doors for Open Shelving (Temporarily
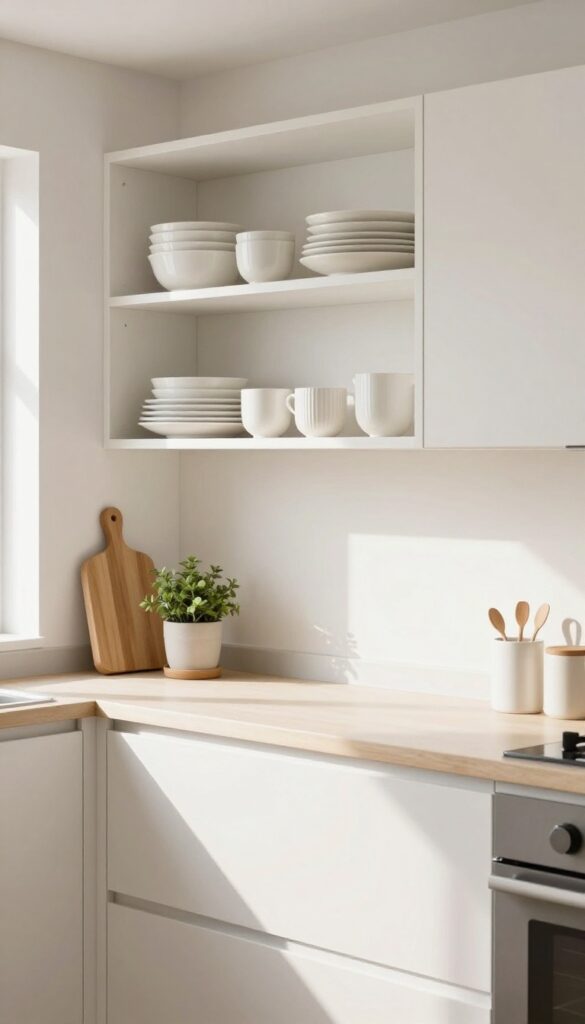
If your rental kitchen feels closed in and dark, those upper cabinets might be the culprit. Removing the doors (and storing them safely) instantly opens up the room and gives you a chance to style your everyday dishes like a decor piece. It’s a low-commitment, high-impact change that makes grabbing a mug feel more intentional.
This idea works best in smaller kitchens where every inch of visual space counts. Without cabinet fronts, the eye travels farther, making the room feel bigger and airier. Plus, you’ll actually use what you have instead of letting things hide in the back.
Just keep it tidy—open shelves show everything, so a quick edit of your most-used items creates a clean, curated look.
Best Items To Display
Stick with everyday dishes in a cohesive color palette—white, cream, or soft gray keep things calm. Mix in a few glass jars for dry goods, a small plant, or a wooden cutting board for warmth. Avoid overcrowding; leave breathing room between groups.
Storage Tip
Use the lower cabinets for items you don’t use daily. This swap is about accessibility, so keep your most-used plates, bowls, and glasses on the open shelves. Store bulky appliances or rarely used gadgets behind closed doors below.
Renter-friendly Note
Before removing doors, check with your landlord or take photos of the hinges. Store the doors flat in a closet or under the bed. When it’s time to move out, reattach them—no one will ever know.
3. Use a Rolling Cart as a Mobile Island
Counter space is prime real estate in a rental kitchen, and sometimes you just need a little more elbow room. A slim rolling cart slides into that awkward gap between the fridge and the wall or tucks under a window, giving you extra prep space without a permanent footprint. Plus, it’s on wheels, so you can roll it right where you need it and stash it away when you’re done.
A rolling cart is the ultimate small-kitchen hack—it’s like having a mini island that doesn’t require a renovation. Use it as a coffee station in the morning, a prep area while cooking, or extra storage for pantry overflow. The key is choosing a cart that fits your style: metal and wood for a farmhouse vibe, sleek stainless steel for modern, or a colorful enamel top for a pop of personality.
Best Materials And Finishes
- Look for a cart with a sturdy frame—metal or solid wood—and a surface that can handle spills. Butcher block tops are great for chopping, while stainless steel feels clean and resists stains. If you want to warm up the space, go for a wood top with a white or black metal base.
- For a budget-friendly option, a simple wire cart with a wooden cutting board on top works wonders.
Storage And Styling Tips
- Use the shelves to store everyday items like oils, spices, and small appliances. Keep the top clear for prep or a coffee setup. Add a small plant or a pretty canister for visual interest.
- If your cart is in a high-traffic area, choose one with locking wheels so it stays put when you need it.
Small-space Layout Fix
- Measure the gap you plan to slide the cart into—most standard carts are 15 to 18 inches wide. If you have a narrow galley kitchen, place the cart against an empty wall or next to the stove. When not in use, roll it under a counter overhang or into a closet.
- This way, you gain counter space without losing floor space.
4. Install Under-Shelf Baskets for Extra Pantry Space
Kitchen cabinets can feel like a black hole for small items—spices vanish, snack packs get buried, and you end up buying duplicates. Under-shelf baskets are a simple fix that turns wasted vertical airspace into organized storage. Clip a few onto existing shelves, and suddenly you have a dedicated spot for tea bags, seasoning packets, or cleaning wipes.
It's a low-cost upgrade that makes a big difference in how your kitchen functions day to day.
Under-shelf baskets work best in upper cabinets or open shelving where you have a few inches of clearance below the shelf. They're especially handy in rental kitchens where you can't add permanent shelving. Choose wire baskets with a clean finish—black or chrome blends in easily—and make sure the clips are sturdy enough to hold weight.
Use them for lightweight items like spice jars, foil rolls, or dish towels. For heavier pantry staples, stick with baskets that have reinforced hooks. The key is to keep things visible and accessible, so you're not digging through a pile every time you cook.
Where To Place Them
- Focus on upper cabinets above your prep area or the section of shelving that holds dry goods. Avoid putting them over the stove or sink where heat and moisture can damage the contents. If you have open shelving, clip baskets underneath the lowest shelf to keep countertops clear.
- In a pantry cabinet, use them on the door or under the shelf that holds taller items—this creates a second layer of storage without sacrificing space.
Best Items To Store
- Think small and frequently used: spice blends, tea bags, instant coffee packets, snack-size chips, or cleaning tablets. You can also store kitchen tools like measuring spoons, vegetable peelers, or small tongs. Avoid heavy cans or glass jars that could strain the clips.
- For a tidy look, group similar items together in the same basket—all baking spices in one, all tea bags in another.
Styling And Finishing Touch
- To keep the kitchen feeling cohesive, match the basket finish to your cabinet hardware. If your pulls are brushed nickel, go with silver-toned wire baskets. For a warmer look, choose bronze or copper.
- Add a small label on the front of each basket using a label maker or chalk pen—this makes it easy for everyone in the household to find and put things back. The result is a kitchen that feels organized without looking cluttered.
5. Add a Peel-and-Stick Backsplash for Instant Polish
Rental kitchens often come with boring, builder-grade backsplashes—or none at all. A peel-and-stick backsplash is the easiest way to add color, texture, and a finished look without breaking your lease or your budget. These removable tiles or sheets go up in minutes, protect the walls from splatters, and peel off cleanly when it's time to move out.
It's a low-commitment upgrade that makes the whole kitchen feel more intentional and polished.
Peel-and-stick backsplashes have come a long way from the flimsy vinyl squares of the past. Today, you can find options that mimic real subway tile, marble, hexagon patterns, or even textured stone. They're waterproof, easy to wipe down, and surprisingly durable.
The best part? You don't need any special tools—just a ruler, a utility knife, and a little patience to line up the pattern. For renters, this is a game-changer: you get the look of a tiled backsplash without the permanence or the cost.
Best Materials To Look For
- Stick with high-quality vinyl or gel-based tiles that have a realistic finish. Avoid the cheapest options—they often look plasticky and don't adhere well. Look for products with a strong adhesive backing and a smooth, grout-like finish between tiles.
- Some brands even offer metallic or glass-look options that catch the light beautifully.
Small-space Fix: Go Full Height
In a compact kitchen, running the backsplash all the way from the counter to the upper cabinets—or even to the ceiling—creates a seamless, expansive feel. It draws the eye upward and makes the room appear larger. If your kitchen has open shelving, carry the backsplash behind the shelves for a cohesive look.
Styling Tip: Coordinate With Countertops
- Choose a backsplash color that complements your countertops, not just your cabinets. If you have white counters, a soft sage or pale blue tile adds warmth. For butcher block or dark counters, a white marble-look backsplash keeps things bright.
- A little contrast goes a long way in making the kitchen feel custom.
6. Magnetize Your Knife Block and Spice Jars
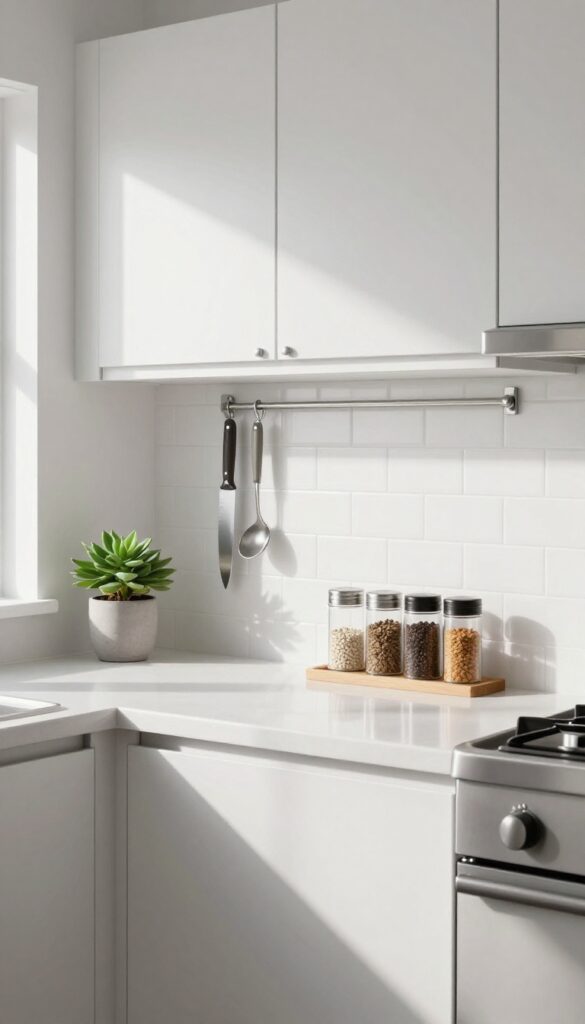
Counter space is precious in a rental kitchen, and bulky knife blocks or spice racks eat up way too much of it. A magnetic strip mounted on the wall or under a cabinet changes the game entirely. It keeps your most-used tools within arm's reach while freeing up that valuable real estate for food prep or a small plant.
Plus, it looks sleek and modern, like something out of a chef's kitchen.
A magnetic strip isn't just for knives—you can also use it to hold spice tins, metal utensils, or even small tools like vegetable peelers. The key is choosing a strip that's strong enough to hold your heaviest chef's knife securely. Install it in a spot that's convenient but out of the way of busy countertop zones.
Under-cabinet placement works wonders in small kitchens, keeping everything visible but not cluttering the workspace.
Best Materials And Finishes
Look for a magnetic strip made of stainless steel or brushed nickel to resist rust and match common rental kitchen hardware. Black strips offer a nice contrast against white subway tile, while silver blends in seamlessly with stainless steel appliances. Some strips come with a wood veneer for a warmer look that pairs well with butcher block counters.
Installation Without Drilling
Renters can use heavy-duty adhesive strips or magnetic tape designed for smooth surfaces like tile or painted drywall. Just make sure the surface is clean and dry before sticking. For a more permanent feel without damaging walls, consider a strip that mounts with removable 3M Command strips rated for the weight of your knives.
Styling Your Magnetic Strip
- Arrange knives by size with the heaviest closest to the center for balance. Leave a little space between each item so the strip doesn't look cluttered. You can also hang a small metal tin for odds and ends like bottle openers or measuring spoons.
- Keep the look intentional and minimal—this is functional decor, not a catch-all.
7. Use Tension Rods to Create Dividers Inside Cabinets
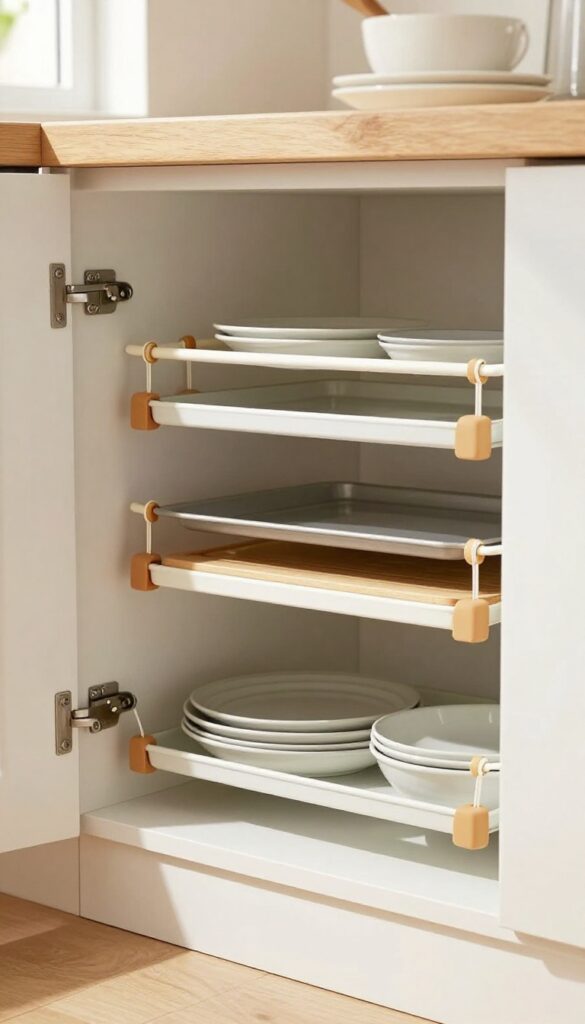
Kitchen cabinets can quickly become a chaotic jumble of baking sheets, cutting boards, and pot lids. Every time you reach for one, the whole stack threatens to avalanche. Tension rods are a simple, renter-friendly fix that brings order without any drilling or permanent changes.
Tension rods are incredibly versatile and can be installed vertically or horizontally inside your cabinets. Place one vertically to create a dedicated slot for baking sheets or cutting boards, keeping them upright and easy to grab. Use them horizontally to separate pot lids by size, or even to hang spray bottles and cleaning supplies.
The best part? They adjust to fit most cabinet widths and require no tools—just twist and lock into place. This small change makes a huge difference in daily kitchen flow, saving you from frustrating searches and toppling stacks.
Best Placement Tips
For maximum efficiency, install tension rods near the back of the cabinet so they don't interfere with items stored in front. In a deep cabinet, use two rods to create multiple vertical dividers. If your cabinet is shallow, a single horizontal rod near the door can keep lids from sliding forward.
Materials That Work Best
Look for tension rods with rubber ends to grip cabinet walls securely without scratching. Metal rods are durable and easy to clean, while plastic ones are lighter and often cheaper. Choose a rod that matches your cabinet hardware—silver, white, or black—for a cohesive look.
Small-space Bonus Idea
In a tiny apartment kitchen, use a tension rod under the sink to hang cleaning spray bottles, freeing up floor space. You can also install one inside a pantry cabinet to hold chip clips, measuring spoons, or even small cutting boards. It's a low-cost, high-impact storage hack.
8. Layer a Runner Rug for Warmth and Definition
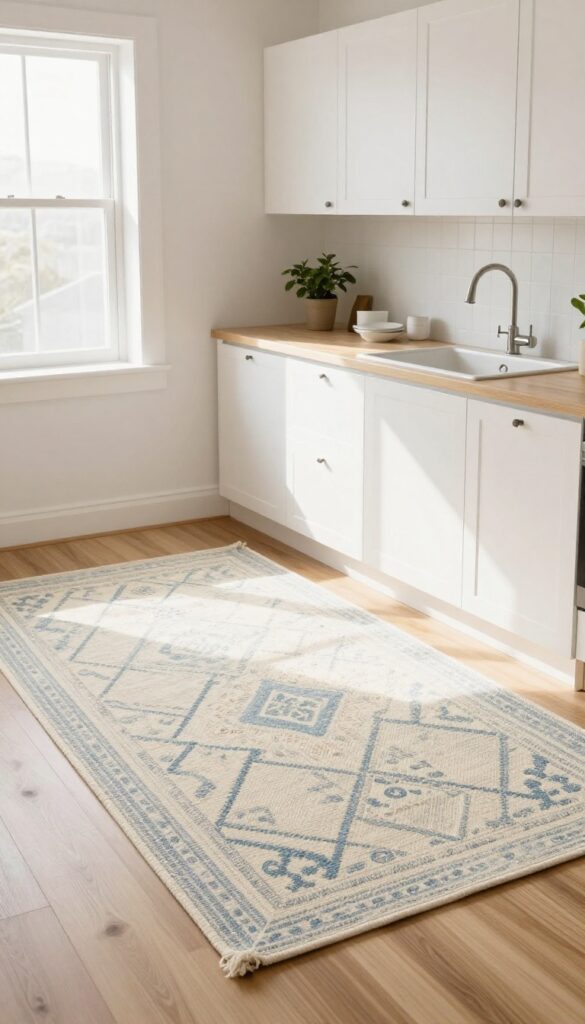
A runner rug does more than protect your floors—it anchors the busiest part of your kitchen. Placing a washable runner in front of the sink or stove adds a soft layer underfoot, breaks up expanses of tile or wood, and visually defines your main work zone. For rental kitchens, it’s an easy swap that brings color and texture without any permanent changes.
Runners are a low-commitment way to introduce pattern and warmth into a kitchen that might otherwise feel sterile or temporary. Because you can roll it up and take it with you, it’s perfect for renters who want to personalize without painting or tiling. Look for low-pile or flatweave styles that won’t trap crumbs and can be tossed in the washing machine.
A runner also helps reduce noise and makes standing for long periods a little easier on your joints.
Best Materials For A Rental Kitchen
- Stick with natural fibers like cotton, wool, or a cotton-wool blend for durability and easy care. Flatweave cotton rugs are lightweight and machine-washable, while wool offers stain resistance and a soft feel. Avoid high-pile or shag rugs—they trap food debris and are harder to clean.
- If you’re on a budget, look for indoor-outdoor rugs that mimic natural textures but are completely waterproof.
Placement And Size Tips
- Measure the length of your sink or stove area and add at least 12–18 inches on each side so the rug extends beyond the cabinet fronts. A 2×3 or 2.5×4 foot runner works well for most standard kitchens. Place it so the front edge sits just under the toe kick of the cabinets—this keeps it from curling up and creates a seamless look.
- If you have a galley kitchen, a single long runner down the center can visually widen the space.
Color And Pattern To Hide Wear
- Choose a runner with a busy pattern or a dark background—think navy, charcoal, or deep green—to hide inevitable spills and stains. Geometric prints, stripes, or subtle Moroccan motifs add visual interest without overwhelming a small kitchen. If your rental has neutral countertops and cabinets, a patterned runner can act as the room’s focal point.
- For a more cohesive look, pull one color from the rug into your dish towels or counter accessories.
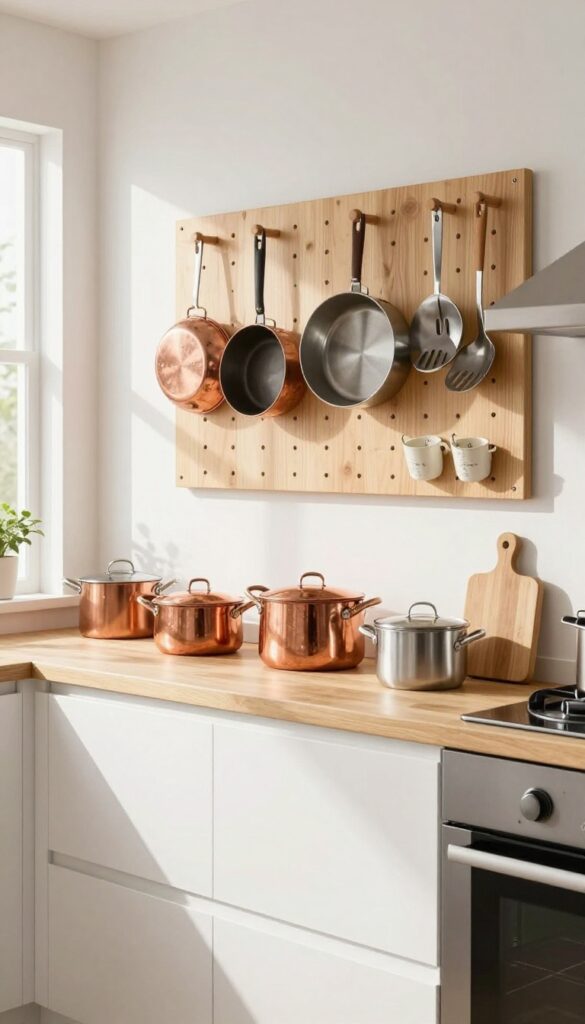
9. Store Pots and Pans on a Wall-Mounted Rail
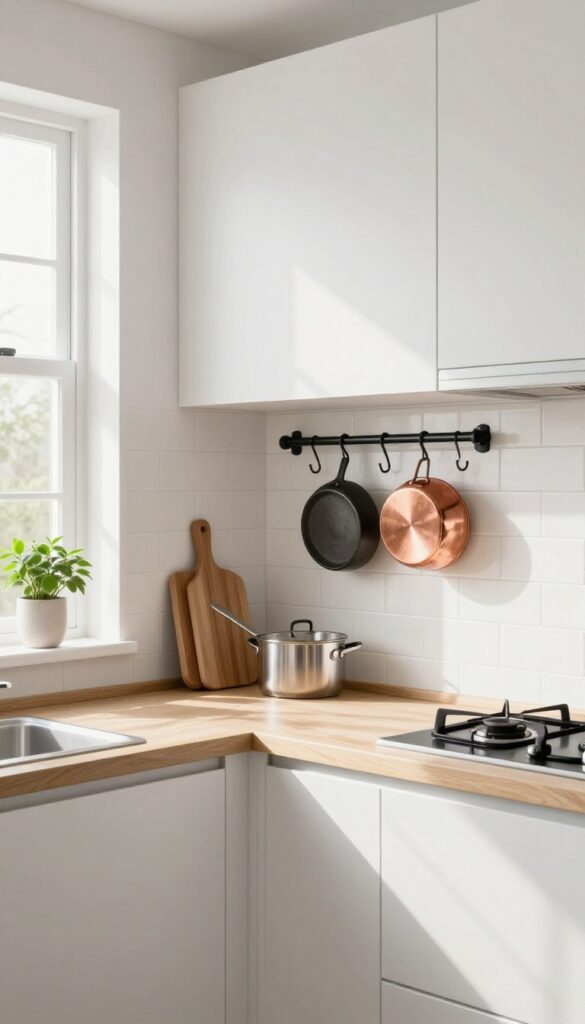
If your cabinets are bursting at the seams, it might be time to take your cookware out of hiding. A wall-mounted rail with S-hooks lets you hang pots, pans, and even utensils right where you can see them. It frees up precious cabinet space and adds a cozy, professional-kitchen vibe to your rental.
Plus, it turns everyday tools into part of the decor—functional and stylish at the same time.
This idea works especially well in small kitchens where every inch counts. By moving bulky pots and pans to the wall, you instantly open up storage for dry goods, dishes, or small appliances. The rail itself becomes a design feature, especially when you choose a finish that complements your hardware—like matte black for modern spaces or brass for a warm touch.
Hang your most-used pieces for easy access, and leave the rarely used ones in cabinets. It's a practical swap that makes cooking feel more intentional and your kitchen look more put-together.
Best Materials And Finishes
- Stainless steel rails are durable and match most kitchens, but if you want a bit of personality, go for copper or brass—they warm up the space and look great against white or gray walls. For a rental, look for adhesive or clamp-on rails that don't require drilling. Just make sure the rail is sturdy enough to hold heavier cast iron or Dutch ovens.
- S-hooks in the same finish keep the look cohesive.
Layout Tip
Mount the rail above your stove or countertop, but leave enough clearance so pots don't bump into burners or block your view. A good height is about 12 to 18 inches above the counter. If you have a backsplash, the rail can double as a decorative element—especially if you arrange pots by size or color for a curated look.
Small-space Fix
- In a tiny kitchen, a single rail can hold a surprising amount. Use it for your go-to skillet, a couple of saucepans, and a colander. You can also hang measuring cups or wooden spoons from extra hooks.
- To keep it from feeling cluttered, stick to one rail per wall and limit yourself to five or six pieces. This way, it stays functional without overwhelming the space.
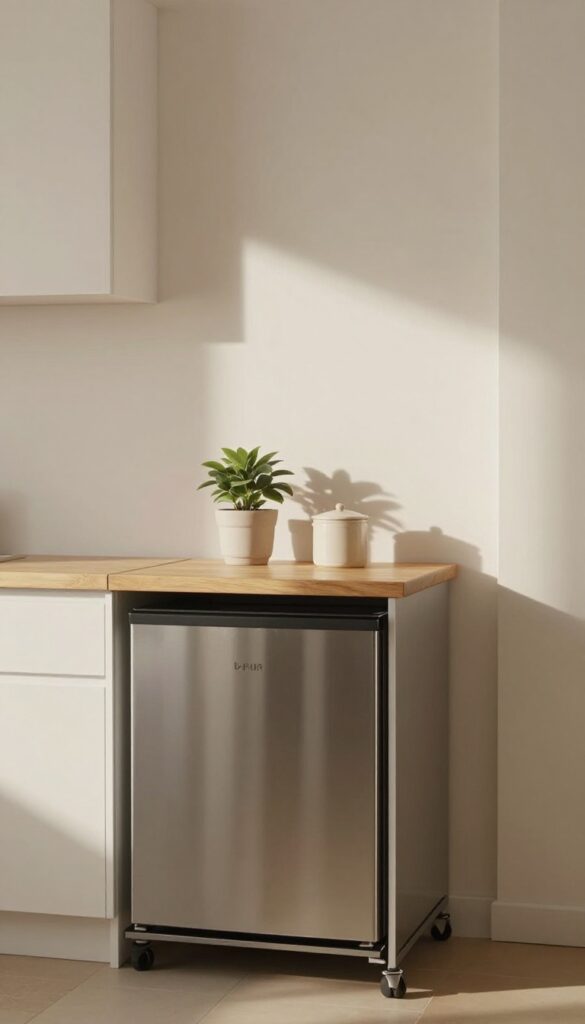
10. Add a Slim Cart Between the Fridge and Counter
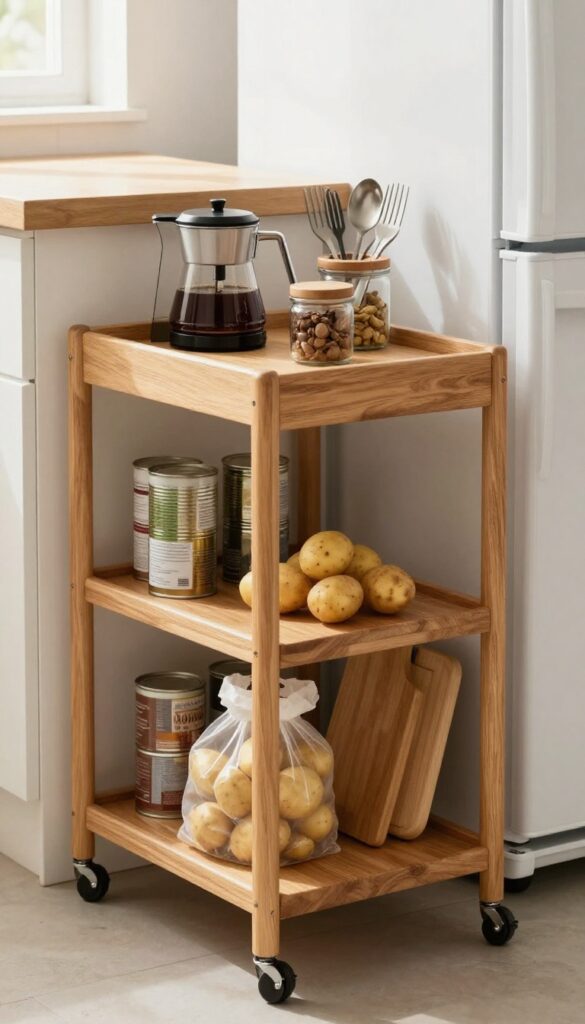
That narrow gap between your fridge and counter is probably just collecting dust bunnies right now. But with a slim rolling cart, it becomes one of the handiest spots in your kitchen. These carts are usually just 6 to 10 inches wide—perfect for sliding into tight spaces—and they give you instant storage without taking up any floor space you're actually using.
A narrow rolling cart turns an awkward dead zone into a functional workstation. Look for one with a wooden top so you can use it as extra counter space for your coffee maker or toaster. The lower shelves are great for storing potatoes, onions, or extra cans of tomatoes.
Because it's on wheels, you can pull it out to clean behind the fridge or roll it over to the prep area when you need more room. It's one of those small changes that makes a rental kitchen feel way more flexible.
Best Materials For A Slim Cart
- Go with a metal frame and a solid wood or butcher-block top. The metal keeps it lightweight and easy to roll, while the wood adds warmth and gives you a sturdy surface for chopping or setting down hot pans. Avoid all-wire carts if you plan to use the top as counter space—they're not stable enough.
- A bamboo top is a great budget-friendly alternative that still looks natural and ties in with wood tones elsewhere in the kitchen.
Storage Tip: Organize By Use
- Use the top shelf for things you grab daily—like your coffee maker, oil, and salt. The middle shelf can hold canned goods or jars, and the bottom shelf is perfect for heavier items like a bag of potatoes or a stack of cutting boards. If your cart has a towel bar on the side, hang dish towels or oven mitts there.
- This keeps everything within arm's reach and makes the cart feel like a natural part of your workflow.
Small-space Fix: Match The Height
- Measure the height of your counter before you buy. You want the cart's top to sit at the same level as your counter so it can double as extra prep space. If it's too tall or too short, it'll look awkward and won't be as useful.
- Many rolling carts come with adjustable shelves, so you can customize the fit. And if the gap is wider than 12 inches, consider a two-tier cart with a butcher-block top for even more surface area.
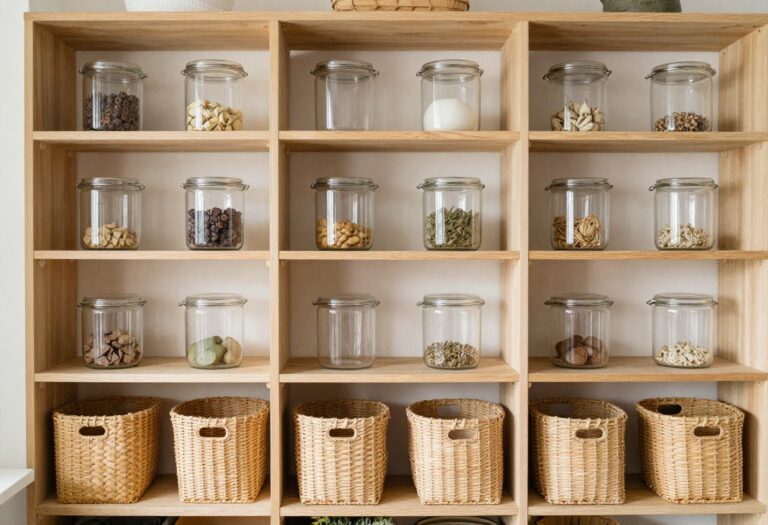
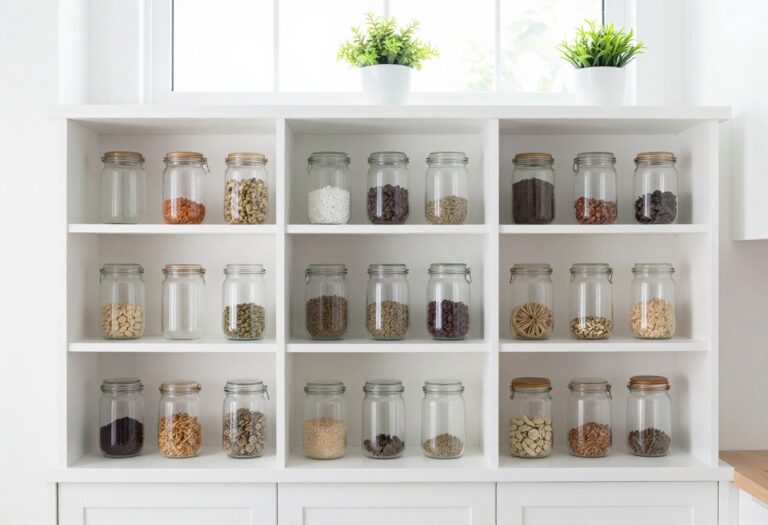
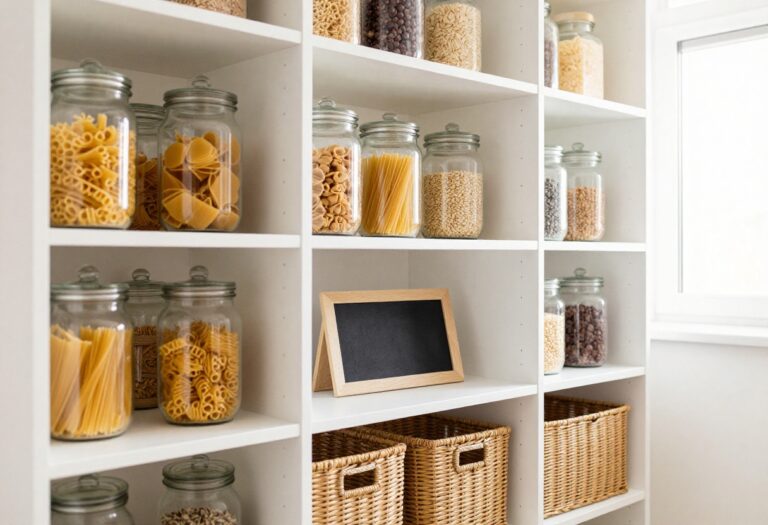
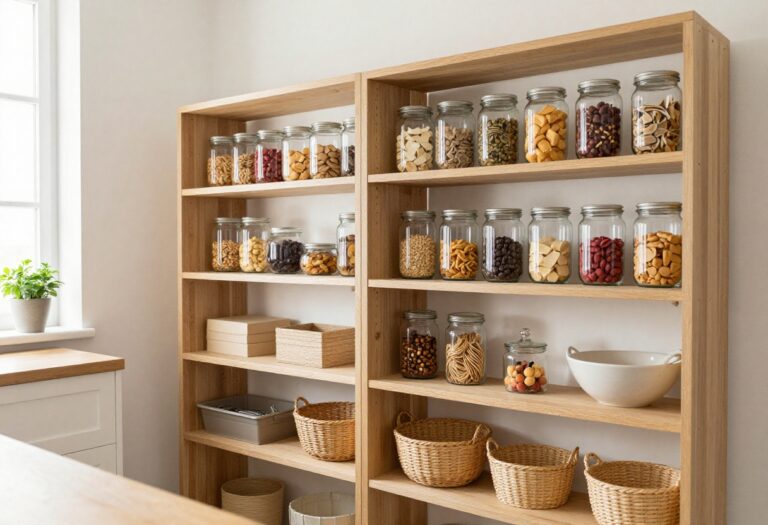
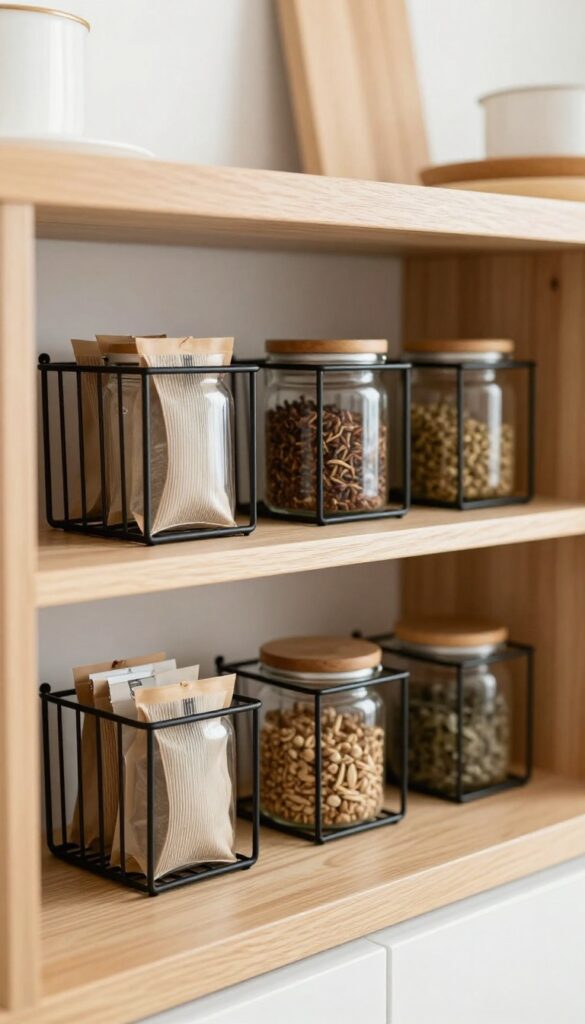
11. Use Clear Containers for a Uniform Pantry Look
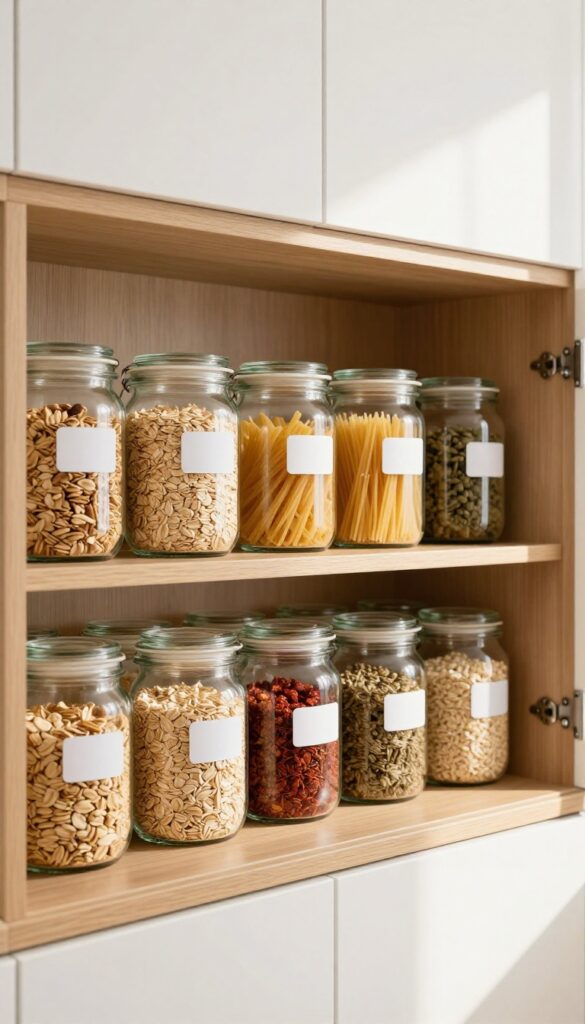
There’s something deeply satisfying about opening a pantry or cabinet and seeing a row of identical clear jars filled with oats, pasta, and spices. It’s not just about looks—clear containers make it easy to spot what you’re running low on, which means fewer forgotten ingredients and less food waste. In a rental kitchen where you can’t change the cabinets, this simple swap brings instant order and a cohesive, almost spa-like feel.
Transferring dry goods into matching clear jars or bins is one of the quickest ways to transform a cluttered pantry into a calm, organized space. The visual repetition of uniform containers creates a sense of harmony, and the transparency lets you see exactly what you have at a glance. Plus, it’s a renter-friendly upgrade that doesn’t require any permanent changes—just some jars, labels, and a little time.
Best Containers To Choose
- Opt for glass jars with airtight lids—they keep food fresh longer and look more polished than plastic. Square or rectangular shapes maximize shelf space, while round jars work well for taller items. Stick to one style and size range for the most uniform look; mixing too many shapes can feel busy.
- Budget-friendly options include IKEA’s Korken series or repurposed pasta sauce jars with matching lids.
Labeling For Easy Access
- Labels are the secret to keeping your system functional. Use a simple label maker or chalk labels for a clean, customizable look. Place labels on the jar lids or fronts so you can read them from above or at eye level.
- Group similar items together—baking supplies on one shelf, grains on another—and arrange labels in the same spot on every jar for consistency.
Small-space Pantry Hack
If your rental has shallow cabinets or a tiny pantry, use slim, stackable bins for items like snack packs or spice envelopes. Clear, modular bins from brands like mDesign or Container Store fit neatly and can be pulled out easily. For deep cabinets, add a lazy Susan or tiered shelf inside to keep jars accessible without digging.
12. Install a Hanging Pot Rack from the Ceiling
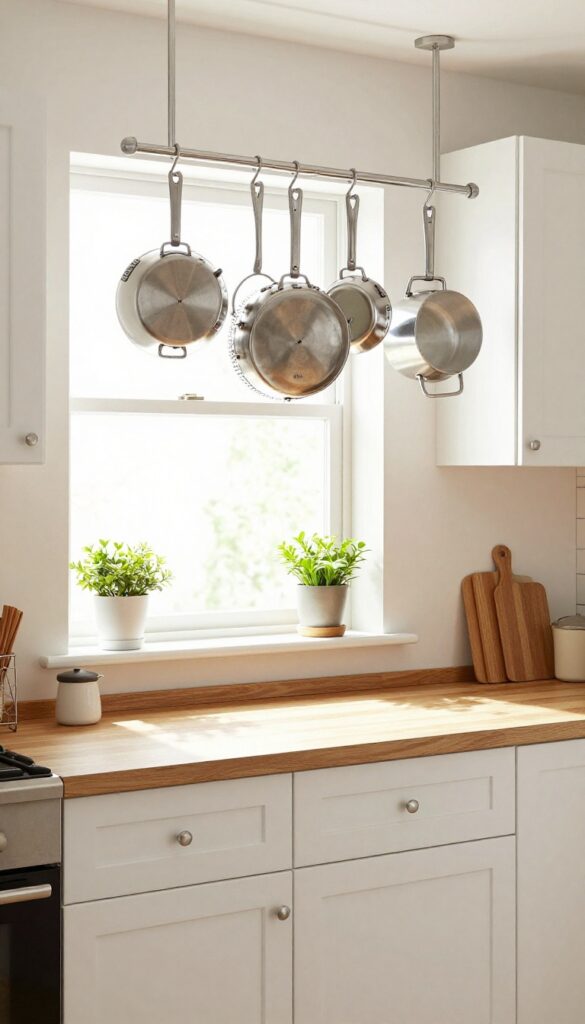
If you've got a sturdy ceiling beam or a heavy-duty hook, a hanging pot rack can be a total game-changer in a rental kitchen. It keeps your most-used cookware right where you need them—within arm's reach—while freeing up precious cabinet space for other essentials. Plus, the visual effect is instantly cozy and chef-like, giving your kitchen a professional edge without a full renovation.
A hanging pot rack is one of those ideas that feels both practical and stylish. It turns your pots and pans into decor, adding texture and warmth overhead. In a rental, you can install a rack that hooks into a single ceiling joist (check with your landlord first, but many allow it as long as you patch the hole later).
Choose a rack that matches your kitchen's vibe—black iron for a rustic look, stainless steel for modern, or wood for a farmhouse feel. Hang it over an island or near the stove for maximum convenience. Just make sure your heaviest pieces are within easy reach and that the rack is securely anchored.
Best Materials
Go for metal racks in matte black, brushed nickel, or copper to complement your existing hardware. Wood racks add warmth and work well in cottage-style kitchens. Avoid plastic or cheap finishes that might chip or sag under weight.
Layout Tip
Position the rack where you do most of your cooking—above the stove or a prep island. Keep frequently used pots and pans on the lower hooks, and store lids separately on a wall-mounted rail or in a drawer nearby.
Small-space Fix
In a tiny kitchen, a ceiling pot rack frees up lower cabinets for pantry items or small appliances. To avoid a cluttered look, limit the rack to your most-used cookware and keep it organized by size or color.
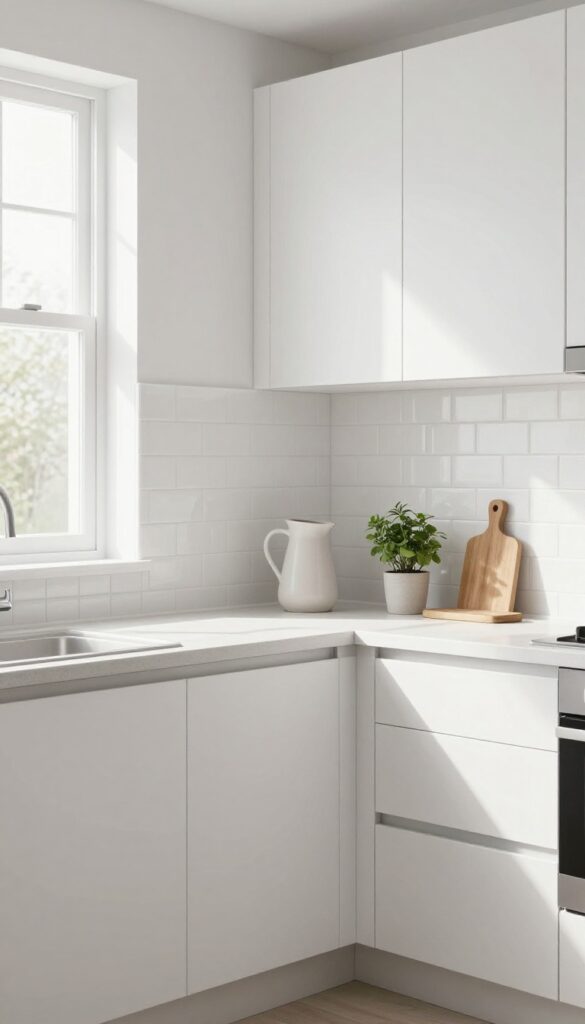
13. Decorate with Greenery That Doubles as Storage
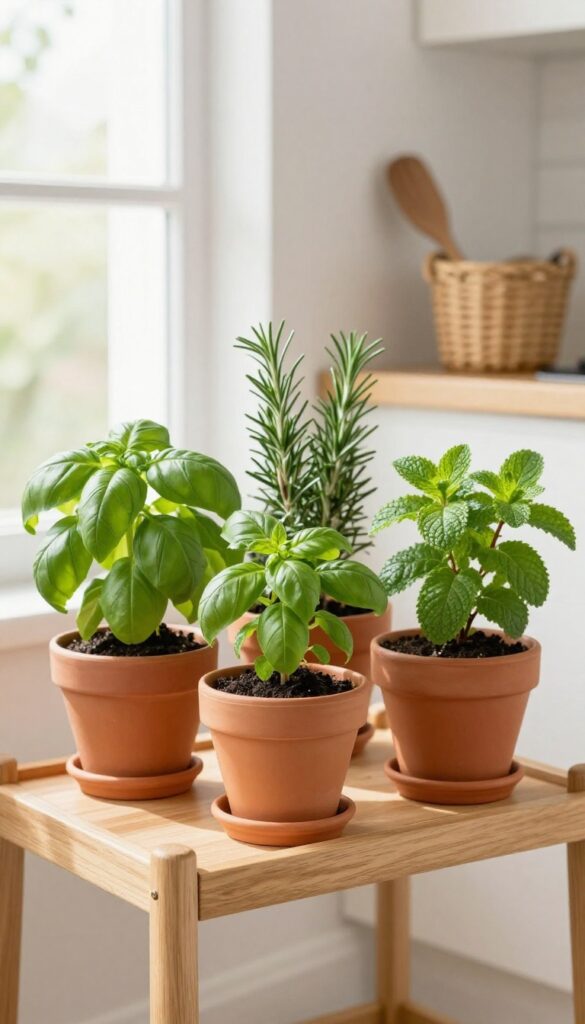
Plants do more than just purify the air—they can also pull their weight when counter space is tight. A few well-placed herbs or trailing vines add life to your kitchen while giving you a spot to stash small items. The trick is choosing varieties that earn their keep, both visually and practically.
Fresh herbs are one of the easiest ways to bring nature indoors without sacrificing function. A row of basil, mint, and rosemary on a sunny windowsill becomes a living spice rack—snip what you need for dinner and enjoy the fragrance all day. For wall space, magnetic planters on the fridge or a metal backsplash hold small pots upright, freeing up countertops.
Even a simple hanging planter near the sink can store dish towels or scrub brushes alongside a trailing pothos. The key is to pick plants that thrive in your kitchen's light and that you'll actually use, so the greenery feels intentional, not just decorative.
Best Plants For A Kitchen Garden
Stick with compact herbs like basil, chives, parsley, and thyme. They grow well in small pots, don't need tons of light, and survive occasional neglect. For low-light corners, try mint or a small snake plant—they'll still look great even if you forget to water them now and then.
Storage-smart Planter Ideas
Look for planters with built-in hooks or magnets so you can attach them to the fridge, a metal shelf, or a magnetic knife strip. Tiered window shelves let you stack multiple pots without taking up sill space. A hanging planter with a small shelf underneath can hold spices or a salt cellar.
Styling Tip: Mix Textures
Pair glossy ceramic pots with matte terracotta or woven baskets for visual interest. Keep the color palette neutral—white, sage, or warm clay—so the greenery pops. Group three planters of different heights on a tray for a cohesive look that's easy to move when you need the counter.
FAQ
Can I paint my rental kitchen cabinets?
Most leases prohibit painting, but you can use removable contact paper or peel-and-stick vinyl to update cabinet fronts temporarily. Always check with your landlord first.
What's the best way to add storage without drilling holes?
Look for tension rods, magnetic strips, over-the-door organizers, and adhesive hooks. These options don't damage walls and are easy to remove when you move out.
How do I make a small kitchen feel bigger?
Use light colors, open shelving, and mirrors to reflect light. Keep countertops clutter-free and choose multi-functional furniture like a rolling cart.
Are peel-and-stick backsplashes durable?
Yes, quality peel-and-stick tiles are water-resistant and easy to clean. They can last for years but are designed to peel off without residue when you're ready to move.
What should I do with awkward empty wall space?
Turn it into a vertical storage zone with a pegboard, magnetic strip, or wall-mounted rail. It's functional and adds character without taking up floor space.
Conclusion
Rental kitchens don't have to feel limiting. With a few smart, storage-focused tweaks, you can create a space that's both functional and full of personality—without losing your security deposit.
Start with one or two ideas that speak to your biggest pain point, and build from there. Small changes really do add up, and your kitchen will thank you for it.