13 Cheap Kitchen Backsplash Ideas That Still Look Smart
A kitchen backsplash can make or break the whole room, but you don't need to spend a fortune to get a high-end look. Whether you're renting or just watching your budget, there are plenty of affordable materials that add serious style.
The trick is choosing something that feels intentional and fits your space without overwhelming it. Small kitchens especially benefit from a backsplash that adds personality without eating up visual square footage.
Light colors, reflective surfaces, and simple patterns can make a tiny kitchen feel bigger and brighter. And because you're working with less wall area, you can often splurge on a slightly pricier material without blowing your budget.
1. Peel-and-Stick Subway Tile
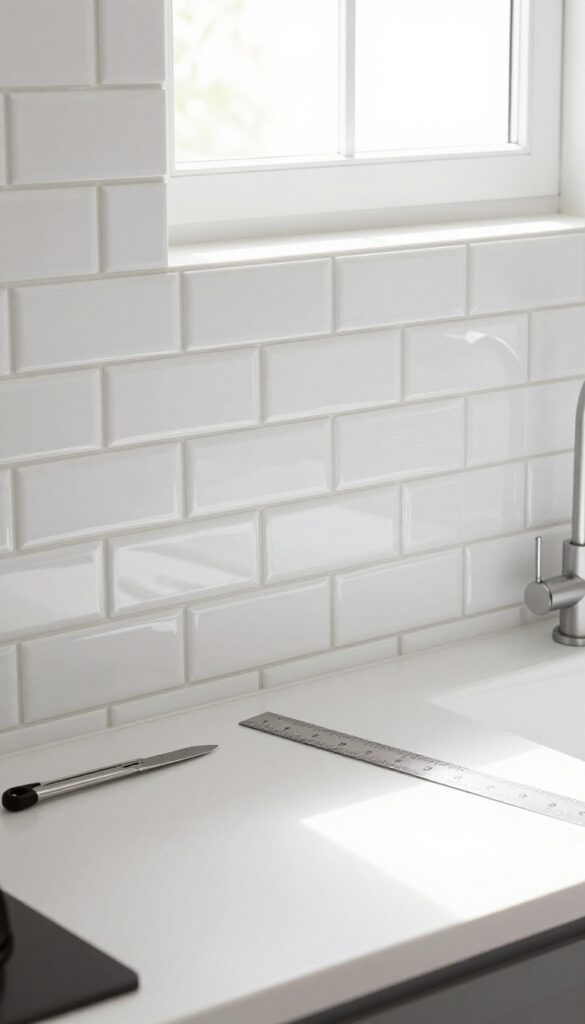
Subway tile has been a kitchen staple for over a century, but the traditional installation involves messy thinset, grout, and a hefty price tag. Peel-and-stick versions skip all that while delivering the same clean, classic look. They come in realistic ceramic finishes, from crisp white to soft gray and even pastel hues.
Because the tiles are glossy, they bounce light around the room, making a small kitchen feel noticeably larger and brighter. Best of all, you can install them in a single afternoon with just a utility knife and a ruler, and they peel off cleanly when you want a change.
Peel-and-stick subway tile is a budget-friendly alternative that doesn't sacrifice style. The adhesive backing sticks firmly to smooth, clean walls, and the tiles are thin enough to cut with scissors or a craft knife. Most brands offer starter kits with spacers to keep lines straight, so even a DIY beginner can achieve a professional-looking finish.
The material is also waterproof and easy to wipe down, making it practical for the area behind a stove or sink. If you rent or like to update your decor often, this is a no-commitment way to get the subway tile look without the permanence of real tile.
Best Colors For Small Kitchens
- White is the classic choice for a reason—it maximizes light reflection and makes the space feel open. But if you want a subtle twist, try a warm off-white like ivory or a pale gray that adds depth without darkening the room. Soft pastels like blush or mint can introduce a hint of color while still keeping the kitchen airy.
- Avoid dark tiles in a small kitchen; they tend to absorb light and make the room feel cramped.
Installation Tips For A Seamless Look
- Start by cleaning the wall thoroughly with rubbing alcohol to remove grease and dust. Measure and mark a level line as a guide, then peel and stick each tile, pressing firmly from the center outward. Use a grout float or a credit card to smooth out air bubbles.
- For edges and corners, cut tiles slightly oversized and trim with a utility knife. Let the adhesive cure for 24 hours before exposing the tiles to moisture or heavy steam.
Finishing Touch: Grout-look Edging
To make peel-and-stick tiles look more authentic, add a thin bead of white or gray caulk between the tiles after installation. This mimics real grout lines and gives the wall a finished, seamless appearance. You can also use metal trim strips along the edges where the tile meets the countertop or cabinets for a polished, built-in look.
2. Beadboard Paneling
Beadboard brings instant cottage charm without the hefty price tag. At just a few dollars per square foot, it’s one of the most budget-friendly ways to add texture and visual interest to your kitchen. The vertical grooves create a sense of height, making it a smart choice for small spaces or kitchens with low ceilings.
Plus, it’s a renter-friendly DIY project that can be painted in a weekend.
Beadboard paneling is an easy, affordable way to transform a plain kitchen wall into something with character. The material itself is inexpensive, and installation is straightforward enough for a confident DIYer. You can cover an entire wall, install it as a backsplash behind the stove, or even use it on an island for a cohesive look.
Paint it white for a crisp, classic feel, or try a soft sage green for a subtle pop of color that keeps the space bright and airy. The vertical lines naturally draw the eye upward, which helps low ceilings feel taller—a huge bonus in compact kitchens. For renters, peel-and-stick beadboard panels offer the same look without permanent commitment.
Just make sure to seal the surface properly behind the stove to protect against grease and splatters.
Best Colors
- White is the most popular choice for beadboard because it keeps the kitchen light and open. If you want a bit more personality, consider pale sage, soft blue, or even a warm greige. These colors add depth without overwhelming the space.
- For a cohesive look, match the beadboard to your existing trim or cabinets.
Small-space Fix
In a tiny kitchen, beadboard works wonders by creating the illusion of height. Install it from the countertop all the way up to the ceiling—or even just a few feet above the counter—to make the room feel taller. Pair it with open shelving to keep the visual weight low and the space airy.
Finishing Touch
To give beadboard a polished look, add a narrow shelf or a thin piece of molding at the top where it meets the wall. This creates a clean transition and makes the installation look custom. A coat of semi-gloss paint will also make it easier to wipe down any kitchen grime.
3. Contact Paper with a Pattern
Peel-and-stick contact paper has seriously leveled up. Forget the sticky shelf liner you remember—today’s options come in convincing marble, geometric, and even terrazzo prints that look surprisingly high-end. The best part?
It’s waterproof and wipes clean with a sponge, making it a no-brainer for kitchen backsplashes. If your rental has boring white tile or you just want a weekend project that doesn’t require a contractor, this is your move.
Applying contact paper is straightforward: clean the surface, measure carefully, and smooth it on with a plastic squeegee to avoid bubbles. The result is an instant refresh that feels intentional and polished. And when you’re ready for a change—or need to move out—it peels off without damaging the wall.
For small kitchens, choose a pattern with a light background to keep the space feeling open. A subtle geometric or soft marble print adds texture without overwhelming the room.
Best Patterns For Small Kitchens
Stick with small-scale patterns or muted colors to avoid visual clutter. A delicate terrazzo or a white marble with faint gray veining works beautifully. If you want a bolder look, try a geometric pattern in a single color—like hexagons in navy or sage—to add interest without shrinking the space.
Application Tips For A Seamless Look
- Measure your backsplash area and cut the paper a few inches larger than needed. Use a sharp utility knife and a straight edge for clean cuts. Overlap sheets slightly and trim along the countertop or cabinets for a custom fit.
- A plastic squeegee helps push out air bubbles, and a hairdryer on low heat can soften the paper around outlets or corners.
Finishing Touch
Pair the patterned backsplash with solid-color countertops and simple hardware to keep the focus on the print. A white quartz or butcher block counter balances the pattern, while matte black or brass faucets add a modern contrast. For a cohesive look, pull a subtle color from the pattern—like a soft green or warm beige—and use it in your dish towels or canisters.
4. Tin Ceiling Tiles
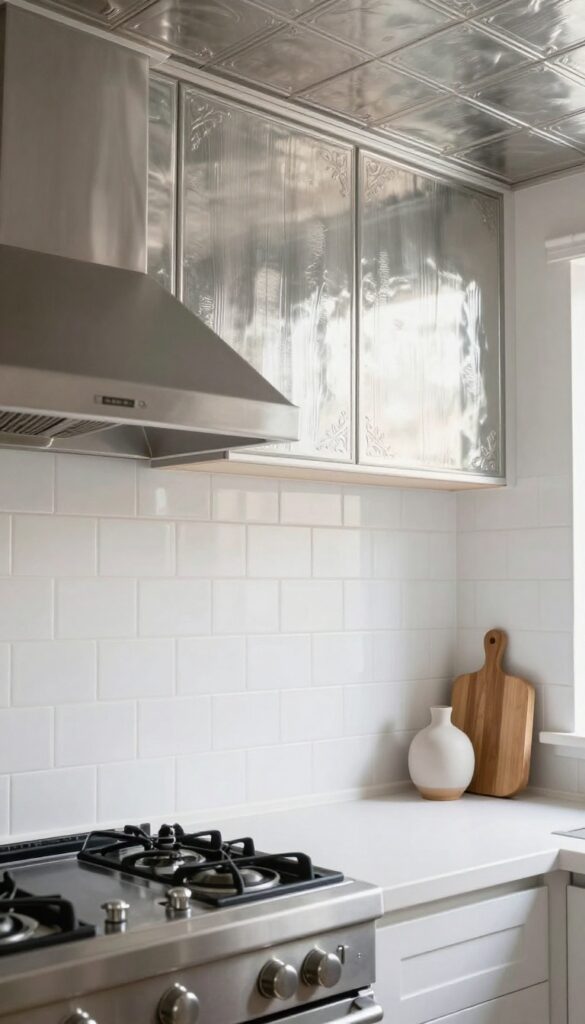
Tin ceiling tiles aren't just for ceilings. These embossed metal squares bring instant vintage charm and a subtle shimmer that makes small kitchens feel bigger and brighter. The 12×12 sheets are lightweight and easy to cut, so you can glue them directly to the wall without special tools.
Whether you cover the whole backsplash or just a narrow strip behind the stove, the effect is polished and unexpected.
Tin ceiling tiles offer a budget-friendly way to add texture and light reflection to a small kitchen. The metallic finish bounces light around, making the space feel more open. They're also durable and easy to clean—just wipe with a damp cloth.
For a cohesive look, choose a finish that matches your faucet or cabinet hardware, like brushed nickel or oil-rubbed bronze.
Best Colors
Stick with metallic finishes like silver, bronze, or copper to maximize light reflection. White painted tiles work well in very small kitchens for a clean, airy feel. Avoid dark or matte colors, which can make the space feel heavy.
Layout Tip
Use tiles only behind the stove as a focal point. This saves money and material while still giving you that vintage look where it counts. Pair with simple subway tile on the rest of the wall for contrast.
Small-space Fix
In a galley kitchen, install tiles from counter to upper cabinets on one wall only. This creates a feature wall that draws the eye without overwhelming the room. Keep the opposite wall light and plain.
5. Chalkboard Paint
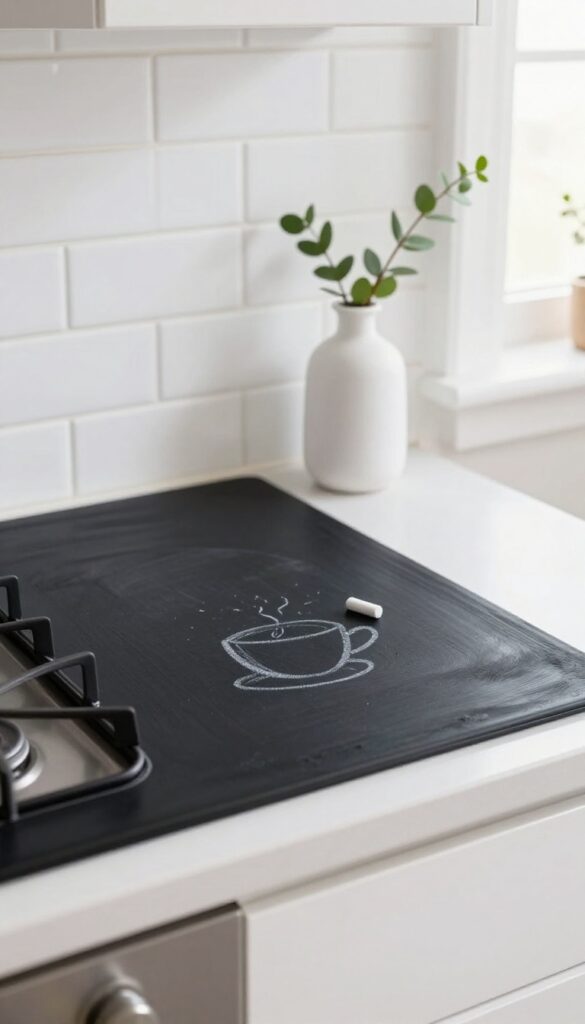
Imagine a backsplash that does more than just protect your walls from splatters. A chalkboard-painted surface turns that often-overlooked strip of wall into a living part of your kitchen. You can jot down grocery lists, sketch a quick recipe, or leave a morning doodle for your family.
The best part? It costs next to nothing and takes an afternoon to complete.
Chalkboard paint is one of the most budget-friendly backsplash ideas out there, and it works especially well in small kitchens where every inch counts. Instead of dedicating precious wall space to a bulletin board or a whiteboard, your backsplash becomes both a design element and a functional tool. The matte black finish adds a subtle, industrial edge that pairs nicely with white cabinets, open shelving, or warm wood tones.
You can keep it simple or get creative by painting a geometric shape or a framed rectangle behind the stove. Either way, it brings a casual, lived-in charm that feels intentional, not messy.
Best Colors And Finishes
- Classic black is the most popular choice, but chalkboard paint now comes in a range of colors—think deep green, navy, or even a soft gray. For a cleaner look, stick with a dark hue that contrasts with your countertops. If you're worried about the room feeling too dark, try painting only a small section behind the stove or sink.
- The matte finish naturally hides fingerprints and smudges, which is a huge plus in a busy kitchen.
Small-space Setup
- In a tiny kitchen, a chalkboard backsplash can visually expand the room by creating a seamless, uninterrupted surface. Keep the area around it clutter-free so the black doesn't feel heavy. Pair it with open shelving and light-colored walls to balance the darkness.
- Use magnetic chalkboard paint if you want to hang lightweight utensils or spice jars—just test the magnet strength first.
Finishing Touch
To keep the chalkboard looking fresh, season it before first use: rub the side of a piece of chalk over the entire surface, then wipe it off. This prevents ghosting and makes your writing erase cleanly. Frame the painted area with thin wood trim or metal edging for a polished, intentional look that separates it from the rest of the wall.
6. Reclaimed Wood Planks
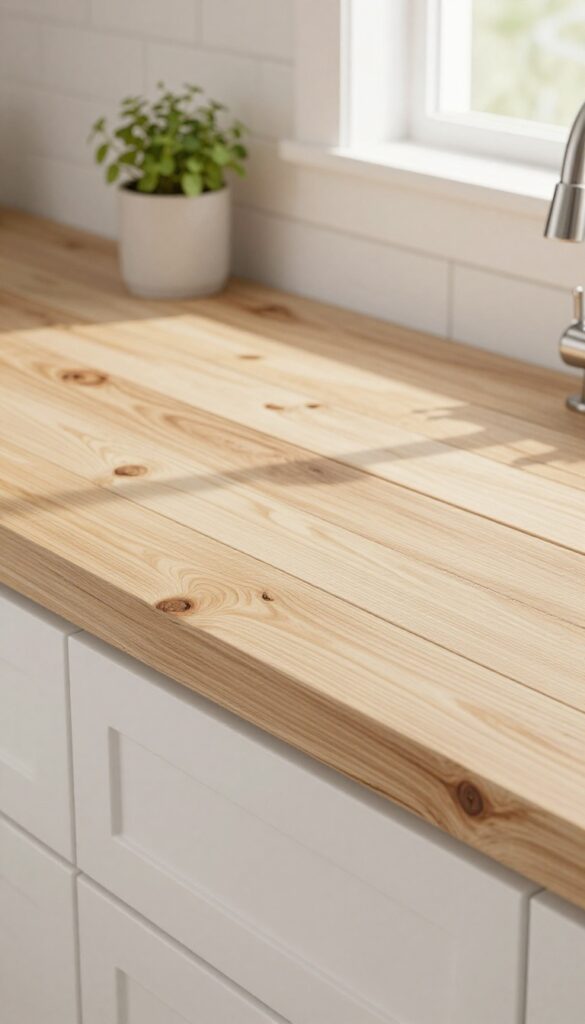
Thin slices of reclaimed wood add warmth and texture to a kitchen without breaking the bank. The natural grain and varied tones create a rustic look that softens a modern kitchen, making it feel more inviting. Plus, it's a great way to bring a bit of the outdoors in, especially if you choose a light wood to keep the space open and airy.
Reclaimed wood planks offer a budget-friendly way to add character and warmth to your kitchen. The key is to use thin slices—about ¼ inch thick—so they don't protrude too much from the wall. Seal them with a clear matte finish to protect against splashes and stains.
The natural variation in color and grain creates a unique, lived-in look that pairs beautifully with white cabinets and stainless steel appliances. This idea works especially well in small kitchens because the light wood tones reflect light, making the space feel larger. For a cohesive look, carry the wood onto an open shelf or a small island.
Best Wood Choices
- Opt for lighter woods like pine, ash, or birch to keep the kitchen feeling bright. These woods have subtle grain patterns that add texture without overwhelming the space. Avoid dark woods like walnut or mahogany, as they can make a small kitchen feel cramped.
- If you're using actual reclaimed wood, look for pieces with minimal knots and a consistent color palette.
Installation Tips
- Install the planks horizontally to make the kitchen feel wider, or vertically to draw the eye upward and create the illusion of height. Use a level and spacers to ensure even gaps between planks. Apply a clear matte sealer before installation to protect the wood from moisture.
- For a seamless look, continue the wood onto a small backsplash area behind the stove.
Styling And Finishing
- Pair the wood backsplash with simple white or light gray countertops to let the texture shine. Add open shelving in the same wood tone for a cohesive look. Keep countertops clutter-free to maintain an open feel.
- A few green plants or a ceramic vase can add a fresh pop of color without competing with the wood.
7. Glass Mosaic Sheets
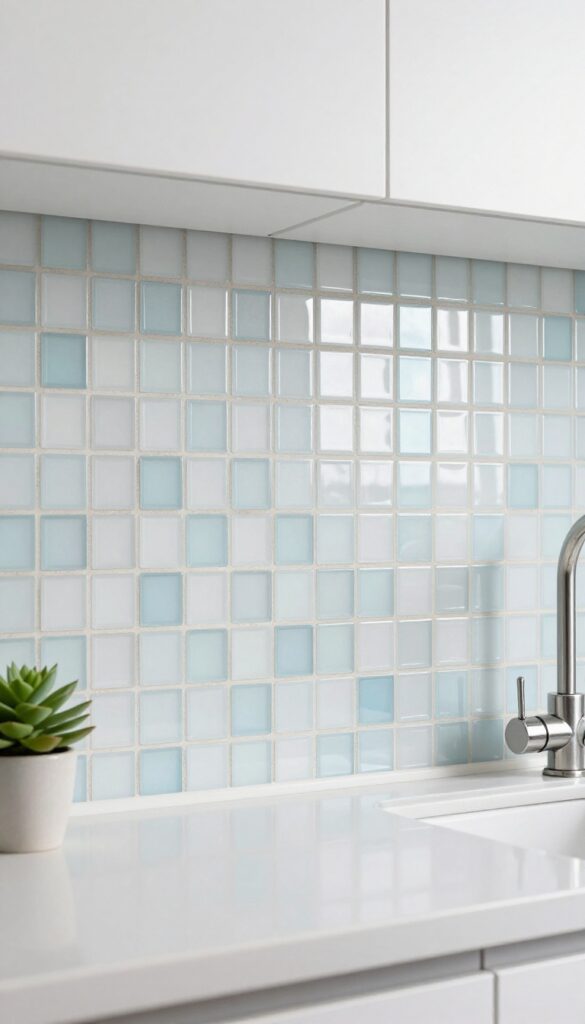
Glass mosaic sheets bring a touch of elegance to a small kitchen without breaking the bank. The tiny tiles catch the light and create a soft, shimmering effect that makes the space feel larger and more open. Sticking with a neutral palette like frosted white or pale blue keeps the look calm and prevents the pattern from overwhelming the room.
Glass mosaic sheets are a smart choice for budget-friendly kitchen upgrades. The mesh backing makes installation straightforward, even for DIYers, and the small tile size means you can cover awkward spots like behind a sink or stove with minimal waste. The grout lines add just enough texture to keep the backsplash interesting without feeling busy.
In a small kitchen, the reflective quality of glass helps bounce light around, making the whole space feel brighter and more airy.
Best Colors
Stick with light, neutral tones like frosted white, pale blue, soft gray, or champagne. These colors maximize light reflection and keep the kitchen feeling open. Avoid dark or highly saturated hues, which can make a small space feel cramped.
Small-space Fix
To make the kitchen feel larger, run the mosaic sheets from counter to upper cabinets without a break. Continuing the tile behind the range hood or to the ceiling can visually extend the space. Pair with white or light-colored grout to maintain a seamless look.
Budget-Friendly Swap
Glass mosaic sheets are often sold in 12×12-inch mesh sheets, which are cheaper per square foot than individual tiles. Look for sales at home improvement stores or online retailers. You can also mix two complementary colors in a checkerboard pattern for a custom look without the custom price.
8. Painting a Faux Tile Pattern
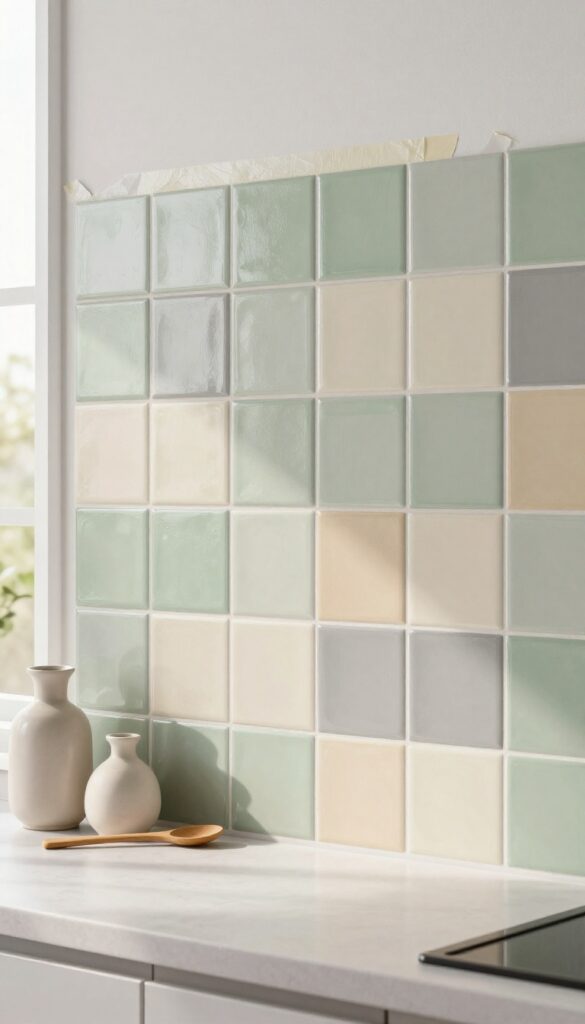
If you love the look of tile but not the price tag, painting a faux tile pattern is a budget-friendly alternative that delivers serious style. Using just painter's tape, a level, and a few paint colors, you can create a custom grid that mimics real tile—without the mess or expense of demolition. This technique works especially well in small kitchens where you want to add visual interest without overwhelming the space.
Stick to two or three shades from the same color family for a cohesive, designer feel that looks intentional and polished.
Start by measuring your backsplash area and planning your grid. Use a level to draw vertical and horizontal lines with a pencil, then apply painter's tape along those lines to create squares. Choose two or three paint colors in the same hue family—like soft whites, warm grays, or muted blues—and paint each square a different shade.
Remove the tape while the paint is still slightly wet for clean edges. The result is a textured, dimensional look that tricks the eye into seeing real tile. This idea works best on smooth, primed walls and can be refreshed easily when you want a change.
Best Colors
- Stick to a monochromatic palette for a sophisticated effect. For example, pair a light cream with a warm taupe and a deeper greige. Or try three shades of sage green for a subtle, organic vibe.
- Avoid high-contrast combos that might look busy—soft transitions between shades read as intentional design.
Small-space Fix
In a tiny kitchen, use larger squares (like 6×6 inches) to make the wall feel less cluttered. You can also paint only a partial backsplash—just behind the stove or sink—to save time and keep the room airy. The grid pattern adds depth without overwhelming the space.
Finishing Touch
Seal your painted backsplash with a clear matte polyurethane or water-based sealer to protect against splashes and grease. This makes it wipeable and durable, just like real tile. Reapply every year or two to keep it looking fresh.
9. Vinyl Floor Tiles on the Wall
Vinyl floor tiles aren't just for floors anymore. Their durability and waterproof nature make them a surprisingly smart choice for a kitchen backsplash, especially in smaller kitchens where every surface needs to work hard. The stone and wood-look options bring a tactile, grounded feel that typical wall tiles can't quite match.
Plus, because they're thicker than standard peel-and-stick wall tiles, they add a subtle dimension that catches the light without overwhelming the space.
Stick vinyl floor tiles directly to the wall using a strong construction adhesive. They handle heat and moisture beautifully, so they're perfectly at home behind a stove or sink. The slight extra thickness creates a barely-there shadow line between tiles, giving your backsplash a handcrafted look without the effort.
For a small kitchen, choose a light wood grain or a soft gray stone to keep the space feeling open. The texture alone adds enough interest to skip a busy pattern.
Best Materials
- Look for luxury vinyl plank or tile (LVP/LVT) with a rigid core. These are more stable and less likely to warp near heat sources. Stick with matte finishes—they hide fingerprints and splatters better than glossy ones.
- Stone-look vinyl in a herringbone layout mimics real tile at a fraction of the cost.
Small-space Fix
In a galley kitchen, run the vinyl tiles from counter to upper cabinets in a continuous sheet. The lack of grout lines visually expands the wall, making the room feel wider. Pair with open shelving instead of upper cabinets on one side to keep the line of sight clear.
Finishing Touch
Seal the edges with a clear silicone caulk where the vinyl meets the countertop and backsplash. This prevents moisture from sneaking behind the tiles and gives a clean, built-in look. Match the caulk to the tile color for a seamless finish.
10. Mirror Tiles
Mirror tiles are a clever trick for small kitchens. They bounce light around the room and make the space feel much larger than it actually is. Placed behind the stove or sink, they add a sleek, reflective surface that’s both practical and visually expanding.
Mirror tiles work best in small kitchens where you want to maximize light and space without a full renovation. They reflect the room and any natural light, creating an open, airy vibe. Use them sparingly behind the stove or sink to avoid a disco-ball effect.
Clean them with glass cleaner for a streak-free shine.
Best Placement
Focus mirror tiles on the main focal wall—behind the stove, sink, or range hood. This draws the eye and makes the kitchen feel deeper. Avoid covering an entire wall; a 2×3 or 3×4 tile section is enough to create an illusion of space without overwhelming the room.
Style Pairing
Pair mirror tiles with matte black or brushed nickel fixtures for a modern contrast. White or light gray grout keeps the look clean and seamless. Add warm wood accents like a cutting board or open shelving to soften the reflective surface and keep the space inviting.
Cleaning Tip
Mirror tiles show smudges easily, so keep a microfiber cloth and glass cleaner handy. For greasy areas near the stove, a mix of vinegar and water works well. Avoid abrasive sponges that can scratch the mirror finish.
11. Cork Sheets
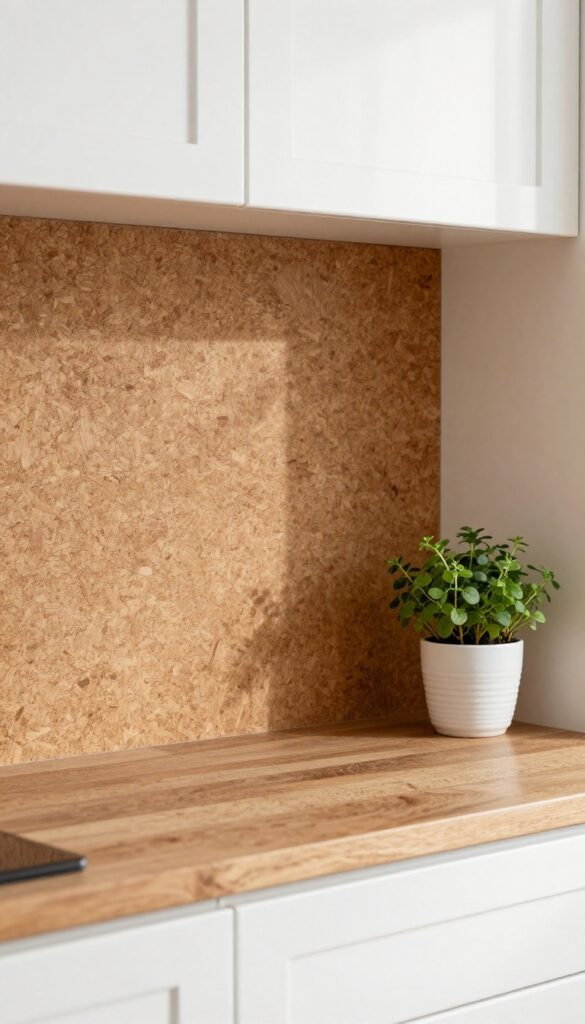
Cork brings a natural warmth that tile just can't match. It's soft underfoot—handy if you drop a dish—and naturally antimicrobial, which is a bonus in a kitchen. Sealed with a waterproof finish, it holds up beautifully against splashes and steam.
Cork sheets make an unexpected but smart backsplash choice. The honey-toned texture adds organic warmth without overwhelming a small kitchen. Plus, it's a sustainable material that feels cozy and inviting.
Best Colors
Stick with natural cork tones—honey, tan, or light amber. These warm neutrals pair well with white cabinets and butcher-block counters. For a bolder look, you can stain cork a darker walnut or charcoal, but the natural shades keep the space airy.
Small-space Fix
In a compact kitchen, cork's soft texture helps absorb sound and soften the room. Use it from counter to upper cabinets as a full backsplash, or try a half-wall version behind the stove. Either way, it makes the kitchen feel grounded and less sterile.
Finishing Touch
Seal cork with a water-based polyurethane or a dedicated cork sealer. Reapply every year or two to keep it moisture-resistant. A matte finish preserves the natural look, while satin adds a subtle sheen that's easy to wipe down.
12. Fabric Covered with Glass
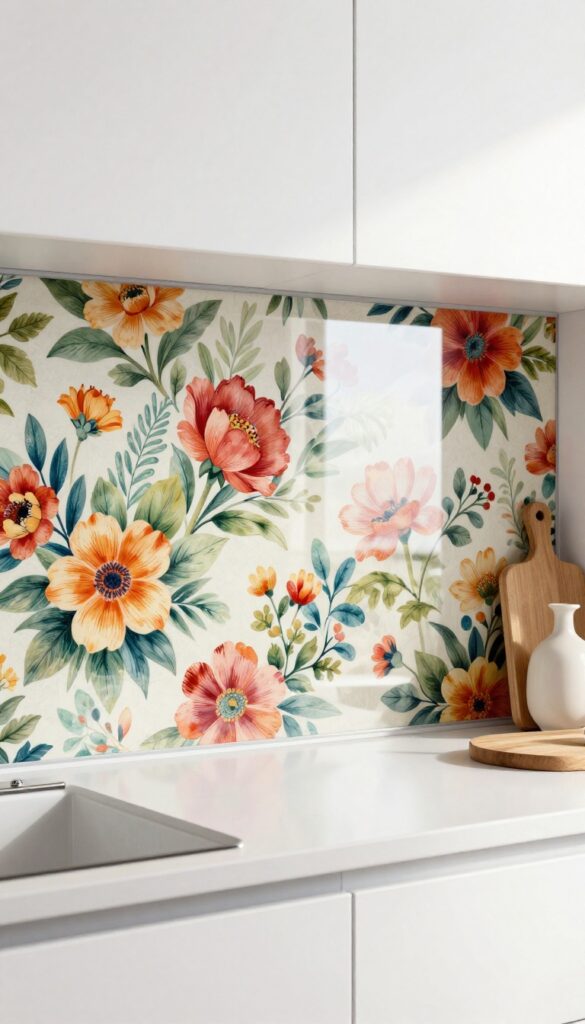
For a backsplash that’s as unique as your favorite dress, try sandwiching fabric between a thin plywood panel and a sheet of clear glass or acrylic. It’s a clever way to introduce pattern without permanent commitment—swap the fabric whenever the mood strikes. In a small kitchen, this trick adds personality without overwhelming the space, and the glass surface makes cleaning a breeze.
This DIY backsplash lets you play with color, pattern, and texture in a way that feels custom but costs far less than tile. The glass protects the fabric from grease and splashes, so it stays looking fresh. It’s also a great solution for renters who want a stylish upgrade without altering the walls.
Choose a bold floral for a cottage feel, a geometric print for a modern edge, or a subtle stripe for a classic look. The key is to pick a fabric that coordinates with your countertops and cabinets—think of it as a large-scale art piece for your kitchen wall.
Best Materials
- Use a 1/4-inch plywood board cut to your backsplash dimensions. For the fabric, choose a medium-weight cotton or linen that doesn’t stretch easily. The glass should be tempered for safety—most hardware stores can cut it to size.
- Acrylic is a lighter, shatter-resistant alternative if you’re worried about weight.
Small-space Fix
In a compact kitchen, this idea shines because it adds visual depth without taking up any floor space. Stick to lighter fabrics or small-scale patterns to keep the room feeling open. Mount the panel so it sits flush with the countertop to avoid a bulky look.
Finishing Touch
Frame the edges with thin metal trim or wood molding to give it a polished, built-in appearance. This also hides any raw edges of the fabric and glass, making the whole installation look seamless and intentional.
13. Stenciled Cement Tile Look
A stencil and concrete-effect paint can give your kitchen an artisanal feel without the weight or cost of real tile. The matte finish and repeating geometric patterns mimic encaustic cement tiles, adding a subtle bohemian edge. Because you're painting directly on the wall, this idea works especially well in small kitchens where bulky materials can feel cramped.
Choose a stencil with a repeating geometric or Moroccan-inspired pattern. Use concrete-effect paint in warm gray or soft taupe, and apply it over a clean, lightly sanded wall. The matte texture absorbs light, making the space feel grounded and cozy.
Stick to one wall behind the stove or sink to create a focal point without overwhelming the room. Pair with natural wood open shelving and brass fixtures to reinforce the handcrafted vibe.
Best Colors
Stick to earthy neutrals like warm gray, pale terracotta, or dusty blue. These tones complement the concrete effect and keep the look from feeling too cold. Avoid glossy paints—the whole point is the matte, almost chalky finish.
Layout Tip
Focus the pattern on a single wall or a narrow strip above the counter. In a small kitchen, a full backsplash of stenciled pattern can be too busy. Limiting it to the stove area or a breakfast bar wall keeps the design intentional and balanced.
Finishing Touch
Seal the painted surface with a matte polyurethane or a clear matte sealer. This protects against splashes and makes cleaning easier without adding shine. Reapply every couple of years to keep the stencil looking fresh.
FAQ
What is the cheapest kitchen backsplash option?
Contact paper and chalkboard paint are the most affordable, often costing under $20 for a small kitchen. Both are easy to apply and remove, making them perfect for renters.
Can I install a backsplash myself without experience?
Yes. Peel-and-stick tiles, beadboard, and contact paper are beginner-friendly and require no special tools. Just measure carefully and follow the instructions.
How do I make a small kitchen backsplash look bigger?
Use light colors, reflective materials like glass or mirror tiles, and vertical patterns like beadboard. Keeping the backsplash simple and continuous also helps the space feel larger.
Are peel-and-stick backsplashes durable?
High-quality peel-and-stick tiles are waterproof and heat-resistant up to a point. They hold up well behind sinks and stoves, but avoid direct contact with open flames.
What backsplash works best for rental kitchens?
Removable options like peel-and-stick tile, contact paper, and fabric behind glass are ideal. They come off cleanly without damaging walls, so you get your deposit back.
Conclusion
Updating your kitchen backsplash doesn't have to mean a full renovation or a big budget. With a little creativity and some affordable materials, you can completely change the look and feel of your cooking space.
The best part is that most of these ideas are DIY-friendly, so you can tackle them over a weekend. Whether you go for the timeless charm of beadboard or the modern shimmer of glass mosaic, each option brings something unique to a small kitchen.