11 Dining Kitchen Ideas for a Smooth Eat-In Layout
Blending your dining area with the kitchen can make the heart of your home feel more spacious and connected. But pulling off a smooth eat-in layout doesn't require a major renovation or a big budget.
With a few smart choices, you can create a space that's both practical and inviting. From choosing the right table to adding cozy touches, these ideas focus on making your kitchen-dining combo work harder for you.
Let's dive into 11 budget-friendly ways to get that seamless flow.
1. A Slim Console Table Doubles as a Breakfast Bar
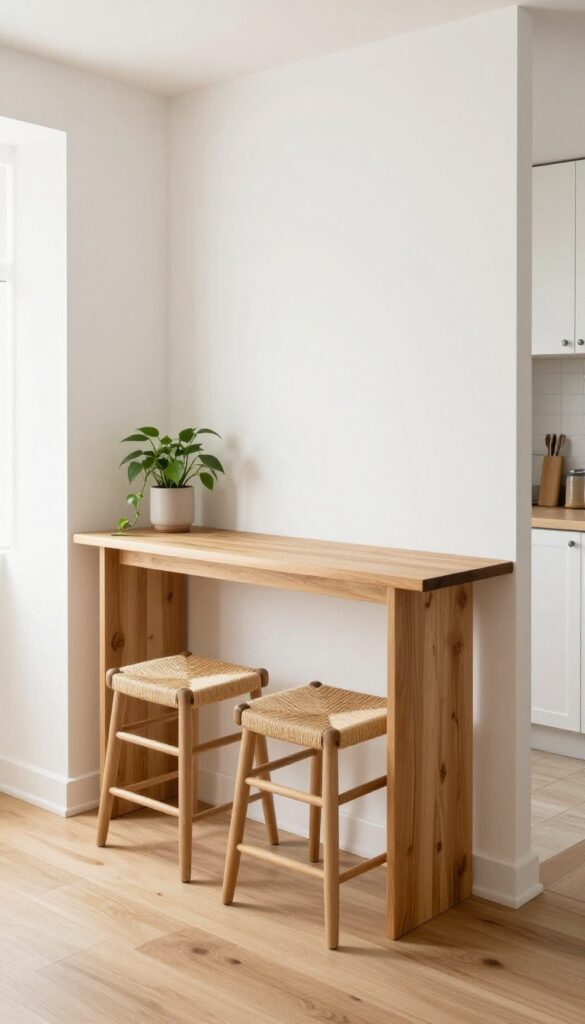
Not every kitchen has room for a full island or a sprawling farmhouse table. That’s where a slim console table slides in to save the day—and your morning coffee routine. Placed against a wall or the back of a counter, it carves out a casual dining spot without eating up precious floor space.
The best part? It feels intentional, not like a cramped afterthought.
A console table breakfast bar works best when you keep it lean and purposeful. Look for a table no deeper than 18 inches so you can still walk around comfortably. Top it with backless stools that slide completely underneath when not in use—this keeps the pathway clear and the room feeling open.
For a budget-friendly version, try a secondhand console table or a simple wooden plank on hairpin legs. Paint or stain it to match your existing cabinetry or go for a contrasting tone like warm walnut against white cabinets. Add a small lamp or a trailing plant on the table to soften the look and make it feel like a real dining spot, not just a catchall.
Best Colors
Stick with light, airy neutrals if your kitchen is small—white, pale gray, or natural wood keep things from feeling heavy. For a pop of personality, try a deep navy or sage green console against lighter walls. The stools can echo the table color or add a subtle contrast with woven seats or black metal frames.
Small-space Layout Tip
Position the console table along a blank wall near the kitchen work zone, not blocking the main traffic flow. If your kitchen opens into a living area, place it on the room side of a peninsula so it acts as both dining surface and visual divider. Measure twice—you want at least 36 inches of clearance behind the stools for easy movement.
Budget-Friendly Swap
- Skip expensive custom pieces. A ready-made console table from a big-box store or a vintage find from a flea market works perfectly. Spray-paint the legs a matte black or brass for an instant upgrade.
- For stools, look for simple wooden or metal designs under $50 each—they’re easy to repaint if your style changes later.
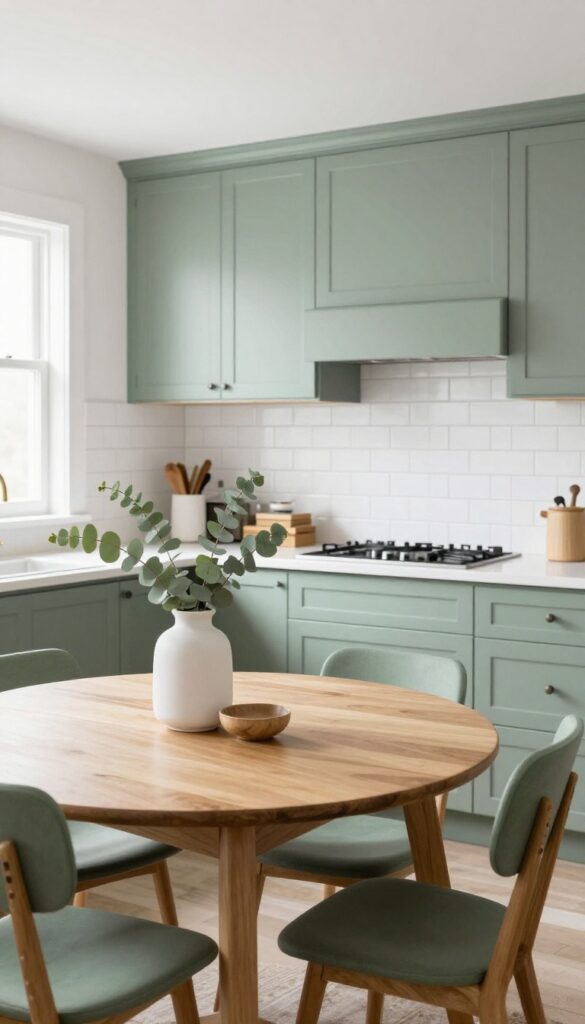
2. Round Tables Soften the Layout
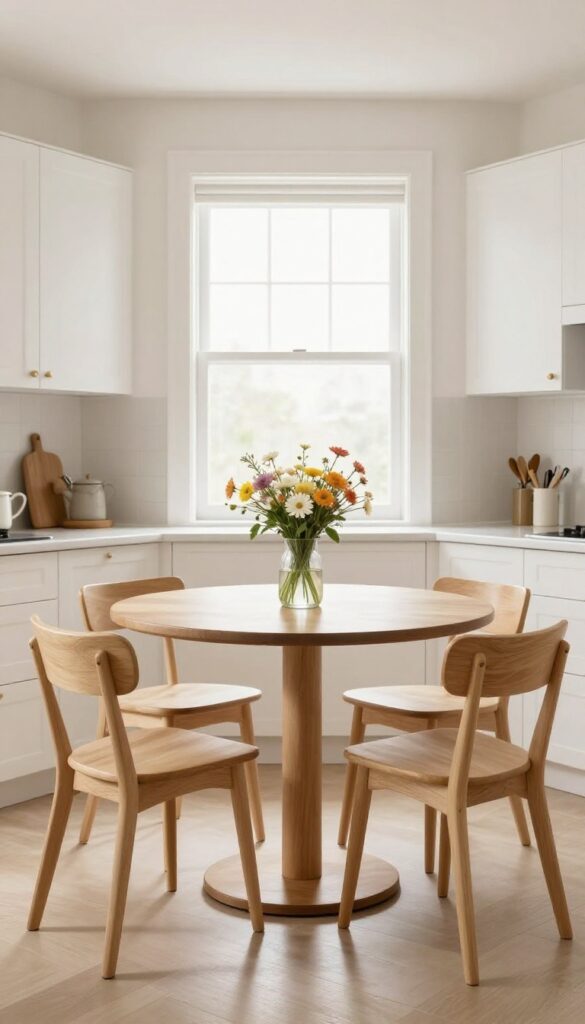
A rectangular table can feel like a roadblock in a tight eat-in kitchen. Round tables, on the other hand, slip into corners or small nooks without jutting into walkways. Their curved shape naturally guides movement around them, making the whole space feel more open and less boxed in.
Plus, there’s something inherently inviting about gathering around a circle—it encourages conversation and feels less formal than a straight-edged dining set.
Round tables are a budget-friendly way to make a small dining area feel intentional and cozy. Without sharp corners, they soften the visual lines of a kitchen filled with cabinets and countertops. They also work beautifully in awkward spaces where a rectangle just won’t fit, like a bay window nook or a tight corner near the kitchen island.
Look for a pedestal base to maximize legroom and make the table easy to pull out for extra seating. For a clean, airy look, choose a light wood finish or a white painted top that blends with the kitchen palette. A round table doesn’t have to be large—even a 36-inch diameter version can seat two to four people comfortably.
Best Materials For A Budget Pick
- You don’t need solid hardwood to get a great look. A laminate table with a wood-grain finish can mimic oak or walnut at a fraction of the price. Metal pedestal bases in black or brushed brass add an industrial touch that feels current.
- For a softer vibe, a round table with a white or cream lacquered top keeps things bright and works with any chair style. Thrift stores and online marketplaces often have solid wood round tables that just need a fresh coat of paint or stain.
Layout Tip For Tight Spaces
- Place the table at least 36 inches from the nearest counter or wall so chairs can slide out easily. In a corner nook, angle the table slightly to create a more dynamic flow. If your kitchen has an island, position the round table on the opposite side to balance the layout.
- A small round table can also double as a prep station when you’re cooking—just pull it close to the counter for extra workspace.
Finishing Touch With Seating
- Mix two upholstered chairs with two wooden ones for a collected, budget-friendly look. Choose chairs with slim profiles so they don’t overwhelm the table. A simple round rug underneath anchors the dining area and adds texture.
- Stick to a neutral rug with a subtle pattern to keep the focus on the table’s shape.
3. Bench Seating Saves Space and Adds Charm
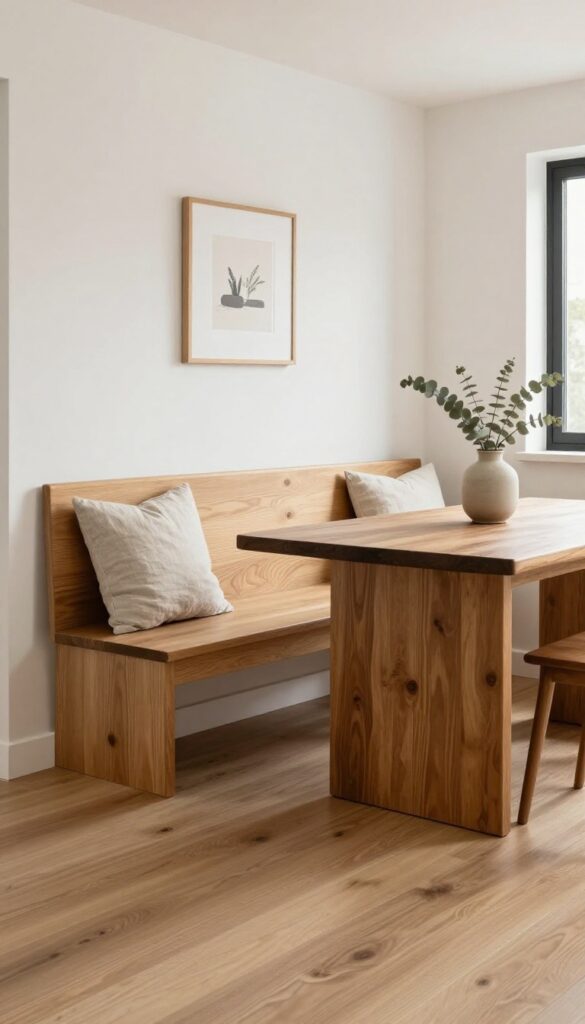
A bench along one side of your dining table does more than just seat people. It frees up floor space, makes the room feel less cluttered, and brings a relaxed, almost café-like vibe to your eat-in kitchen. Whether you go with a built-in banquette or a standalone piece, the bench acts as a visual anchor while tucking away extra storage underneath.
It’s a smart swap that feels both intentional and cozy.
If your eat-in kitchen feels tight with four bulky chairs, swapping two of them for a bench can instantly open things up. The bench hugs the wall, so there’s no gap behind it, which means you gain a few extra inches of walking room. Plus, the continuous seat lets you slide in and out easily—no more pulling chairs in and out.
To keep the look cohesive, choose a bench that complements your table’s finish or adds a subtle contrast, like a light oak bench with a dark walnut table. Add a couple of toss pillows in a durable fabric like canvas or linen for back support, and you’ve got a spot that feels custom without the custom price tag.
Best Materials For A Budget-friendly Bench
- You don’t need to splurge on solid hardwood to get a great bench. Look for benches made from engineered wood with a veneer finish—they mimic the look of real wood at a fraction of the cost. If you want something sturdier, check secondhand stores for solid pine benches that you can sand and paint yourself.
- For a modern edge, a metal-framed bench with a wood seat is often cheaper than an all-wood piece and adds an industrial touch. Just make sure the seat is at least 18 inches deep so it’s comfortable for meals.
Storage Tip: Hidden Bins Under The Seat
- One of the best perks of a bench is the storage potential. If you’re using a freestanding bench, place low-profile woven bins or lidded baskets underneath to stash table linens, extra napkins, or kids’ art supplies. For a built-in look, have a carpenter add a hinged seat that lifts up—perfect for storing bulky items like holiday serving dishes or board games.
- The key is to keep the storage accessible but out of sight, so the bench stays sleek and uncluttered.
Cozy Detail: Cushions That Tie The Room Together
- A bare wood bench can feel a bit hard after a long dinner, so add a cushion that matches your kitchen’s color palette. For a budget-friendly route, buy a standard bench cushion online or make one from foam and fabric. Choose a stain-resistant fabric like outdoor-grade polyester or a cotton-poly blend—it’ll hold up to spills and daily use.
- A soft gray or warm beige cushion keeps the look neutral, while a muted navy or sage green adds a subtle pop of color that ties into your rug or window treatments.
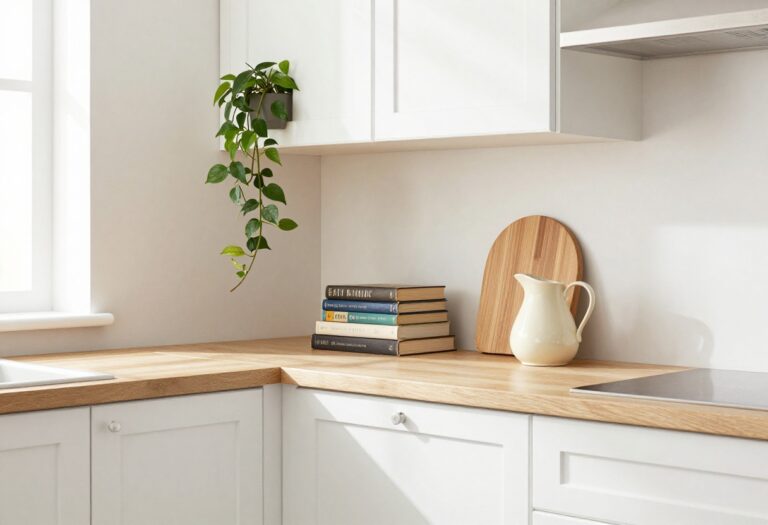
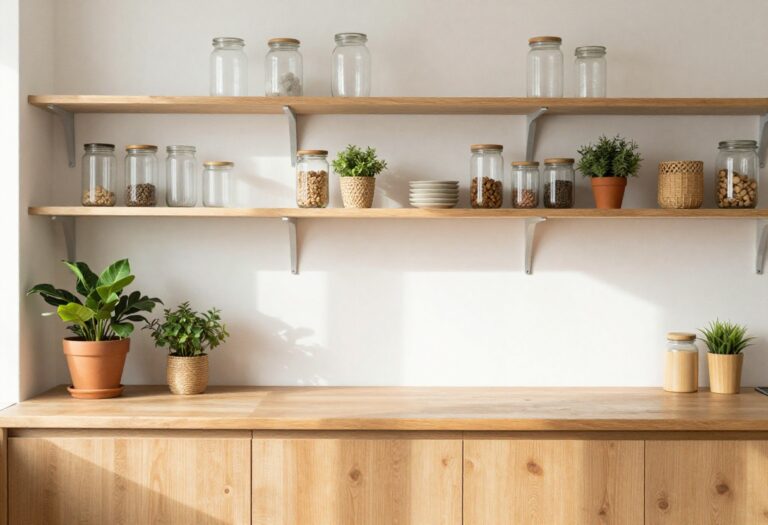
4. Open Shelving Above the Dining Area
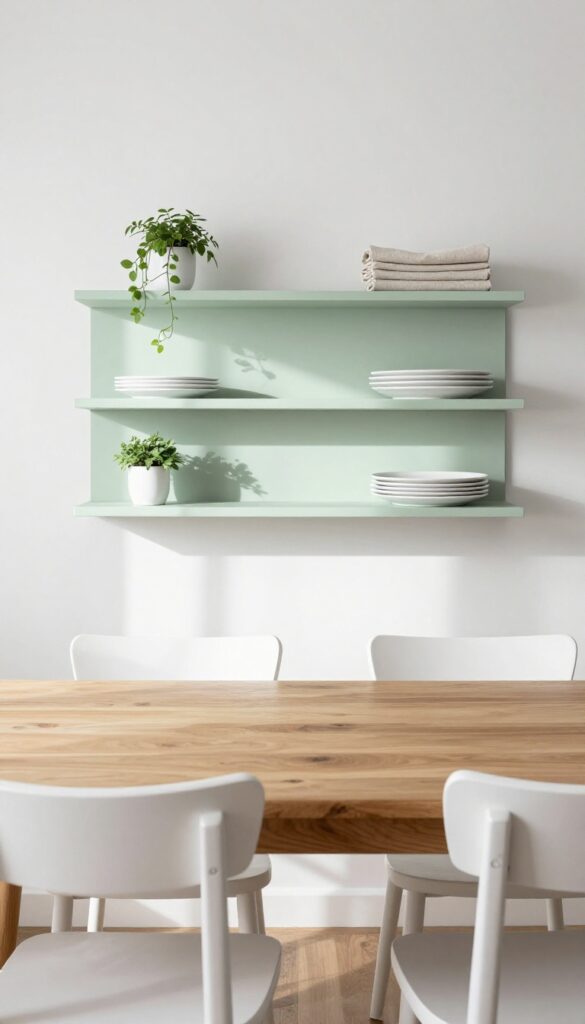
Floating shelves above your dining table do more than just store things—they anchor the eating zone and make it feel like a real destination. Instead of leaving that wall blank, you get a chance to layer in personality with everyday items like plates, plants, or your favorite cookbooks. It’s an especially smart move in an open layout where the dining area needs a clear visual boundary without adding bulky furniture.
Mounting a few floating shelves above your table is one of the easiest ways to define a dining nook without spending much. You can use basic pine boards painted to match your trim, or snag budget-friendly metal and wood shelves from big-box stores. The key is keeping the styling intentional—think a mix of functional pieces (matching dinnerware, glassware) and decorative touches (a small trailing plant, a stack of neutral linen napkins).
This draws the eye upward, making the ceiling feel higher and the dining zone feel purposeful. For a clean look, stick to a limited color palette: white dishes, wood tones, and a single accent color like sage green or terracotta. Avoid overcrowding—leave some breathing room between items so the shelves don’t look cluttered.
Budget-Friendly Swap
- You don’t need custom carpentry to pull this off. Ready-made floating shelves from IKEA or Target cost under $30 each and install in minutes with a drill and level. Paint them the same color as your wall for a seamless look, or go with a contrasting stain if you want the shelves to pop.
- Another money-saving trick: use a single long shelf instead of two or three smaller ones—it creates a stronger horizontal line and needs fewer brackets.
Shelf Styling Tip
- Stick to the rule of threes when arranging objects. Group items in odd numbers, varying heights and textures. For example, place a stack of plates on a wooden stand, lean a small framed art piece behind it, and set a low ceramic vase with dried eucalyptus to one side.
- Keep heavier items toward the ends and lighter pieces in the middle for visual balance. Rotate seasonal decor—swap in pumpkins in fall, citrus in winter, or fresh herbs in summer—to keep the display feeling current.
Small-space Fix
- In a tight eat-in kitchen, open shelves can replace a bulky hutch or buffet. Mount them just above head height so they don’t interfere with sightlines or bump heads. Use them for items you reach for daily—coffee mugs, small bowls, or a set of everyday wine glasses.
- This frees up cabinet space and keeps the dining area feeling airy rather than cramped. If your table is pushed against a wall, consider a single narrow shelf running the full width of the table for a built-in look.
5. A Rug Defines the Dining Zone
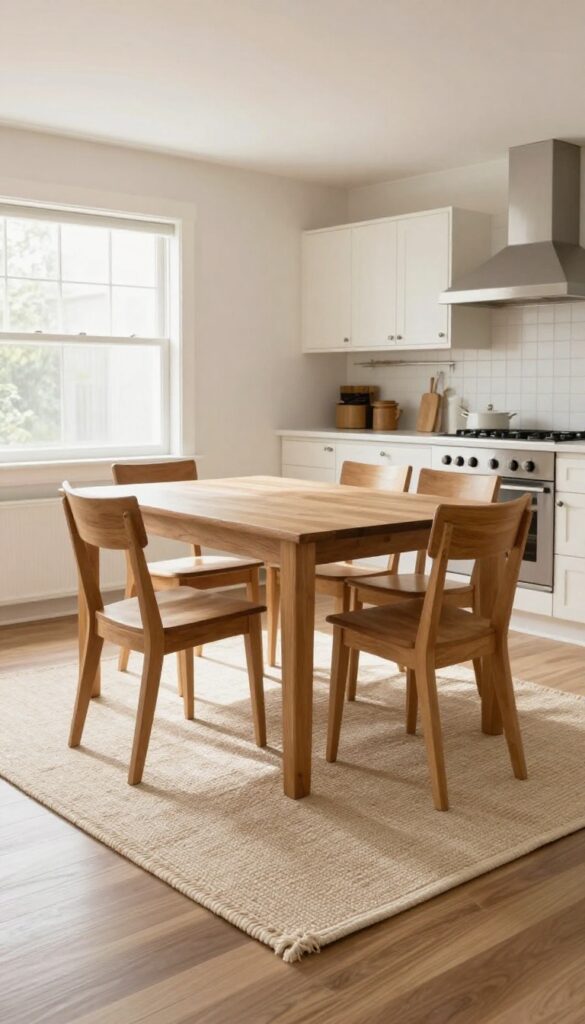
In an eat-in kitchen, the dining area can sometimes feel like an afterthought—just a table plopped in the middle of the room. But a well-chosen rug instantly anchors the table and chairs, creating a distinct zone that feels intentional and cozy. It’s a simple trick that adds warmth, texture, and a clear visual boundary between cooking and dining spaces.
Lay a durable rug under the table to visually separate the dining area from the kitchen. Choose a low-pile or indoor-outdoor style for easy cleaning.
Best Materials For High-traffic Spots
- Since this rug sits near the kitchen, it’ll face spills, crumbs, and constant foot traffic. Flatweave cotton, polypropylene, or indoor-outdoor rugs are your best bet. They’re tough, stain-resistant, and easy to wipe clean or toss in the wash.
- Avoid high-pile or shag rugs—they trap debris and make chair sliding a chore.
Size And Placement Tips
- Go big enough so that even when chairs are pulled out, all four legs stay on the rug. A good rule: add at least 24 inches of rug beyond the table edge on each side. Center the rug under the table, and make sure it doesn’t bump into cabinets or the island.
- A too-small rug looks skimpy and can trip you up.
Budget-Friendly Swap
You don’t need a designer rug to make this work. Look for affordable indoor-outdoor rugs at home stores or online—they often mimic natural fibers like jute or sisal but cost less and clean up better. A simple solid or subtle pattern in a warm neutral ties the space together without breaking the bank.
6. Pendant Lights Hang Low for Intimacy
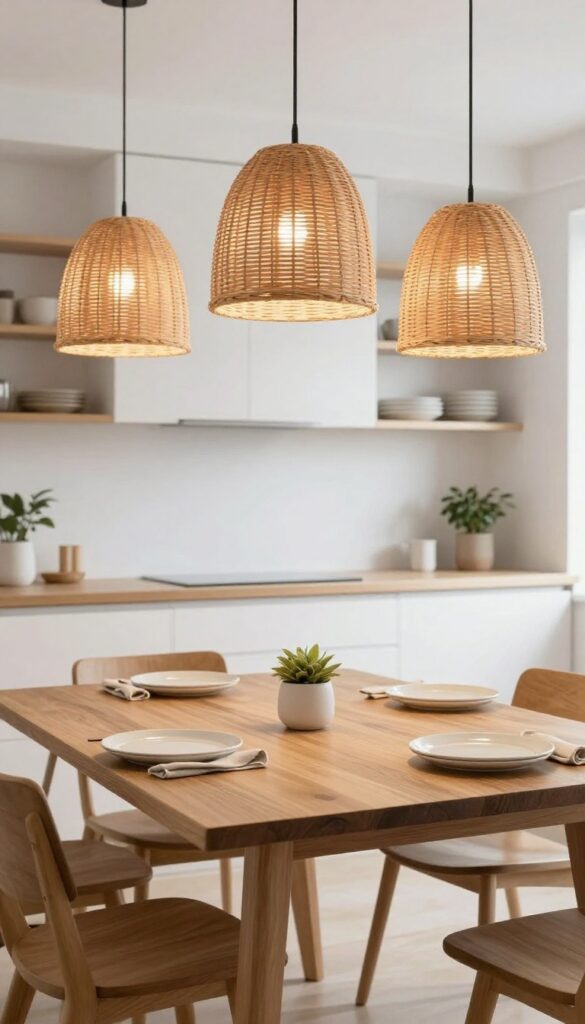
Lighting can make or break a dining area, especially in an open kitchen layout. A single pendant or a cluster of small shades hung 30-36 inches above the table creates a focal point and warms up the space. Go for budget-friendly options like paper or rattan to keep costs low while adding texture and soft glow.
Hanging lights low over the dining table instantly defines the eating zone in a kitchen. It draws the eye down, making the table feel like a cozy island rather than just another surface. The key is height—too high and you lose the intimate effect; too low and it gets in the way.
Stick to that 30-36 inch range for a balanced look that works with standard table heights. Budget-friendly materials like paper lanterns or woven rattan shades are perfect for this because they diffuse light softly and add warmth without breaking the bank. Plus, they're lightweight and easy to install yourself.
Best Materials For A Soft Glow
- Paper shades are the ultimate budget winner—they cast a warm, diffused light that flatters faces and food. Rattan or bamboo pendals add natural texture and pair well with wooden tables or neutral kitchens. Both options are affordable, often under $50 each, and come in various shapes like globes, drums, or cones.
- Avoid glass or metal if you're going for that soft, intimate vibe; they tend to create harsher shadows.
How Many Lights To Use
- For a rectangular table, a row of three small pendants spaced evenly looks balanced and modern. A round table works beautifully with a single statement shade or a cluster of three different-sized ones hung at varying heights. Keep the cluster within the table's footprint so no light hangs over empty floor space.
- If your table is small, one medium pendant is plenty—don't overcrowd the visual area.
Installation Tip For Renters
- If you can't hardwire a pendant, try plug-in pendant kits that hang from a ceiling hook and plug into a nearby outlet. You can also use a swag hook to route the cord along the ceiling. Another renter-friendly hack: hang a paper lantern from a command hook rated for weight, then use a cord cover painted to match the ceiling.
- It's a temporary fix that still delivers that low-hang intimacy.
7. Fold-Down Wall Tables for Tiny Kitchens
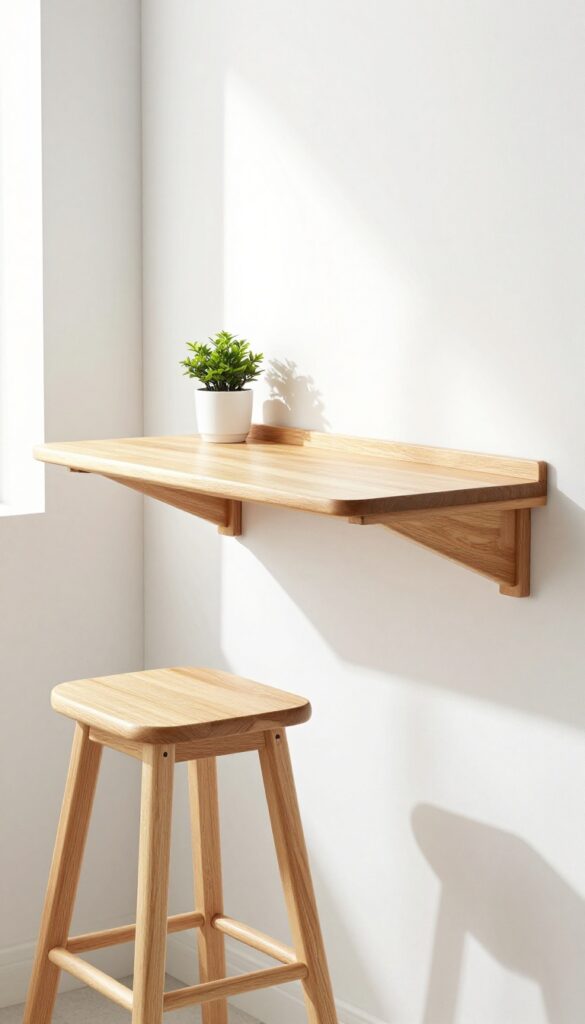
When your kitchen is so small that every inch of floor space matters, a traditional dining table can feel like a luxury you simply don't have room for. That's where a fold-down wall table comes in—it's a smart, space-saving solution that gives you a functional eating surface exactly when you need it, then disappears when you don't. Think of it as a tiny kitchen's best friend: a drop-leaf table mounted to the wall flips up for meals and folds flat against the wall, leaving the floor clear for movement or other activities.
A drop-leaf table mounted to the wall flips up when you need it and folds flat when you don't. Pair with a couple of folding chairs stored nearby. This setup works especially well in galley kitchens, breakfast nooks, or even a hallway that leads into the kitchen.
The key is to mount it at a comfortable bar-height or standard table height, depending on your chairs. For a budget-friendly version, look for a secondhand wooden drop-leaf table or build your own using a sturdy hinge mechanism and a piece of plywood cut to size.
Best Materials
- Go for a solid wood or wood-veneer top that can handle daily use and occasional spills. A light oak or birch finish keeps the space feeling airy, while a darker walnut adds warmth without overwhelming a small room. If you're on a tight budget, a laminate top with a wood-grain pattern is a durable and affordable alternative.
- Avoid glass tops—they show fingerprints and can feel fragile in a busy kitchen.
Small-space Fix
Mount the table at a height that works with folding chairs or stools that can tuck completely underneath when not in use. Consider adding a shallow shelf above the table for a few everyday items like a salt shaker or a small plant. When the table is folded down, the shelf keeps the wall from looking bare and adds a touch of personality.
Budget-Friendly Swap
Instead of buying a new drop-leaf table, repurpose an old wooden desk or a sturdy cutting board with folding brackets from a hardware store. Attach the brackets to the wall and the board to the brackets for a custom look at a fraction of the cost. Paint the board in a cheerful color like sage green or soft yellow to make it a focal point.
8. Mix and Match Chairs for Personality
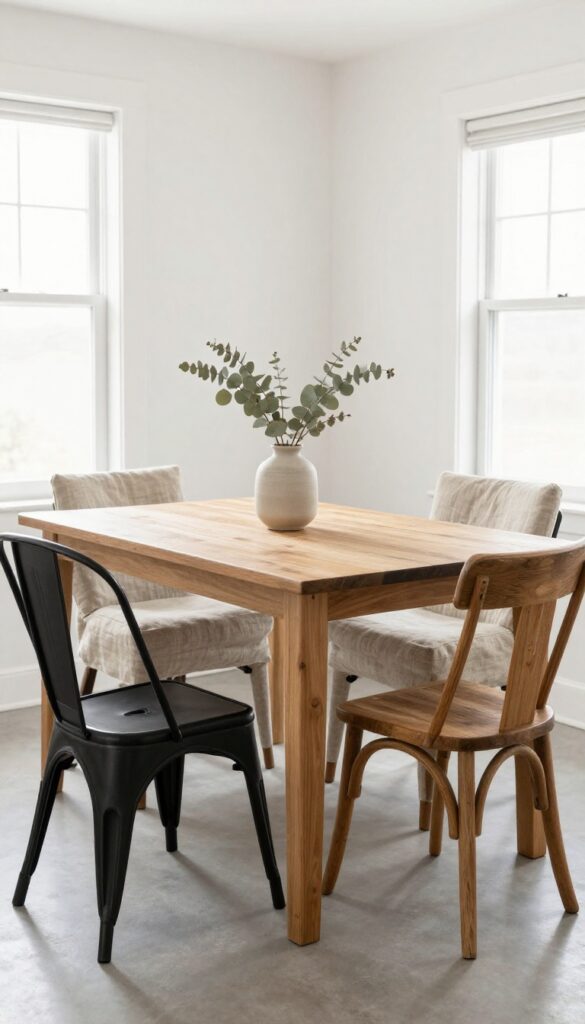
A matching dining set can feel safe, but it often lacks character. By combining different chair styles around your table, you instantly add visual interest and a collected-over-time vibe. Thrift stores and flea markets are goldmines for budget-friendly finds that let you experiment without breaking the bank.
The beauty of mismatched chairs is that they break up the monotony of a uniform set while still feeling intentional. Start with a pair of sturdy armchairs at the head of the table—these anchor the look. Then fill the sides with two or three side chairs in complementary shapes or materials.
The key is to keep one element consistent, like color, wood tone, or seat height, so the mix feels curated rather than chaotic. A quick sand and paint job can unify thrifted chairs that are otherwise too different.
Best Materials To Combine
- Wood and metal are a classic pairing—think rustic farmhouse chairs on one side and sleek industrial ones on the other. For a softer contrast, mix upholstered chairs with wooden ones. Velvet or linen seats add texture and comfort, while bare wood keeps the look grounded.
- If you're working with a small budget, spray-paint mismatched wooden chairs in the same color for instant cohesion.
Layout Tip
- Place the most substantial chairs at the head of the table to create a visual anchor. Lighter or smaller chairs work well along the sides. If your table is against a wall, use armchairs on the outer side and side chairs against the wall to save space.
- For round tables, alternate chair styles evenly around the perimeter.
Budget-Friendly Swap
- Skip the expensive designer chairs and hit up thrift stores, garage sales, or Facebook Marketplace. Look for solid wood frames that you can sand and repaint. Even chairs with worn upholstery are fair game—just recover the seats with fabric remnants.
- A can of spray paint and new seat cushions can transform a $5 find into a showpiece.
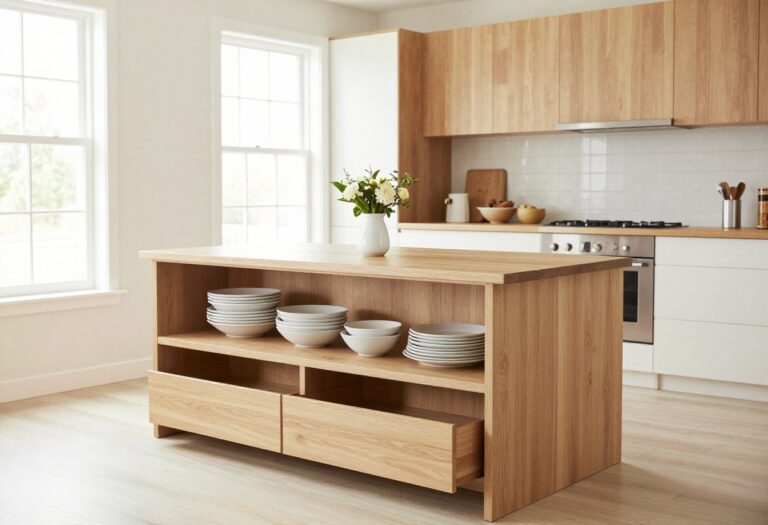
9. Use a Kitchen Cart as a Mobile Dining Island
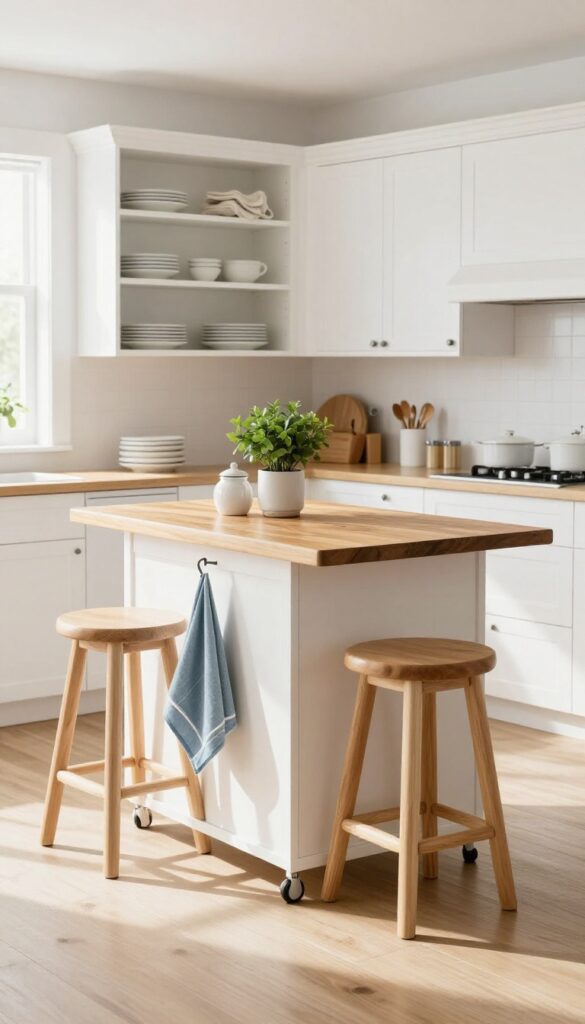
A rolling kitchen cart is one of those budget-friendly buys that keeps on giving. It adds prep space, extra storage, and a casual dining spot all in one compact package. The best part?
You can move it wherever it's needed—pull it out for breakfast, then tuck it away when you want the floor space back.
For small kitchens or eat-in layouts that feel tight, a kitchen cart with a butcher-block top is a smart workaround. It gives you a sturdy surface for chopping veggies or setting down a coffee mug, and the open shelves or drawers below hold everyday dishes, linens, or pantry overflow. When you need a quick meal spot, just roll it to the table or counter, grab a couple of stools, and you're set.
Afterward, it slides back into its corner like nothing happened. This idea works especially well in rental kitchens where you can't install a permanent island, or in any home where flexibility matters more than a built-in.
Best Materials And Colors
Look for a cart with a solid wood or butcher-block top—it's durable and looks warm against most cabinet finishes. A white or light gray base keeps things airy, while a dark navy or black cart adds a bit of drama. Metal frames with a matte finish feel industrial but still homey, especially paired with a natural wood top.
Styling And Storage Tips
Use the shelves below for items you reach for daily: a stack of salad plates, cloth napkins, or a small basket of fruit. Hang a couple of S-hooks on the side for kitchen towels or a lightweight cutting board. Keep the top mostly clear except for a small plant or a jar of utensils—you want it ready for action at a moment's notice.
Small-space Layout Fix
In a narrow galley kitchen or a corner dining nook, measure first to make sure the cart won't block traffic when pulled out. A cart that's 36 inches wide or less usually fits standard openings. Place it against a wall when not in use, and tuck two slim stools underneath so they're out of sight.
10. Add a Mirror to Expand the Space
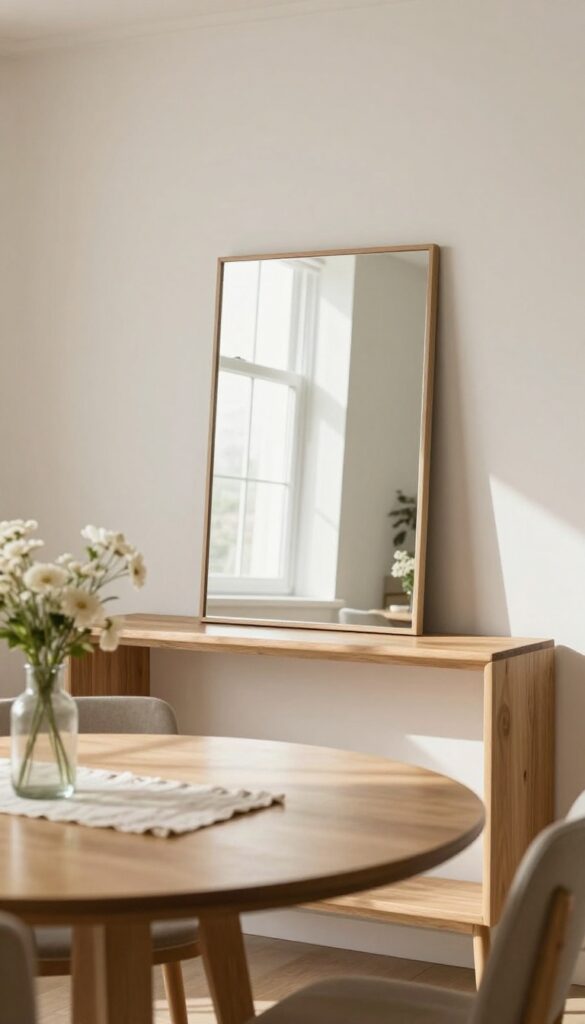
A well-placed mirror can completely transform a compact eat-in kitchen. It bounces light around the room, making the whole space feel airier and more open. Plus, it’s one of the most budget-friendly decor tricks you can try.
Hang a large mirror on one wall near the dining area to reflect light and make the room feel bigger. It's an inexpensive trick that works wonders.
Best Placement
Position the mirror across from a window to maximize natural light. If that’s not possible, aim it toward a light-colored wall or a lamp to create a soft glow. Avoid placing it behind the dining chairs where it might get bumped.
Frame Style
A simple, thin frame keeps the look clean and modern. For a budget-friendly option, try a frameless mirror with beveled edges. If you want a bit of warmth, a natural wood frame works great in a kitchen with wooden accents.
Size Matters
Go big—a small mirror can look like an afterthought. A mirror that’s at least 36 inches wide will make a noticeable difference. Lean it against the wall on a console table for a casual, relaxed vibe.
11. Keep a Cohesive Color Palette
A smooth eat-in layout doesn't need a full renovation—it just needs a color story that ties both zones together. When your kitchen and dining area share the same two or three hues, the eye glides from counter to table without a jarring stop. This trick costs nothing but a little paint and planning, yet it makes the whole space feel intentionally designed.
Sticking to a tight palette of two or three colors creates visual flow without clutter. Pick one neutral—like warm white, soft gray, or beige—as your base, then add one or two accent colors that appear in both areas. Maybe your kitchen cabinets are a muted sage, so you bring that same green into the dining nook with chair cushions or a pendant shade.
Or your dining chairs are a deep navy, and you echo that blue in kitchen towels, a backsplash tile, or a few ceramic canisters. The key is repetition: the same colors pop up in both zones, making the layout feel like one cohesive room rather than two separate spaces. This approach works especially well in open-concept homes where the kitchen flows directly into the dining area, but it also helps in galley kitchens with a small table tucked at one end.
You don't need to match everything perfectly—just keep the palette consistent enough that the eye moves smoothly from one function to the next.
Best Colors For Flow
- Neutrals are your safest bet for a cohesive palette because they blend easily and keep the space calm. Think creamy off-white, warm greige, or soft taupe as your main backdrop. For accents, choose one muted color like dusty blue, sage green, or terracotta, and one deeper tone like charcoal or navy for contrast.
- Avoid high-contrast combos like black and white unless you plan to repeat both equally in each zone—otherwise one area can feel heavier.
Budget-Friendly Swap
- If painting cabinets or walls feels too permanent, use textiles and accessories to unify the palette. Swap out kitchen towels, a runner, placemats, and chair cushions in your chosen accent colors. A set of coordinated dish towels and napkins costs under $20 and instantly ties the two zones together.
- Even a single vase or fruit bowl in your accent color on the counter echoes the dining table centerpiece.
Finishing Touch
Add one or two small decor pieces that bridge the two areas—like a ceramic utensil holder on the counter that matches the dining table's ceramic fruit bowl. Or hang a single piece of art on the wall between the kitchen and dining zone that pulls in both accent colors. This tiny visual anchor reinforces the palette without adding clutter.
FAQ
What is the best table shape for a small eat-in kitchen?
Round or oval tables work best because they eliminate sharp corners and allow more people to fit in tight spaces. They also make traffic flow easier.
How much space do I need between the table and kitchen counters?
Aim for at least 36 inches of clearance so people can move around comfortably. If possible, 42 to 48 inches gives even more breathing room.
Can I use bar stools instead of dining chairs?
Absolutely. Bar stools at a counter-height table or island save space and create a casual vibe. Just make sure they have footrests for comfort.
What type of lighting works best above a dining table in a kitchen?
Pendant lights or a small chandelier hung 30-36 inches above the table provide focused light and define the area. Dimmable bulbs add flexibility.
How can I make my eat-in kitchen feel cozy on a budget?
Add soft elements like a rug, cushions on chairs, and warm lighting. A few plants or a bowl of fruit on the table also bring life without costing much.
Conclusion
Creating a smooth eat-in layout doesn't have to mean knocking down walls or spending a fortune. Small changes—like swapping out a table shape, adding a rug, or hanging a pendant light—can completely transform how your kitchen feels.
The key is to choose ideas that fit your space and your lifestyle. Start with one or two of these tips, and you'll soon have a kitchen-dining area that's both functional and welcoming.