15 Kitchen Island Storage Ideas Layout Plans That Save Room
Your kitchen island can be more than just a prep station or breakfast bar. With a little planning, it becomes a storage powerhouse that keeps clutter at bay and everything within reach.
Whether you're remodeling or just looking for a weekend refresh, these 15 ideas blend smart layouts with practical storage. From hidden drawers to open shelving, each concept is designed to maximize every inch without overwhelming your space.
Ready to make your island work harder? Let's dive in.
1. Pull-Out Trash and Recycling Bins
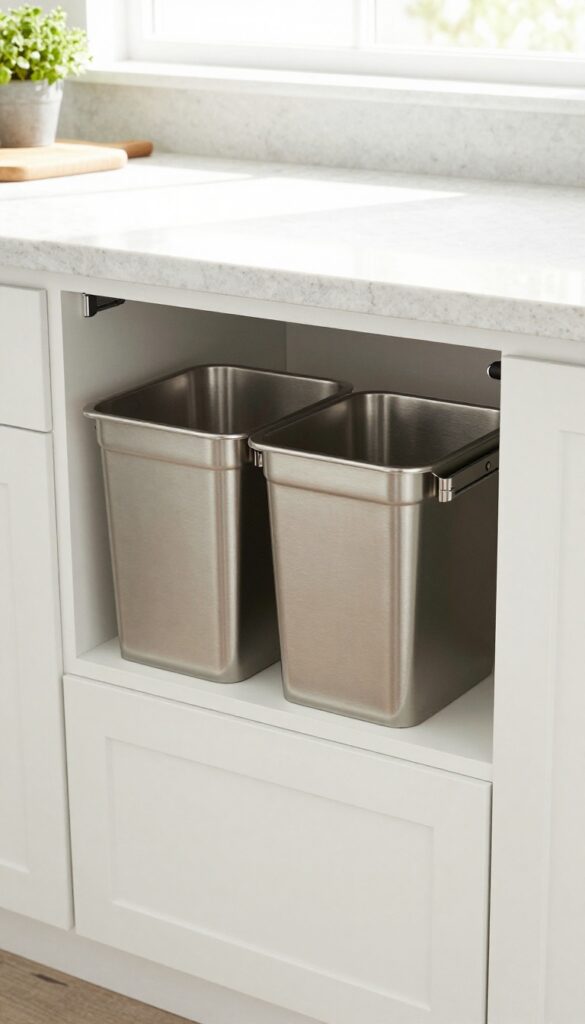
A cluttered kitchen counter or a bulky trash can taking up precious floor space can make even the most organized cook feel cramped. Pull-out bins tucked inside your island solve that problem with a clean, built-in look. You get the convenience of easy access without the visual noise.
This is one of those weekend-friendly upgrades that instantly makes your kitchen feel more spacious and intentional.
Installing pull-out trash and recycling bins inside your kitchen island is a smart way to keep waste out of sight while freeing up floor space. A double-bin system lets you sort recyclables from trash effortlessly, and adding a lid helps contain odors. This layout works especially well in galley or L-shaped kitchens where every inch counts.
The bins slide out smoothly on heavy-duty tracks, making disposal quick and mess-free. For a polished finish, choose bins that match your cabinet hardware or go with a sleek stainless steel option that complements modern appliances.
Best Layout Tip
Position the bins near the sink or prep zone so you can scrape plates and toss scraps without walking across the room. If your island has a seating area, place the bins on the opposite side to keep smells and sights away from diners.
Material And Finish
Stainless steel bins resist rust and are easy to wipe down. For a warmer look, choose a cabinet-front panel that matches your island's base—this makes the bins virtually disappear. Soft-close slides add a touch of luxury and prevent slamming.
Small-space Fix
If your island is narrow, opt for a single, wider bin instead of two smaller ones. You can still separate trash and recycling by using removable dividers or color-coded liners. This keeps the footprint compact while maintaining functionality.
2. Deep Drawers for Pots and Pans
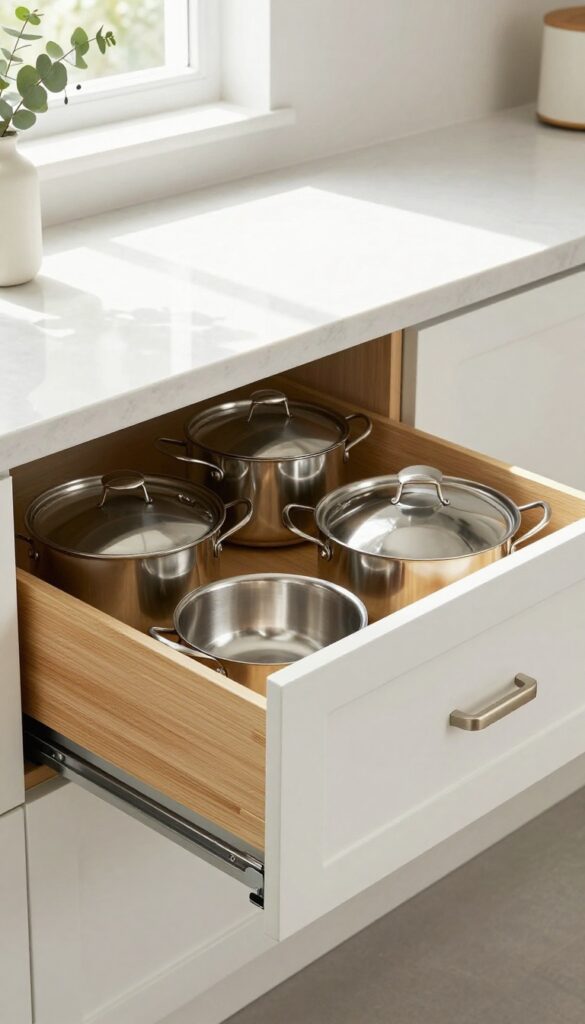
Standard cabinets with doors and shelves often turn into a black hole of clanging pots and lids. Deep, full-extension drawers change that completely. They slide out smoothly so you can see everything at once, grab a heavy skillet without bending awkwardly, and put it back without a wrestling match.
This swap is a weekend-refresh dream because it doesn't require a full renovation—just pull out the old cabinet box and slide in a drawer unit. The payoff is a kitchen that feels instantly more organized and spacious.
Deep drawers are a storage powerhouse for any kitchen island. They eliminate the frustration of stacking pots and pans in dark cabinets, where the one you need always seems to be at the bottom. With full-extension glides, every inch of the drawer is accessible, and you can use vertical dividers to keep lids upright and separated.
This system works especially well in islands because the depth allows for storing larger stockpots and roasting pans that might not fit elsewhere. Plus, it's a relatively simple DIY upgrade if you're comfortable with basic carpentry, or a quick call to a handyman for a weekend project.
Best Materials
- Go with plywood drawer boxes instead of particle board—they're stronger, resist moisture better, and last for decades. For the drawer fronts, match your existing cabinet style; shaker-style fronts in a durable paint finish (like a soft white or warm gray) keep the look timeless. Inside, use bamboo or coated wire dividers for lids and bakeware.
- They're lightweight, easy to clean, and add a subtle texture contrast.
Layout Tip
Designate one deep drawer for pots and another for pans to prevent stacking. Use a tiered insert or a simple wooden peg system to keep lids vertical—this saves space and lets you grab the right lid without shifting everything. If your island is wide enough, consider a double-width drawer with a central divider; it gives you two organized zones without needing separate units.
Small-space Fix
- In a compact island, choose a single deep drawer instead of two standard ones. Use a custom-cut insert with adjustable pegs to accommodate both pots and lids in one layer. This maximizes every inch while keeping everything visible.
- Pair it with a magnetic strip on the inside of the drawer front for storing small lids or measuring spoons.
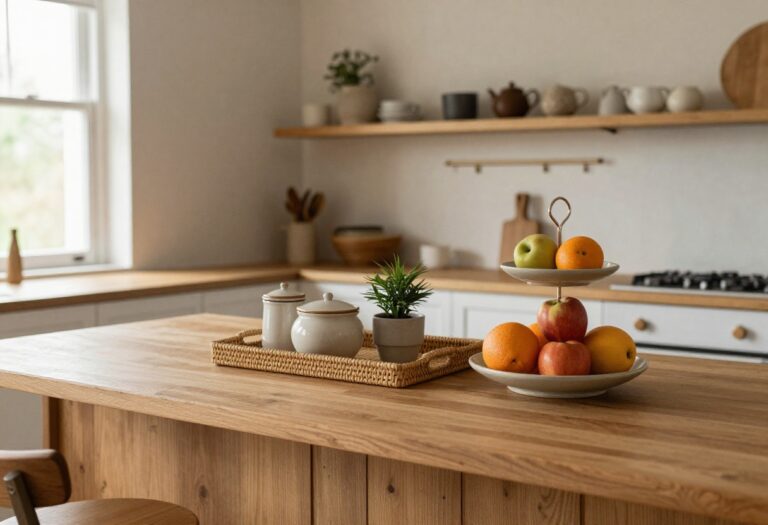
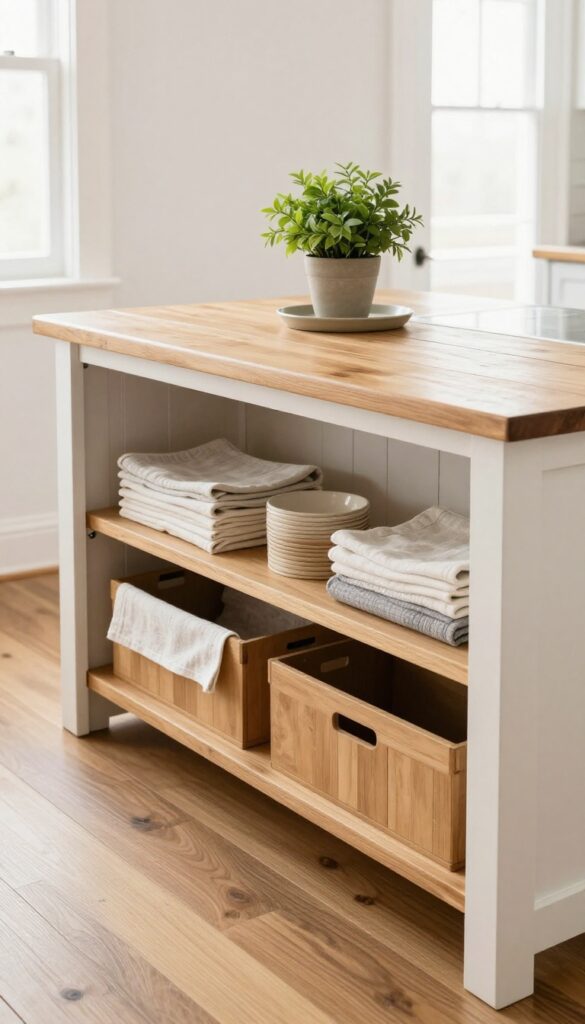
3. Open Shelving for Everyday Dishes
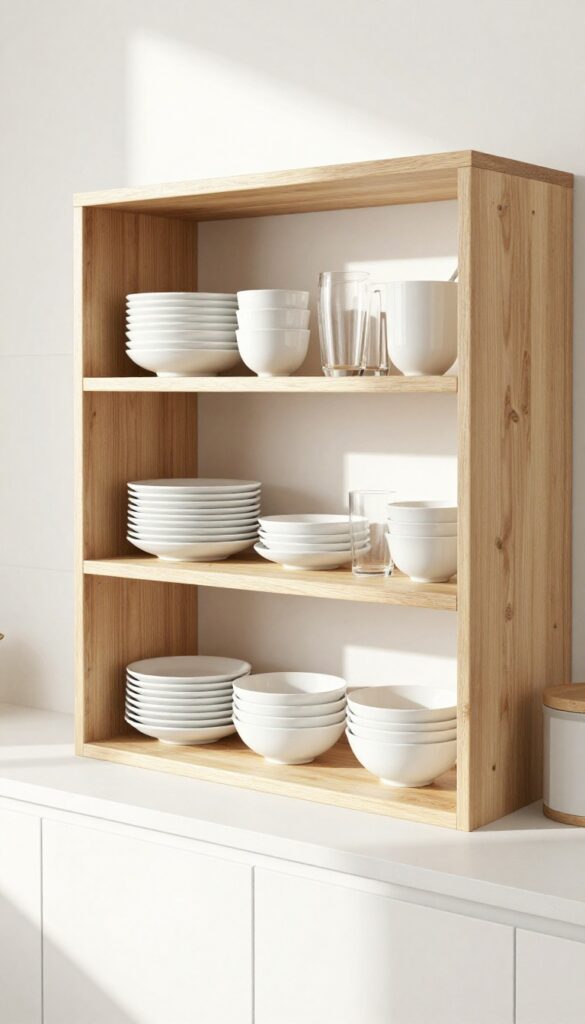
Open shelving on one side of your kitchen island turns daily dishes into part of the decor. Instead of hiding plates and bowls behind cabinet doors, you keep them within arm's reach while adding a casual, breathable feel to the room. Matching dinnerware creates a cohesive look, but even a mix of white stoneware and wood tones can feel intentional and warm.
It's a smart way to save cabinet space and make your island work harder without feeling cluttered.
Adding open shelves to the side of your island that faces the dining area or main walkway is a weekend-friendly project that instantly opens up your kitchen. You can use floating shelves in wood or metal to match your island's style, or repurpose a small bookshelf for a similar effect. The key is to keep the shelves shallow—about 8 to 10 inches deep—so they don't intrude into the walkway.
Stack plates vertically in divided racks, nest bowls, and line up glasses by height. This setup frees up upper cabinets for less-used items and makes your morning coffee or dinner prep feel more streamlined. Plus, seeing your everyday dishes within view encourages you to use them more often, which is a nice shift away from saving things "for good."
Best Materials
Go with natural wood shelves like oak or walnut to add warmth, or choose sleek metal brackets with thick butcher block for an industrial touch. The shelf material should complement your island's finish—if your island is painted, consider a contrasting wood tone. For a budget-friendly swap, use reclaimed wood or even a stained pine board with simple L-brackets.
Layout Tip
Position the shelves on the side of the island that faces your main seating or prep area. Keep the lowest shelf at least 18 inches above the countertop so you can still use the island surface for chopping or serving. Stack plates vertically in a divided wooden rack to maximize space and keep them stable.
Shelf Styling Tip
- Group similar items together—all white plates on one shelf, clear glasses on another. Add a small plant or a ceramic pitcher for visual break. Avoid overcrowding; leave about 20% of the shelf empty to keep the look airy.
- Rotate seasonal pieces like a wooden salad bowl or a stack of linen napkins to keep the display fresh.
4. Wine Rack or Wine Fridge Integration
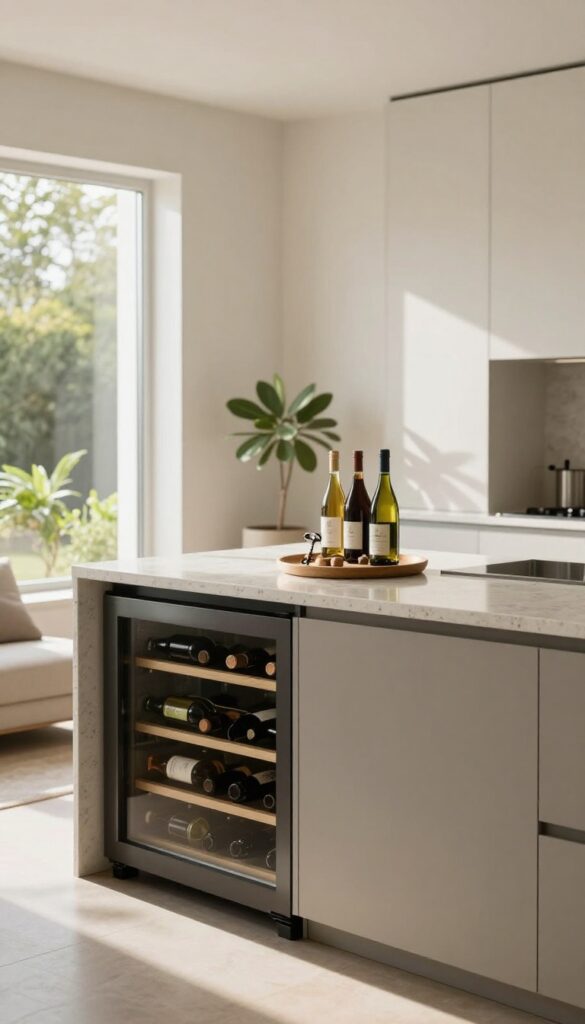
When your kitchen island doubles as a wine station, you instantly level up your hosting game without sacrificing an inch of floor space. A dedicated wine section keeps bottles organized, at the right temperature, and always within arm's reach. Whether you love a casual glass after work or throw dinner parties every weekend, this setup feels both luxurious and totally doable.
Dedicate a section of the island to wine storage. A built-in wine fridge keeps bottles at the perfect temperature, while a countertop rack adds a decorative touch. Great for entertaining without taking up extra floor space.
Best Layout Tip
Place the wine fridge at the end of the island facing the dining area or living room. This way, guests can grab a bottle without stepping into your work zone. If your island is against a wall, a countertop rack on the far side works just as well.
Small-space Fix
Don't have room for a full fridge? Use a slim under-counter model (just 15 inches wide) or a tiered countertop rack that holds six to eight bottles. Both options keep the look clean and the footprint tiny.
Finishing Touch
Add a small tray for corkscrews and wine stoppers right next to the rack. It makes the setup feel intentional and saves you from hunting for tools mid-conversation.
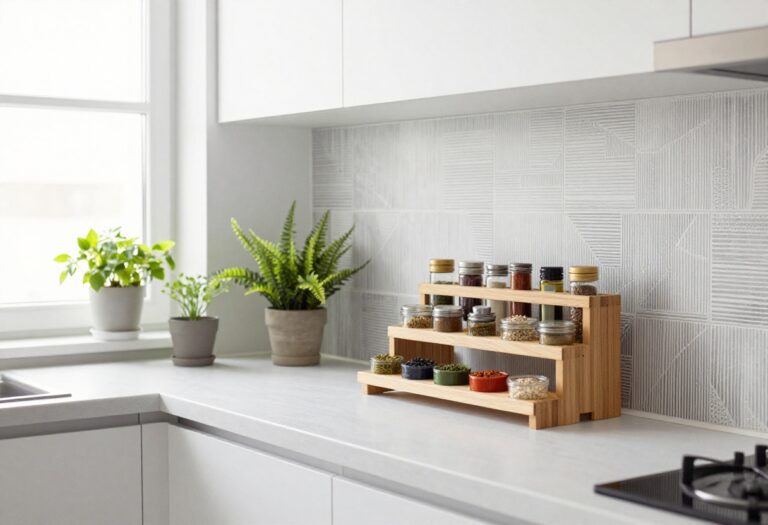
5. Spice Drawer Near the Cooktop
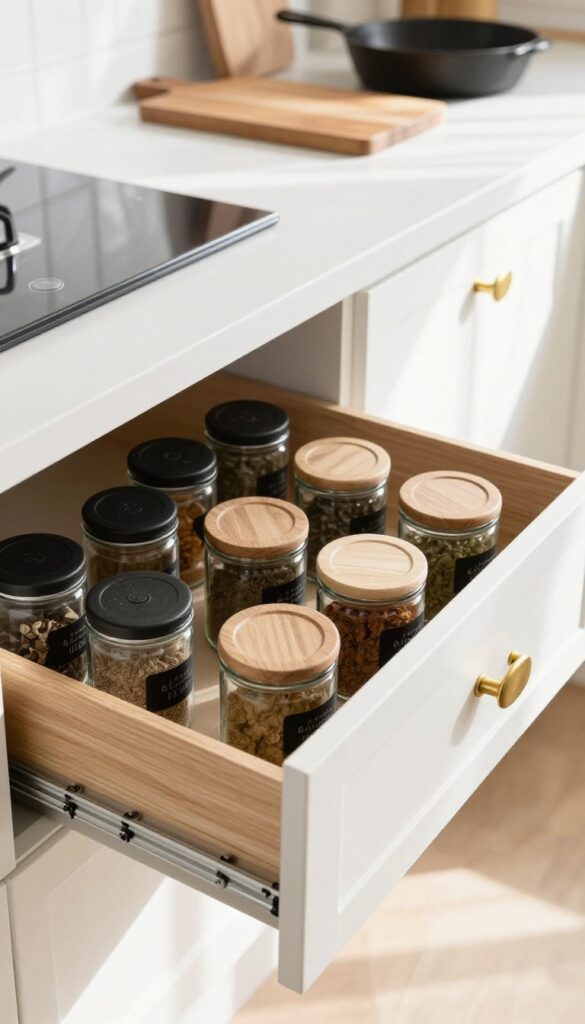
When your island sits right next to the stove, that close reach becomes a golden opportunity for smarter cooking. Instead of stacking spice jars in a deep cabinet where they get lost, tuck a shallow drawer right into the island. Every pinch of cumin or dash of smoked paprika is instantly at hand.
It turns a quick weeknight dinner into a smoother, more enjoyable process.
A dedicated spice drawer near the cooktop keeps your most-used seasonings within arm's reach. No more digging through cluttered cabinets or knocking over bottles while you're stirring a pot. The shallow depth—around 3 to 4 inches—prevents stacking and makes everything visible at a glance.
Use tiered inserts or small glass jars with uniform labels for a clean, organized look that also feels like a subtle upgrade to your kitchen workflow.
Best Layout Tip
- Position the drawer on the side of the island closest to the stove. If your island has a cooktop on top, the drawer can go directly underneath or on the adjacent side. Keep it shallow enough to avoid wasted space—just deep enough for standard spice jars.
- A cutlery-style insert with adjustable dividers works perfectly.
Storage Tip
- Opt for small, uniform jars with labels facing up. This way you can spot what you need without pulling everything out. Magnetic strips on the inside of the drawer front can hold metal tins for even quicker access.
- Group spices by type (baking, savory, herbs) to speed up your cooking flow.
Finishing Touch
Line the drawer with a non-slip mat or felt liner to keep jars quiet and in place. Add a small LED strip under the drawer front for a soft glow that makes labels easy to read. Choose a warm wood or neutral interior finish so the drawer feels intentional, not just functional.
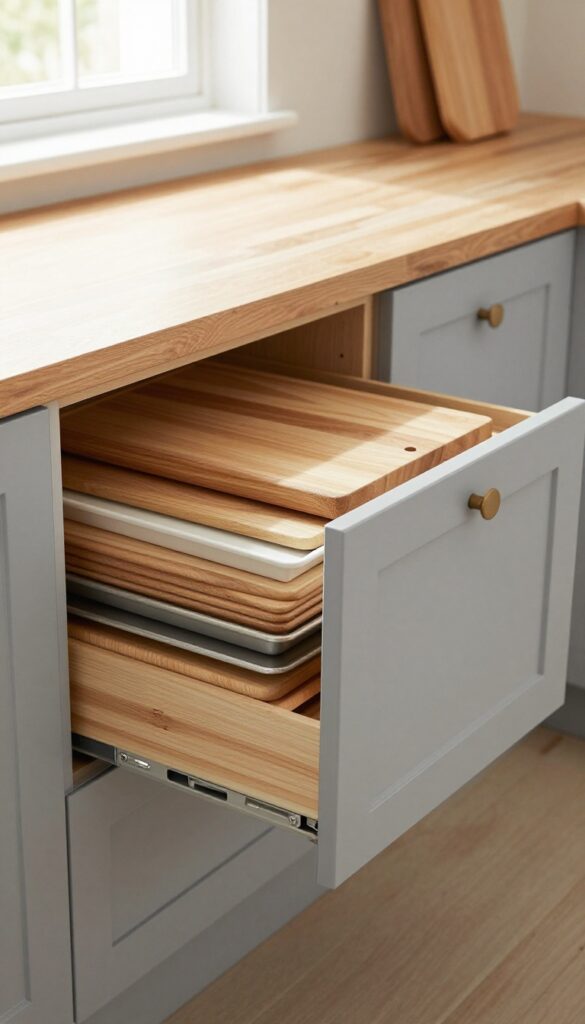
6. Cutting Board Storage Slot
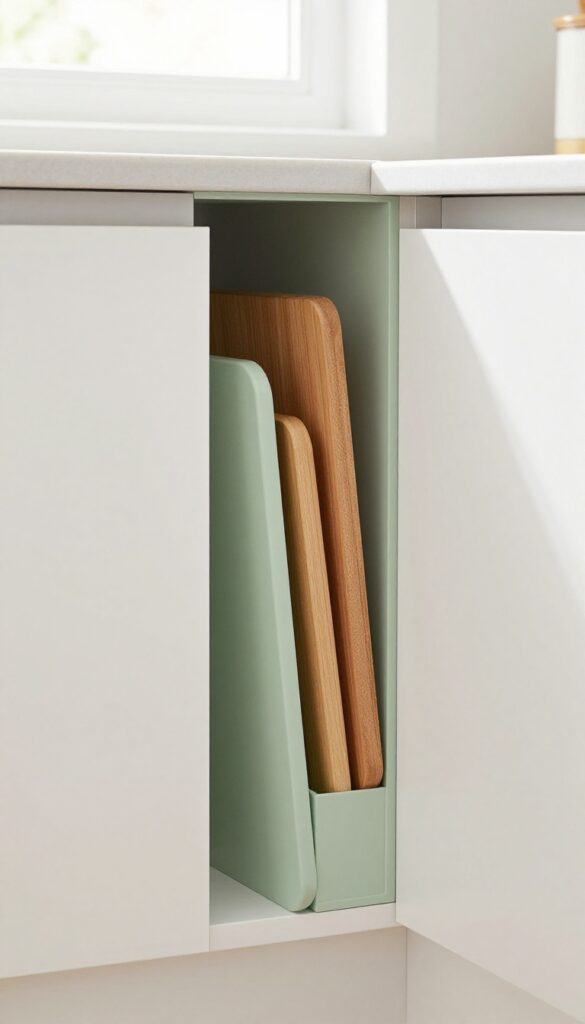
A dedicated slot for cutting boards isn't just clever—it's a weekend-refresh dream. You can carve out a narrow vertical space between cabinets or beside the sink, and suddenly those bulky boards have a home that's both tidy and protective. Best of all, this tweak costs next to nothing if you're handy with a jigsaw or can repurpose an existing gap.
Instead of stacking cutting boards in a drawer where they slide around and dull edges, a vertical slot keeps each board upright and accessible. The visual effect is clean and almost architectural—a slim opening that reveals just the edges of your boards. It works beautifully in a galley kitchen or on an island end, and it frees up prime drawer real estate for spatulas and peelers.
Best Materials
- For the slot itself, use plywood or MDF painted to match your cabinets. If you're retrofitting, a simple frame of 1×2 lumber creates a channel. Line the bottom with felt or cork to cushion the boards and prevent sliding.
- The slot should be about 1.5 inches wide—enough for most boards but not so wide that they tilt.
Layout Tip
Position the slot near your prep zone, ideally between the sink and stove. If your island has a solid end, you can build the slot into the side panel. For a rental-friendly version, use a tension rod inside a deep cabinet to create a vertical divider—no tools required.
Finishing Touch
Paint the interior of the slot a contrasting color like navy or sage for a surprise pop when you grab a board. Or line it with a thin strip of LED tape for a soft glow that makes the slot feel intentional and polished.
7. Appliance Garage for Small Gadgets
Counter space is precious, especially in a kitchen where every inch counts. An appliance garage hides your toaster, blender, or coffee maker behind a sleek roll-top or lift-up door, keeping them plugged in and ready while maintaining a clean, uncluttered look. It's a weekend-friendly project that instantly streamlines your morning routine and makes your kitchen feel more spacious.
An appliance garage is essentially a dedicated cubby with a door that closes to conceal small appliances. It can be a custom-built addition to your cabinetry or a standalone cabinet placed on the counter. The key is to have an outlet inside so you can leave everything plugged in—no more hauling the mixer out of a cupboard.
Choose a roll-top door for a classic feel or a lift-up door for a more modern look. This idea works especially well in galley kitchens or on narrow countertops where every inch of workspace matters.
Best Materials
Match your existing cabinetry for a seamless look, or go with a contrasting wood like walnut for a pop of warmth. For a budget-friendly option, use a ready-made cabinet from a home store and paint it to match your trim. Metal roll-top doors in brushed steel or matte black add an industrial edge, while a painted wood door with beadboard panels brings cottage charm.
Layout Tip
Position the appliance garage near an outlet and close to your main prep zone so you can easily reach the toaster or coffee maker. If you have a corner counter, consider a corner appliance garage to utilize dead space. Make sure the door opens fully without hitting upper cabinets or light fixtures—measure twice before installing.
Finishing Touch
Add a small pull-out shelf or a lazy Susan inside to make reaching the back appliance effortless. Use a slim power strip with a built-in surge protector to manage cords neatly. For a polished look, paint the interior of the garage a slightly darker shade than the door to create depth and hide any inevitable crumbs.
8. Drawer Dividers for Utensils and Gadgets
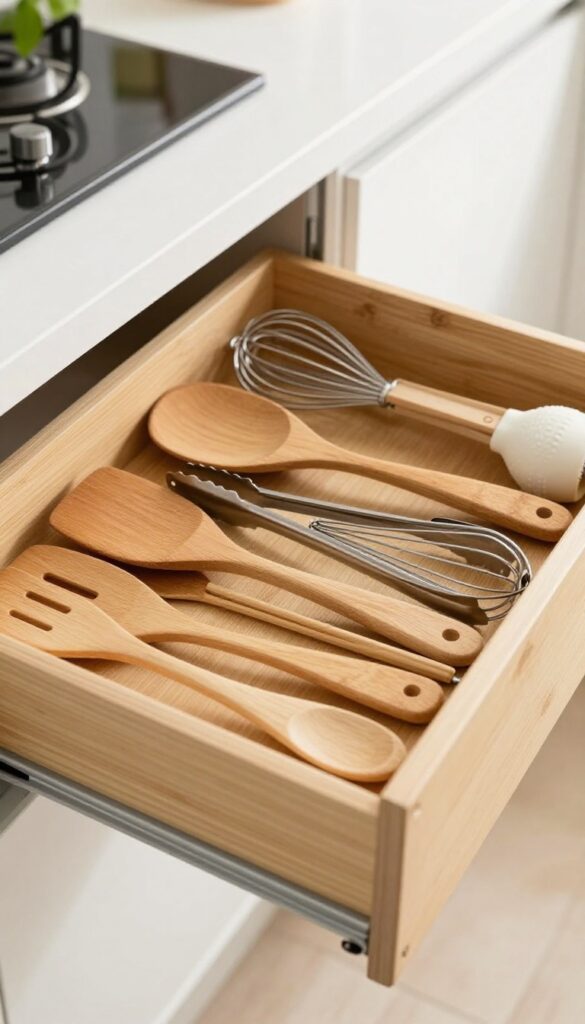
Wide kitchen drawers are a dream until you open one and find a tangled mess of spatulas, whisks, and measuring cups. That chaos eats up time and makes cooking feel more frustrating than it should. Adjustable drawer dividers are the weekend-refresh solution that turns a jumbled drawer into a neatly organized tool station.
They're easy to install, completely customizable, and instantly make your kitchen feel more put-together.
Adjustable dividers let you create dedicated slots for every utensil and gadget you own. No more digging through a pile to find the right tool. You can arrange the compartments to fit your specific collection, whether that means a wide slot for your ladle collection or narrow ones for skewers and chopsticks.
The result is a drawer that opens smoothly and reveals everything at a glance. Plus, dividers keep items upright and separated, so they stay clean and ready to use. This is one of those small upgrades that makes a big difference in your daily routine.
Best Materials
- Bamboo dividers are a popular choice—they're lightweight, durable, and bring a warm natural texture to your drawers. For a more modern look, clear acrylic dividers keep things sleek and let you see through to the drawer bottom. Metal dividers with a matte black or brushed nickel finish add an industrial edge and are easy to wipe clean.
- Whichever material you choose, make sure the dividers are adjustable so you can reconfigure the layout as your tool collection grows.
Layout Tip
- Start by grouping your utensils by function: cooking utensils (spatulas, tongs, ladles), baking tools (whisks, measuring cups, rolling pins), and prep gadgets (peelers, zesters, garlic presses). Then arrange the dividers to create zones that match these categories. Place the most frequently used tools toward the front of the drawer for easy access.
- If you have deep drawers, consider using tiered dividers or adding a small riser to store smaller items on top of larger ones.
Small-space Fix
- In a narrow kitchen island with limited drawer space, use a single wide drawer with adjustable dividers to consolidate all your gadgets into one organized spot. Instead of spreading utensils across multiple drawers, you can fit everything into one well-planned drawer. This frees up other drawers for pots, pans, or linens.
- For extra efficiency, add a cutlery tray insert on top of the dividers for smaller items like measuring spoons and kitchen shears.
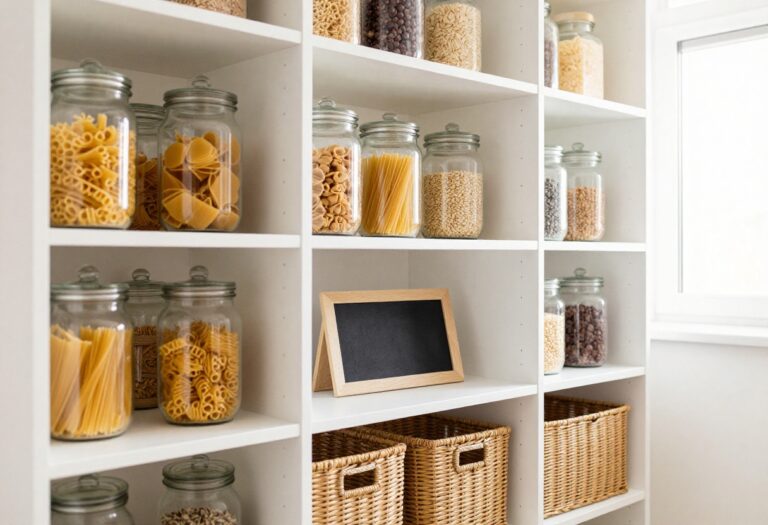
9. Pull-Out Pantry for Dry Goods
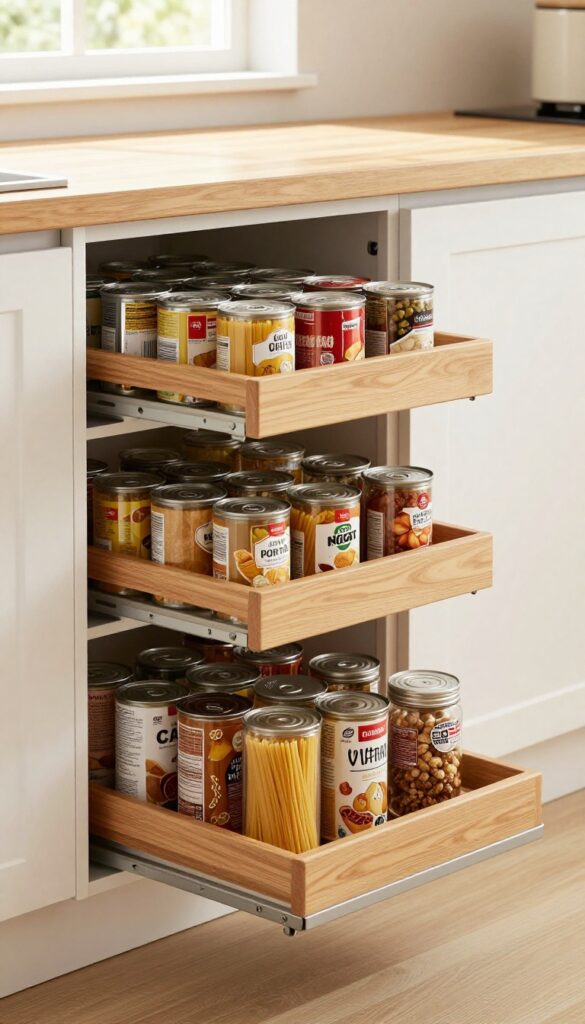
If your kitchen feels like it's missing a proper pantry, your island can step in. A tall, narrow pull-out shelf on one end turns unused space into a neatly organized mini pantry for canned goods, pasta, snacks, and spices. Everything stays visible and easy to grab, so you're not digging through cabinets or forgetting what you already have.
It's a smart solution for small kitchens where every inch counts, and it feels surprisingly spacious once you see how much fits in a slim profile.
Installing a pull-out pantry on your island is a weekend-friendly project that instantly upgrades your kitchen's storage game. The key is choosing the right depth and width to match your island's existing frame—typically 12 to 18 inches wide and tall enough to hold standard pantry items. Use adjustable dividers or tiered shelves to keep cans and jars from toppling over when you slide the unit out.
For a cohesive look, match the pull-out's front panel to your island's cabinetry or go with a contrasting color for a subtle design moment. This idea works best on the end of a longer island or on the side opposite the cooking zone, so it doesn't interfere with meal prep traffic.
Best Materials
- Go with sturdy plywood or MDF for the shelf boxes—they hold weight without sagging. Soft-close slides are worth the upgrade for a smooth, quiet pull-out. For the front panel, match your island's existing wood or painted finish, or try a warm oak or matte black for contrast.
- Wire baskets are another option if you prefer an airy look, but solid shelves keep dry goods tidier.
Layout Tip
Position the pull-out pantry on the end closest to your main food prep area so you can grab ingredients without walking around the island. If your island has seating, place it on the kitchen-facing side instead of the seating side to keep the pantry accessible yet out of the way. Leave at least 36 inches of clearance in front for easy pulling.
Small-space Fix
In a galley or very compact kitchen, a pull-out pantry can double as a spice and oil station. Use narrow, tiered inserts to fit taller bottles on one side and shorter spice jars on the other. Add a small bamboo riser to create two levels inside the same pull-out—maximizing vertical space without making the unit deeper.
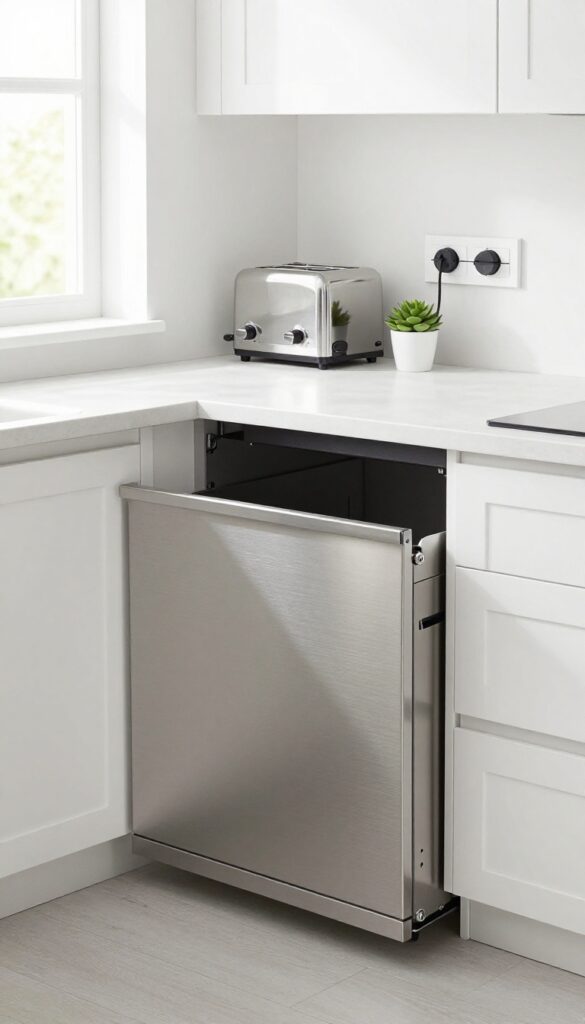
10. Built-In Microwave Drawer
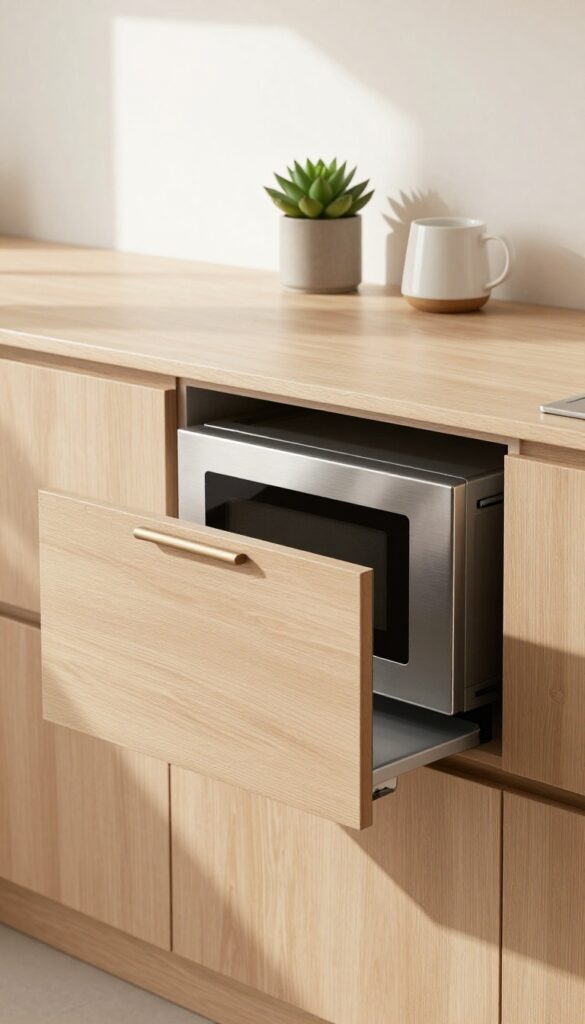
A microwave drawer slides out from under the counter, freeing up precious counter space and putting the controls at a reachable height for everyone. It's a sleek, integrated look that feels custom and modern without requiring a full renovation. The best part?
It tucks away completely, keeping your kitchen looking clean and uncluttered.
Installing a microwave drawer is a weekend-friendly project if you have an existing cabinet you can modify or a gap in your lower cabinetry. The drawer mounts like a dishwasher, so you'll need an electrical outlet nearby and proper ventilation space. Choose a model with a trim kit that matches your cabinet finish for a seamless built-in appearance.
This setup is especially handy for families—kids can safely heat snacks without reaching over hot surfaces, and shorter cooks won't struggle to see inside. Plus, it frees up your counter for a coffee station, cutting board, or just some breathing room.
Best Placement
The most popular spot is directly under the countertop in an island or peninsula, but you can also install one in a lower cabinet run near the main prep zone. Aim for a location that's convenient for both cooking and reheating—ideally within a few steps of the refrigerator and sink.
Styling It Seamlessly
To make the drawer blend in, order a custom front panel from your cabinet maker or use a matching slab door. Stainless steel fronts work too, but a panel-ready model lets you match your exact wood or painted finish. Add a slim pull handle that echoes your cabinet hardware for a cohesive look.
Installation Tip
Measure the cutout dimensions carefully—most drawers require a 24-inch wide opening and about 18 inches of depth. If you're replacing a standard cabinet, you may need to adjust the toe kick or add a filler strip. Hire an electrician if you need to run a new outlet, but the physical installation is straightforward with a helper.
11. Towel Rack or Hooks on the Side
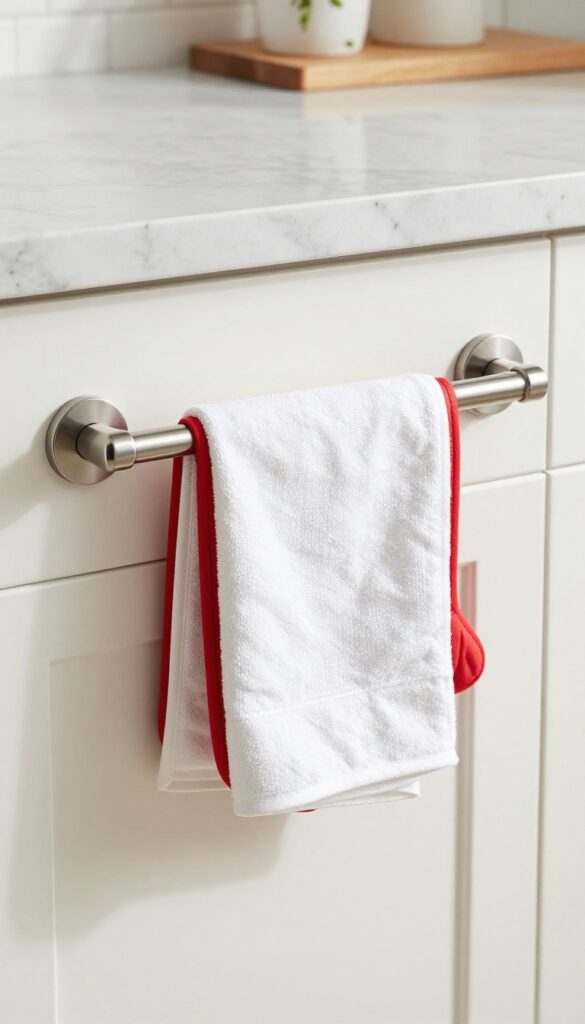
That empty side panel of your island is just begging to be useful. Adding a slim towel bar or a few hooks gives you a spot for dish towels and oven mitts without cluttering your countertops. It's a small tweak that makes a big difference in a busy kitchen, especially when you're cooking and need to grab a towel fast.
Plus, it keeps everything within arm's reach, so you're not dripping water across the floor.
A side-mounted towel rack or hooks is a weekend-friendly upgrade that instantly adds function and a touch of style. You can choose a sleek bar that matches your cabinet hardware or go with industrial hooks for a more rustic feel. Either way, it frees up drawer space and keeps your counters clear.
For a cohesive look, pick a finish that ties into your existing fixtures—brass, matte black, or stainless steel all work beautifully. Install it at a height that's easy to grab, typically around 18 to 24 inches below the countertop edge. This idea is especially great for small kitchens where every inch counts, turning an unused surface into a hardworking helper.
Best Materials
- Stick with durable, easy-to-clean materials like stainless steel, brass, or powder-coated metal. If your kitchen leans warm, go for brass or copper. For a modern look, matte black or chrome works well.
- Avoid wood or fabric-covered bars in this spot—they'll get damp and wear out fast. A simple metal bar or a row of sturdy hooks will hold up to daily use and stay looking good.
Placement Tip
- Mount the rack on the side of the island that faces your main work zone, not the dining area. That way, towels are handy while you cook but stay out of sight from the rest of the room. If your island has a breakfast bar overhang, place the rack below the overhang so it doesn't interfere with seating.
- For hooks, space them about 6 inches apart so each towel or mitt has room to dry.
Styling Note
- Treat your towel rack as a tiny decor moment. Fold or roll dish towels neatly before hanging them, and choose colors that complement your kitchen palette—like a soft sage green against white cabinets or a navy stripe with brass hardware. Swap towels seasonally for an easy refresh.
- A matching set of oven mitts hung nearby adds a polished, put-together feel.
12. Cookbook Shelf with a Display

A dedicated cookbook shelf does more than store your favorite reads—it turns your kitchen into a lived-in, personality-filled space. By choosing a shallow shelf or cubby, you keep recipes within easy reach while adding a curated visual moment. Propping one cookbook open creates an instant focal point that feels intentional, not cluttered.
This idea works beautifully in a kitchen island because it uses otherwise wasted end space. The open book invites browsing, and the surrounding shelf becomes a mini gallery for a small plant, a ceramic vase, or a vintage utensil holder. It's a weekend-refresh friendly project that instantly makes your island feel more finished and personal.
Best Placement
Install the shelf on the end of the island that faces the dining area or living room, so it's visible from the main gathering spots. This turns the shelf into a decorative feature, not just storage. If your island has a breakfast bar, place the shelf on the opposite side to keep it out of the way but still accessible.
Shelf Styling Tip
Layer your cookbooks with the largest at the back and smaller ones in front. Prop one open to a beautiful recipe page, then add a small succulent or a salt cellar for texture. Keep the color palette cohesive—neutral cookbooks with a single green accent plant look clean and intentional.
Storage Tip
Use a shallow shelf (about 8–10 inches deep) so it doesn't protrude into walkway space. If your island has a recessed end, a custom cubby works even better. Add a small lip or bookend to prevent cookbooks from sliding off when someone bumps the island.
13. Seating with Hidden Storage Benches
Benches along your kitchen island can pull double duty when they’re designed with lift-up seats. Instead of just providing a spot to perch, they hide away items you don’t want cluttering your countertops. Think table linens, extra napkins, or even small appliances you only pull out for special occasions.
It’s a smart, space-aware move that keeps your kitchen looking tidy without sacrificing seating.
For a weekend-refresh friendly project, look for ready-made storage benches or repurpose an old wooden bench by adding a hinged top. The key is matching the bench style to your island’s finish—painted wood for a farmhouse vibe, sleek upholstered for modern kitchens. Place them on the overhang side so they tuck neatly under the counter when not in use.
This way, you gain hidden storage without losing the open, airy feel of your kitchen.
Best Materials
Solid wood or marine-grade plywood holds up best for benches that get daily use. If you want a softer look, go for a bench with a padded cushion that still lifts—just ensure the hinge mechanism is sturdy. For easy cleaning, choose materials that wipe down well, like sealed oak or painted MDF with a matte finish.
Storage Tip
- Use shallow bins or dividers inside the bench to keep items organized. Store things you reach for often, like placemats or cloth napkins, near the top. Deeper items like seasonal decor can go toward the bottom.
- Label the bins if you share the kitchen with others—it keeps everyone on the same page.
Styling Note
Keep the bench top clear when not in use, or add a small tray with a plant or cookbook for a styled look. Choose a cushion color that ties into your kitchen’s palette—soft gray, navy, or natural linen work with most schemes. The bench itself becomes a design feature, not just a storage hack.
14. Corner Drawers for Awkward Spaces
Corner cabinets are notorious for wasted potential—deep, dark voids where baking sheets go to disappear. But with angled corner drawers, that awkward nook becomes one of the most functional spots in your kitchen. These pullouts follow the shape of your island, turning a dead zone into smart storage for trays, platters, and oversized pans.
It’s a weekend-refresh-friendly upgrade that feels custom without the full renovation headache.
Instead of letting that corner gap collect dust, install two or three angled drawers that slide out smoothly. They make use of every inch, and because they’re tailored to the island’s geometry, they look intentional and polished. Pair them with soft-close hardware and you’ve got a quiet, efficient storage solution that keeps bulky items accessible.
For a cohesive look, match the drawer fronts to your island’s existing cabinetry style—shaker or slab both work beautifully.
Best Materials
Go with plywood boxes for durability, especially if you’re storing heavy cast-iron pans. Drawer fronts should match your island’s finish—painted MDF in a crisp white or soft gray keeps the space airy, while natural oak adds warmth. For the interior, consider a non-slip liner to keep trays from sliding around when you open and close the drawer.
Layout Tip
Plan the drawer sizes based on what you’ll store. A shallow top drawer (3–4 inches deep) is perfect for cutting boards and small baking sheets, while deeper bottom drawers (6–8 inches) handle stockpots and large platters. Make sure the drawer slides are rated for heavy loads—full-extension slides let you see everything at a glance.
Small-space Fix
If your island is compact, use a single deep corner drawer instead of multiple shallow ones. This maximizes vertical space and keeps the footprint minimal. Add a wooden divider inside to separate baking sheets from mixing bowls—it’s a simple DIY touch that makes a big difference in daily use.
15. Charging Station Drawer
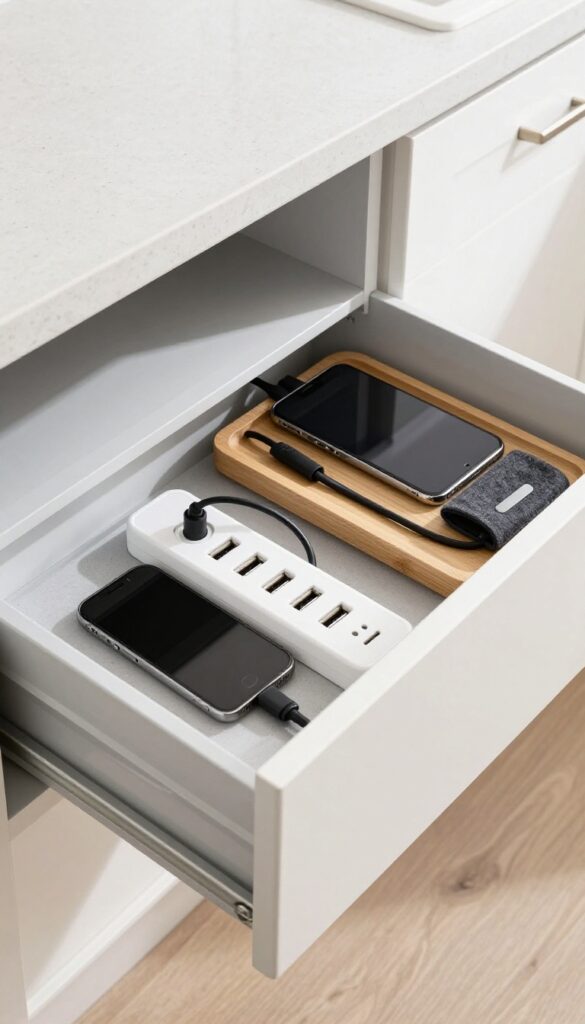
A drawer dedicated to charging your devices is the ultimate clutter-buster for a busy kitchen. It keeps phones, tablets, and laptops neatly tucked away while they power up, so your countertops stay clear for meal prep or morning coffee. This weekend-friendly project takes just a few hours and instantly makes your kitchen feel more organized and intentional.
Turn one deep drawer into a hidden charging hub. Install a power strip inside, drill a small hole in the back for cords, and add a few cable clips to keep everything tidy. When the drawer is closed, all you see is a sleek, uninterrupted front—no tangled wires or blinking lights.
It’s a smart, space-aware solution that works especially well in a kitchen island or a base cabinet near your main workspace.
Best Drawer To Use
Choose a drawer that’s at least 6 inches deep and located close to an outlet. If your island doesn’t have power, you can run an extension cord through the cabinet base. A wide drawer (18 inches or more) gives you room for multiple devices and a small organizer for charging bricks.
Installation Tips
- Use a grommet or a cord pass-through kit for a clean hole. Secure the power strip to the drawer bottom with Velcro strips so it stays put. Add a slim cable management tray if you want extra control.
- For safety, pick a power strip with surge protection and USB ports.
Styling The Drawer Interior
Line the drawer with a non-slip drawer liner in a neutral tone like gray or beige. Use small felt pouches or silicone cable ties to keep cords from tangling. A shallow wooden tray can corral loose items like AirPods or charging cubes, keeping everything looking neat even when open.
FAQ
What is the best way to add storage to an existing kitchen island?
Start by assessing your current island's structure. You can add pull-out drawers, open shelving, or a towel rack without major renovation. For deeper storage, consider retrofitting a cabinet with pull-out bins or a spice drawer.
How deep should kitchen island drawers be?
Standard drawer depth is around 24 inches, but for pots and pans, go deeper (up to 30 inches) if space allows. For utensils and spices, shallower drawers (6-12 inches) work better. Measure your items first.
Can I add a microwave drawer to a small island?
Yes, but ensure the island is at least 24 inches deep and has proper ventilation. Microwave drawers are typically 15-20 inches tall, so plan the layout accordingly. Consult an electrician for outlet placement.
What are some budget-friendly kitchen island storage ideas?
Use tension rods under the island for hanging spray bottles, add adhesive hooks for towels, or repurpose small baskets on open shelves. A simple pegboard on the side can hold utensils and gadgets.
How do I keep my kitchen island organized long-term?
Regularly declutter and assign a home for every item. Use drawer dividers, label bins, and do a seasonal purge. Stick to a one-in-one-out rule for gadgets to prevent overflow.
Conclusion
Your kitchen island can be both beautiful and brilliantly functional. By choosing the right mix of storage solutions, you'll create a space that works for your daily routine without feeling cramped.
Whether you tackle one idea this weekend or plan a full remodel, each step brings you closer to a kitchen that's as smart as it is stylish. Happy organizing!