11 DIY Kitchen Wall Decor Ideas That Feel Handmade and Airy
Your kitchen walls deserve more than a blank canvas. They’re the perfect spot to layer in texture, color, and a little bit of your personality. But finding decor that feels both handmade and airy can be tricky—especially when you want it to look intentional, not cluttered.
The good news? You don’t need a big budget or advanced craft skills to create something beautiful. With a few simple materials and a little creativity, you can transform bare walls into focal points that feel light, fresh, and totally you.
These 11 DIY ideas lean into natural textures, soft palettes, and practical designs. Each one is meant to be achievable, stylish, and easy to live with.
1. Floating Herb Garden Shelves
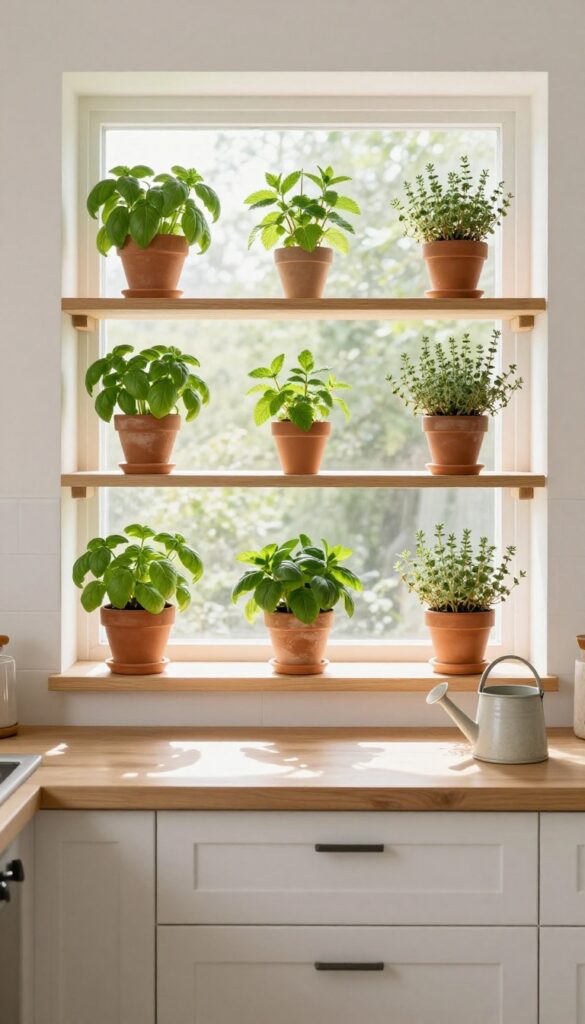
Imagine reaching over while you're cooking to snip a few basil leaves or a sprig of mint. That's the kind of effortless charm floating herb garden shelves bring to a kitchen. They turn an empty wall into a living, breathing decor piece that's both useful and beautiful.
The key is keeping them light and airy: narrow wooden shelves, small terra-cotta pots, and plenty of natural light. This isn't just about looks—it's about making your kitchen feel more alive and connected to the food you prepare.
Mount narrow wooden shelves near a sunny window and line them with small pots of basil, mint, or thyme. The greenery adds life and a soft, airy feel, plus you get fresh herbs for cooking.
Best Materials
- Go with light woods like pine or bamboo to keep the look airy. Whitewashed or natural finishes work best. For the pots, unglazed terra-cotta is a classic choice—it breathes well and adds a warm, earthy texture.
- If you prefer a cleaner look, matte white ceramic pots blend seamlessly with most kitchens.
Layout Tip
Install the shelves at different heights to create visual interest. Place the lowest shelf about 12 inches above the counter so the herbs are easy to reach. Stagger the pots so taller herbs like rosemary sit on the top shelf, while trailing thyme or oregano spill over the edge of a lower one.
Finishing Touch
Add a small watering can or a ceramic spoon rest on the shelf for extra charm. Keep the arrangement slightly asymmetrical—three pots on one shelf and two on another feels more natural than perfect symmetry. A tiny pair of pruning shears tucked into a pot adds a practical, styled look.
2. Woven Wall Hanging with Natural Fibers

There’s something about a woven wall hanging that instantly softens a kitchen. Maybe it’s the texture, or the way natural fibers catch the light. Either way, this DIY project adds warmth without taking up counter space.
Using cotton rope or jute, you can create a loose, open weave that feels light and airy—perfect for a kitchen that already has enough going on.
A woven wall hanging works especially well in kitchens with neutral palettes or lots of wood tones. The natural fibers blend in without disappearing, adding depth and a handmade feel. Keep the design simple: a few basic knots or a wide weave that lets the wall peek through.
Hang it alone above a coffee station or group two or three smaller ones near a window for a layered look. Since kitchens tend to have hard surfaces like tile and stainless steel, the softness of the fibers creates a nice contrast. Plus, it’s easy to dust or take down for a quick shake outdoors.
Best Fibers For A Light Look
- Cotton rope is the easiest to work with and comes in natural whites and warm beiges. Jute adds more texture but can shed a little, so keep it away from food prep areas. For an even airier feel, try a blend of thin cotton cords and leave gaps between knots.
- Avoid thick, heavy wool or acrylic yarns—they can look too dense for a kitchen wall.
Placement And Scale
- A single large hanging works well above a kitchen sink or on a blank wall near the dining area. For smaller spaces, try a cluster of three mini hangings in different sizes, spaced a few inches apart. Keep the bottom edge at least six inches above any countertop to avoid splashes.
- The goal is to draw the eye upward and make the ceiling feel higher.
Finishing Touch
- Add a thin wooden dowel or a natural branch at the top to hang the piece. This small detail reinforces the organic look and makes it easy to swap out or adjust. If you want a pop of color, dip-dye the ends of the rope in a muted clay or sage tone before weaving.
- Just keep the dye subtle so the overall feel stays light.
3. DIY Wooden Spoon Rack Display
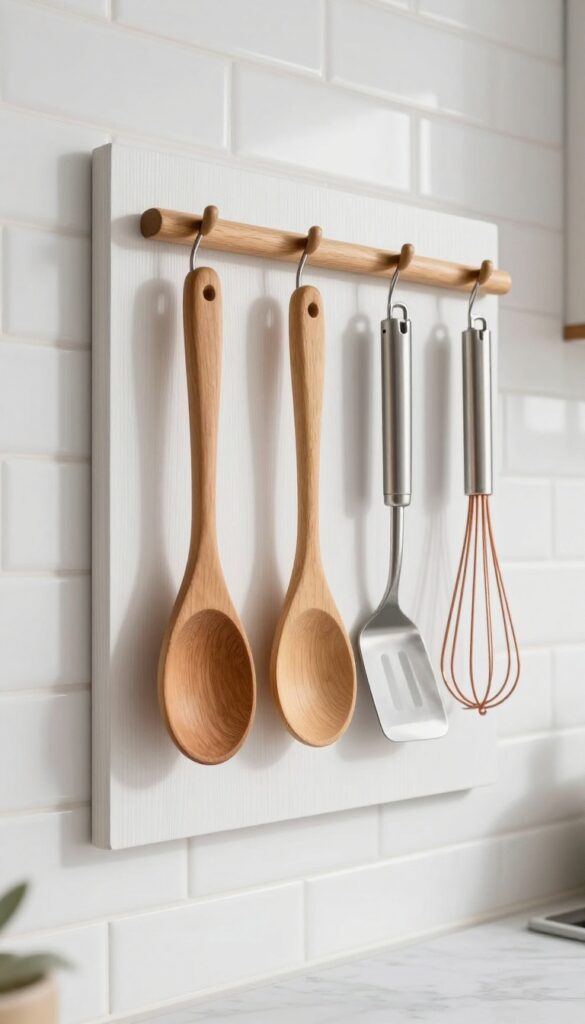
There’s something so charming about a row of wooden spoons hanging within arm’s reach. It’s one of those small details that makes a kitchen feel lived-in and loved. A DIY spoon rack turns everyday tools into wall art, and the best part?
You can build one in an afternoon with basic supplies.
This idea works especially well in kitchens that lean rustic, farmhouse, or even modern eclectic. The warm wood tones soften harder surfaces like tile and stainless steel, while the hanging storage keeps counters clutter-free. Choose a piece of reclaimed wood or a smooth pine board, add a few cup hooks or a drilled peg rail, and you’ve got an instant display that’s both practical and pretty.
Best Wood Choices
- For a light and airy feel, go with white oak or ash—they have subtle grain and a pale finish. If you want more contrast, walnut or cherry adds richness without feeling heavy. Avoid pressure-treated lumber; it can look too rough for a kitchen wall.
- A simple sanding and a coat of food-safe mineral oil or matte polyurethane will protect the wood and bring out its natural warmth.
Placement & Layout Tip
- Hang the rack near your stove or prep area so utensils are always handy. For a balanced look, center the board above the backsplash or between upper cabinets. If your wall feels bare, try a longer board with 5 to 7 hooks spaced 3 to 4 inches apart.
- Leave a little room between each spoon so they don’t overlap, and vary utensil lengths for visual interest.
Styling The Display
- Mix wooden spoons with a few stainless steel spatulas or a copper whisk to break up the texture. Keep the collection curated—too many items can look messy. Add a small trailing plant on top of the board or a tiny framed recipe card nearby for a finishing touch.
- The goal is functional decor that feels intentional, not cluttered.
4. Pressed Flower Art in Simple Frames
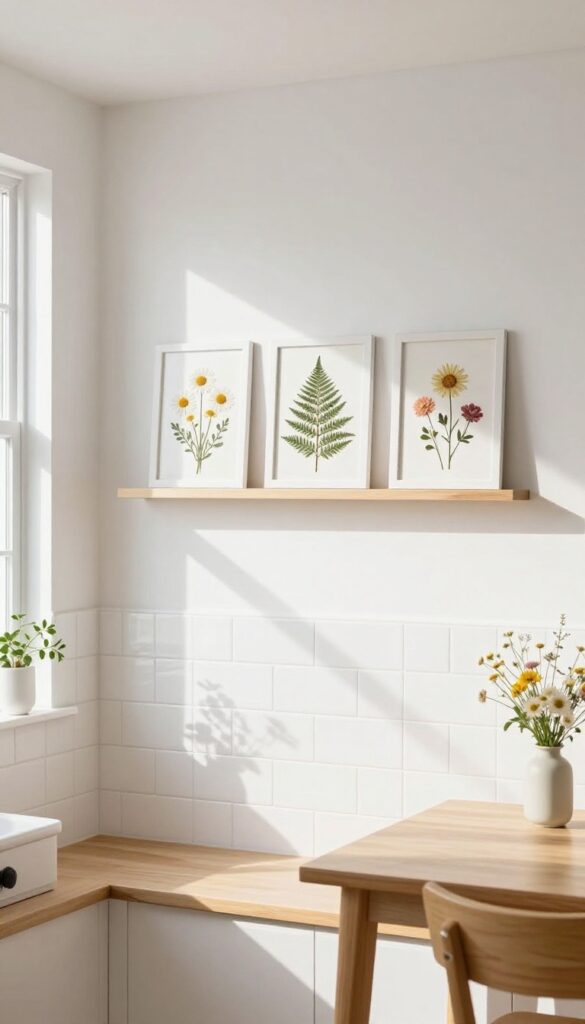
This idea brings a bit of the outdoors in without taking up counter space. Pressed flowers tucked into slim, light-colored frames create a soft, romantic look that feels personal and handmade. The best part?
You can gather the materials on a weekend walk and arrange them exactly how you like.
Start by collecting wildflowers or blooms from your garden—daisies, ferns, and small roses work beautifully. Press them between the pages of a heavy book for about a week, then arrange them in thin frames with white or pale wood finishes. Hang a small cluster of three to five frames in a staggered layout above a breakfast nook or open shelving.
The delicate petals and muted colors add texture without overwhelming the room, making the kitchen feel lighter and more inviting.
Best Blooms To Press
Flat flowers like pansies, violas, and Queen Anne's lace press evenly and keep their shape. Avoid thick or fleshy blooms like succulents or tulips, which can rot or lose color. Stick to one or two flower types per frame for a clean, cohesive look.
Frame And Layout Tips
Thin frames in white, pale gray, or natural wood keep the focus on the flowers. Use frames with mats to give each bloom breathing room. Arrange them in a small gallery wall with 3 to 4 inches between frames, or line them up on a narrow shelf for a simpler display.
Where To Hang
A blank wall near the sink or above a coffee station works well, since these spots already feel like natural gathering points. Avoid direct sunlight, which can fade the petals over time. If your kitchen gets a lot of light, consider using UV-protective glass in the frames.
5. Chalkboard Menu Board with a Twist
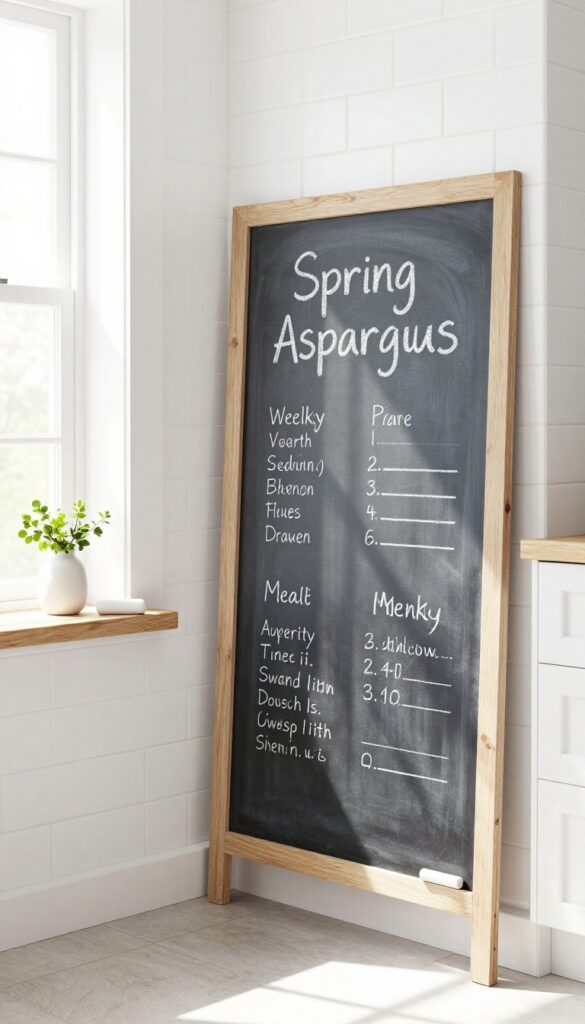
Chalkboard walls are a classic kitchen feature, but they can feel a little predictable. This version keeps the practicality while adding a fresh, light look. Instead of a standard daily menu, use your chalkboard to highlight seasonal produce, a weekly meal plan, or a favorite quote.
It becomes a functional piece of art that evolves with your mood.
A chalkboard menu board is both practical and stylish, especially when you give it a twist. Paint a section of wall or a large wooden board with chalkboard paint. Then, instead of listing today's specials, write something that changes with the seasons or your weekly routine.
Think "spring asparagus" or "this week's dinners." It keeps the kitchen feeling dynamic and personal without adding clutter. The key is to keep the writing neat and the board well-maintained, so it looks intentional rather than messy.
Best Colors
For a light and airy feel, pair a classic black chalkboard with white or pastel chalk. Or go for a gray or green chalkboard paint to soften the contrast. White chalk on a light gray board feels modern and subtle, blending into a neutral kitchen palette.
Layout Tip
Place the board near the coffee station or breakfast nook, where it's easy to see and update daily. If you're using a large wooden board, lean it against the backsplash or hang it on a wall with a simple leather strap for a casual, handmade look.
Finishing Touch
Add a small ledge or shelf beneath the board to hold a cup of chalk, an eraser, and a few fresh herbs or a small vase. This turns the board into a mini vignette that feels styled and functional at the same time.
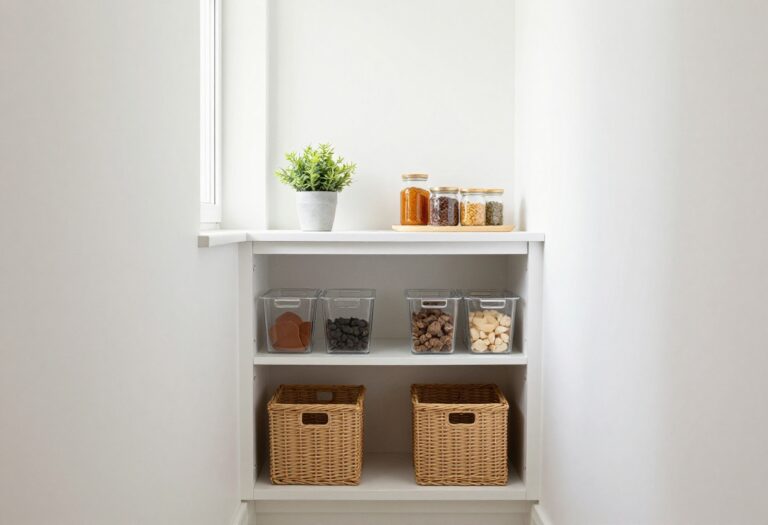
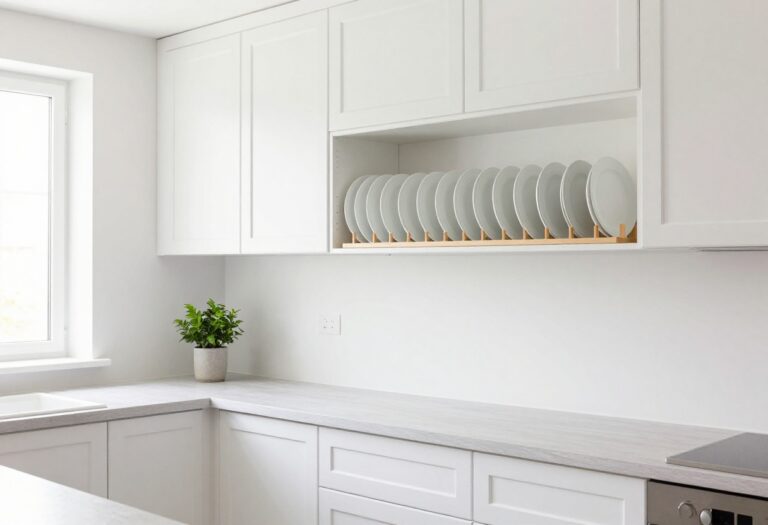
6. Open Shelving with Layered Ceramics
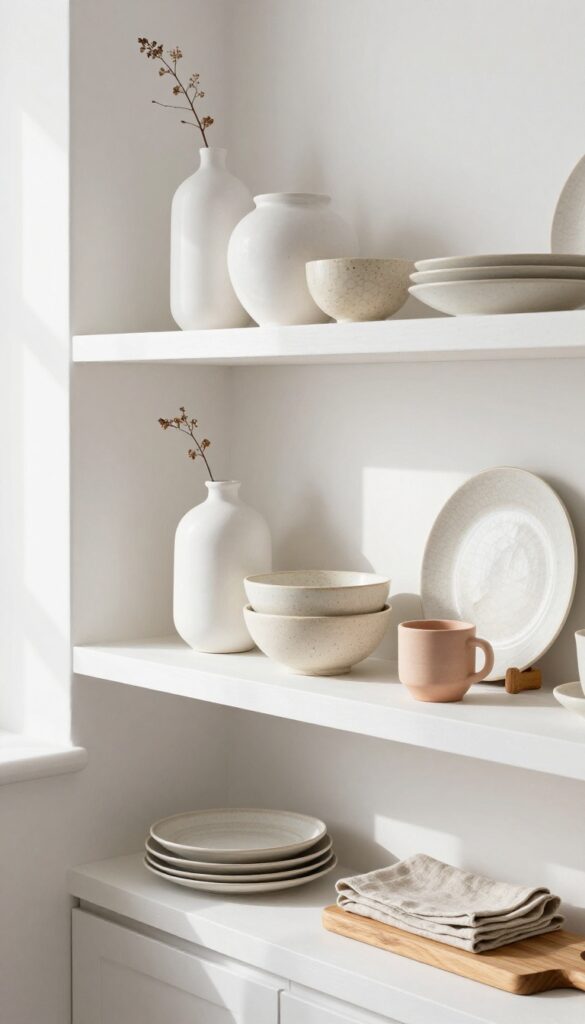
Floating shelves are a kitchen workhorse, but they can easily feel cluttered if you just pile things on. The trick is to treat them like a mini gallery. By layering handmade ceramic plates, bowls, and small vases in a soft palette of whites, creams, and muted earth tones, you create a display that feels both curated and relaxed.
The open look keeps the kitchen light and airy, while the ceramics add texture and warmth.
Start with a sturdy floating shelf in a finish that blends with your cabinets—white oak or matte black both work well. Arrange your ceramics in small groupings, varying heights and shapes. Lean a few plates against the wall, stack small bowls, and tuck in a tiny vase or two.
The key is to leave breathing room between clusters so the shelf doesn't look overloaded. This styling trick makes the kitchen feel more personal and collected over time.
Best Colors & Materials
- Stick to an earthy neutral palette: matte white, warm cream, soft beige, and pale terracotta or sage. Glazed ceramics with subtle crackle or speckled finishes add visual interest without overpowering the space. Avoid bright or glossy pieces—they’ll compete with the airy vibe.
- Mix in a few wooden or linen accents, like a small cutting board or a linen napkin, to soften the look.
Shelf Styling Tip
- Create depth by layering items front to back. Place taller vases or pitchers at the back, then mid-height bowls, and finally small plates or cups at the front. Use odd numbers in each grouping (three or five pieces) for a balanced but natural feel.
- Leave about a third of the shelf empty to let the eye rest—this prevents the display from feeling busy.
Finishing Touch
Add a small trailing plant, like pothos or string of pearls, draped over the edge of the shelf. The soft greenery contrasts beautifully with the ceramics and reinforces the light, airy mood. Keep the plant low-maintenance and trim it regularly so it doesn't overwhelm the display.
7. DIY Fabric Bunting in Soft Tones
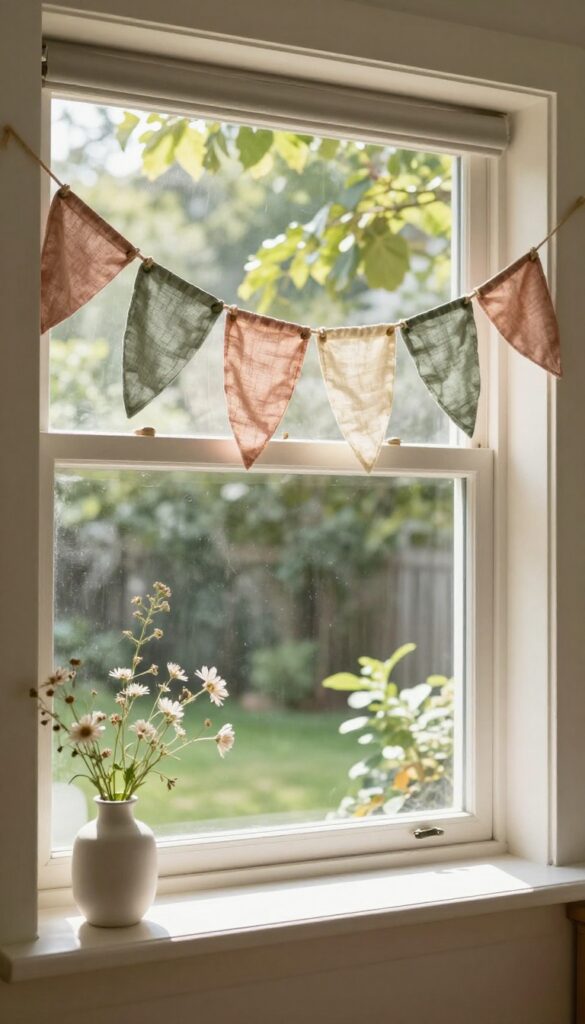
Bunting isn't just for garden parties or nurseries. When made with soft, muted fabrics and hung with intention, it becomes a charming, airy accent for your kitchen. Think gentle linen triangles in blush, sage, and cream, strung along a window frame or above your sink.
The movement adds life, and the handmade feel keeps the space from looking too polished or cold.
This DIY project is as simple as it gets: cut triangles from fabric, fold each over a piece of twine, and glue or stitch in place. The key is choosing the right fabric and placement. Soft linen or cotton in pastel shades keeps the look light and sophisticated.
Drape the bunting across a window, along a shelf edge, or above a kitchen island. It softens hard lines and adds a gentle, playful vibe without overwhelming the room.
Best Fabrics And Colors
- Stick with natural fibers like linen, cotton, or a cotton-linen blend. Avoid shiny or stiff fabrics—they won't drape nicely. For colors, think dusty rose, pale blue, warm cream, and muted sage.
- These tones keep the bunting feeling airy and cohesive with most kitchen palettes. You can also mix in a subtle stripe or gingham for a bit of pattern.
Placement Tips
- Hang the bunting where it can catch a breeze or be seen from multiple angles. Over a window frame adds softness to natural light. Along the top of open shelving draws the eye upward and fills empty wall space without clutter.
- Keep it above counter height so it doesn't interfere with cooking or cleaning.
Finishing Touch
- For a polished look, iron the fabric triangles before stringing. Use a simple knot or a small stitch to secure each piece on the twine. Leave a few inches of twine at each end for tying.
- You can also add tiny wooden beads between triangles for extra texture. The result is a decor piece that feels both intentional and effortlessly handmade.
8. Hanging Dried Herb Bundles
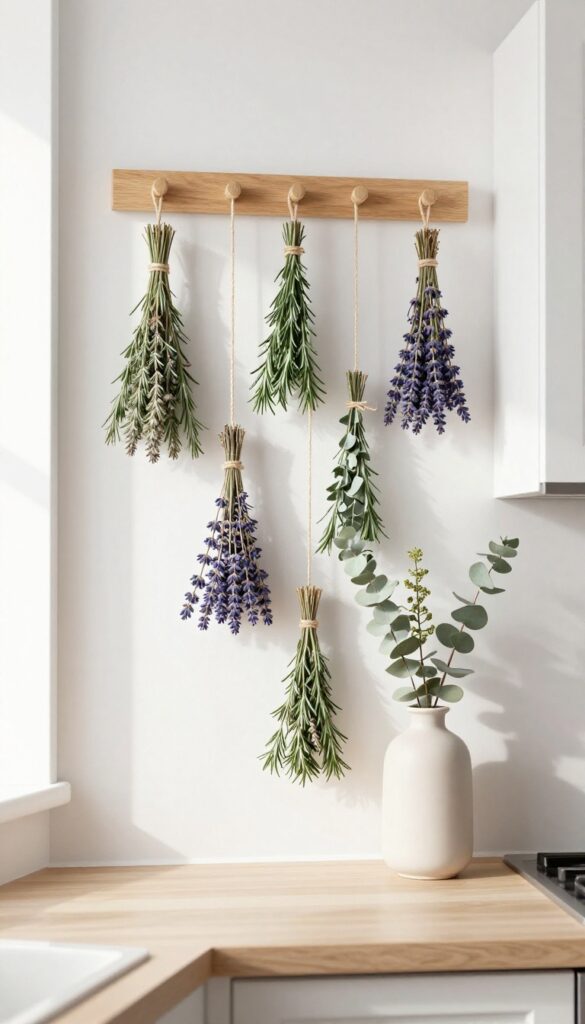
Dried herbs do more than just season your cooking—they bring a soft, natural charm to your kitchen walls. Bundles of lavender, rosemary, or eucalyptus tied with simple twine and hung upside down create a textured, aromatic display that feels both rustic and refined. This idea works especially well in kitchens with neutral tones and plenty of natural light, where the dried plants add a subtle pop of green without overwhelming the space.
It’s an easy way to introduce organic texture and a gentle, calming scent that changes with the season.
Hanging dried herb bundles is one of those decor moves that feels effortlessly stylish. You can gather fresh herbs from your garden or buy them from a local market, then let them air-dry for a couple of weeks. Once dried, tie the stems together with twine and hang them from a wooden dowel mounted on the wall or simply from a cup hook.
The result is a living, breathing piece of art that doubles as a natural air freshener. Place them near a window or above the sink where you’ll catch their fragrance as you move through the kitchen. They also make a lovely focal point above a coffee station or open shelving.
Best Herbs For The Look
- Not all herbs dry equally well or look as pretty hanging on the wall. Lavender keeps its color and scent longest, while rosemary holds its shape and adds a woodsy note. Eucalyptus dries into graceful, silvery-green leaves that complement modern farmhouse or boho kitchens.
- For a more culinary vibe, try thyme, sage, or oregano—they shrink a bit but still look charming. Mix two or three types together for a fuller display.
Hanging And Styling Tips
- Use a lightweight wooden dowel or a simple brass rod to create a mini clothesline effect. Space the bundles a few inches apart so they don’t crowd each other. If you’re short on wall space, hang a single bundle from a hook near the stove or over the sink.
- For added texture, weave in a few dried flowers like strawflowers or baby’s breath. Keep the bundles out of direct sunlight to preserve their color longer, and give them a gentle shake every now and then to dust them off.
Where To Hang Them
- The most practical spots are near a window where they get indirect light, or above a kitchen island where they become a natural centerpiece. If you have open shelving, let a bundle hang over the edge of a shelf for a casual, lived-in feel. In a small kitchen, a single bundle on a hook next to the range hood adds a soft touch without taking up counter space.
- Just avoid hanging them directly over a stove or sink where steam and heat could make them brittle or moldy.
9. Magnetic Spice Jar Wall
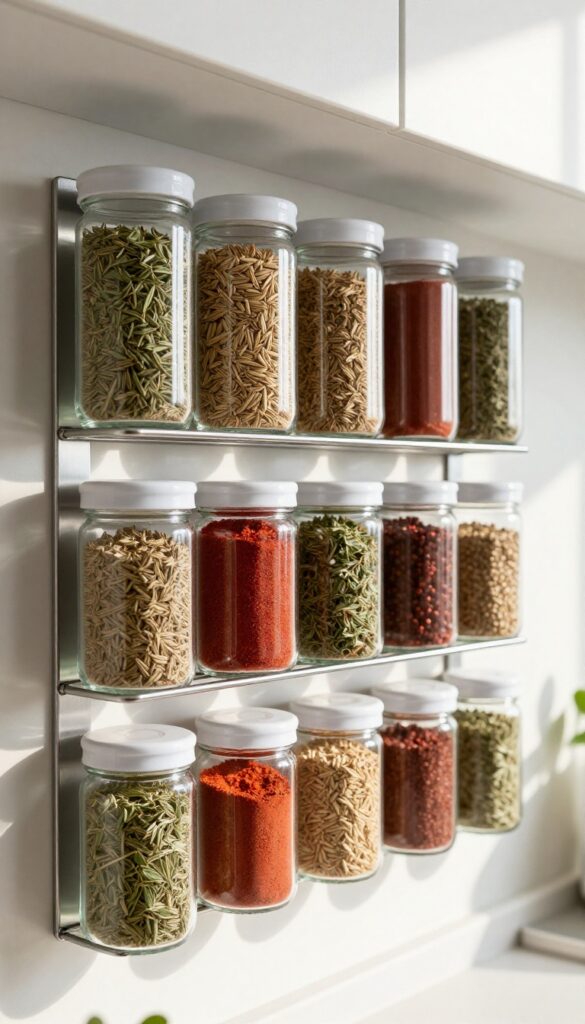
Imagine reaching for your cumin or oregano without digging through a cluttered cabinet. A magnetic spice jar wall turns an empty stretch of kitchen wall into a functional, beautiful display. It keeps your most-used spices visible and within arm's reach while freeing up precious counter and cabinet space.
The look is light and airy—think clear jars with white lids lined up in neat rows or a gentle cluster that feels curated, not chaotic.
This idea pairs practicality with a clean, modern aesthetic. Start with a metal sheet or a magnetic board—smooth stainless steel works beautifully for a sleek look, while a galvanized metal sheet adds a subtle industrial touch. Fill small glass jars with your spices, then attach strong magnets to the lids.
Arrange them in tidy rows for a graphic, organized feel, or go for a loose cluster that feels more organic. The result is a wall that's both a storage solution and a piece of art, perfect for small kitchens or any space where you want to keep things light and open.
Best Materials
- For the base, a thin stainless steel sheet is a top choice—it's smooth, easy to clean, and reflects light to keep the space feeling airy. If you want a warmer look, a magnetic board with a white or light wood frame blends seamlessly into a light and airy kitchen. For the jars, opt for clear glass with a simple, uniform shape—round or square—and use white or metallic lids for a cohesive, polished finish.
- Glue neodymium magnets (they're stronger than ceramic) to the lids with a strong adhesive, and let them cure fully before hanging.
Layout Tip
- Plan your layout before sticking anything up. For a light and airy feel, keep the arrangement simple and balanced. Try a grid of three rows with four jars each, leaving a few inches of breathing room around the edges.
- Or go for a staggered cluster that starts low near your prep zone and fans upward. Either way, leave some negative space—don't fill the entire board. This keeps the wall from feeling too busy and lets the jars stand out like little floating gems.
Styling Detail
- To make the display feel intentional, label each jar with a clean, handwritten tag or a small chalkboard sticker. Use the same font and color for all labels—white on black or black on white keeps it crisp. If you have a few colorful spices like paprika or turmeric, let them add a subtle pop of color.
- For an extra touch, mount a small LED strip above the board to gently illuminate the jars, making the wall feel like a functional art piece.
10. DIY Abstract Canvas Art with Neutral Tones
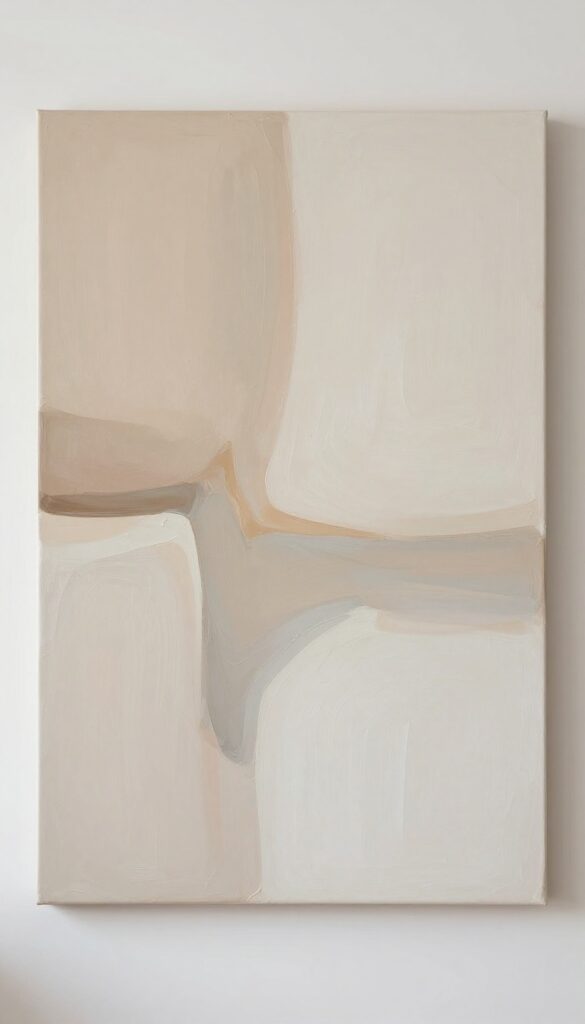
Blank walls can feel cold, but a single oversized canvas changes everything. This project is forgiving—no artistic talent required. Soft sweeps of beige, blush, and pale gray create a calm focal point that feels both modern and personal.
The best part? You can finish it in an afternoon, and it costs a fraction of store-bought art.
Start with a large canvas (at least 24×36 inches) and three acrylic paint colors: a warm beige, a dusty blush, and a pale gray. Use a wide brush or even a sponge to apply paint in long, sweeping strokes. Don't overthink it—let the brush move naturally.
Leave some white space so the canvas breathes. Once dry, hang it at eye level above a console table or kitchen island. The neutral palette ties into any color scheme, and the abstract design keeps the eye moving without feeling busy.
Best Colors For A Light, Airy Look
- Stick to muted earth tones and soft pastels. Beige with a hint of warmth, blush that's barely there, and gray that reads more silver than charcoal. These shades reflect light and keep the kitchen feeling open.
- Avoid high-contrast combos like black and white—they'd compete with the handmade vibe.
Canvas Size And Placement Tip
- Go big. A single large canvas makes more impact than a gallery wall of small pieces. Hang it so the center is about 57–60 inches from the floor.
- In a kitchen, that often means above a counter or between upper cabinets and the backsplash. Leave at least 4 inches of breathing room around the edges.
Finishing Touch For A Polished Look
Let the canvas sit for 24 hours to fully cure, then seal it with a matte varnish. This protects against kitchen grease and dust. Choose a frame-less gallery wrap so the paint continues around the sides—it looks intentional and modern without extra cost.
11. Repurposed Window Frame as a Wall Organizer
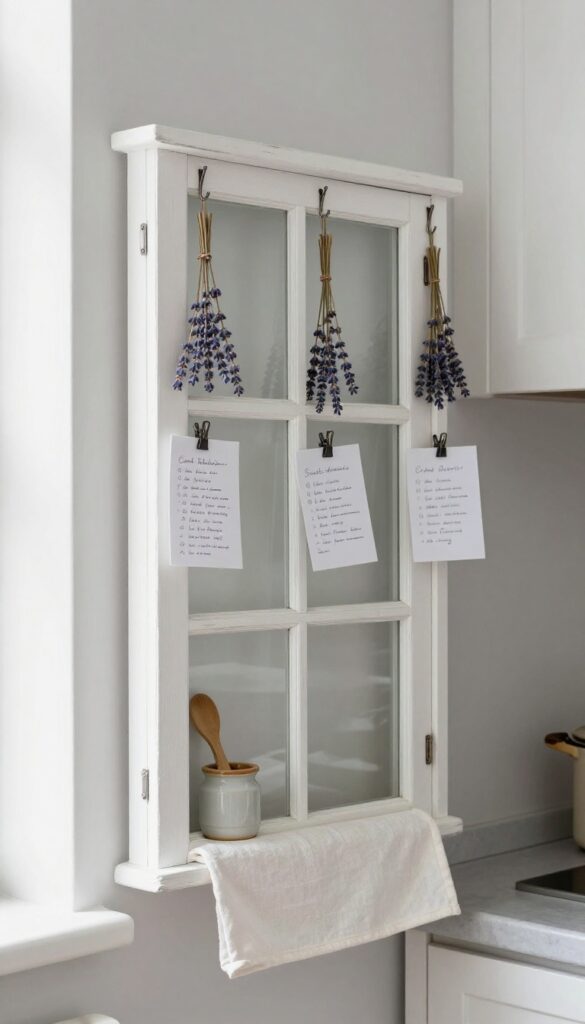
Turn an old wooden window frame into a charming wall organizer that adds character and function to your kitchen. By removing the glass and adding hooks or clips, you create a unique display for recipe cards, dried herbs, or lightweight utensils. It’s a perfect blend of vintage charm and everyday practicality, fitting right into a light and airy kitchen aesthetic.
This idea works especially well in kitchens with limited counter space or blank walls that need a focal point. The natural wood tones soften the look, while the open grid keeps things feeling uncluttered. You can paint the frame a soft pastel or whitewash it to match your palette, or leave it raw for a rustic touch.
The key is to keep the items you hang minimal and intentional—think a few dried lavender sprigs, a favorite recipe card, or a pretty tea towel. This isn’t just decor; it’s a smart way to keep daily essentials within easy reach without adding visual noise.
Best Colors
For a light and airy feel, stick with white, pale gray, or natural wood tones. A distressed white finish softens the frame and blends seamlessly with bright kitchens. If you want a pop of color, try a muted sage or dusty blue on the frame, then keep the items neutral.
Storage Tip
Attach small bulldog clips or cup hooks to the mullions for hanging. Use the bottom sill to hold a small jar for utensils or a tiny plant. Avoid overloading—leave plenty of negative space so the frame feels like art, not clutter.
Finishing Touch
Add a small hook to the top center of the frame and hang a single dried eucalyptus branch or a string of faux pearls. This draws the eye upward and adds a delicate, curated feel that keeps the piece from looking too rustic.
FAQ
How do I keep DIY kitchen wall decor looking airy and not cluttered?
Stick to a cohesive color palette with lots of whites, neutrals, and soft pastels. Use open shelving and avoid overcrowding each piece. Negative space is your friend.
What are the best materials for a light, handmade look?
Natural materials like wood, cotton, linen, jute, and dried botanicals work beautifully. They add texture without feeling heavy or overly polished.
Can I mix different DIY decor styles on one wall?
Absolutely. Just keep a common thread—like color, material, or scale—to tie them together. For example, combine a woven wall hanging with a pressed flower frame and a small shelf.
How do I make sure my DIY decor stays practical in a kitchen?
Choose projects that serve a dual purpose, like herb shelves, spice racks, or utensil displays. Avoid delicate items near the stove or sink where they might get splattered.
What if I’m not crafty? Are these ideas still doable?
Yes. Many of these projects require only basic supplies and simple steps. Start with something like the pressed flower art or the fabric bunting—they’re forgiving and easy to customize.
Conclusion
Your kitchen walls have so much potential to reflect your style and make the space feel truly yours. These 11 DIY ideas prove that handmade decor doesn’t have to be complicated or expensive—just thoughtful and personal. Pick one or two projects that speak to you, and let your kitchen evolve naturally.
The best part? Every time you walk in, you’ll see a little piece of your own creativity hanging on the wall.