15 Simple Kitchen Ideas Indian Homes Can Try This Year
Your kitchen is more than just a cooking space—it's where morning chai happens and family conversations flow. But if it's starting to feel a bit tired or cluttered, you don't need a full renovation to breathe new life into it.
A few thoughtful changes over a weekend can make a world of difference. The key is to focus on ideas that are both stylish and doable, without breaking the bank or requiring professional help.
Whether you have a compact Mumbai apartment kitchen or a spacious Bangalore home, these 15 simple ideas are designed to fit Indian homes and lifestyles.
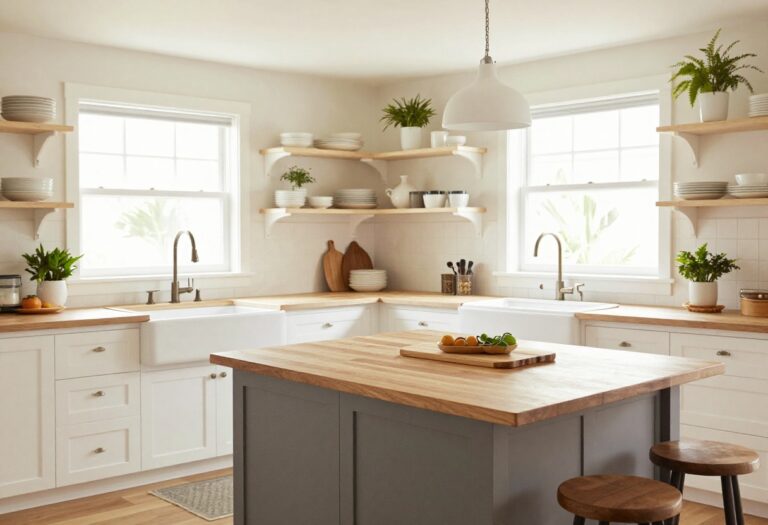
1. Open Shelving for Everyday Crockery
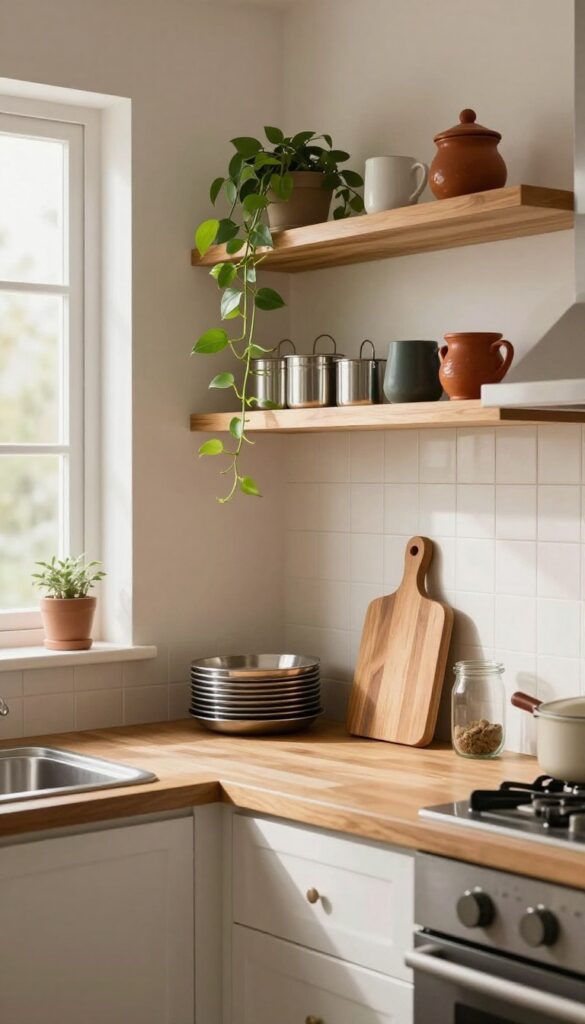
Swap out those bulky upper cabinets for a couple of sturdy open shelves and watch your kitchen breathe. This swap instantly makes the space feel larger and more welcoming, plus it puts your daily-use steel thalis, katoris, and ceramic mugs right where you need them. It's a weekend-friendly project that brings both style and convenience to the heart of your home.
Open shelving is a practical and stylish way to store everyday crockery while adding character to your kitchen. By removing upper cabinets, you create an airy, open feel that makes even small kitchens appear larger. The key is to keep it intentional—display only items you use regularly, like steel plates, small bowls, and favorite mugs.
This not only streamlines your morning routine but also turns functional storage into a design feature.
Best Materials
Go for solid wood shelves in warm tones like teak or mango wood to complement Indian kitchens. If your kitchen leans modern, powder-coated metal shelves in black or matte white offer a sleek contrast. For a rustic touch, reclaimed wood with visible grain adds texture and warmth.
Shelf Styling Tip
- Avoid overcrowding. Arrange items in small groups: stack steel thalis on one side, nestle katoris in a neat row, and cluster mugs near the front. Add a small plant or a jar of spices for a pop of color.
- Leave breathing room between groups to maintain a curated, uncluttered look.
Layout Tip
Install shelves at a height that's easy to reach—typically 18 to 24 inches above the countertop. If you have a tiled backsplash, mount the shelves directly onto the tile for a seamless look. For rental kitchens, consider floating shelves with hidden brackets to avoid visible hardware.
2. A Statement Backsplash with Indian Tiles
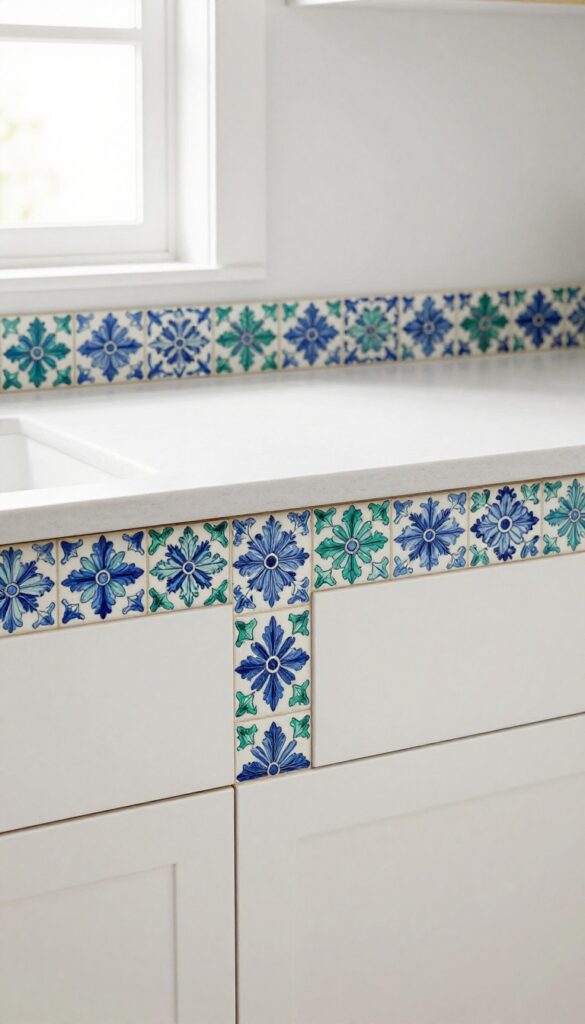
The area behind your stove or sink is prime real estate for a little personality. Instead of plain tiles or a full-on marble slab, consider a small patch of jaali or hand-painted tiles. Even a narrow strip—just a foot high—can become the focal point of your kitchen without overwhelming the space or your budget.
Indian tiles bring warmth, pattern, and a sense of craft to modern kitchens. Whether you choose geometric jaali patterns or floral hand-painted motifs, a concentrated backsplash area draws the eye and adds texture. It’s a weekend-friendly project because you only need a small quantity of tiles, and the installation is quick.
Pair with solid-colored countertops and cabinets to let the pattern shine. The result feels curated and personal, not chaotic.
Best Tile Choices
Jaali tiles in terracotta or white offer a subtle, architectural look. Hand-painted tiles from Rajasthan or Gujarat bring vibrant blues, greens, and reds. For a more understated effect, try matte-finish encaustic cement tiles in a repeating diamond or floral pattern.
Placement Tip
Install the tiles only behind the stove or sink—about 12 to 18 inches high. This keeps the look intentional and easy to clean. Extend the tile to the edge of the counter on both sides for a finished appearance.
Finishing Touch
Seal the tiles with a clear, food-safe sealer to protect against oil and moisture. Use a dark or brass grout to make the pattern pop, and match the grout color to one of the tile’s accent shades for a cohesive look.
3. Magnetic Spice Rack on the Fridge
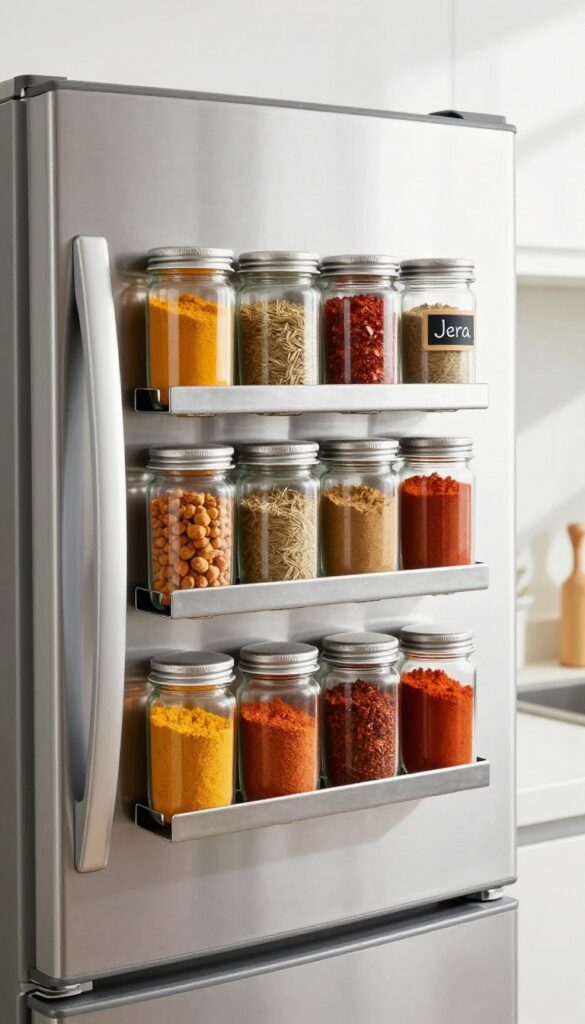
Counter space is precious in Indian kitchens, especially when you're juggling multiple pots and pans. But the side of your refrigerator? That's prime real estate just waiting to be used.
A magnetic spice rack turns an overlooked surface into a functional, stylish storage spot for your everyday spices. It's a small change that makes a big difference in how your kitchen feels and functions.
Stick magnetic jars for your most-used spices like jeera, haldi, and red chili powder on the side of your refrigerator. This clever, space-saving solution frees up counter space and keeps your cooking essentials within easy reach. Plus, it adds a modern, organized look to your kitchen.
Best Materials
Opt for clear glass jars with magnetic lids so you can see the spices at a glance. Stainless steel or tin jars with a magnetic back also work well. Avoid plastic, as it can stain and look less polished over time.
Layout Tip
Arrange the jars in a single row or a small grid, grouping spices by frequency of use. Keep the most-used ones (like salt and turmeric) at eye level, and lesser-used ones higher up. This makes grabbing what you need quick and intuitive.
Finishing Touch
Label each jar with a simple chalkboard sticker or a handwritten tag. It adds a personal, organized feel and helps everyone in the family find the right spice. For a cohesive look, use the same style of labels and jars.
4. Under-Shelf Basket for Extra Storage

In most Indian kitchens, the space between the countertop and the upper cabinets is just empty air. A few under-shelf baskets clipped onto existing shelves instantly give you a dedicated spot for onions, garlic, or potatoes. It’s a practical weekend project that clears counter clutter and makes everyday cooking feel less chaotic.
Wire baskets that hook under your shelves are a genius way to use vertical space that normally goes to waste. They keep root vegetables visible and ventilated, so they stay fresh longer. Plus, you can install them in under 15 minutes with no tools—perfect for a quick weekend refresh.
Best Materials
Go for galvanized steel or black powder-coated wire baskets. They’re sturdy, rust-resistant, and blend with most kitchen styles. Avoid plastic ones—they can look cheap and trap moisture.
Where To Place
Hang them under upper cabinets near the stove or prep area. Or use them in a pantry shelf for extra veg storage. Just make sure the baskets are within easy reach so you can grab an onion while cooking.
Styling Tip
Keep the baskets tidy by using only a single layer of vegetables. Overfilling makes them look messy and strains the hooks. Pair with a small chalkboard label on the shelf above for a neat, organized vibe.
5. A Bright Runner or Dhurrie on the Floor
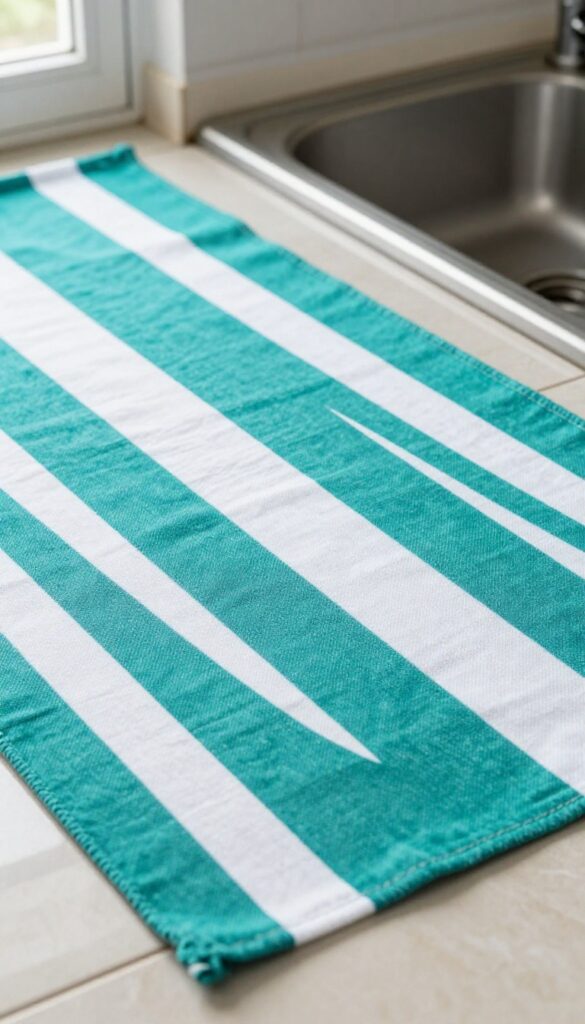
Kitchen floors often get overlooked when it comes to decor. But a washable cotton runner or a small dhurrie can completely change the feel of the space. It adds warmth, color, and comfort underfoot, especially in front of the sink or stove where you stand the most.
Plus, it's an easy weekend refresh that doesn't require any tools or commitment.
A runner or dhurrie instantly makes a kitchen feel more lived-in and inviting. Choose a pattern that pulls in colors from your countertops or cabinets—think bright stripes, subtle geometrics, or floral motifs. The key is to pick something machine-washable so it stays fresh even with daily spills.
Lay it perpendicular to the counter for a grounded look, and make sure it's long enough to cover the standing area but not so long that it trips you up. This simple swap can be done in minutes and transforms the entire zone into a cozy, stylish spot.
Best Materials For Easy Care
Cotton and cotton-blend dhurries are ideal for Indian kitchens because they're lightweight, absorbent, and dry quickly. Avoid high-pile rugs that trap crumbs and moisture. Look for flat-weave or low-pile options that can handle frequent washing without losing shape.
Placement And Size Tips
Place the runner in front of the sink or stove—the two high-traffic areas where you stand the longest. Measure the length of your counter and add a few inches on each side for a balanced look. A 2×3 or 2×4 foot dhurrie works well for smaller kitchens, while longer runners (2×6 or 2×8) suit larger layouts.
Color And Pattern Ideas
Bright colors like mustard, teal, or coral add a pop of energy to neutral kitchens. If your kitchen already has bold tiles or cabinets, choose a dhurrie with a subtle stripe or tone-on-tone pattern. For a cohesive look, pick a color that appears elsewhere in the room, like the backsplash or utensil holders.
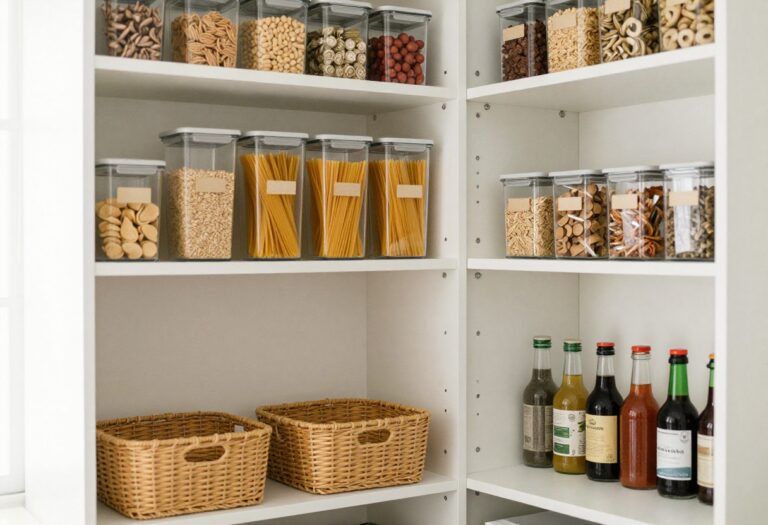
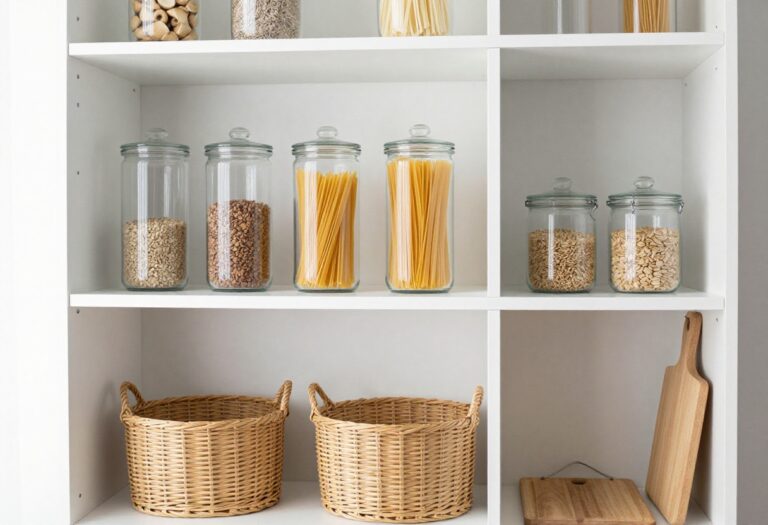
6. Glass Jars for Staples on Display
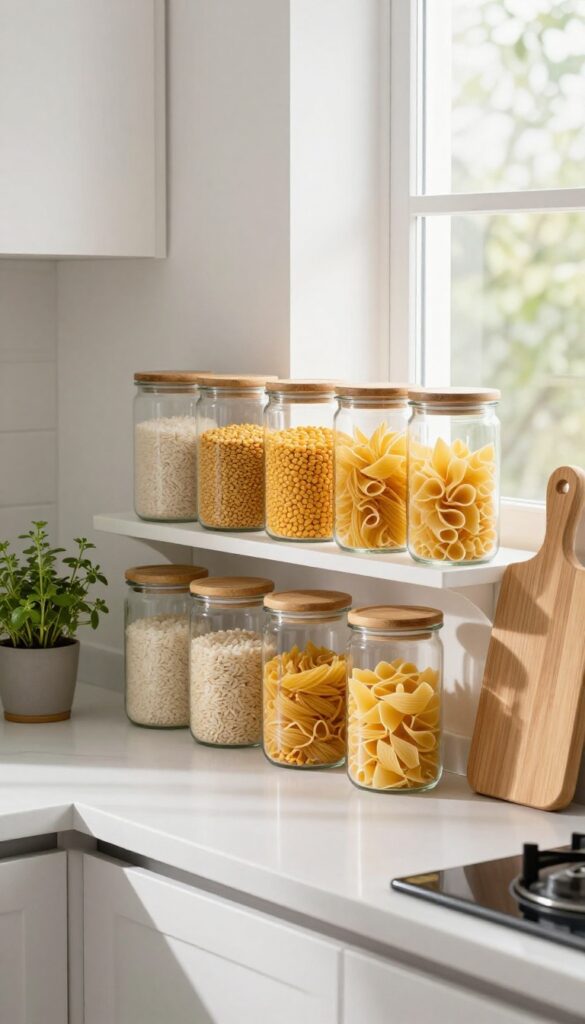
Open shelving is a popular kitchen trend, but it can quickly look messy if you're not careful. Glass jars offer a simple fix—they turn everyday staples into part of the decor. When your rice, dal, and pasta are stored in uniform containers, the shelf instantly looks intentional and curated.
Plus, you can see exactly what you have, which makes meal planning and grocery runs a little easier.
The trick is consistency. Pick jars that are the same shape and size for a cohesive look. Square or rectangular jars maximize shelf space and line up neatly.
Round jars work too, but they leave gaps. Stick to clear glass so the contents are visible—colored glass hides the very thing you're trying to display. Arrange them in a row on a shelf near your cooking area, and you've got a functional pantry that doubles as decor.
This is a weekend-friendly project: just transfer your staples, label the jars if you want, and you're done.
Best Materials
- Clear glass is the obvious choice, but look for jars with airtight lids to keep everything fresh. Bamboo or stainless steel lids add a natural, modern touch. Avoid plastic lids—they can look cheap and don't seal as well.
- If you want to add a little texture, choose jars with a subtle ribbed pattern or a slight tint. Just make sure the glass is thick enough to withstand regular use.
Shelf Styling Tip
- Group jars by type or color for a more organized look. Keep all the grains together, then pulses, then flours. If you have space, add a small plant or a wooden cutting board next to the jars to break up the glass and add warmth.
- Don't overcrowd the shelf—leave a little breathing room so the jars stand out. Use a tiered shelf riser if you want to show off smaller jars in the back.
Small-space Fix
- In a tiny kitchen, use a narrow wall shelf or a magnetic rack on the side of the fridge to store a few jars. You can also stack jars vertically if they're square and sturdy. Another idea: install a slim shelf above the sink or stove for frequently used items like salt, sugar, and tea.
- Every inch counts, and glass jars make even a small pantry look polished.
7. A Pegboard Wall for Utensils and Tools
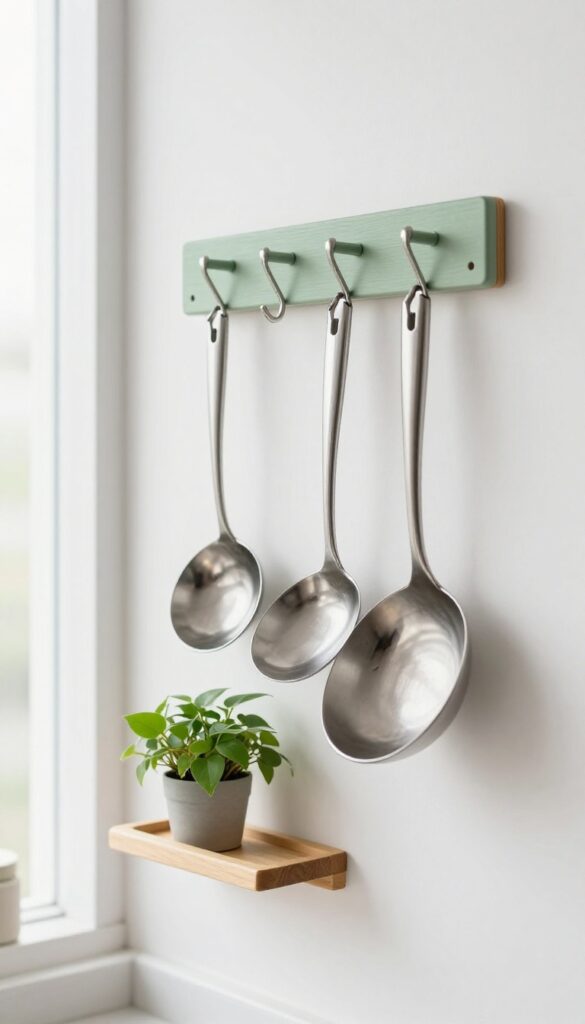
If your kitchen walls are bare, you're missing out on prime real estate that can do double duty. A pegboard mounted near your prep area turns empty wall space into a functional display for your most-used tools. It keeps ladles, spatulas, and small pans within arm's reach while adding an industrial-chic vibe that feels both practical and stylish.
Pegboards are a weekend-friendly project that instantly upgrades your kitchen's efficiency and look. Choose a board that fits your wall, paint it to match your cabinets or go bold with a contrasting color, and arrange hooks and shelves to hold everything from measuring cups to your favorite whisk. The result is a personalized tool wall that saves drawer space and makes cooking feel more organized.
Best Materials
Opt for a sturdy hardboard or metal pegboard. Hardboard is easy to paint and looks warmer, while metal offers a sleek, modern finish. For a budget-friendly option, IKEA's SKÅDIS system works great and comes with accessories designed for kitchen tools.
Layout Tip
Mount the pegboard at a height where you can easily grab the most-used items. Arrange tools by frequency of use: keep spatulas and tongs at eye level, and place measuring cups and smaller gadgets on lower hooks. Leave some empty hooks for future additions.
Finishing Touch
Add a small shelf on top of the pegboard for a plant or a jar of wooden spoons. This softens the industrial look and brings a touch of greenery into the kitchen. Choose a low-maintenance plant like a pothos or a small succulent.
8. Indoor Herb Garden on the Windowsill
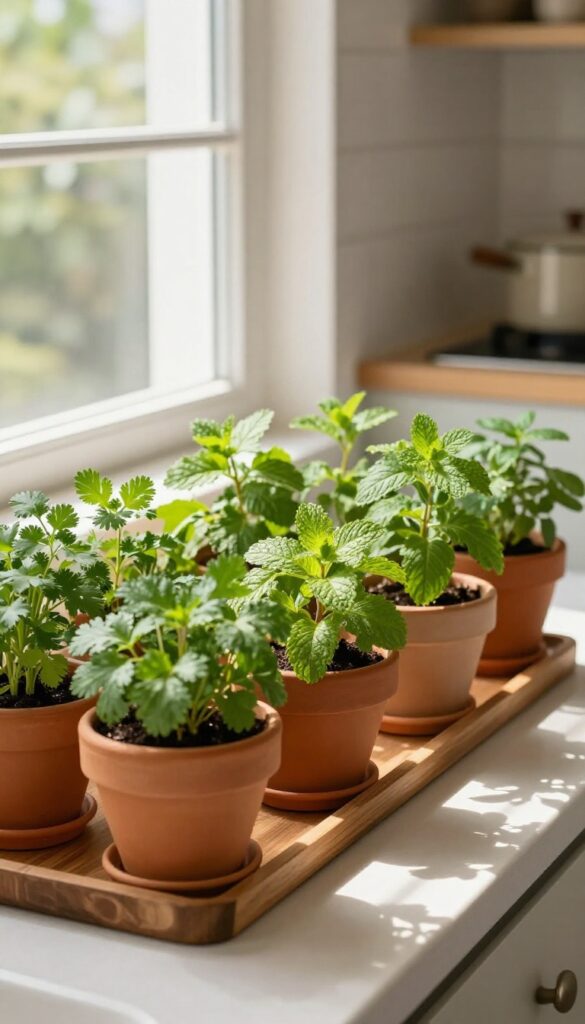
A sunny windowsill is prime real estate that often goes overlooked. Turn it into a mini herb garden with small pots of coriander, mint, and curry leaves. Not only will you have fresh herbs within arm's reach for your daily cooking, but the vibrant green leaves also add life and a pop of color to your kitchen.
It's a weekend project that instantly makes the space feel more personal and lived-in.
Growing your own herbs is one of the most rewarding kitchen upgrades. It's practical, budget-friendly, and instantly elevates the look of your countertop or windowsill. Plus, nothing beats snipping fresh curry leaves straight into your tadka.
The key is choosing the right pots and placement so the herbs thrive without cluttering your workspace.
Best Herbs For Indian Cooking
- Stick with herbs you use regularly: coriander, mint, curry leaves, and maybe some tulsi. These grow well in small pots and don't require too much fuss. Coriander needs a bit more water, while mint can be invasive, so give it its own pot.
- Curry leaves love warmth and sunlight, making a south-facing windowsill ideal.
Pot And Planter Styling
- Uniform clay pots or simple ceramic planters in earthy tones keep the look cohesive. If you want a boho vibe, mix in a few woven baskets. Use saucers to catch water and protect your windowsill.
- Group the pots on a small tray or a wooden stand to create a mini garden feel without taking up too much space.
Maintenance Tip For Busy Weekends
- Set a reminder to water once a day or every other day, depending on the herb. Rotate the pots weekly so all sides get sun. Trim regularly to encourage bushy growth.
- If you're going away, use self-watering pots or ask a neighbor to check in. A little effort goes a long way in keeping your kitchen green and fresh.
9. Swap Cabinet Handles for a Quick Update
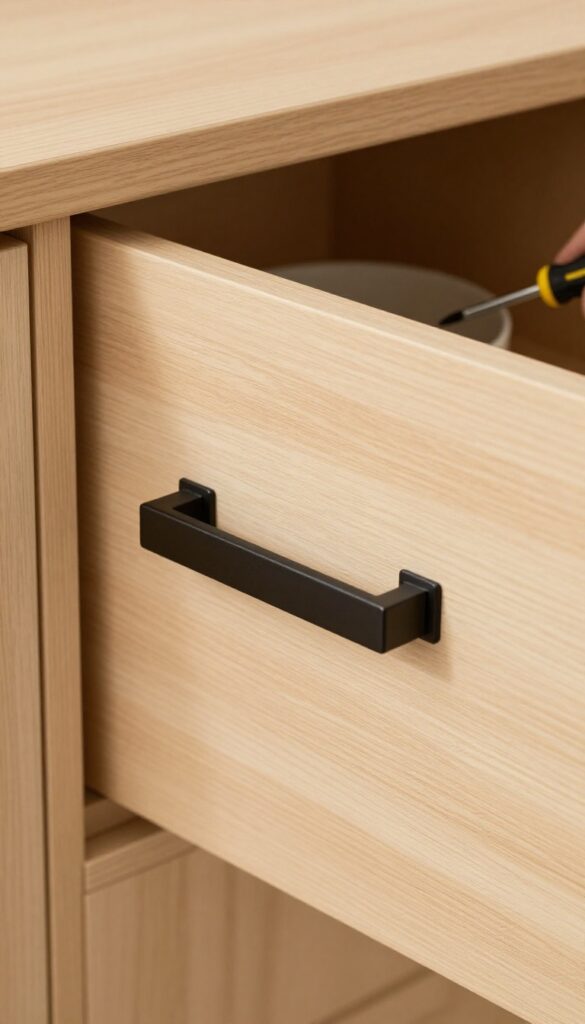
Sometimes the smallest change makes the biggest visual impact. If your kitchen still has those old plastic or brass handles from a decade ago, swapping them out is a weekend project that instantly refreshes the whole space. New hardware acts like jewelry for your cabinets—it draws the eye and sets the tone for the room without requiring any structural work or painting.
Changing cabinet handles is one of the most satisfying DIY updates because it takes just a screwdriver and an afternoon. The key is choosing a style that complements your existing cabinet color and finish. For light wood or white cabinets, matte black handles create a striking contrast that feels modern and grounded.
Warm wooden knobs soften a sleek, handleless kitchen and add a touch of natural texture. Ceramic knobs with subtle patterns or solid colors bring personality to plain cabinets, especially in smaller kitchens where you want a focal point. Measure the distance between screw holes (center-to-center) before buying to ensure a perfect fit—most standard drawers and doors use 3-inch or 4-inch spacing.
Once installed, step back and notice how the new hardware ties the room together, making even old cabinets look intentional and updated.
Best Materials For Indian Kitchens
- For Indian homes where humidity and heat can affect hardware, choose materials that hold up well. Matte black stainless steel is durable, fingerprint-resistant, and works with most cabinet colors. Brass or gunmetal finishes add warmth and resist tarnishing better than polished brass.
- Wooden handles (teak or mango wood) need occasional oiling but bring an earthy, warm feel. Ceramic knobs are easy to clean and come in endless colors, but avoid porous glazes that may stain near the stove.
Budget-friendly Swap Tip
- You don't need to replace every handle at once. Start with the most visible cabinets—the ones above the counter or on the island—and see how you like the look. Mixing finishes (like matte black pulls on upper cabinets and brass knobs on lower ones) can look intentional if you repeat the mix elsewhere, like in lighting or faucet.
- Shop online or at local hardware stores for bulk discounts; many sellers offer sets of ten or more at a lower per-piece price.
Styling The New Hardware
- Once your new handles are on, let them shine by keeping countertops clutter-free. Pair matte black hardware with a black faucet or black-framed open shelving for a cohesive look. For wooden knobs, add a wooden cutting board or a small plant in a terra-cotta pot to echo the natural texture.
- If you chose ceramic knobs with a pop of color, pull that color into a tea towel or a vase on the counter. The hardware should feel like part of a bigger design story, not an afterthought.
10. A Rolling Cart for Extra Prep Space
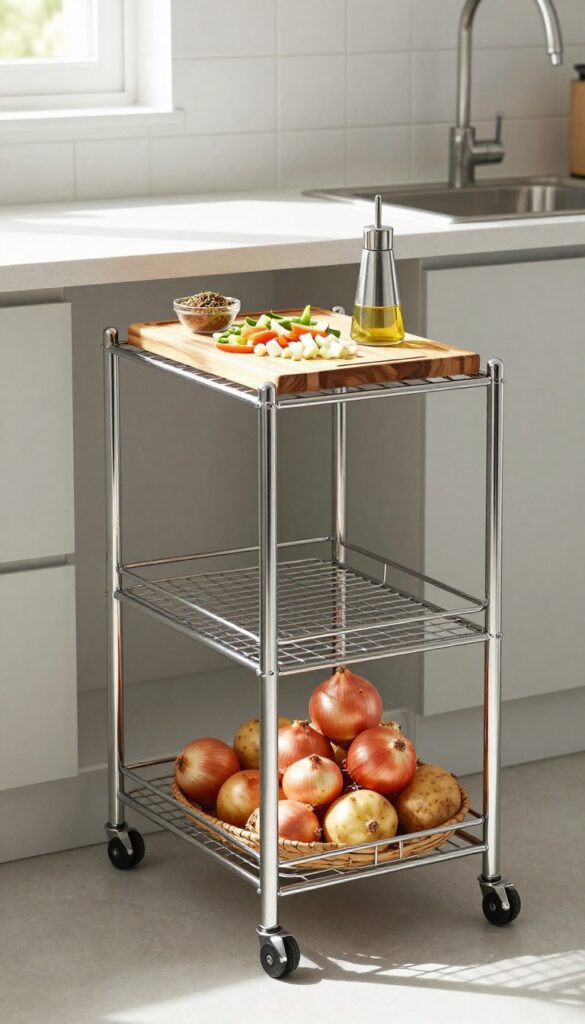
A slim rolling cart is one of those kitchen additions that feels like a cheat code for small spaces. It slides right next to your counter, giving you extra surface area for chopping veggies or setting down hot pans, and can be whisked away when you need floor space back. The best part?
It doesn’t require any installation or permanent change—just buy, roll, and use. For Indian kitchens where counter space is often tight, this simple cart becomes a flexible workhorse that adapts to your cooking flow.
A rolling cart adds instant prep space without the commitment of a full renovation. Look for a narrow design with two or three shelves—enough to hold a cutting board, mixing bowls, or even a stack of onions and potatoes. The mobility means you can position it near the stove while cooking, then tuck it beside the fridge or into a corner when guests come over.
It’s also a great spot to store frequently used spices or oils, keeping them within arm’s reach but off your main counters.
Best Materials
For Indian kitchens, opt for a cart with a stainless steel or powder-coated metal frame—it handles humidity and heat well. Wooden carts add warmth but need sealing to resist moisture. Open wire shelves are great for airflow, especially if you’re storing vegetables, while solid wood or bamboo shelves work better for dry goods and utensils.
Layout Tip
Place the cart on the same side as your stove or sink to create a continuous work triangle. If your kitchen has a narrow gap between the counter and the wall, measure first—standard carts are about 12 to 18 inches wide. Use the top shelf as a landing zone for hot pans, and the lower shelves for bulkier items like a pressure cooker or dal containers.
Styling Detail
Keep the cart looking intentional by adding a small tray for oils and spices, a wooden chopping board that doubles as decor, and a tiny plant or jar of fresh coriander on the top. This prevents it from feeling like a cluttered utility cart and makes it part of your kitchen’s visual flow.
11. Decorative Storage Baskets for Open Shelves
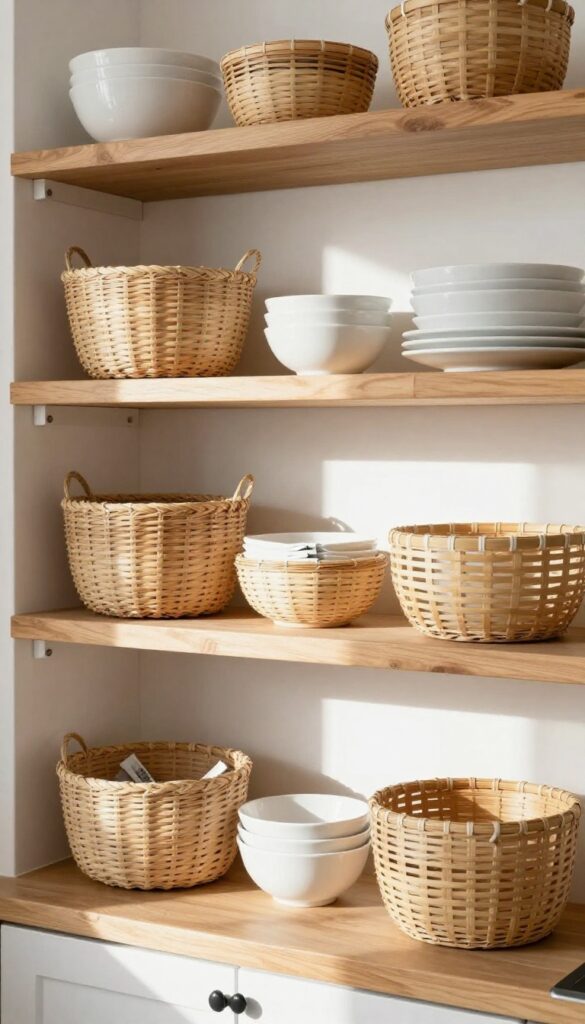
Open shelves in the kitchen are great for displaying pretty dishes, but they can also become a magnet for random packets, napkins, and small gadgets. The trick to keeping them looking intentional is to mix in a few decorative baskets that hide the clutter while adding warmth and texture. Woven bamboo or soft fabric baskets instantly soften the hard lines of shelving and make the whole kitchen feel more lived-in and inviting.
Woven baskets are a weekend-refresh hero because they require zero installation and instantly transform messy shelves into styled vignettes. Choose baskets in natural tones like seagrass, rattan, or jute to complement most Indian kitchen color schemes. For a cohesive look, stick to one or two basket styles and repeat them across shelves.
Use them to store tea sachets, spice packets, napkins, or even small utensils. The contrast between the basket's organic texture and sleek kitchen surfaces creates visual interest without adding visual noise.
Best Materials For Indian Kitchens
- Bamboo and seagrass are excellent choices because they're lightweight, breathable, and affordable. Fabric baskets in neutral linen or cotton blends work well if you want a softer look. Avoid plastic or shiny synthetic baskets—they can look cheap and clash with natural decor.
- For a more durable option, try water hyacinth baskets, which hold up well in humid climates.
Styling Tip: Mix Open And Covered Baskets
To keep shelves from looking too uniform, alternate between open baskets (for items you access often) and covered baskets (for hiding less attractive supplies). Place a small open basket for frequently used tea bags next to a covered one for backup napkins. This creates a rhythm that feels curated but practical.
Budget-Friendly Swap
Instead of buying expensive designer baskets, look for local handwoven options at craft markets or online stores. You can also repurpose sturdy gift boxes by wrapping them in jute rope or fabric. This keeps costs low while still achieving that warm, textured look.
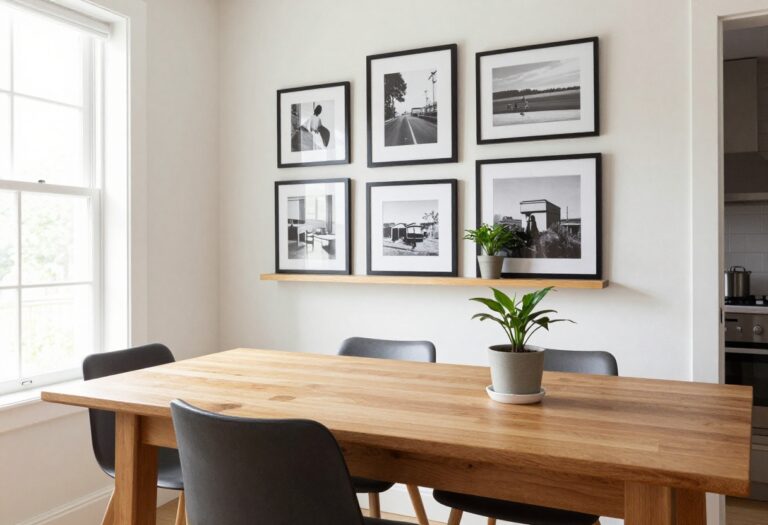
12. A Small Art or Photo on an Empty Wall
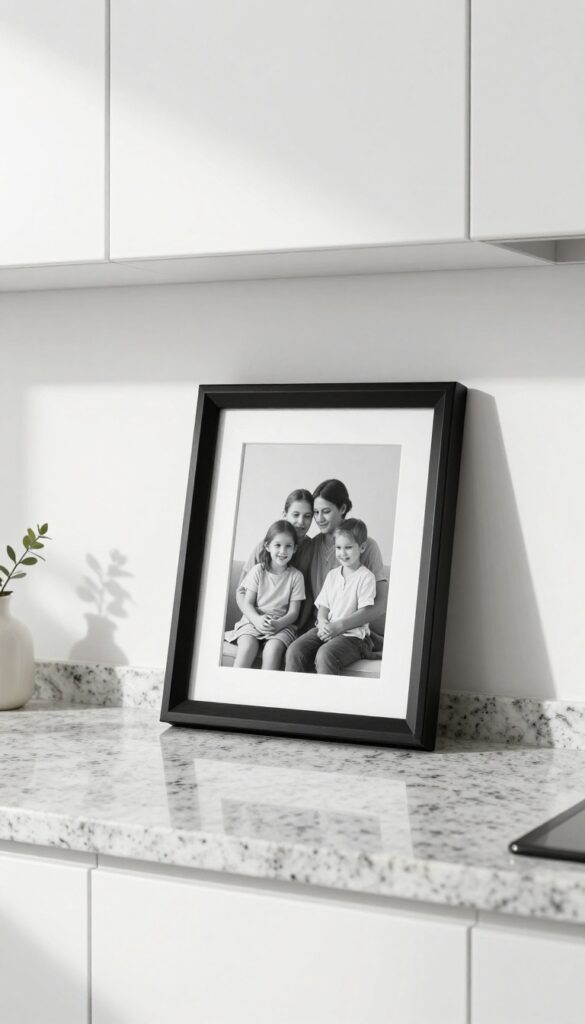
That narrow strip of wall between the counter and the upper cabinet often ends up bare. But it’s the perfect spot for a tiny piece of art or a framed photo. Adding something personal there instantly makes the kitchen feel lived-in and intentional, not just a workspace.
Hang a small framed print or a family photo on a blank wall. It personalizes the space and makes the kitchen feel more like part of your home, not just a utility room. Choose something that makes you smile every time you walk in.
Where To Place It
Look for empty spots near the breakfast nook, above the sink, or beside the window. Avoid placing it where splatters or steam might damage the frame. A spot at eye level works best.
Frame Style And Color
Stick with a simple frame that matches your kitchen’s hardware or cabinet finish. Black, brass, or natural wood frames blend in without clashing. A matted frame adds a polished look without extra effort.
Swap It Seasonally
Keep it fresh by rotating the artwork or photo every few months. A small ledge shelf makes swapping easy. This keeps the kitchen feeling current without a full redecorate.
13. Upgrade Your Lighting with Under-Cabinet LEDs
Good lighting can transform a kitchen from functional to fantastic, and under-cabinet LEDs are one of the easiest upgrades you can make. These slim strips tuck away neatly, casting a bright, even glow across your countertops. No more chopping vegetables in your own shadow or squinting to read recipes.
The best part? Battery-operated options mean zero wiring—just peel, stick, and enjoy instant task lighting. In the evenings, a warm-toned strip creates a soft, inviting ambiance that makes your kitchen feel cozy and polished.
Stick battery-operated LED strips under cabinets to brighten your countertops. Good task lighting makes cooking easier and creates a warm, inviting glow in the evenings. This weekend-friendly refresh requires no electrician—just measure your cabinet underside, clean the surface, and press the adhesive strip into place.
Many kits come with a remote or motion sensor, so you can adjust brightness or turn lights on with a wave. For a seamless look, choose strips that match your cabinet finish or go with a discreet warm white that blends into the background.
Best Color Temperature
Stick with warm white (2700K–3000K) for a cozy, restaurant-style glow that flatters wood tones and white cabinets alike. Cool white (4000K+) feels too clinical for most Indian homes—save that for garages or workspaces. Some LED strips let you switch between temperatures, giving you flexibility for different tasks.
Installation Tip
Before sticking, wipe the cabinet underside with rubbing alcohol to remove grease and dust. Measure twice, cut once—most strips have marked cut lines every few inches. If your cabinets have a lip, mount the strip slightly set back so the light spreads evenly without glaring into your eyes.
Finishing Touch
Pair under-cabinet lights with a dimmer switch or smart plug so you can adjust the mood from bright prep mode to soft evening glow. For a cohesive look, match the light color to your existing pendant or recessed lights.
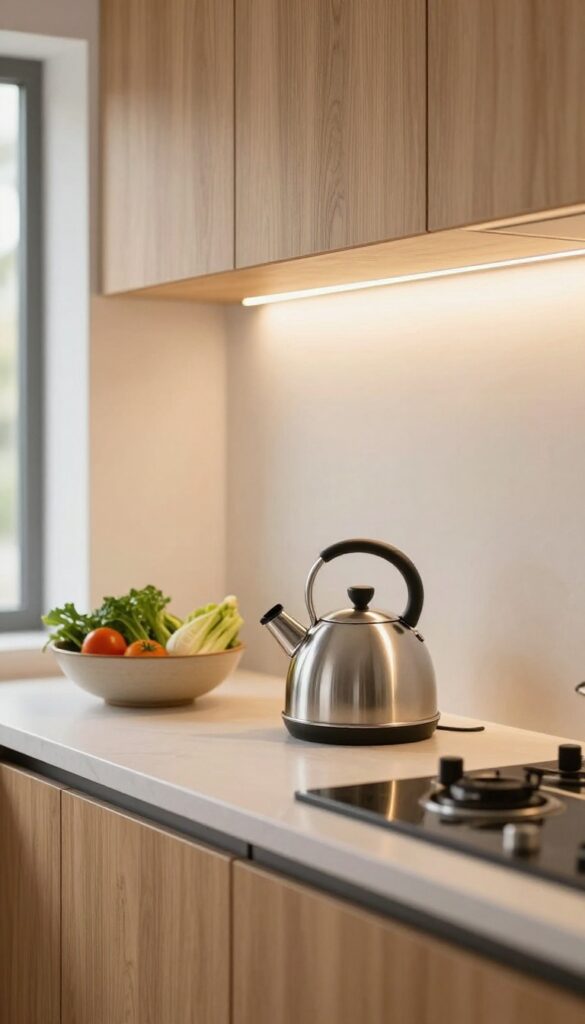
14. A Tray for Your Daily Tea and Coffee Station
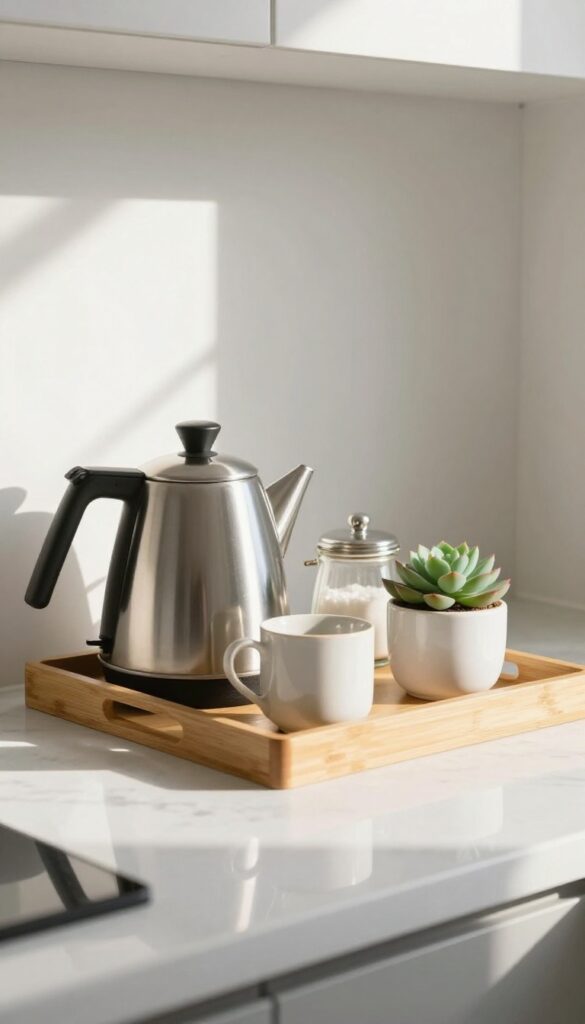
Your morning tea or coffee ritual deserves a spot that feels intentional, not cluttered. A dedicated tray on the counter corrals all the essentials—kettle, cups, sugar jar—into one tidy zone. It’s a small gesture that makes your kitchen look styled and saves you from rummaging through cabinets at 6 AM.
Pick a corner of your counter that’s near a power outlet. A tray keeps everything contained and easy to wipe down. Choose a material that complements your kitchen: bamboo for warmth, marble for a clean look, or a metal tray for an industrial edge.
Arrange items by height—tall kettle in back, short cups in front—and add a small plant or a pretty jar for visual interest.
Best Tray Materials
- Bamboo trays add a natural, warm feel and are budget-friendly. Marble or ceramic trays feel more polished and are easy to clean. For a rustic touch, try a wooden tray with raised edges.
- Metal trays (copper, brass, or black) work well in modern kitchens.
What To Include
Keep it minimal: your kettle or coffee maker, two or three mugs, a small jar for sugar or tea bags, and maybe a spoon rest. Avoid overcrowding—leave some empty space so the arrangement breathes. A tiny plant or a salt lamp can add a cozy touch.
Placement Tip
Set the tray near your sink or water source for easy refilling. If counter space is tight, use a slim tray on a floating shelf or a cart. Make sure it’s not in the way of your main prep area.
15. Add a Touch of Green with a Pothos or Snake Plant
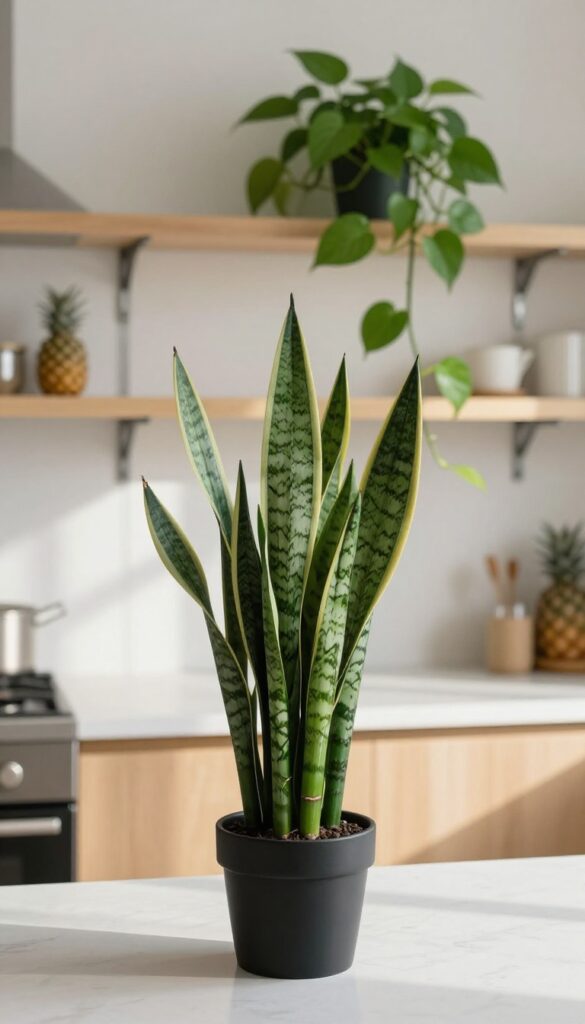
Plants do more than just look pretty—they actually clean the air and make a kitchen feel alive. A pothos or snake plant is perfect because it thrives on neglect, so even if you forget to water it for a week, it’ll still look great. Tuck one on a high shelf or the corner of your countertop, and suddenly your kitchen feels fresher and more inviting without any extra effort.
Adding a low-maintenance plant like pothos or snake plant is one of the easiest ways to bring life into your kitchen. These plants don’t need direct sunlight or frequent watering, making them ideal for busy households. Place them on a top cabinet, a floating shelf, or a windowsill where they can trail or stand tall.
The vibrant green leaves contrast beautifully with neutral kitchen tones, and they naturally purify the air by removing toxins. It’s a small change that makes a big visual impact—and it’s practically zero maintenance.
Best Spots To Place Them
High shelves are ideal for pothos because the vines can cascade down, adding a soft, organic feel. Snake plants work well on countertops or open shelving, where their upright leaves create a sculptural element. Avoid placing them in dark corners—they need at least some indirect light to stay happy.
Styling With Pots
Choose a planter that complements your kitchen’s color scheme. A terracotta pot adds warmth, while a sleek ceramic pot in white or matte black keeps things modern. For a cohesive look, stick to one or two pot colors across your kitchen plants.
Care Tips For Busy Cooks
Water pothos only when the soil feels dry to the touch—usually once a week. Snake plants need even less, about every two to three weeks. Both are forgiving if you miss a watering, so they’re perfect for anyone who wants greenery without the guilt.
FAQ
How can I make my small Indian kitchen look bigger?
Use light colors on walls and cabinets, add mirrors or glossy tiles, keep counters clutter-free, and opt for open shelving to create an airy feel.
What are some budget-friendly kitchen decor ideas?
Swap cabinet handles, add a peel-and-stick backsplash, use glass jars for storage, or hang a pegboard. These cost little but make a big visual impact.
How do I organize Indian spices in a small kitchen?
Use a magnetic rack on the fridge, a tiered spice rack inside a cabinet, or small labeled jars on a shelf. Keep frequently used ones within easy reach.
Can I decorate my kitchen without painting or drilling?
Absolutely. Use removable wallpaper, adhesive hooks, under-shelf baskets, and freestanding furniture like a rolling cart or a small table.
What colors work best for Indian kitchens?
White, cream, and light gray keep the space bright. Accent with warm tones like terracotta, mustard, or deep green for a cozy, inviting look.
Conclusion
Refreshing your kitchen doesn't have to mean a full remodel or spending a fortune. With these 15 simple ideas, you can make meaningful changes over a weekend that add both style and function to your cooking space.
Pick one or two ideas that resonate with your current needs, and see how small tweaks can transform the heart of your home. Happy decorating, and enjoy your refreshed kitchen!