11 Elegant Kitchen Ideas With Refined Everyday Details
An elegant kitchen doesn't have to feel untouchable. The best designs strike a balance between refined details and the kind of warmth that makes you want to linger over morning coffee.
Think soft lighting, natural materials, and small touches that feel personal rather than precious. These 11 ideas focus on everyday elegance—details that look beautiful but also hold up to real life.
Whether you're planning a full remodel or just refreshing a few elements, each suggestion is meant to feel achievable and inviting. From clever storage solutions to subtle texture plays, let's explore ways to make your kitchen feel polished without losing its lived-in soul.
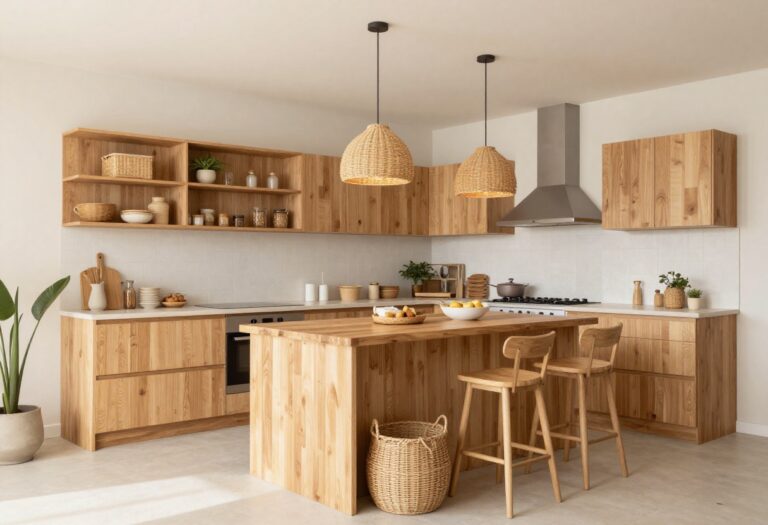
1. Warm Wood Accents That Soften the Space
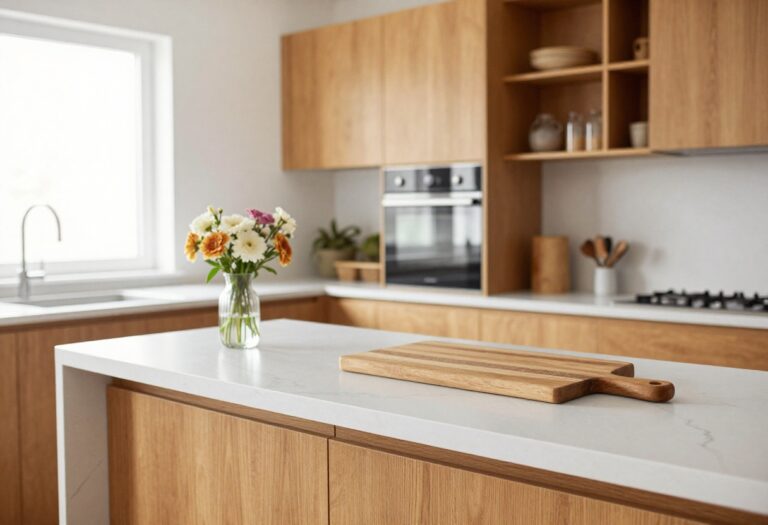
Kitchens can feel cold and clinical when every surface is tile, stone, or stainless steel. That’s where wood comes in. A few well-placed wooden elements—like open shelving, a butcher block countertop, or simple bar stools—bring instant warmth and make the room feel more inviting.
The natural grain and varied tones of wood soften the hard edges and create a balanced, lived-in look that’s both practical and stylish.
Wood doesn’t have to dominate the kitchen to make an impact. Even small touches, like a wooden cutting board left on the counter or a set of wooden canisters, add texture and warmth. For a bigger statement, consider open shelving in a warm oak or walnut.
It breaks up the monotony of upper cabinets and gives you a spot to display everyday dishes or cookbooks. Butcher block countertops are another favorite—they’re durable, affordable, and develop a beautiful patina over time. Pair them with lighter cabinetry to keep the space from feeling too heavy.
Wooden bar stools or a farmhouse table can also anchor a kitchen island or breakfast nook, making the area feel more like a gathering spot than just a workspace.
Best Wood Tones For A Warm Kitchen
- Stick with medium to warm wood tones like oak, walnut, or cherry. Avoid overly orange or yellow finishes—they can look dated. A matte or satin finish works best because it shows less wear and feels more natural.
- If your kitchen has cool gray or white cabinets, a rich walnut adds nice contrast. For warmer cabinet colors, go with a lighter oak to keep things airy.
Where To Add Wood Without Overdoing It
- Focus on one or two statement pieces. Open shelving on one wall, a butcher block island top, or a set of wooden stools are enough. You can also add wood through smaller accents like a wooden fruit bowl, cutting boards, or a knife block.
- The key is balance—too much wood can make the kitchen feel dark or rustic, so mix it with lighter surfaces and plenty of natural light.
Styling Tip: Mix Wood With Greenery
- Wood and plants are a natural pair. A small potted herb garden on the windowsill or a trailing pothos on an open shelf brings life and softens the wood’s texture. The green leaves echo the organic feel of the wood grain and keep the space from looking too monochromatic.
- It’s an easy, low-cost way to tie the look together.
2. Layered Lighting for Ambiance and Task
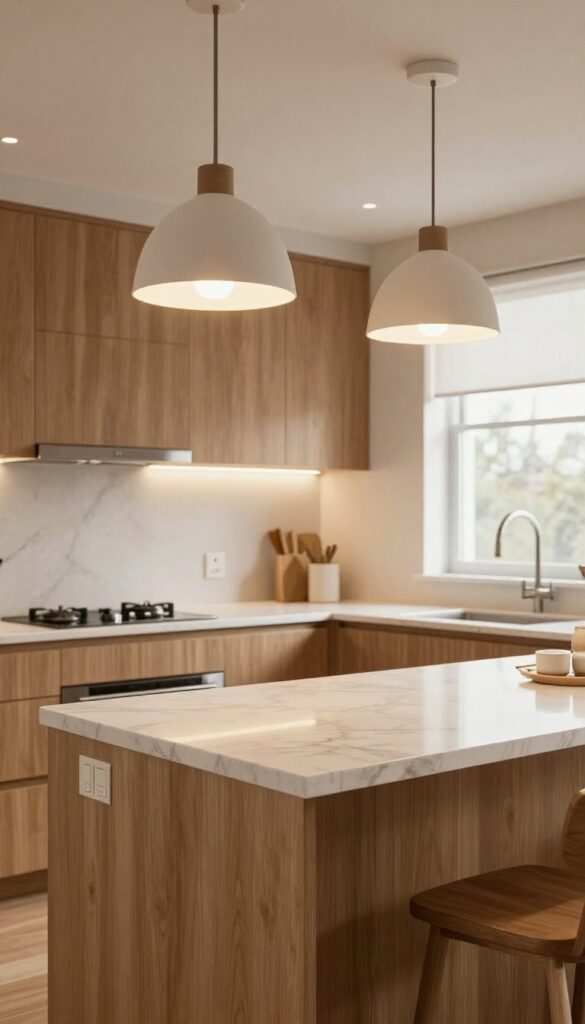
Lighting is the secret ingredient that can make a kitchen feel warm and inviting or cold and sterile. The trick isn't just picking one fancy fixture—it's layering different light sources to match the moment. By combining pendant lights over an island with under-cabinet task lighting and a dimmer switch, you get a flexible setup that shifts from bright meal prep to cozy dinners without any harsh glare.
Think of your kitchen lighting like a dimmer for your mood. Start with a statement pendant or two over the island—these add personality and a warm glow. Then add under-cabinet lights to banish shadows on your countertops, making chopping and reading recipes a breeze.
Finally, install a dimmer switch so you can dial down the brightness when you're lingering over a glass of wine. This layered approach gives you control over the atmosphere, letting the kitchen feel both practical and stylish at the flip of a switch.
Best Bulb Temperature
Stick with warm white bulbs (2700K–3000K) for all your layers. Cooler temps can feel clinical, especially in a kitchen meant to feel lived-in. Warm light makes wood cabinets glow and softens stainless steel, creating that cozy, welcoming vibe.
Fixture Style Tip
Choose pendants with fabric or seeded glass shades—they diffuse light beautifully and reduce harsh shadows. For under-cabinet lights, go with LED strip lights that are dimmable and easy to install. They're low-profile and won't compete with your main fixtures.
Placement Pointers
Hang pendants about 30–36 inches above the island counter for optimal light without blocking sightlines. Under-cabinet lights should be placed near the front edge of the cabinets to illuminate the countertop fully, not the backsplash. This way, you get task light exactly where you need it.
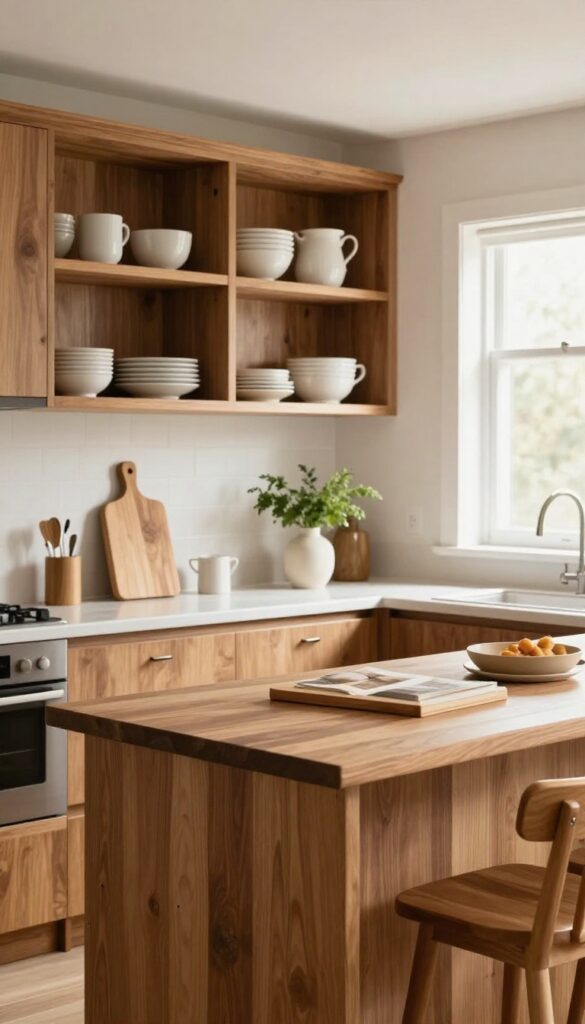
3. Open Shelving With Everyday Ceramics
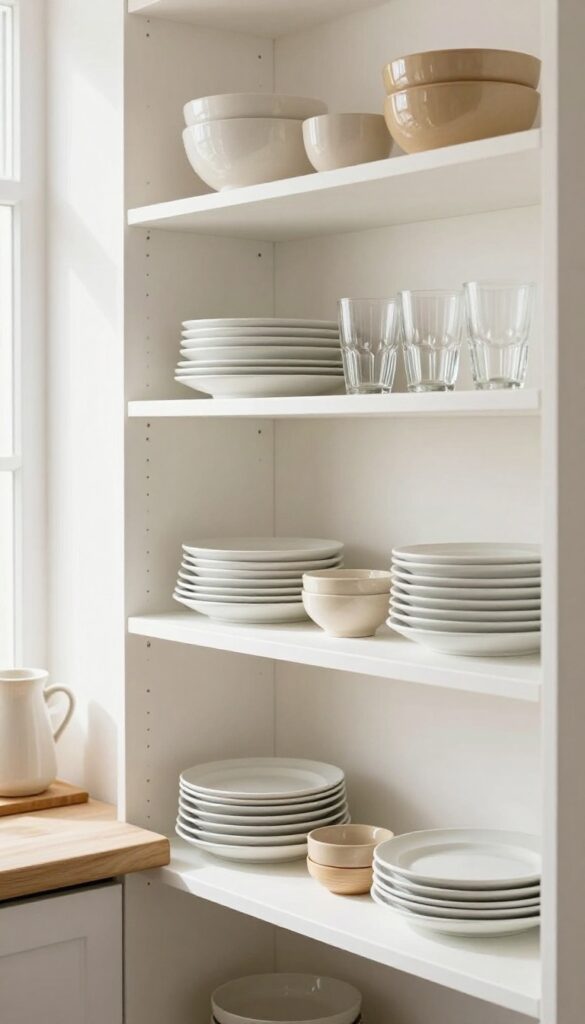
Open shelving gets a bad rap for being impractical, but when you treat it like a functional display space, it actually makes your kitchen feel more organized and welcoming. The trick is to style it with the dishes and glassware you use daily—not just decorative pieces that collect dust. By sticking to a cohesive color palette and keeping the arrangement intentional, you get that warm, lived-in look without the clutter.
Open shelving is one of those design choices that can go either way—it either looks beautifully curated or like a messy catch-all. The secret to pulling it off is to treat your everyday ceramics as the star of the show. Think white dinner plates, simple stoneware bowls, and clear glass tumblers stacked neatly.
When everything follows a similar color story (soft whites, warm grays, or earthy neutrals), the shelves feel calm and collected rather than chaotic. This approach works especially well in smaller kitchens where closed cabinets can feel heavy—open shelving keeps the space airy and gives you easy access to your most-used items. Plus, it encourages you to edit down your collection, which is always a good thing.
Best Colors
Stick to a neutral palette with warm undertones—think cream, beige, soft taupe, and matte white. If you want a pop of color, choose one accent shade like sage green or terracotta and repeat it on a few pieces. Avoid mixing too many bright colors or patterns, which can make the shelves feel busy.
Shelf Styling Tip
Vary the heights of your stacks and add a few natural elements like a small wooden cutting board or a ceramic pitcher. Leave some breathing room between groups so the eye can rest. A simple rule: group items in odd numbers and lean a few plates against the back of the shelf for depth.
Small-space Fix
In a tiny kitchen, use floating shelves above the sink or counter instead of upper cabinets. Keep the most-used dishes on the lower shelves and reserve the top for glassware or smaller bowls. This keeps everything within reach and makes the kitchen feel larger.
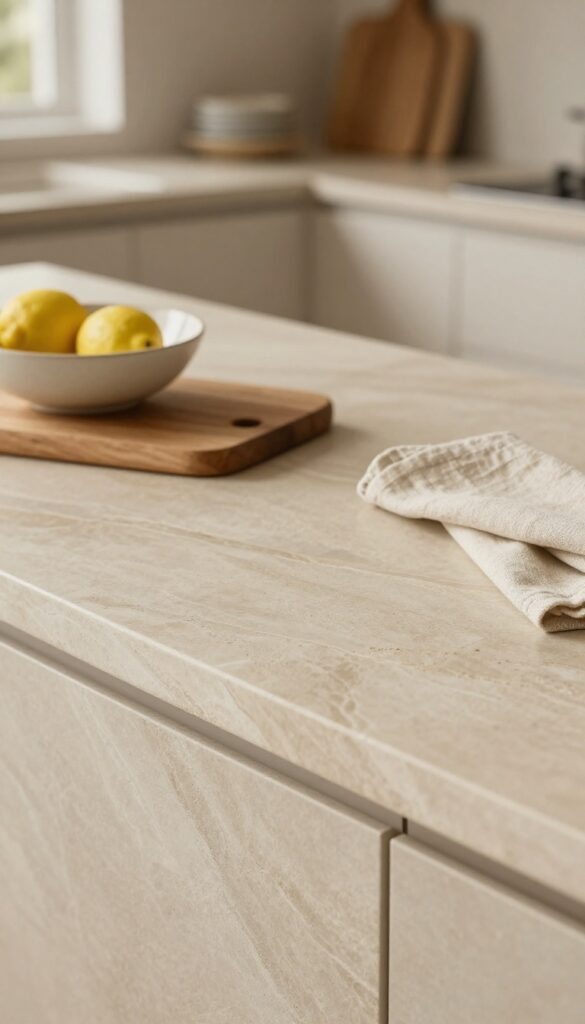
4. A Statement Backsplash in Subtle Texture
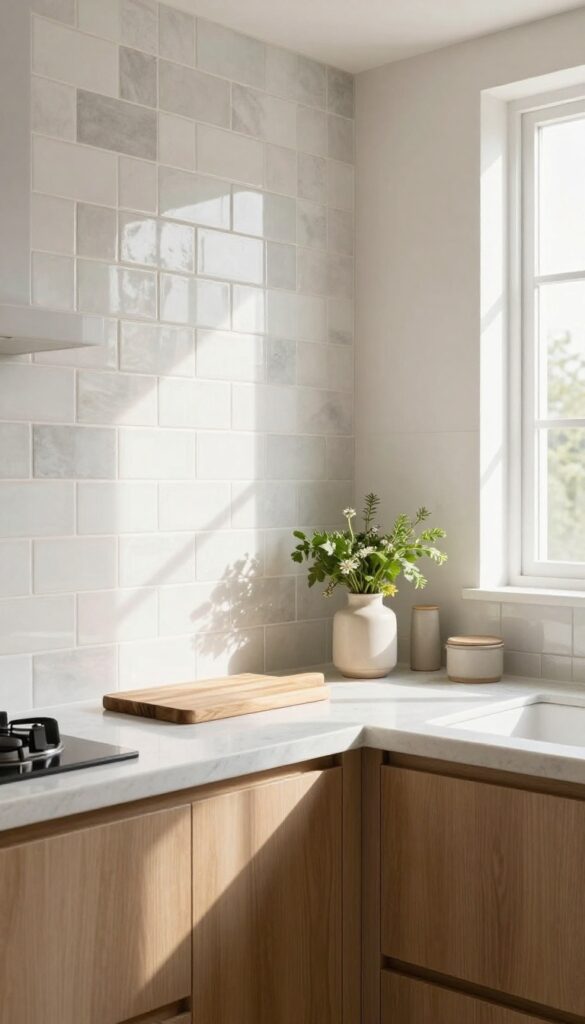
You might think a backsplash needs to be bold to make an impact, but sometimes the quietest choices speak the loudest. Handmade subway tile or zellige brings a gentle, uneven surface that catches light in the softest way, adding depth without demanding attention. It’s the kind of detail that makes a kitchen feel thoughtfully put together, not overly designed.
The beauty of a subtly textured backsplash is how it shifts throughout the day as natural light moves across the room. Those tiny variations in glaze and surface create a lived-in warmth that flat tile just can’t match. Plus, it pairs beautifully with both sleek modern cabinets and more traditional wood tones, making it a versatile choice for any kitchen.
Best Materials
Handmade subway tile and zellige are top contenders for this look. Handmade subway tile offers slight irregularities in size and glaze, while zellige brings a glossy, hand-pressed finish with natural color variation. Both feel artisanal without being fussy.
Color And Finish
Stick with soft whites, warm grays, or pale terra-cotta tones to keep the texture the star. A matte or satin finish works best—high gloss can feel too shiny and compete with the subtle texture. The goal is a surface that glows, not glares.
Styling Tip
Let the backsplash be the hero by keeping countertops relatively clean and simple. A single wooden cutting board, a small vase with fresh herbs, or a few ceramic canisters are all you need. The texture does the heavy lifting, so resist overcrowding the space.
5. Soft-Close Cabinetry With Thoughtful Hardware
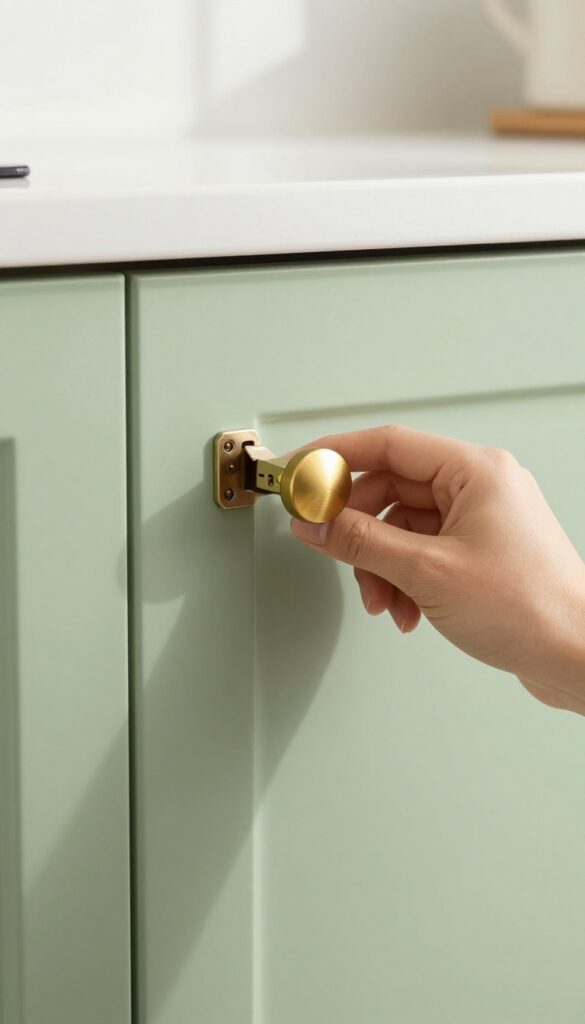
There's something quietly satisfying about a cabinet door that glides shut on its own, no slam, no fuss. Soft-close hinges are one of those upgrades you don't notice until they're missing, and once you have them, you'll wonder how you lived without them. Pair that smooth motion with hardware that feels good in your hand—brushed brass or matte black knobs and pulls—and suddenly every trip to the pantry feels a little more intentional.
It's not about flashy design; it's about the small, tactile details that make daily life feel smoother and more refined.
Upgrading to soft-close hinges is a relatively low-cost change that instantly elevates the quality of your kitchen. The gentle resistance as the door closes eliminates noise and prevents wear over time. Choose hardware finishes that complement your cabinet color and overall kitchen palette.
Brushed brass adds warmth and a subtle vintage touch, while matte black offers a crisp, modern contrast. For a cohesive look, stick with one finish throughout the kitchen, including drawer pulls, cabinet knobs, and even faucet fixtures. The result is a space that feels both practical and polished, with every interaction feeling considered and smooth.
Best Finishes For Warmth And Contrast
Brushed brass works beautifully with white, navy, or sage green cabinets, adding a soft glow that feels inviting. Matte black pairs well with natural wood tones or deep charcoal cabinets for a more dramatic, grounded look. If you prefer a subtle approach, try unlacquered brass—it develops a natural patina over time, adding character.
Installation And Budget Tips
Soft-close hinges are easy to install yourself with just a screwdriver, and they're available at most hardware stores for around $5–$10 per hinge. For a budget-friendly upgrade, you can also buy soft-close adapters that attach to existing hinges. Focus on high-traffic cabinets first—the ones near the stove or sink—and expand from there.
Styling The Hardware Layout
- For a streamlined look, use long bar pulls on drawers and smaller knobs on cabinet doors. In a galley kitchen, consider cup pulls for a retro feel that's also ergonomic. Mixing finishes?
- Keep it intentional: limit to two complementary metals, like brushed brass for hardware and matte black for the faucet, to avoid visual clutter.
6. A Dedicated Coffee or Tea Station
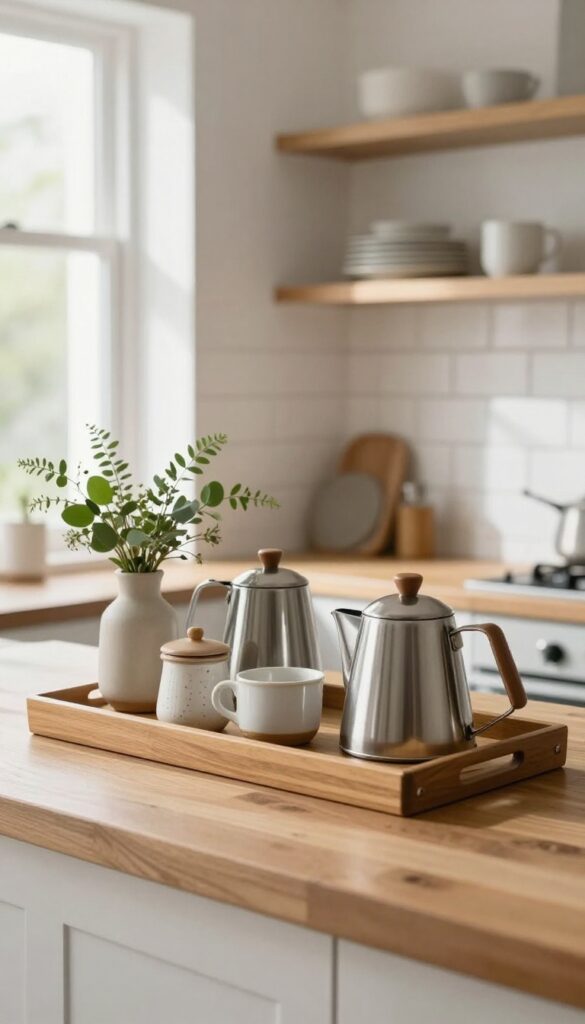
There’s something quietly luxurious about having a spot that’s just for your morning ritual. A dedicated coffee or tea station turns a simple counter or cart into a moment of calm, even on hectic days. It doesn’t take much—just a small nook where you can keep your kettle, favorite mugs, and a few essentials within easy reach.
The trick is making it feel intentional, not cluttered. A tray corrals the items, a tiny plant adds life, and suddenly that corner becomes one of the most inviting spots in your kitchen.
Think of it as a mini sanctuary for your caffeine fix. Whether you’re a pour-over purist or a tea bag minimalist, having everything in one place streamlines your morning and adds a layer of warmth to the room. The key is to keep it practical but styled—a pretty canister for sugar, a small vase for a sprig of greenery, and maybe a little dish for spoons.
It’s the kind of detail that feels both useful and personal, and it instantly makes your kitchen feel more curated.
Best Spot And Layout
Look for an unused corner of the counter, a slim cart that fits between cabinets, or even a section of a hutch. The ideal spot is near a power outlet for your kettle or coffee maker and has enough surface area for a tray (about 12 by 18 inches works well). If counter space is tight, a wall-mounted shelf with a built-in mug rack can hold the essentials without taking up valuable prep area.
Styling The Vignette
- Start with a wooden or ceramic tray to anchor the setup. Place the coffee maker or kettle on the tray, then add a small jar for stir sticks or sugar, a stack of two or three favorite mugs, and a tiny plant like a succulent or a sprig of eucalyptus in a bud vase. Keep the color palette simple—neutral tones with one accent color that ties into the rest of the kitchen.
- A small dish for used tea bags or coffee grounds keeps things tidy.
Storage And Organization Tip
- Use a small basket or a ceramic crock to store extra tea bags, coffee pods, or single-serve packets. If you have room, a narrow drawer or a slim shelf underneath can hold a backup stash. Labeling canisters with chalk labels or simple tags adds a personal touch and keeps everything easy to find.
- The goal is to make the station feel complete but not overcrowded—edit ruthlessly.
7. Natural Stone Countertops With Honed Finish
Polished stone has long been the default, but honed finishes are quietly stealing the spotlight in kitchens that want a softer, more grounded feel. The matte surface doesn't shout for attention; it lets the natural veining and subtle color variations do the talking. For anyone who loves the look of marble but worries about etching, honed quartzite offers a durable alternative that still feels luxurious.
It's the kind of detail that makes a kitchen feel collected and calm, not cold or precious.
Honed stone countertops bring a tactile quality that polished surfaces just can't match. The finish feels almost silky under your fingers, and it diffuses light rather than reflecting it harshly. That means fewer fingerprints and water spots, too.
In a warm, lived-in kitchen, this understated look pairs beautifully with matte cabinetry, unlacquered brass, and open shelving. It's a surface that ages gracefully, developing a gentle patina over time that adds character rather than looking worn out.
Best Stone Choices
- Marble is the classic pick, but honed marble will etch from acidic spills like lemon juice or vinegar. If you want that soft look without the stress, honed quartzite is a fantastic swap—it's harder and more resistant to etching, yet still offers beautiful veining. Honed granite is another option; it's less porous than marble and comes in darker tones that hide crumbs and smudges well.
- For a truly low-maintenance choice, consider a sintered stone like Dekton in a matte finish.
Pairing With Cabinetry
- The key to making honed stone feel warm is contrast. Light, creamy stone looks stunning against deep navy or charcoal cabinets. For a more monochromatic vibe, pair a pale gray honed quartzite with white oak cabinets—the wood grain adds the texture that the matte stone doesn't provide.
- Avoid matching the stone too closely to the cabinet color; you want a subtle shift in tone so the countertop reads as a deliberate design element, not an afterthought.
Daily Care And Patina
- Honed surfaces are more porous than polished ones, so sealing is a must—especially for marble and granite. Plan to reseal once a year, or more often if you cook a lot. The beauty of honed stone is that it doesn't show every tiny scratch or water ring the way polished stone does.
- Over time, it develops a soft, even sheen that feels lived-in and loved. Just wipe up spills promptly and use coasters for acidic drinks to keep the surface looking its best.
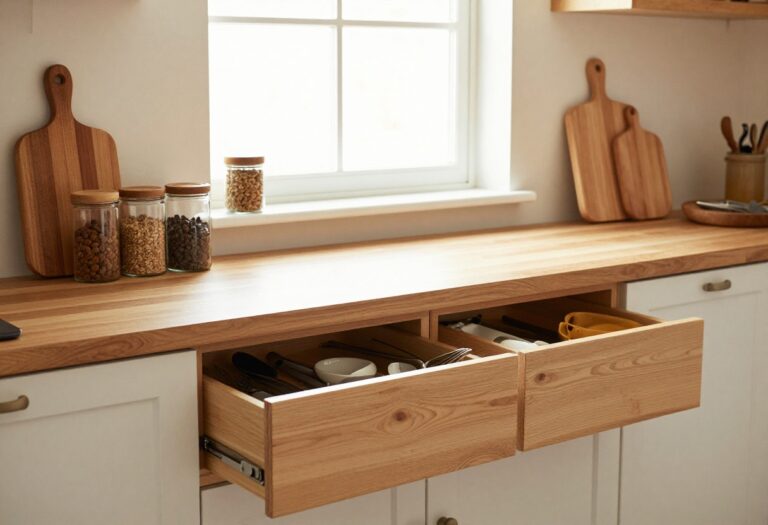
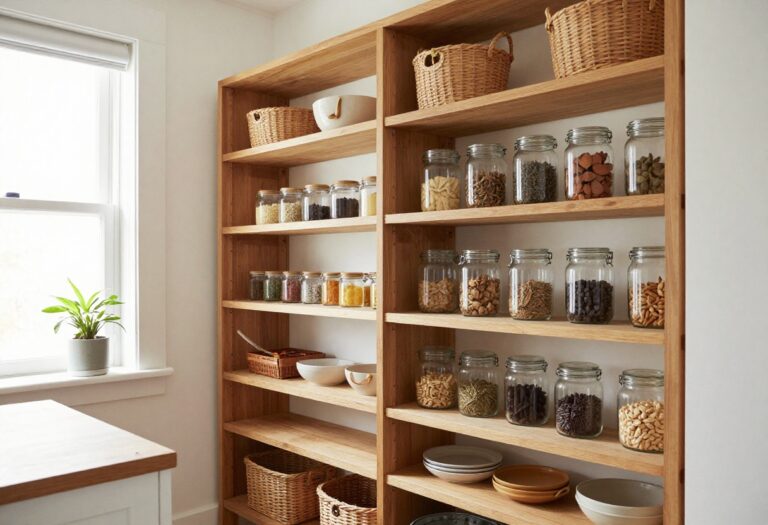
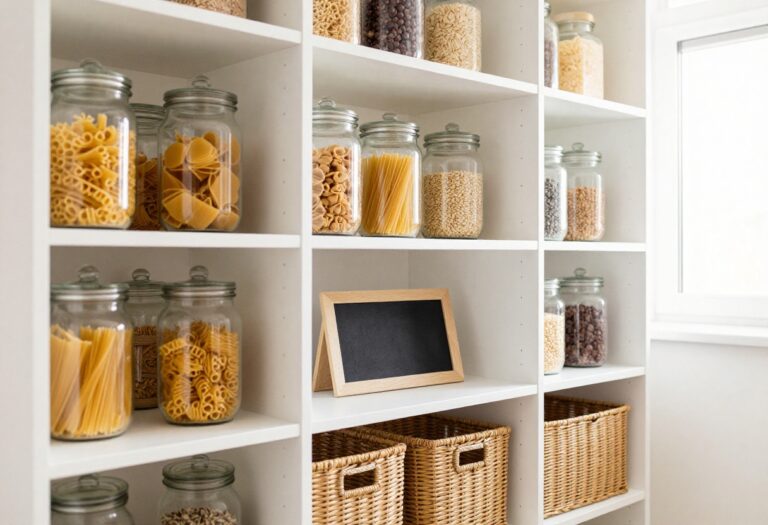
8. Integrated Pantry Storage That Blends In
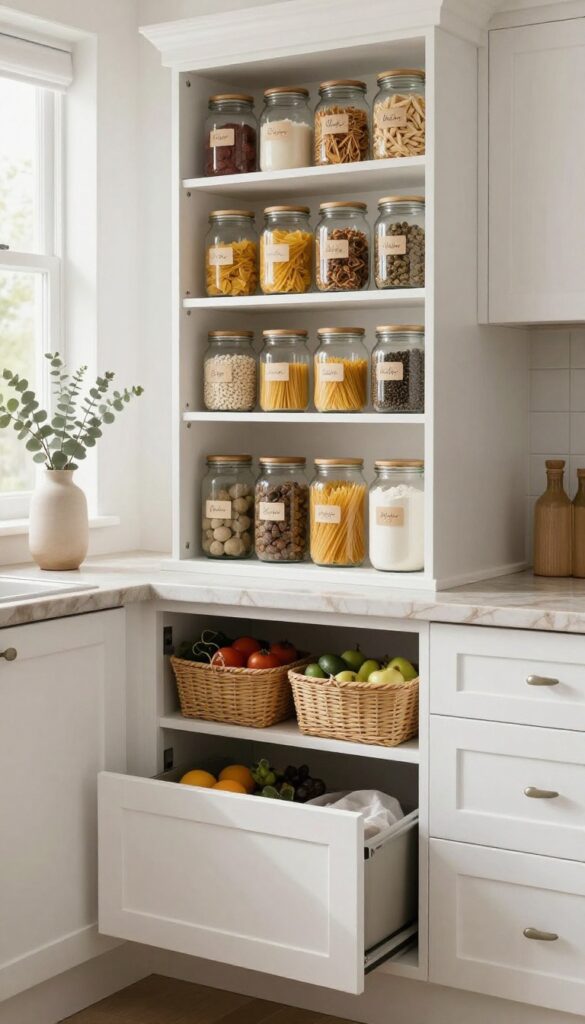
A cluttered pantry can undo all the calm you've worked to create in your kitchen. When every shelf is packed with mismatched boxes and bags, even the prettiest countertops feel chaotic. That's why integrated storage that hides behind closed doors is such a game-changer—it keeps the visual noise tucked away while making your daily cooking flow smoother.
The secret to a serene kitchen isn't just about what's on display; it's equally about what's hidden. Integrated pantry storage means every can, jar, and spice has a designated spot behind cabinet doors that match your kitchen's style. Pull-out drawers let you see everything at a glance, labeled jars add a uniform, tidy look, and matching containers turn a functional space into something almost meditative.
When your pantry is organized, you spend less time searching and more time enjoying the process of cooking. Plus, that clean, streamlined look carries over into the whole room—no more visual clutter sneaking out every time you open a cabinet.
Pull-out Drawers And Baskets
- Deep cabinets are notorious for hiding things in the back. Swap fixed shelves for pull-out drawers or wire baskets, and suddenly every item is within reach. Use them for canned goods, spices, or even small appliances you use daily.
- The action of pulling out a drawer feels satisfying and keeps everything visible, so nothing gets forgotten and expired.
Uniform Containers And Labels
- Mismatched packaging creates visual static. Transfer dry goods like flour, pasta, and snacks into clear glass jars or matching canisters. Add simple labels (chalkboard or printed) for a clean, intentional look.
- This small swap makes your pantry feel like a boutique grocery store—and it's surprisingly calming to see everything in neat rows.
Cabinet Styling Note
- Don't forget the inside of the door. Mount a slim spice rack or a few hooks for measuring spoons and small tools. Keep the color palette neutral—white, beige, or soft gray containers work with almost any kitchen style.
- A well-styled pantry doesn't have to be expensive; even budget-friendly bins from a discount store look elevated when they're all the same color.
9. A Mix of Metals for Visual Interest
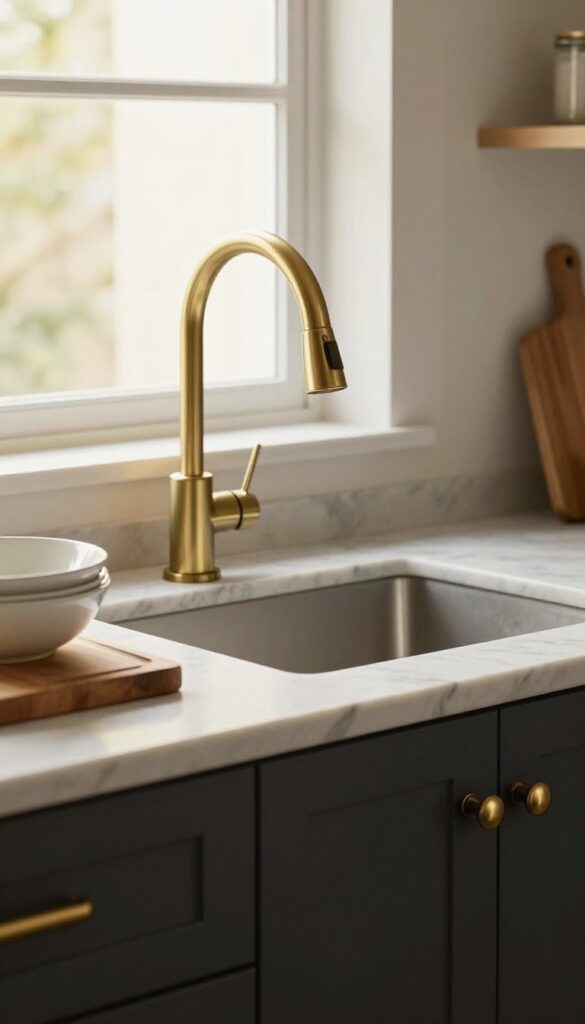
Gone are the days when every finish in a kitchen had to match. Mixing metals adds depth and personality, making the space feel curated over time rather than pulled from a catalog. The key is balance—choose two or three finishes and let one dominate while the others accent.
Brass, chrome, and black work beautifully together when used in small, intentional doses. A brass faucet paired with chrome bar stools and black cabinet pulls creates a layered look that feels warm and lived-in, not chaotic.
Start by picking a primary metal for the largest fixtures, like the faucet or range hood. Then bring in secondary finishes through smaller details—light fixtures, hardware, or accessories. The mix should feel deliberate, so repeat each finish at least twice in the room to create visual rhythm.
For a practical touch, consider finishes that hide fingerprints and water spots, like brushed brass or matte black. This approach works especially well in open-concept kitchens where the metal mix can echo into adjacent living spaces, tying the whole home together.
Best Metals To Combine
- Stick with warm and cool tones that complement each other. Brass and chrome are a classic pair—brass brings warmth, chrome adds crispness. Black hardware grounds the mix and adds a modern edge.
- Avoid mixing more than three finishes, and let one be dominant (like brass on the faucet and light fixtures) while the others play supporting roles (chrome stools, black drawer pulls).
Where To Use Each Finish
- Reserve the dominant metal for eye-level fixtures—faucet, pendant lights, cabinet hardware. Use the secondary finish on furniture pieces like bar stools or a kitchen cart. The third finish works well on small accents like a toaster, canisters, or a fruit bowl.
- This distribution keeps the look balanced without overwhelming the space.
Finishing Touch
Tie the metals together with a neutral backdrop—white or light gray walls, natural wood tones, or a marble-look countertop. The contrast will make each finish pop without clashing. Also, consider the undertones: warm brass pairs nicely with cream cabinets, while cool chrome suits gray or blue tones.
10. Window Treatments That Frame the View
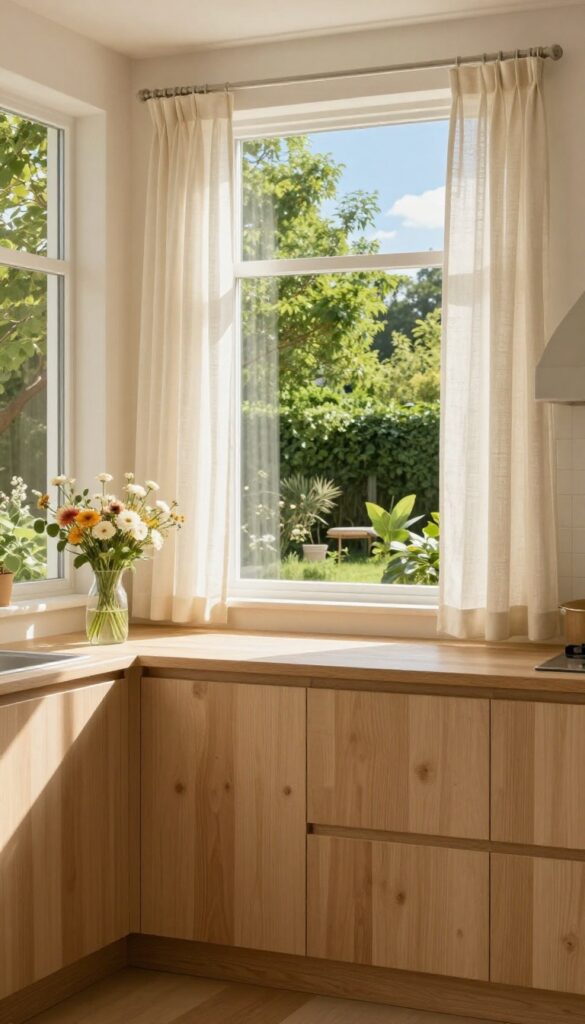
Windows are often the best feature in a kitchen, but bare glass can feel a little unfinished. The right window treatment softens the edges, adds warmth, and makes the whole room feel more intentional. Linen curtains or Roman shades are a go-to choice because they filter light beautifully without blocking it completely.
They bring in texture and a soft, lived-in feel that balances out hard surfaces like countertops and cabinets.
For a kitchen that feels warm and inviting, window treatments should feel natural, not fussy. Linen is a favorite because it has a relaxed drape and a slightly irregular texture that adds character. Roman shades offer a cleaner look while still providing softness.
Both options let you control privacy and light without making the window feel heavy or overdone. The key is to keep the treatment simple so the view stays the star of the show.
Best Fabrics For A Lived-in Look
- Stick with natural fibers like linen, cotton, or a linen-cotton blend. They have a soft, breathable quality that feels right at home in a kitchen. Avoid shiny or stiff fabrics—they can look too formal.
- Instead, go for matte, slightly textured weaves that catch the light gently. Neutral tones like cream, oatmeal, or soft gray work best because they blend into the background and let the outdoors take center stage.
Hanging Height And Length Tips
- Mount the rod as close to the ceiling as possible to make the window feel taller. Curtains should just kiss the floor or hover an inch above it—anything shorter can make the room look squat. For Roman shades, mount them outside the window frame to make the window appear larger.
- Inside-mount shades look tidy but can make a small window feel even smaller, so use outside mounts when you want to maximize light and view.
Layering For Privacy And Warmth
- If your kitchen gets a lot of direct sun or you want more privacy at night, layer a sheer curtain under a heavier linen panel. Sheers diffuse harsh light during the day, and you can draw the linen panels closed in the evening. Another option is a Roman shade paired with a simple valance or a cafe curtain on the lower half.
- This keeps the upper window open for light while adding a cozy, cottage-like feel below.
11. A Welcoming Entry Point With a Small Rug
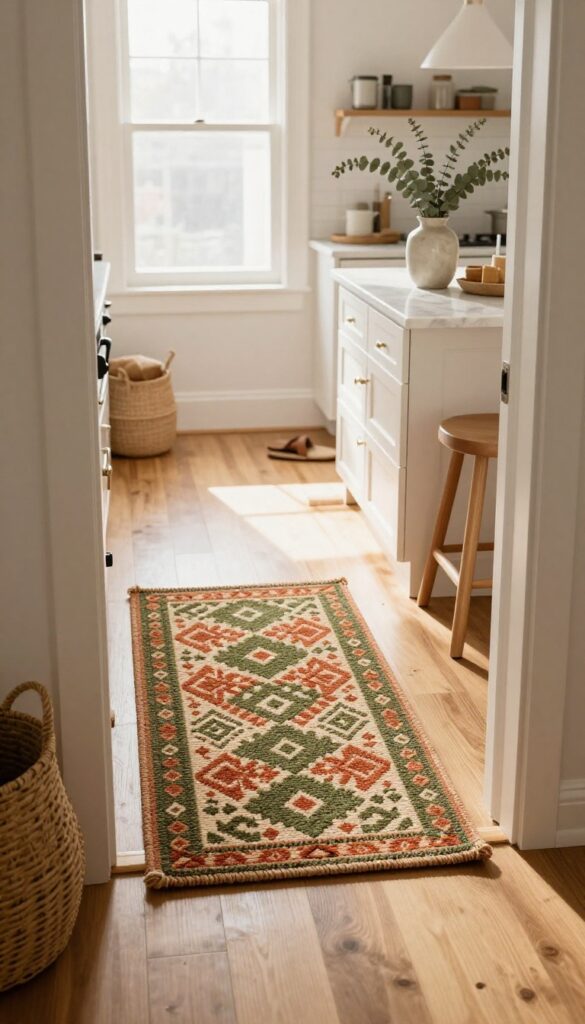
The kitchen entrance often gets overlooked when it comes to decor, but it's actually a prime spot to add warmth and personality. Placing a small, durable rug right where you step in does more than just catch dirt—it signals that this is a lived-in, cared-for space. It's a simple gesture that makes the whole kitchen feel more inviting, especially if you have an open layout where the kitchen flows into a hallway or dining area.
Think of the rug as a soft landing that defines the transition from one room to another. It doesn't have to be large—just enough to cover the area where you naturally step. Choose a washable runner or a low-pile rug in a pattern that hides crumbs and spills.
This isn't just about looks; it's about creating a moment of comfort before you even start cooking. The rug anchors the space visually and adds a layer of texture that balances out hard surfaces like tile or hardwood.
Best Materials For High-traffic Areas
- Since this rug sits right at the kitchen threshold, it needs to handle foot traffic, dropped food, and occasional spills. Look for flatweave cotton, polypropylene, or indoor-outdoor blends that can be tossed in the wash or hosed down. Avoid thick shag or high-pile rugs that trap crumbs and are hard to clean.
- A low-profile design with a non-slip backing (or a separate rug pad) keeps it safe and secure.
Color And Pattern Tips
- A small rug is a great place to introduce a subtle pattern or a pop of color that ties into your kitchen's palette. If your cabinets are neutral, try a rug with a muted geometric print in warm earth tones. For a more monochrome kitchen, a rug with a contrasting border can define the entry without overwhelming the space.
- Just keep the scale of the pattern in check—too busy and it'll feel chaotic in a small area.
Placement And Styling
Position the rug so it aligns with the doorway or the edge of the counter, leaving a few inches of floor visible on each side. If your kitchen opens into a hallway, let the rug extend just past the doorframe to create a visual bridge. Pair it with a small console table or a wall hook nearby for keys and bags—this turns the entry into a functional drop zone that feels intentional, not cluttered.
FAQ
How can I make my kitchen look elegant on a budget?
Focus on small upgrades like swapping hardware, adding a backsplash, or introducing warm textiles. Even changing light fixtures or adding open shelving can elevate the look without a full renovation.
What colors work best for an elegant kitchen?
Neutral palettes with warm undertones—like soft whites, beiges, warm grays, and muted greens—create a timeless base. Add depth with wood tones and metallic accents.
How do I keep an elegant kitchen feeling lived-in?
Incorporate natural materials like wood and stone, display everyday items you love, and avoid overly sterile styling. A few personal touches, like a cookbook stand or a fruit bowl, add warmth.
What lighting makes a kitchen feel elegant?
Layered lighting with dimmers is key. Use warm-toned bulbs (2700-3000K) and combine ambient, task, and accent lighting. Pendant lights with fabric shades or brass details add a refined touch.
Can I mix different cabinet styles in one kitchen?
Yes, mixing styles—like shaker upper cabinets with flat-panel lowers—can add visual interest. Keep the color palette consistent to maintain cohesion.
Conclusion
Elegance in the kitchen doesn't require a complete overhaul. Small, thoughtful details—like warm wood accents, layered lighting, and curated open shelves—can transform the space into something both refined and welcoming.
The goal is to create a kitchen that feels good to cook in and easy to live with. Start with one or two ideas that resonate with your style, and let the rest follow naturally.