13 Ikea Kitchen Cabinets Ideas for Sleek Budget Storage
IKEA kitchen cabinets are a blank canvas waiting for your personal touch. With a little creativity, those budget-friendly boxes can become the backbone of a kitchen that feels warm, layered, and anything but basic.
The key is mixing textures, adding softness, and thinking beyond the standard setup. Whether you're working with a small galley or an open-plan space, these ideas focus on making storage feel intentional and inviting.
No cold, sterile vibes here—just cozy, practical solutions that keep your counters clear and your style front and center. From swapping out doors to playing with open shelving, each idea is designed to be achievable without a full renovation.
1. Mix Open and Closed Storage for Visual Rhythm
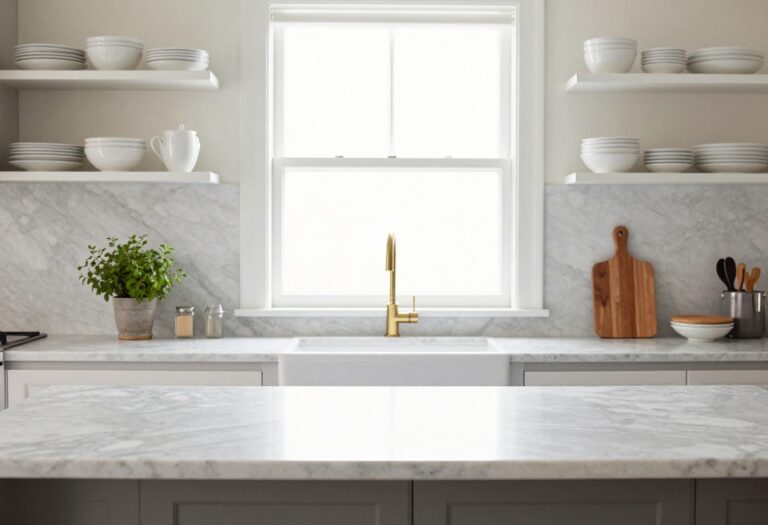
A kitchen full of identical cabinet doors can feel flat, even a little boxy. Breaking up that solid front with a few open shelves adds instant character and a sense of rhythm. The trick is to keep the open sections intentional—display your prettiest dishes or everyday glassware there, and tuck the mismatched Tupperware and bulk spices behind closed doors.
The result is a kitchen that feels both curated and lived-in, without sacrificing an ounce of storage.
This approach works especially well in galley or L-shaped kitchens where wall space is tight. By swapping one or two upper cabinets for open shelving, you create a natural focal point and a chance to layer in texture with ceramic bowls, wooden cutting boards, or a trailing plant. The contrast between closed storage and open display adds depth, making the whole room feel more dynamic.
Plus, it forces you to edit—only keep out what you truly love using.
Best Placement
Install open shelves near your prep zone or coffee station so frequently used items are within easy reach. Avoid placing them directly over the stove where grease can settle on displayed pieces. A spot above the sink or next to the range hood works beautifully.
Styling Tip
Group items in odd numbers and vary heights—stack plates, lean a cutting board, and add a small plant or jar of utensils. Stick to a cohesive color palette (neutral ceramics, warm wood, a few glass pieces) so the shelf feels curated, not cluttered.
Cabinet Color Flow
Keep your lower cabinets and remaining uppers in the same finish to maintain a unified look. White or light gray cabinets let open shelves pop, while dark navy or forest green creates a cozy, dramatic contrast with warm wood or brass accents on the shelves.
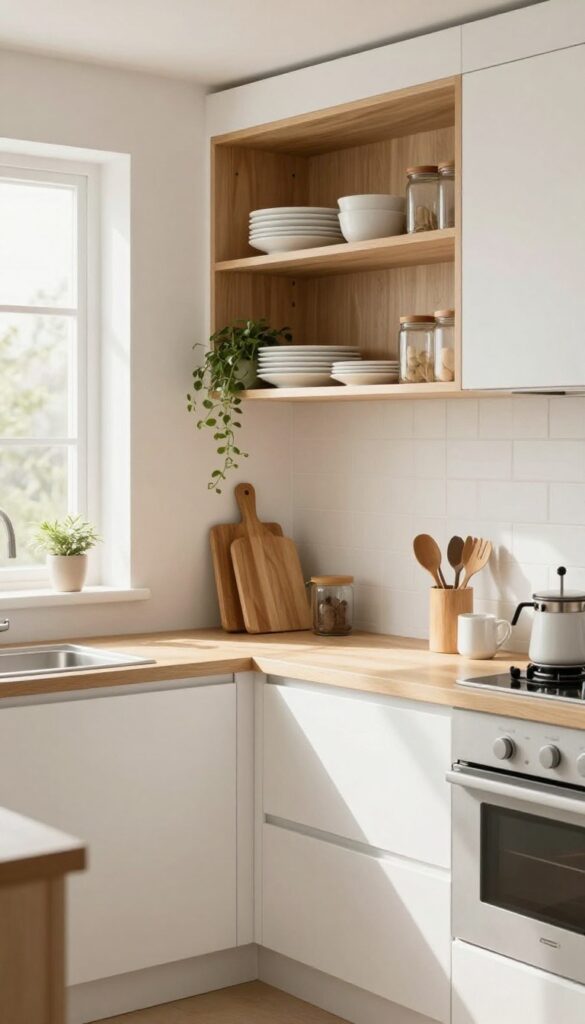
2. Swap Standard Doors for Custom Fronts
Flat-front IKEA cabinets are a blank canvas, but they don't have to stay that way. Swapping out the standard doors for custom fronts from companies like Semihandmade or Kokeena is one of the quickest ways to give your kitchen a high-end, bespoke feel without tearing everything out. You keep the sturdy cabinet boxes and the smart interior storage, but the exterior gets a complete personality transplant.
This upgrade is all about layering warmth and texture into what might otherwise feel like a builder-grade kitchen. Wood tones, ribbed glass, or matte colors instantly add depth and make the space feel more collected and intentional. It's a simple swap that transforms the entire kitchen's personality, turning it from purely functional into a room you actually want to spend time in.
Best Materials For A Cozy Look
For a cozy, layered feel, opt for warm wood veneers like oak or walnut. They bring natural grain and a soft, organic touch that balances out sleek countertops. If you prefer painted fronts, go for matte finishes in earthy tones like sage, clay, or a soft off-white—glossy surfaces can feel too cold and reflective for a cozy kitchen.
Texture Mix Tip
Don't be afraid to mix materials within the same kitchen. Use solid wood fronts on lower cabinets for warmth and ribbed glass on upper cabinets to keep the space feeling open and airy. The contrast between the textured wood and the soft, linear glass adds visual interest without being busy.
Budget-Friendly Swap
You don't have to replace every single door. Start with the most visible cabinets—like the ones flanking the range or the island—and keep standard fronts on less prominent areas. This cuts costs while still giving the kitchen a custom, curated look where it matters most.
3. Add Under-Cabinet Lighting for Warmth
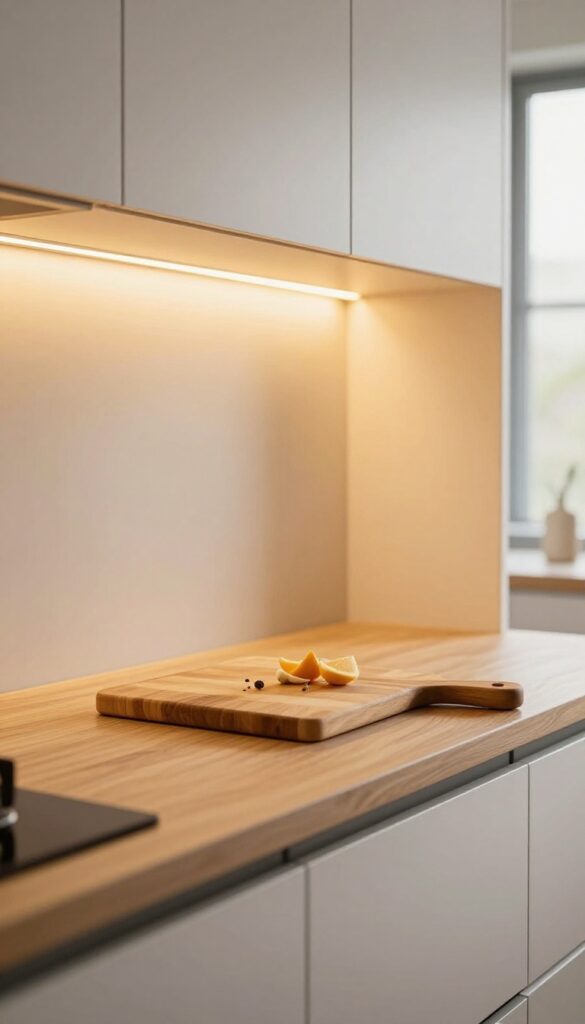
Kitchen tasks like chopping and reading recipes become so much easier when shadows aren't getting in the way. Under-cabinet lighting solves that problem while also adding a cozy, layered glow that makes the whole room feel more inviting. Think of it as the finishing touch that turns a purely functional kitchen into a warm, lived-in space.
LED strip lights mounted beneath your upper cabinets do double duty: they banish countertop shadows and create a soft, ambient glow that makes the kitchen feel cozy after dark. Warm white bulbs (around 2700K) give off a golden, relaxing light that flatters every surface, from butcher block to marble. Dimmable options let you dial it from bright task lighting for meal prep down to a gentle nightlight for late-night snacks.
Installation is surprisingly simple—many kits are plug-in and adhesive-backed, so you don't need an electrician. The result is a kitchen that feels both functional and warmly atmospheric, without any major renovation.
Best Light Temperature
Stick with warm white bulbs in the 2700K to 3000K range. Cooler temperatures (4000K+) can feel clinical and harsh, especially in a kitchen meant to feel cozy. Warm light softens the edges of cabinets and countertops, making the space feel intimate rather than sterile.
Installation Tip
Measure the length of each cabinet section before buying strips. Look for kits with connectors that let you turn corners or skip gaps between cabinets. For a clean look, run the strip about two inches from the front edge of the cabinet so it lights the counter without creating glare in your eyes.
Finishing Touch
Pair under-cabinet lights with a dimmer switch or smart plug so you can adjust brightness throughout the day. Dimmable LEDs let you go from bright prep mode to a soft evening glow with one tap. It's a small upgrade that makes the kitchen feel much more layered and responsive to your routine.
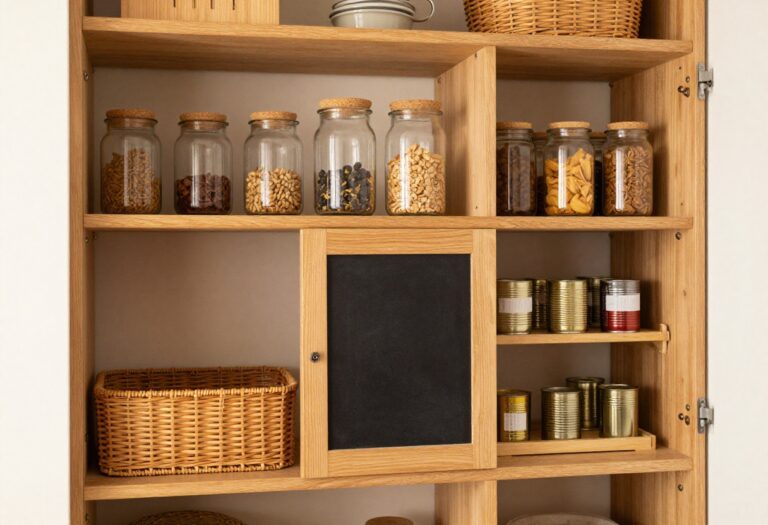
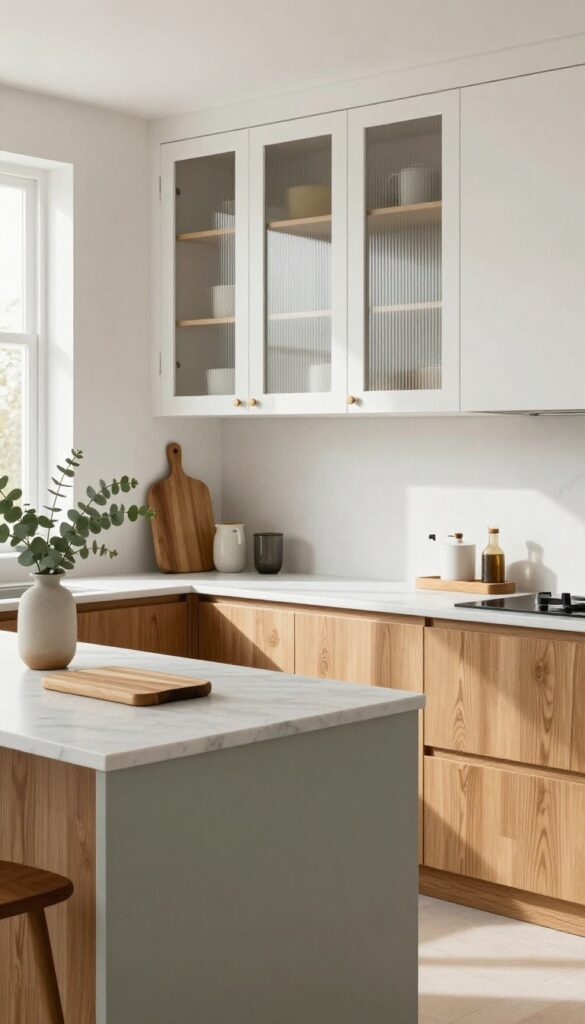
4. Use Glass-Front Doors to Showcase Collections
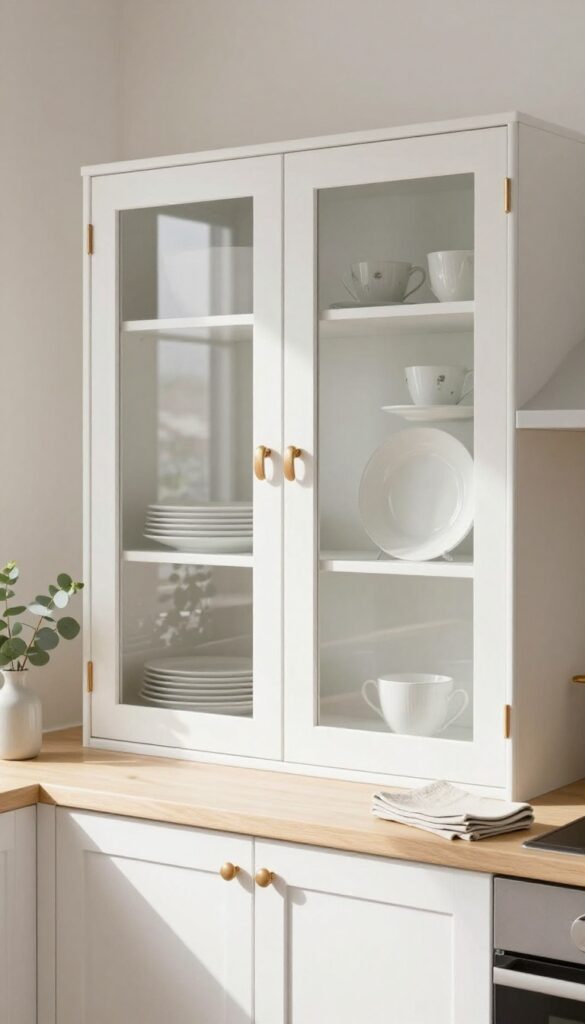
Kitchen cabinets don't have to be all business. Swapping a few solid doors for glass fronts turns ordinary storage into a chance to show off what you love. The effect is instant personality—like a little gallery right in your workspace.
And it doesn't have to be precious; even everyday dishes or a stack of cookbooks can look intentional behind glass. Frosted glass is a smart middle ground: it softens the view so clutter doesn't scream, but still lets color and texture peek through. The result is a kitchen that feels curated, not chaotic, with a cozy, layered look that invites you to linger.
Glass-front doors break up the solid expanse of cabinetry and add visual depth. They make a kitchen feel more open and less boxy, especially in smaller spaces. The key is choosing what to display—think matching white dinnerware, a collection of vintage teacups, or neatly stacked linen napkins.
Keep it simple; overcrowding defeats the purpose. Frosted or ribbed glass is forgiving if you're not a meticulous stylist, while clear glass demands a bit more editing. Either way, the mix of opaque and transparent surfaces adds texture and keeps the eye moving around the room.
It's an easy upgrade that feels custom without a full renovation.
Best Glass Types
Clear glass works best for curated displays like matching dishware or colorful glassware. Frosted or seeded glass hides everyday mismatched items while still adding lightness. For a vintage feel, choose ribbed or reeded glass—it catches light beautifully and softens the view.
What To Display
- Stick to items you use often but want to see: white plates, clear glasses, or a stack of linen napkins. Cookbooks with pretty spines add warmth. Avoid overcrowding—leave breathing room between objects so each piece stands out.
- A few small plants or a ceramic pitcher can break up the lineup.
Cabinet Styling Note
- Lighting makes glass-front cabinets shine. Install small puck lights inside to highlight your collection, especially in darker corners. Stick to warm white bulbs to keep the glow cozy.
- If you can't add hardwired lights, battery-operated stick-on LEDs work just as well and are easy to install.
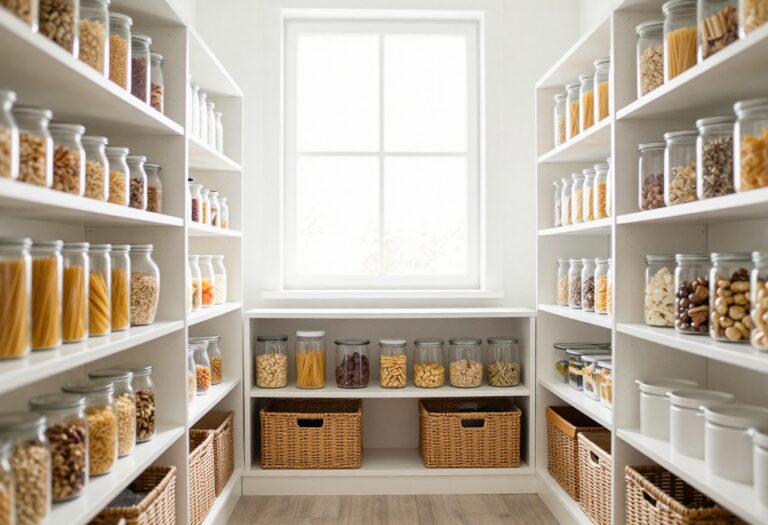
5. Incorporate Baskets and Bins for Soft Texture
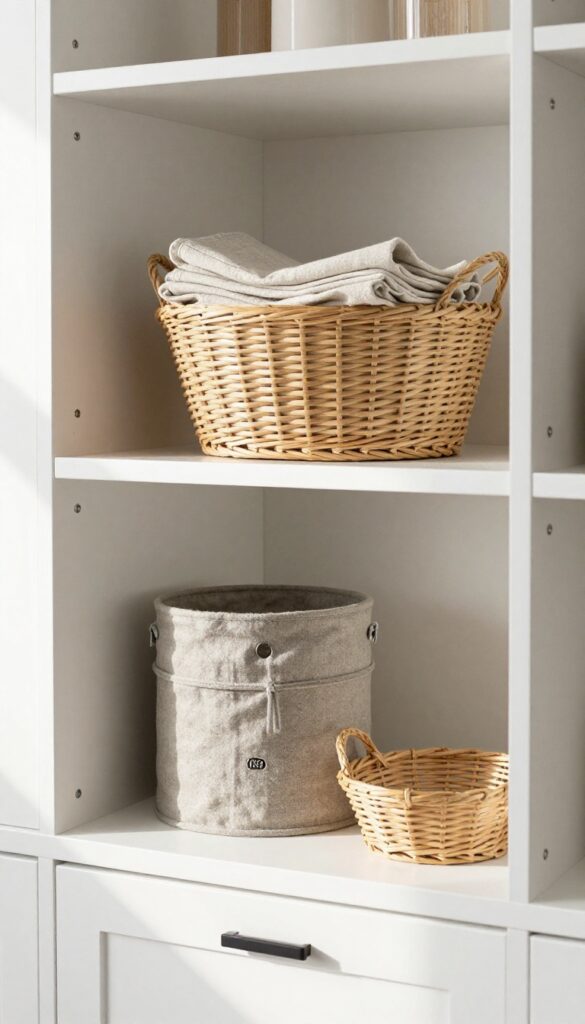
Woven baskets and fabric bins are the easiest way to add warmth to a kitchen full of sleek IKEA cabinets. They soften the clean lines and bring in natural texture, making the space feel more lived-in and cozy. Plus, they hide all the little things that tend to clutter up open shelves or countertops, like snack bags, tea towels, or that random gadget you don't use daily.
Baskets and bins work especially well on open shelving or inside glass-front cabinets, where you want to keep things organized but still visually appealing. The contrast between the smooth cabinet doors and the rough weave of seagrass or the softness of linen bins creates a layered, collected look. Stick to a neutral palette—cream, tan, warm gray—to keep the space feeling calm and cohesive.
For a pop of personality, choose bins in a muted color like sage green or dusty blue.
Best Materials
Seagrass, rattan, and water hyacinth are top choices for a natural, durable feel. If you prefer something softer, go with linen or cotton canvas bins in solid neutral tones. Avoid plastic or shiny synthetic baskets—they'll clash with the warm, organic vibe you're going for.
Where To Place Them
Use large woven baskets on the top shelf of open cabinets to store bulky items like bread baskets or extra linens. Smaller fabric bins work well on lower shelves for snacks, packets, or kids' cups. Inside base cabinets, pull-out bins can hide cleaning supplies or pet food while keeping everything easy to grab.
Styling Tip
Mix basket sizes and shapes for visual interest. A tall rectangular bin next to a round, low basket creates a more dynamic shelf display. Leave a little breathing room around each basket so the eye can rest, and tuck in a small plant or a wooden cutting board for extra texture.
6. Create a Coffee Station With a Dedicated Cabinet
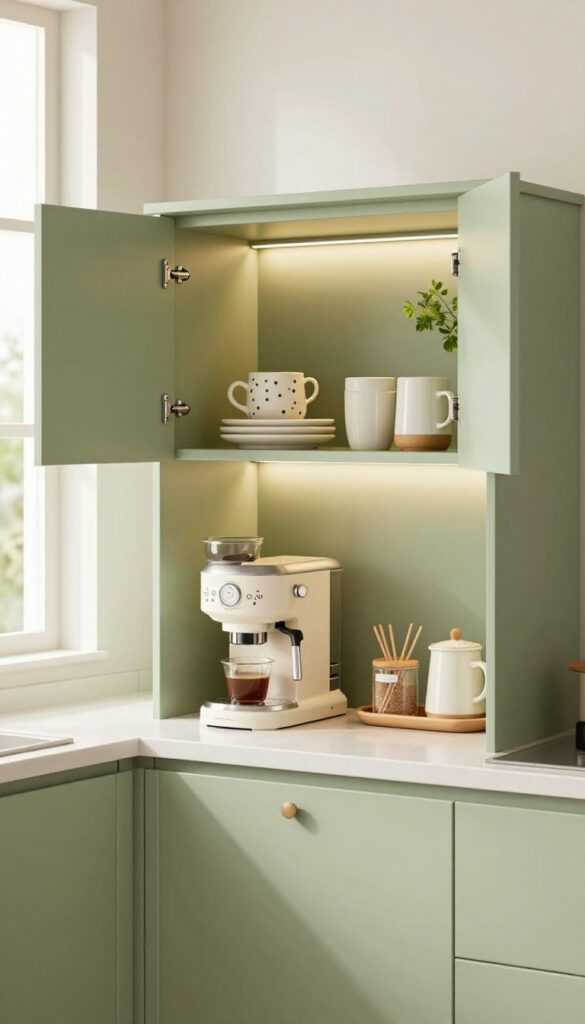
Not every kitchen has counter space to spare for a coffee maker, mugs, and all the little extras that make a morning brew feel special. That’s where a dedicated upper cabinet comes in. By turning one cabinet into a coffee station, you get a tidy, tucked-away spot that keeps everything you need within reach—and closes up when you’re done.
It’s a simple way to add a cozy morning ritual without cluttering your counters.
Choose an upper cabinet near your sink or fridge for easy access to water and milk. Inside, install a sturdy shelf at the perfect height for your coffee machine—usually about 18 inches from the cabinet bottom. Use small bins or trays to corral pods, beans, and sweeteners.
Keep your favorite mugs on the shelf above or on hooks mounted inside the door. When the cabinet door closes, the kitchen looks clean and uncluttered. Open it, and you have a charming little coffee nook ready to go.
Cabinet Setup Tips
- Measure your coffee machine before adding a shelf. You want enough clearance to open the water reservoir and place a mug underneath. Consider adding a small outlet inside the cabinet or nearby for easy plug-in.
- A pull-out shelf or a slide-out tray can make accessing the machine even easier.
Styling The Interior
- Paint the inside of the cabinet a warm tone like soft sage or creamy white to make it feel intentional. Add a small LED puck light for visibility. Use a ceramic tray to hold sugar and stir sticks, and stack mugs in neat rows.
- A tiny plant or a framed photo adds a personal touch without taking up space.
Cozy Finishing Touches
Line the shelf with a pretty paper or a woven placemat to add texture. Keep a small jar of cinnamon or cocoa powder nearby for a flavor boost. If you have room, hang a tiny wreath or a piece of art on the inside of the door—it’s a sweet surprise every time you open it.
7. Install Pull-Out Drawers for Deep Base Cabinets
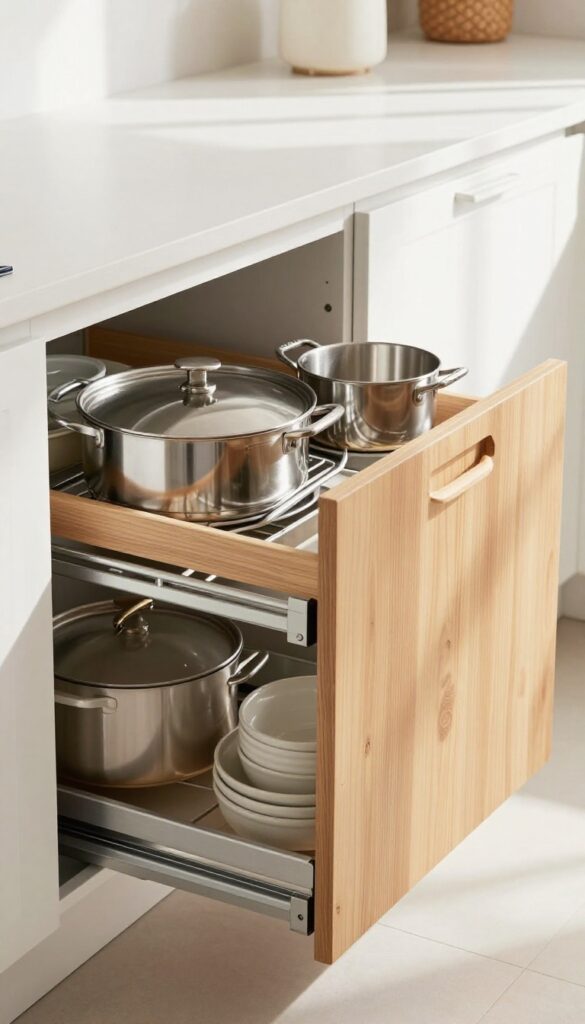
Deep base cabinets are notorious for becoming black holes of cookware. You stack pots and pans, and soon you're playing a frustrating game of kitchen Jenga every time you need a sauté pan. The fix is surprisingly simple: retrofit those deep cabinets with pull-out drawers or roll-out shelves.
Suddenly, everything is visible and within easy reach. It's one of those upgrades that feels like a splurge but costs far less than new cabinetry, and the daily payoff is huge.
Pull-out drawers transform the way you use your lower cabinets. Instead of crouching down and rummaging through a dark abyss, you just glide the drawer open and grab what you need. This is especially game-changing for heavy items like Dutch ovens, stand mixers, or stacks of baking sheets.
The key is to measure carefully and choose the right hardware—full-extension slides are worth the extra cost because they let you access the very back of the cabinet. For a cohesive look, match the drawer fronts to your existing cabinet style, or go with a contrasting wood tone for a furniture-like feel. Either way, the result is a kitchen that feels more organized and luxurious without a full renovation.
Best Materials
Opt for sturdy plywood or solid wood drawer boxes—they hold up better over time than particleboard. Soft-close slides are a must for that quiet, high-end feel. If you're on a budget, wire pull-out baskets work well for lighter items like spices or snacks, but for heavy cookware, go with solid bottoms and sides.
Layout Tip
Think about how you cook. Place the pull-out for pots and pans near the stove, and dedicate another to baking sheets and cutting boards near the prep zone. Use dividers inside the drawers to keep lids paired with their pots—no more lid avalanches.
Cozy Detail
Add a thin, non-slip liner in a warm neutral tone like linen or soft gray. It cushions the drawer and keeps items from sliding around. You can also install a small LED strip under the cabinet above to cast a soft glow into the drawer when it's open—makes the space feel even more inviting.
8. Add a Pegboard Inside Cabinet Doors for Utensils
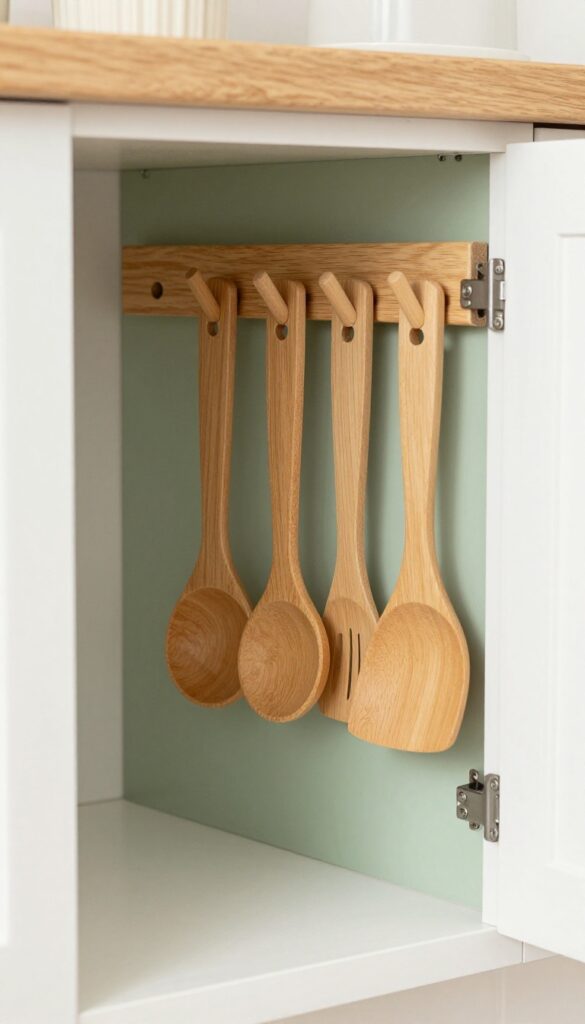
Think about all that empty real estate on the inside of your cabinet doors. It's just sitting there, waiting to hold your most-used tools. A small pegboard mounted inside a door turns wasted space into a handy spot for measuring spoons, spatulas, or lids.
Paint it the same color as the cabinet for a built-in look that feels intentional, not slapped on.
This trick works best on upper cabinet doors near your prep zone. Grab a thin pegboard sheet, cut it to fit the door panel, and attach it with small screws or strong adhesive strips. Use peg hooks to hang items you reach for daily.
The visual effect is clean and layered: when you open the door, everything is neatly displayed, and when closed, the kitchen stays clutter-free. For a cozy touch, choose a warm wood tone or a soft sage green paint that complements your cabinet color.
Best Materials
- Go with a 1/4-inch thick hardboard pegboard for durability. Avoid thin fiberboard that can warp. Use matte paint in a shade that matches your cabinets—white for a seamless look, or a muted hue like dusty blue for a playful pop.
- Add small wooden knobs to the peg hooks for extra warmth.
Layout Tip
Place the pegboard on the door of the cabinet directly above your countertop prep area. Hang items in a logical order: measuring spoons on the left, spatulas in the middle, and lids on the right. Keep heavier items like cast iron lids lower to avoid strain on the door hinges.
Finishing Touch
Outline the pegboard with thin wooden trim painted the same color as the door. This hides raw edges and makes the addition look like it was part of the original cabinetry. Add a small hook for a dish towel on the bottom edge for an extra cozy detail.
9. Use Contrasting Hardware as Jewelry
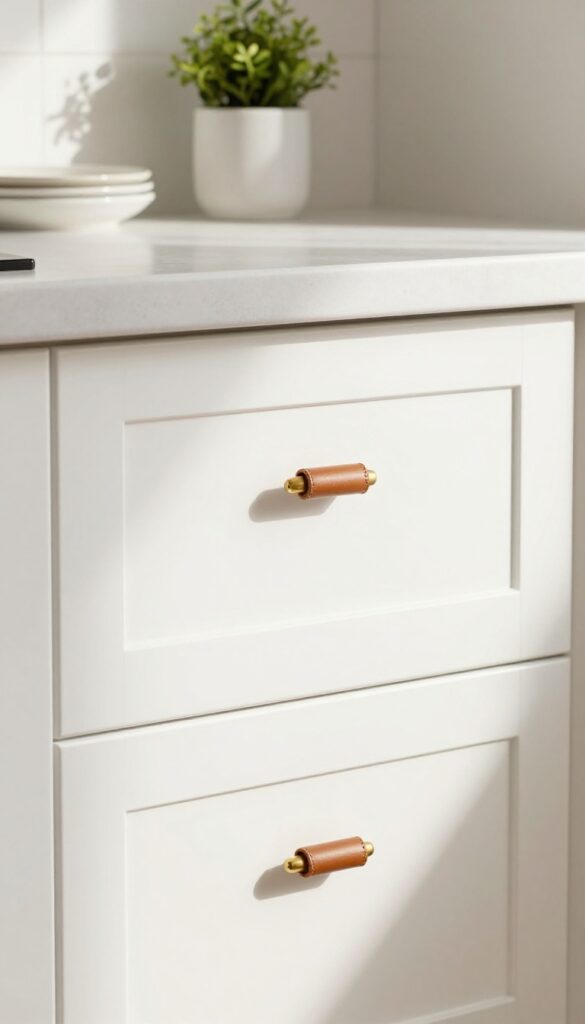
Standard IKEA knobs and pulls serve their purpose, but they don't exactly scream personality. Treating your cabinet hardware like jewelry is one of the quickest ways to elevate a kitchen from builder-grade to curated. A simple swap—brass pulls, matte black knobs, or even leather tabs—can completely shift the feel of your space without a major renovation.
The best part? It's a low-commitment change you can do in an afternoon.
Hardware is the accessory your cabinets never knew they needed. Just like a necklace can transform an outfit, the right knobs and pulls can make your kitchen feel intentional and polished. The trick is to think about contrast: if your cabinets are light, go dark or metallic; if they're dark, try brass or warm wood.
Mixing finishes adds an eclectic, layered look that feels collected over time rather than bought off a shelf. For a cozy, layered vibe, stick with warm metals like unlacquered brass or oil-rubbed bronze—they patina beautifully and soften the overall feel. Leather tabs work especially well on drawers, adding a tactile, organic element that balances the sleekness of IKEA cabinetry.
Best Finishes For A Cozy Look
Unlacquered brass develops a warm patina over time, making it perfect for a lived-in kitchen. Oil-rubbed bronze offers a darker, softer alternative to black, while matte black feels modern but still grounded. If you want something unexpected, try leather pulls in cognac or tan—they bring warmth and texture that metal can't match.
Mixing Metals Like A Pro
- Don't be afraid to combine finishes. A common rule of thumb is to stick to two or three metals in the same undertone—warm (brass, copper, gold) or cool (chrome, nickel, stainless steel). For example, pair brass cabinet pulls with a chrome faucet if you have warm undertones elsewhere.
- The key is to repeat the finishes in other elements like lighting or decor so it feels intentional.
Small-space Styling Tip
In a galley or small kitchen, use hardware to draw the eye upward. Install tall pulls on upper cabinets to create vertical lines that make the ceiling feel higher. On lower cabinets, choose round knobs in a contrasting finish to add visual interest without overwhelming the space.
10. Build a Window-Frame Cabinet for a Focal Point
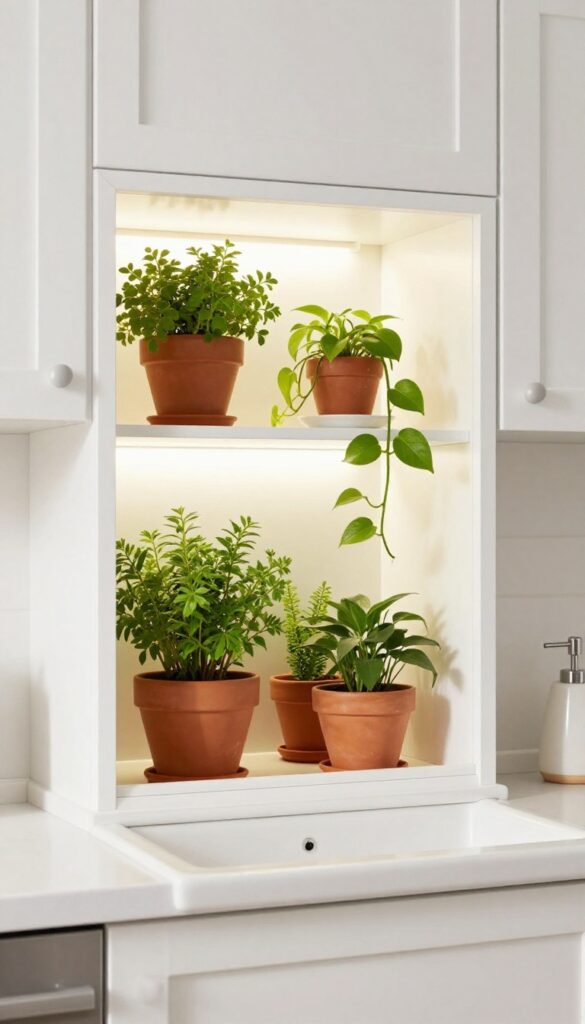
There’s something about a glass-front cabinet that instantly makes a kitchen feel more open and curated. But when you take that idea and turn it into a mini greenhouse above the sink, it becomes something special. The solid cabinet transforms into a light, living display that draws the eye and softens the whole room.
It’s a simple swap—just a glass front and a small shelf—but the effect is like bringing a piece of the outdoors inside, right where you need a little brightness.
This idea works best with a standard wall cabinet positioned above the sink. Replace the solid door with a glass-paned one, or remove the door entirely and add a low glass panel. Inside, install a narrow shelf about halfway up to hold small pots.
The key is keeping it minimal: a few herbs, a trailing pothos, or a row of succulents. The glass reflects light from the window, making the plants pop and giving the cabinet an airy feel. It’s a focal point that doesn’t scream for attention—it just quietly brings life and color into your daily routine.
Best Plants For The Space
- Choose plants that thrive in bright, indirect light and don’t mind a bit of humidity from the sink. Herbs like basil, mint, and thyme are practical and fragrant. Succulents and air plants work well if your kitchen gets less light.
- A trailing pothos or string of pearls adds softness as it spills over the shelf. Keep the arrangement simple—three to five small pots in a row or a single larger trailing plant for a more dramatic look.
Glass Front Options
- You can swap the solid door for a full-glass insert, a grid-pane door, or even a vintage-style window frame. For a cleaner look, go with clear glass and simple mullions. If you want more texture, choose frosted or seeded glass.
- The frame color should match your existing cabinets—white keeps it light, wood adds warmth. If replacing the door isn’t possible, remove the door and add a glass panel on the inside of the frame for a similar effect.
Styling The Shelf
- Use small, uniform pots in neutral tones like terracotta, matte white, or sage green to keep the look cohesive. Add a tiny watering can or a small ceramic dish for a finishing touch. Keep the shelf clutter-free—this is about showcasing the plants, not storing spices or tools.
- A single small grow light strip under the shelf can help plants thrive if natural light is limited, and it adds a warm glow in the evening.
11. Layer a Countertop Shelf for Extra Storage
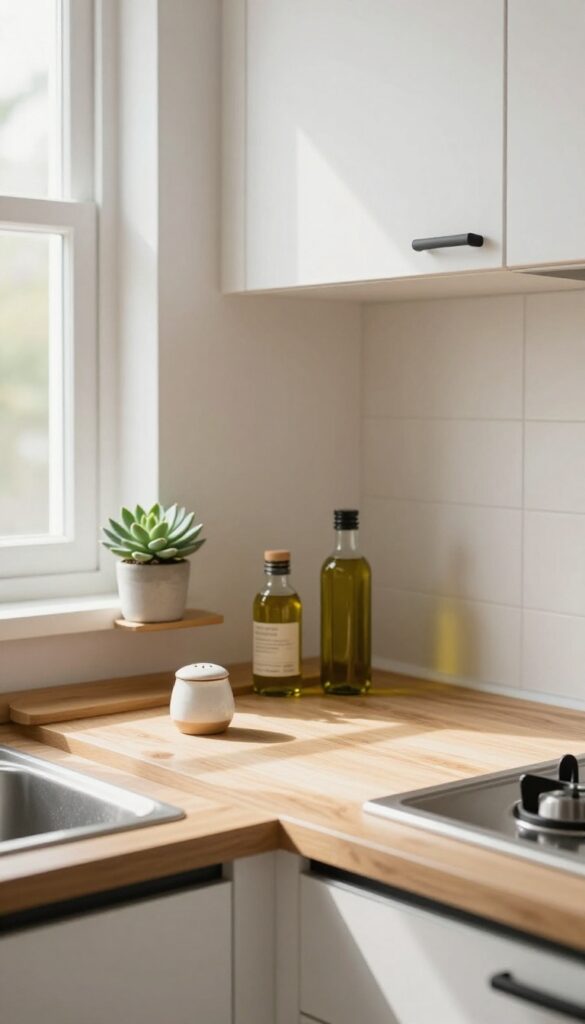
Countertops are prime real estate, but often the vertical space between upper and lower cabinets goes unused. Adding a slim wooden or metal shelf right on the countertop creates an extra layer for everyday items like spices, oils, or small jars. It breaks up the long vertical run of cabinets and introduces a horizontal line that feels intentional and curated.
This trick works especially well in galley kitchens or any layout where counter space is tight but you want to keep frequently used items within arm's reach.
A countertop shelf isn't just about storage—it's a styling move. By choosing a shelf that matches your cabinet hardware or countertop material, you tie the whole look together. Keep the shelf shallow (around 6–8 inches deep) so it doesn't crowd the workspace.
Use it to display a mix of functional and decorative objects: a small plant, a salt cellar, a favorite cookbook propped open. The key is to edit ruthlessly—only keep what you use daily or what makes you smile.
Best Materials
- Warm wood like oak or walnut adds coziness and softens the kitchen's hard surfaces. For a sleeker, more modern vibe, go with brushed brass or matte black metal. A floating shelf with hidden brackets keeps the look clean, while a shelf with visible brackets can lean industrial if that suits your style.
- If your kitchen has open shelving elsewhere, match the countertop shelf material to those for a cohesive look.
Layout Tip
- Place the shelf on the side of the sink or stove where you prep most often. That way, spices and oils are within easy reach while cooking. Avoid putting it directly above a heat source or in a spot where it might block your view of a window or backsplash.
- If your countertop is tight, use a shelf that sits on small legs so you can still slide a cutting board or dish towel underneath.
Styling The Shelf
- Treat the shelf like a mini vignette. Start with a small plant or herb pot for greenery, then add a few jars with matching labels. A small wooden cutting board leaned against the backsplash adds texture.
- Keep the color palette neutral so it doesn't compete with the rest of the kitchen. And don't forget to leave some breathing room—overcrowding defeats the purpose of a styled layer.
12. Paint the Cabinet Interiors a Surprise Color
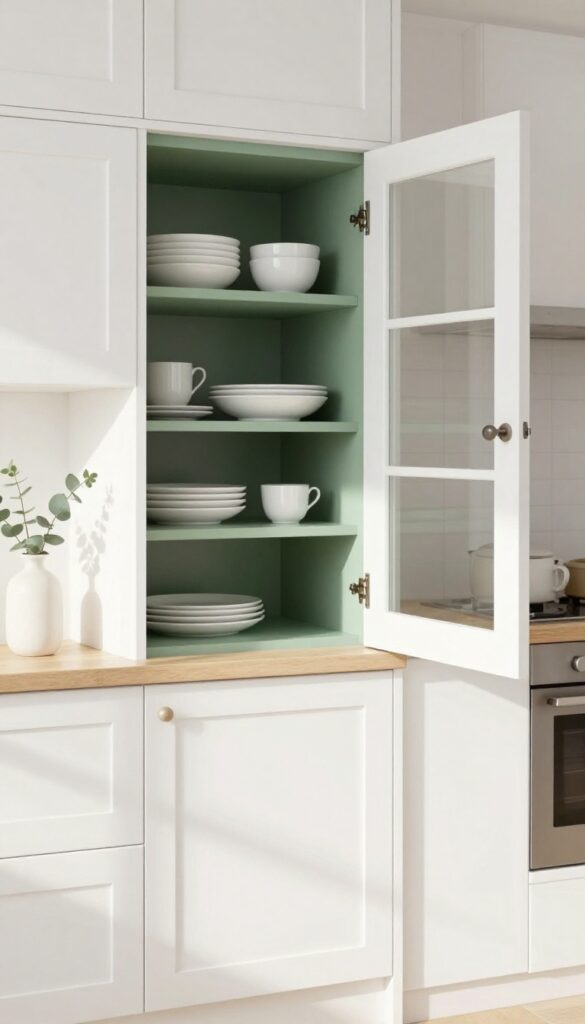
Opening a cabinet door and finding a pop of unexpected color inside is one of those small delights that makes a kitchen feel more personal. Whether you have glass-front cabinets or open shelving, the interior becomes part of the visual landscape, and painting it a bold hue adds depth and character without overwhelming the room. It’s a low-cost, high-impact DIY that works especially well in kitchens with neutral cabinetry, where the surprise color becomes a subtle accent that ties the whole space together.
Painting the inside of your cabinets is a clever way to introduce color without committing to a full cabinet makeover. The effect is especially charming when you leave some doors open or use glass fronts, letting the hue peek through and create layers of interest. Sage green feels earthy and calming, deep blue adds a touch of drama, and blush brings a soft, romantic warmth.
This trick also works wonders for open shelving, where the painted back panel becomes a backdrop for your dishes and decor. The best part? It’s a weekend project that costs little more than a quart of paint and a brush, yet it transforms the look of your kitchen instantly.
Best Colors For The Surprise Effect
- Choose a color that contrasts with your cabinet exterior but still feels cohesive with the rest of the kitchen. For white or light wood cabinets, sage green, navy, or terracotta create a lovely pop. Dark cabinets pair beautifully with a lighter surprise like blush, pale yellow, or a soft mint.
- If you prefer a more subtle look, try a tone that’s slightly deeper than your cabinet color, like a warm charcoal inside gray cabinets. The key is to pick something that makes you smile every time you open the door.
Cabinet Styling Note
- Once the paint is dry, style the interior with intention. Group similar items together, like white dishes or clear glassware, to let the color shine without visual clutter. Use small baskets or risers to create height variation and keep things organized.
- If you have open shelving, add a few plants or ceramic pieces that echo the surprise color, tying the whole look together. The painted interior becomes a backdrop, so keep the items on display simple and curated.
Finishing Touch
Seal the painted surface with a clear matte topcoat to protect it from moisture and grease, especially in a kitchen. This also makes cleaning easier—just a quick wipe with a damp cloth keeps the color looking fresh. For glass-front cabinets, consider adding a subtle LED strip inside to highlight the color and your displayed items, creating a warm glow that makes the surprise even more inviting.
13. Add a Rolling Cart for Flexible Storage
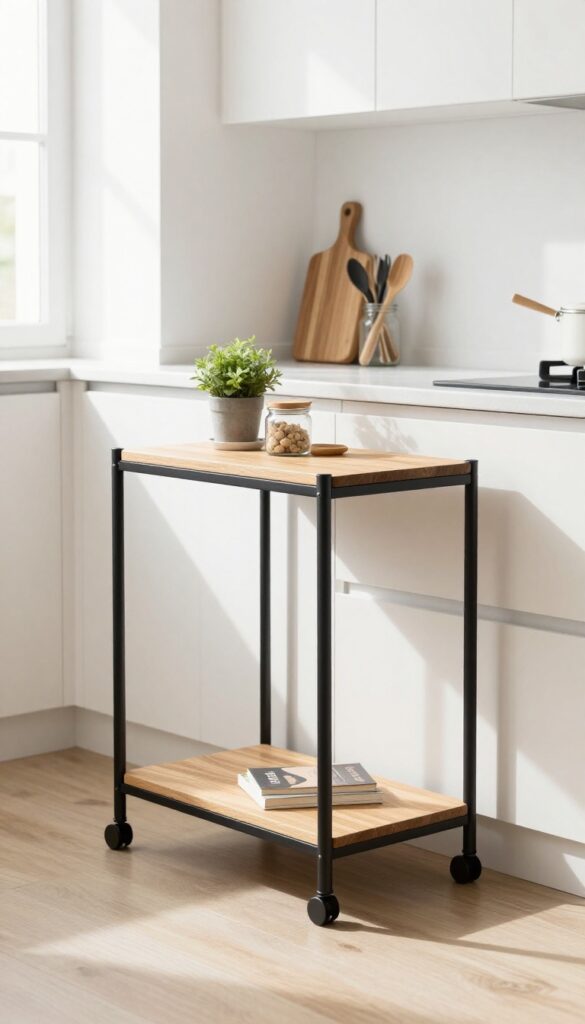
A slim rolling cart tucked beside your cabinets is one of those small additions that instantly makes the kitchen feel more layered and lived-in. It brings a casual, collected look while adding real function—extra counter space when you need it, a mobile pantry for overflow, or a dedicated spot for your morning coffee setup. The beauty is that it moves with you, so you can wheel it over to the island for meal prep or tuck it away when you want a cleaner floor plan.
Rolling carts work especially well in kitchens where counter space is tight or where you want to break up long runs of cabinetry. The contrast of a slim metal or wood cart against solid cabinet fronts adds visual texture and keeps the room from feeling too uniform. Place it near the stove with oils and spices, next to the fridge for extra produce storage, or by the dining area as a bar cart.
The key is choosing a cart that complements your cabinet style—think matte black for modern kitchens, warm wood for farmhouse looks, or bright white for a clean, airy feel.
Best Materials
Look for carts with a sturdy metal frame and wood or wire shelves. Stainless steel or powder-coated iron holds up well in busy kitchens, while bamboo or solid wood adds warmth. Open shelving keeps the look light and airy, but if you need hidden storage, choose a cart with a few solid tiers or add small baskets to corral loose items.
Storage Tip
Use the cart to store items you reach for daily: a cutting board, olive oil, salt and pepper, and a few favorite cookbooks. For a mobile pantry, load it with canned goods, pasta, and snacks. The rolling feature makes it easy to pull out for cleaning or to rearrange your workflow.
Styling Note
- Keep the cart looking intentional by limiting what you place on each shelf. A small plant, a wooden cutting board, and a stack of linen napkins add softness. If you use it for bar tools, group bottles and glasses on the top shelf and tuck mixers and napkins below.
- The goal is a curated, not cluttered, look.
FAQ
Can I use IKEA cabinets in a small kitchen?
Absolutely. IKEA cabinets are designed for small spaces with clever inserts like pull-out shelves and corner solutions. Stick to light colors and open shelving to keep the room feeling airy.
How do I make IKEA cabinets look custom?
Swap the doors for custom fronts, add trim or molding, and use high-end hardware. Painting the cabinets in a unique color also helps them stand out from standard IKEA finishes.
What's the best way to add warmth to IKEA cabinets?
Incorporate natural materials like wood, rattan, or linen. Under-cabinet lighting with warm bulbs also creates a cozy glow. Avoid all-white everything—mix in textures and soft colors.
Are IKEA cabinets durable enough for a busy kitchen?
Yes, especially the Sektion series with solid construction. The frames are sturdy, and you can upgrade drawer dampers and hinges for smoother use. Many homeowners report them lasting for years.
Can I install IKEA cabinets myself?
Many people do, but it requires patience and basic tools. IKEA provides detailed instructions, and there are plenty of online tutorials. For tricky parts like leveling, consider hiring a handyman.
Conclusion
IKEA kitchen cabinets are a smart starting point for a stylish, budget-friendly kitchen. With a few thoughtful tweaks—like swapping hardware, adding lighting, or mixing in natural textures—you can create a space that feels both cozy and organized. The best part?
These ideas are easy to tackle one at a time, so you can evolve your kitchen at your own pace. Start with one change that excites you, and let the rest follow naturally.