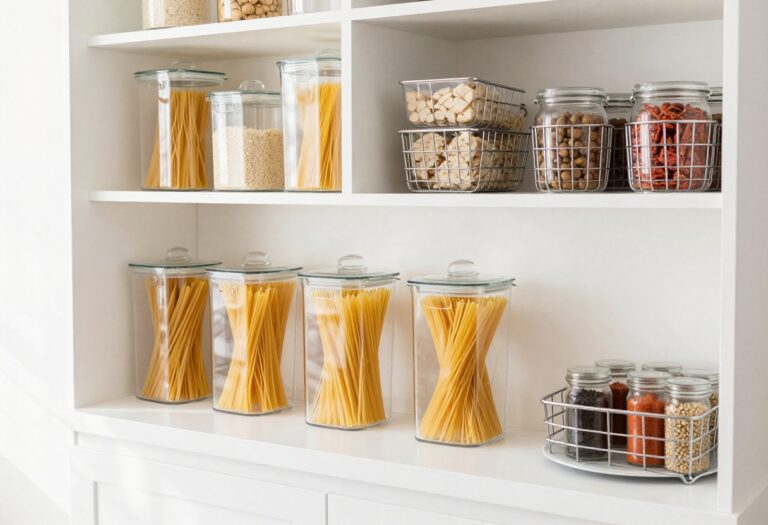
13 Kitchen Countertop Organization Ideas for Appliance Zones
Kitchen countertops often become dumping grounds for small appliances, turning a functional space into a cluttered mess. But with a little planning, you can create dedicated zones that keep everything organized and within reach.
The key is to think in terms of appliance zones—grouping similar items together and giving each its own home.
These 13 ideas will help you streamline your countertops while keeping your kitchen feeling light, airy, and inviting.
1. Designate a Coffee Station with a Tray
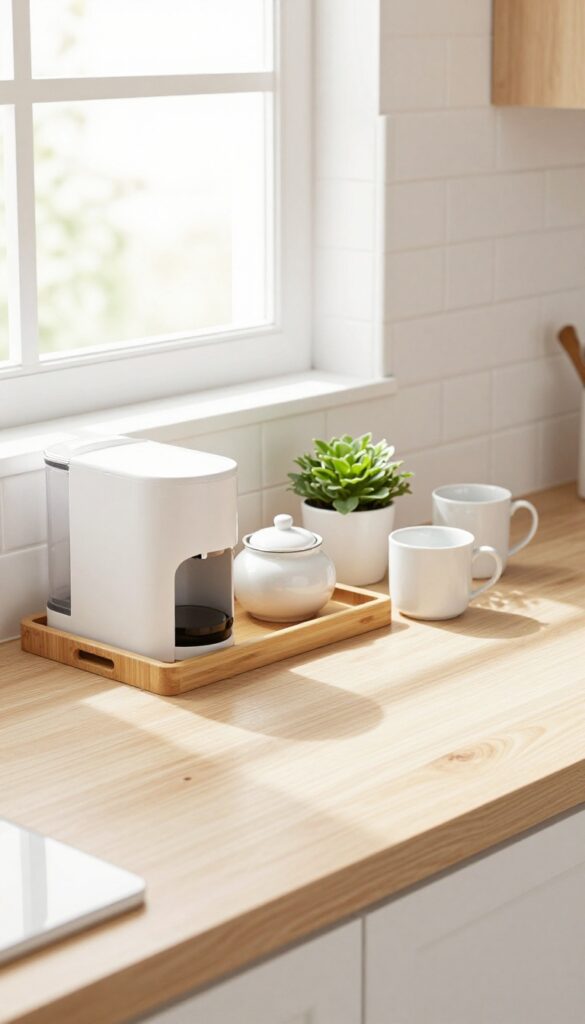
Mornings feel smoother when your coffee setup has a dedicated home. Instead of letting mugs, beans, and gadgets scatter across the counter, gather them on a single tray. This instantly defines the zone and makes cleanup a breeze—just lift the tray and wipe underneath.
The trick is choosing a tray that complements your kitchen's vibe, whether that's warm wood, sleek metal, or textured stone. It's a small shift that brings big calm to your morning routine.
A coffee station doesn't need a lot of space. Even a corner of the counter can become a charming spot when you corral the essentials on a tray. The tray acts like a visual anchor, keeping everything from the machine to the sugar bowl in one tidy cluster.
Plus, it protects your countertops from spills and scratches. For a light and airy feel, opt for a pale wood or white ceramic tray. The goal is to make the station feel intentional, not cluttered.
Add a small plant or a pretty canister for stir sticks, and you've got a zone that's both practical and pretty.
Best Materials For A Light, Airy Look
- Stick with natural or light-colored materials to keep the station feeling open. A bamboo or light oak tray adds warmth without weighing down the space. White marble or matte ceramic also work beautifully, reflecting light and making the counter appear larger.
- Avoid dark or heavy materials like wrought iron or dark wood, which can make the zone feel cramped.
Layout Tip: Keep It Ergonomic
- Place the coffee machine at the back of the tray and mugs at the front for easy access. Store pods or beans in a small canister beside the machine. Leave a little breathing room between items so the tray doesn't look stuffed.
- A well-spaced layout makes the station feel curated, not chaotic.
Finishing Touch: Add A Touch Of Greenery
- A tiny potted succulent or a sprig of eucalyptus on the tray brings life to the station. It softens the hard edges of appliances and adds a fresh, organic note. Just keep the plant small so it doesn't crowd the workspace.
- A little green goes a long way in making the zone feel inviting.
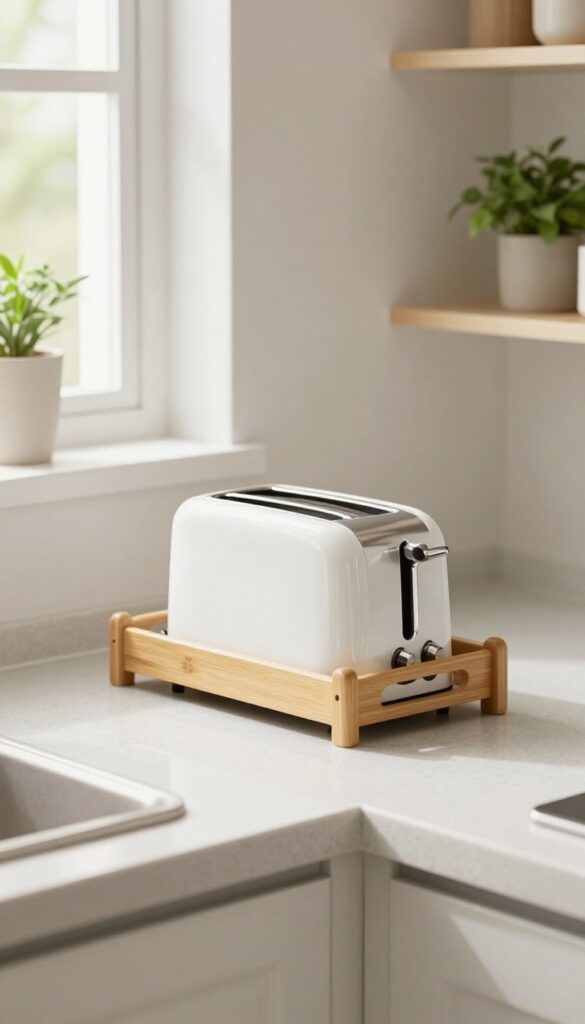
2. Create a Toaster Nook with a Cutting Board
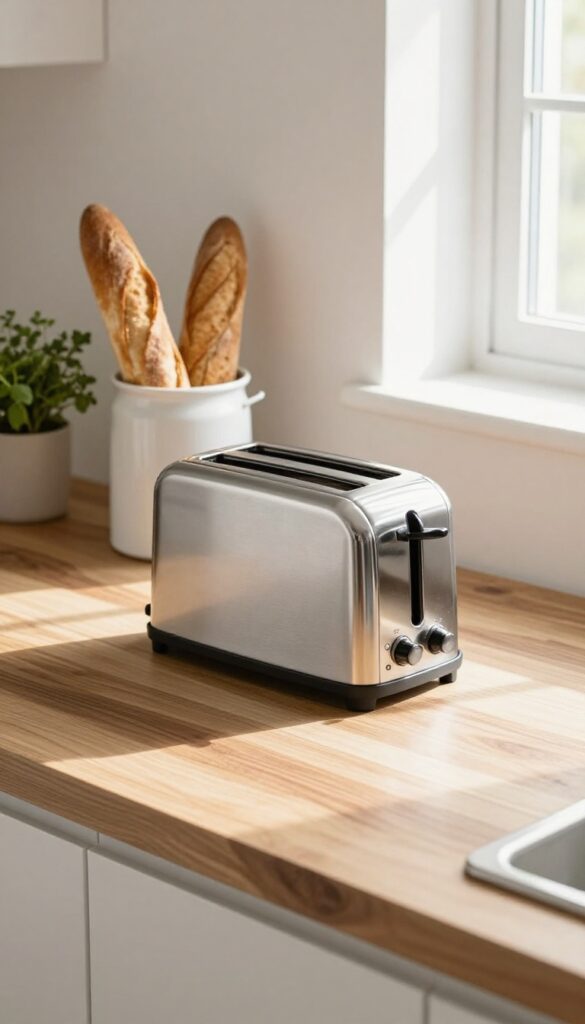
A toaster can feel bulky and messy on a countertop, especially with crumbs scattering everywhere. Placing it on a large wooden cutting board instantly creates a dedicated nook that feels intentional and tidy. The board catches stray crumbs, protects your counter, and adds warmth with its natural grain.
Pair it with a small ceramic canister for bread or bagels, and you have a breakfast station that looks as good as it functions.
This idea works best on a stretch of counter near your coffee station or sink. The cutting board should be slightly larger than the toaster's footprint, leaving room for the bread canister. Choose a board with a juice groove to trap crumbs, or go for a flat board and brush crumbs into the sink.
The result is a cohesive zone that streamlines your morning routine.
Best Materials
Acacia or teak cutting boards add rich color and durability, while bamboo offers a lighter, budget-friendly option. For the canister, ceramic in a matte white or soft pastel keeps the look airy. Avoid plastic or brightly colored containers that might clash with the natural wood.
Layout Tip
Position the board at the edge of the counter so crumbs fall onto the board, not the floor. Leave a few inches of space between the toaster and the canister for easy access. If your counter is narrow, use a slim cutting board that fits flush against the backsplash.
Finishing Touch
Add a small wooden spoon or spreader in the canister for a styled look. A tiny pot of fresh herbs or a salt cellar nearby can tie the nook into the rest of your kitchen. Keep the area clutter-free by limiting it to just the toaster, board, and canister.
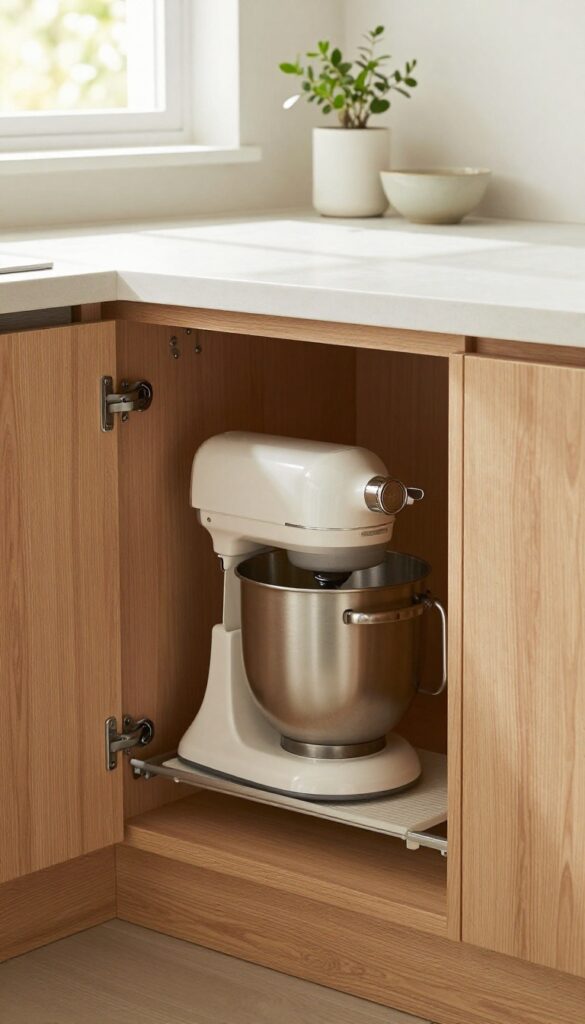
3. Use a Tiered Stand for a Mixer
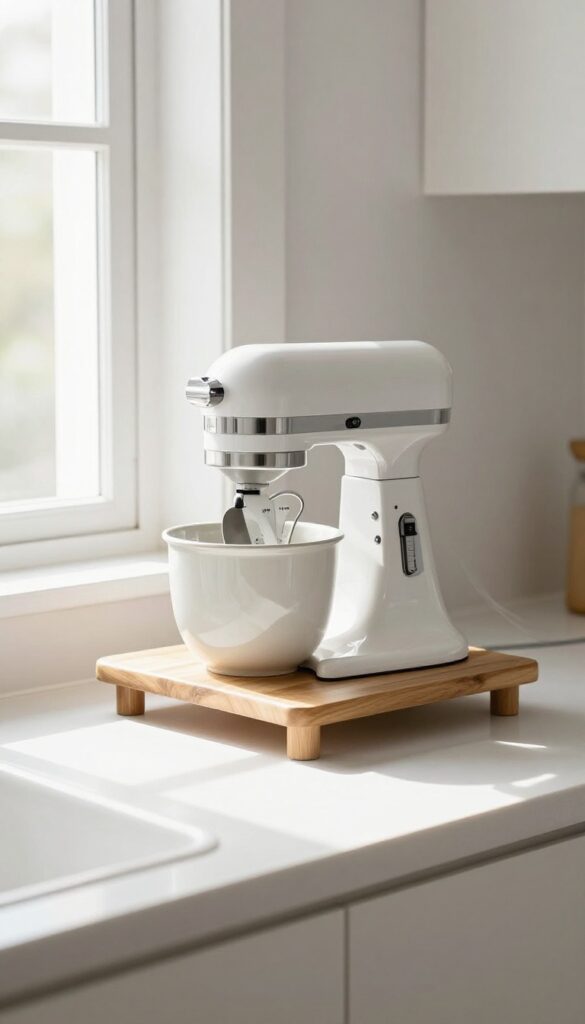
Your stand mixer might be a workhorse, but it also takes up a lot of counter real estate. A tiered stand solves that by lifting it up and creating valuable storage underneath. This setup keeps your mixer front and center for easy access while making the counter feel less cluttered.
Plus, it adds a subtle architectural layer to your kitchen—practical and pretty at the same time.
A tiered stand is one of those organization ideas that feels like a small upgrade with big payoff. By elevating your mixer, you free up the counter space directly below for items you reach for often: measuring cups, spatulas, or even a small bowl for prepped ingredients. The stand itself can be a simple metal or wooden frame, or something with a bit more personality like a marble or acrylic design.
The key is to choose a height that lets you still easily access the mixer's bowl and attachments. This works especially well near a baking station or coffee corner, where you're already grouping related tools together. The visual effect is clean and intentional—your mixer becomes a focal point rather than a bulky appliance.
Best Materials
- For a light and airy feel, go with a white or natural wood tiered stand. It blends in without adding visual weight. If you want a bit of contrast, a dark metal frame (like matte black or brass) can anchor the mixer and make it pop.
- Avoid heavy, ornate stands that compete with the mixer itself—simple lines keep the look streamlined.
Storage Tip
Use the lower tier to store your mixer's attachments in a small basket or ceramic crock. That way, you don't have to dig through drawers when you need the dough hook or whisk. If you have a second shelf, slide a slim cutting board or a few recipe books there for extra function without clutter.
Finishing Touch
Add a small plant or a salt cellar on the top tier next to the mixer to soften the look. A trailing ivy or a tiny succulent breaks up the metal and gives the station a lived-in, styled feel. Just keep it low so it doesn't interfere with the mixer's operation.
4. Install a Wall-Mounted Shelf for a Blender
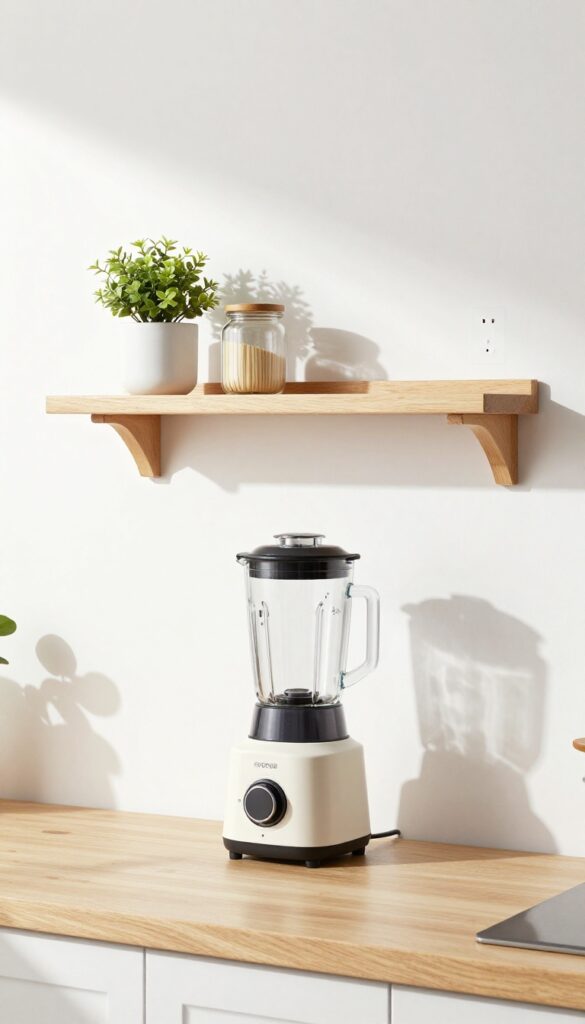
Blenders are bulky, and they often hog precious counter space even when you use them daily. A floating shelf solves that by lifting the blender off the counter while keeping it plugged in and ready to go. The result is a cleaner, more open workspace that still feels efficient and stylish.
Plus, the shelf itself becomes a little display moment—especially if you choose a warm wood or a sleek metal finish that ties into your kitchen's vibe.
Mount a sturdy floating shelf near an outlet at a height that lets you slide a glass or jar underneath the blender spout. This way, you can blend and pour without moving the machine. The shelf should be deep enough to hold the blender base securely—at least 10 inches—and wide enough to accommodate the blender's footprint.
For a light and airy feel, opt for a white or light wood shelf that blends into the wall. If you prefer contrast, a black or brass shelf can add a subtle pop. Keep the area around the shelf clutter-free: maybe a small plant or a jar of straws, but nothing that competes with the blender.
Best Materials
Solid wood with a matte finish feels warm and natural, while powder-coated metal gives a clean, modern look. For a budget-friendly option, try a laminated MDF shelf in a light oak tone. Avoid glass shelves—they can look delicate and may not hold the weight safely.
Layout Tip
Position the shelf so the blender sits at eye level or slightly below. That makes it easy to see the liquid level and operate the buttons. If your outlet is behind the blender, use a short extension cord or a cord cover to keep things tidy.
Styling Detail
Add a small tray or a bamboo mat under the blender to catch drips and make cleaning easier. A tiny succulent or a salt cellar next to it keeps the shelf looking intentional without feeling crowded.
5. Group Small Appliances in a Corner Caddy
Counter space is prime real estate, and those small appliances you use daily can quickly take over. Instead of spreading them out, try grouping them in one spot using a corner caddy or a large lazy Susan. This keeps your kettle, toaster, or coffee maker accessible without sacrificing the rest of the counter for meal prep.
It also creates a neat, intentional look that feels light and airy rather than cluttered.
A corner caddy or lazy Susan turns an often-wasted corner into a functional mini station. The key is choosing one that fits your appliances and matches your kitchen's style—think bamboo for a natural feel, wire for an industrial touch, or sleek acrylic for a modern vibe. Place it near an outlet so you can plug in appliances without cords trailing across the counter.
This setup works especially well in galley kitchens or on smaller islands where every inch counts. To keep the look cohesive, stick to two or three appliances in similar colors or finishes. For example, a white kettle and toaster on a light wood caddy feel fresh and uncluttered.
Add a small tray underneath to catch crumbs or drips, making cleanup a breeze.
Best Materials For A Light, Airy Look
- For that light and airy vibe, choose materials that don't weigh down the space visually. Bamboo or light oak caddies add warmth without feeling heavy. If you prefer something more modern, clear acrylic or slim wire baskets keep the look open and breezy.
- Avoid dark metals or thick woods that can make the corner feel cramped. The goal is to blend the caddy with the countertop so the appliances feel like part of the decor, not an afterthought.
Layout Tip: Keep It Within Reach
- Position your corner caddy near your coffee or tea station for maximum convenience. If you use a kettle daily, make sure it's on the top tier or front of the lazy Susan so you can grab it easily. Store less-used gadgets like a milk frother or electric knife on the back or lower tier.
- This layout keeps your morning routine smooth without having to dig through a crowded corner. Also, leave a little breathing room between appliances to avoid a jam-packed look.
Finishing Touch: Add A Plant Or Tray
- To soften the utilitarian feel of appliances, tuck a small air plant or a tiny succulent on the caddy's edge. It adds a pop of green and makes the grouping feel intentional. Alternatively, place a small ceramic tray under the caddy to catch any drips from the kettle or coffee maker.
- This simple addition keeps the area tidy and adds a layer of texture. Just keep the tray neutral—white, beige, or light gray—to maintain the airy aesthetic.
6. Add a Rolling Cart for Extra Prep Space
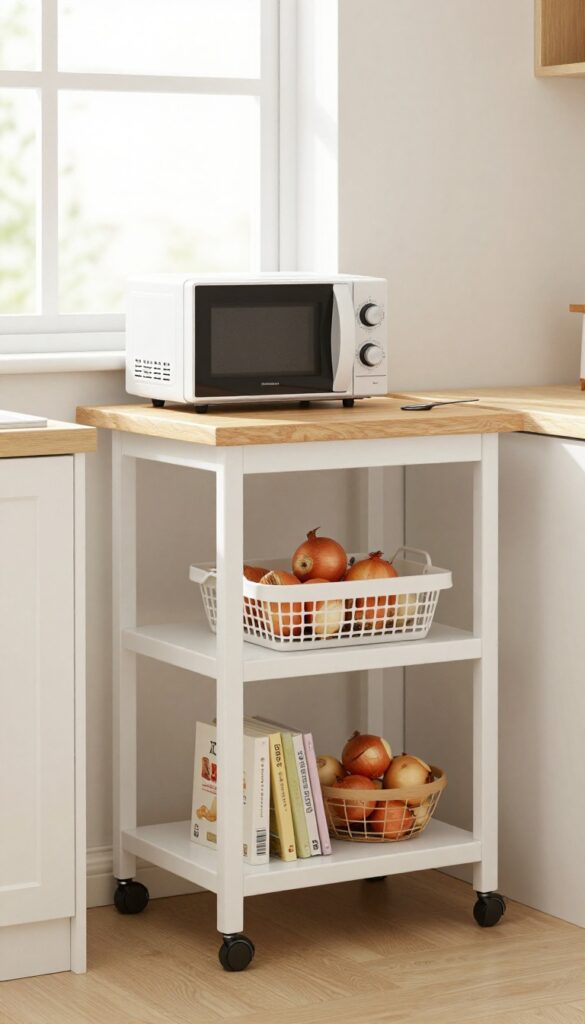
A slim rolling cart is one of those kitchen helpers that feels almost too good to be true. It slides into narrow gaps between counters or next to the fridge, giving you a dedicated spot for appliances like a microwave or air fryer. When you need extra counter space for chopping or assembling ingredients, just pull it out and use the top as a temporary work surface.
The best part? You can tuck it away again in seconds, keeping your kitchen looking clean and uncluttered.
Rolling carts come in all sorts of styles, from sleek stainless steel to warm wood with wire baskets. For a light and airy kitchen, go with a white or pale wood cart that blends into the background. If your kitchen leans more modern, a black metal frame with open shelves adds a touch of industrial charm without feeling heavy.
The key is to choose one that fits your existing color palette and doesn't compete with your countertops.
Think about what you'll store on it. A microwave or air fryer usually lives on the top shelf, while the lower shelves can hold cookbooks, extra bowls, or a small basket of onions and garlic. This keeps your main counters free for daily tasks and makes cooking feel less cramped.
Plus, having a mobile station means you can roll it closer to the dining area when you're serving buffet-style meals or need a spot for drinks during parties.
One practical detail to consider is the cart's height. Make sure it's roughly the same height as your main counter so the top can truly function as extra prep space. A wooden cutting board placed on top gives you a sturdy surface for slicing and dicing, and it doubles as a serving board when guests are over.
With a rolling cart, you're not just adding storage—you're adding flexibility that adapts to how you actually cook and entertain.
Best Materials For A Light Look
- For that airy, open feel, choose a cart with a light wood or white finish. Bamboo is a great sustainable option that brings warmth without darkening the room. If you prefer metal, go with a slim stainless steel or matte white frame—avoid bulky black or dark bronze if you're trying to keep the space feeling breezy.
- Open wire shelves also help maintain visual lightness compared to solid wood panels.
Layout Tip: Where To Park It
- Measure the gap between your counter and the wall or island before buying. A standard cart is about 15 to 18 inches wide, so it fits snugly in most kitchens. Place it near an outlet if you plan to plug in appliances—this saves you from running cords across the floor.
- If your kitchen has a narrow walkway, keep the cart on the side of the counter that's less trafficked.
Finishing Touch: Style The Top
- Even a utilitarian cart deserves a little styling. Set a small wooden cutting board on top, plus a ceramic jar filled with wooden spoons or a tiny plant. This makes the cart feel intentional rather than just a parking spot for appliances.
- When not in use, a stack of colorful cookbooks on the lower shelf adds a pop of personality that ties into your kitchen's overall decor.
7. Use a Bread Box for a Toaster Oven
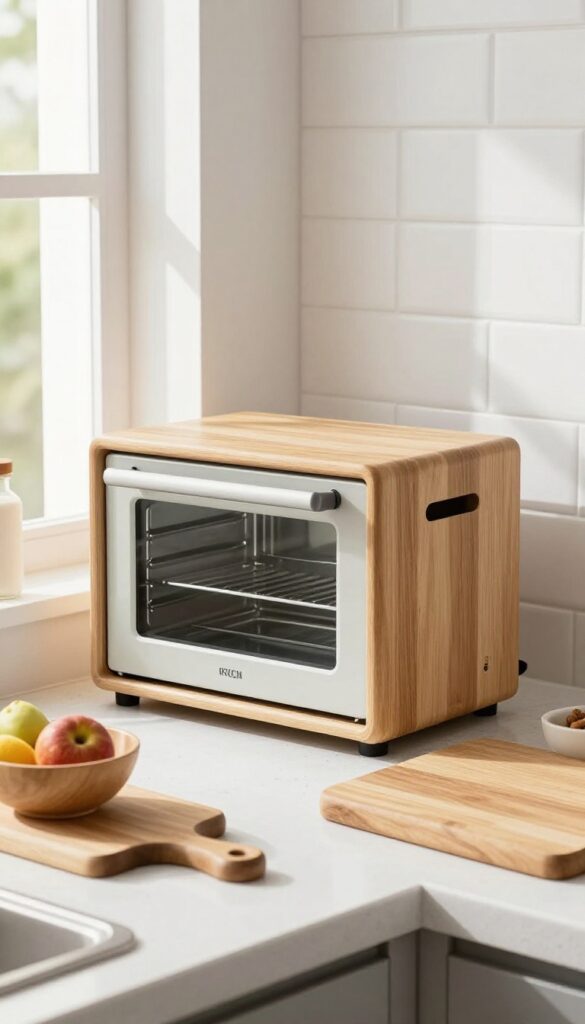
A toaster oven is one of those countertop workhorses that somehow always looks bulky, no matter how sleek the design. Tucking it inside a large bread box or an appliance garage solves the visual clutter instantly. The lid or door lifts up when you need to cook, and when it's closed, the top becomes a handy landing spot for a cutting board or a bowl of fruit.
It's a simple swap that makes the counter feel more spacious and intentional.
The key is choosing a bread box that's tall enough to accommodate the toaster oven's height with a bit of clearance for airflow. Wooden styles in light oak or bamboo keep the look warm and airy, while matte metal options in white or cream blend into the background. Place it near the coffee station or breakfast prep area so the toaster oven stays within easy reach.
The lid can double as a serving surface for toast or pastries, cutting down on counter clutter even further.
Best Materials For An Airy Feel
Bamboo and light-toned woods like acacia or ash keep the bread box from feeling heavy. If you prefer a more modern look, a matte white or pale gray metal box with a roll-top lid adds a clean, minimalist touch. Avoid dark finishes or glossy plastic, which can make the zone feel cramped rather than light and open.
Layout Tip: Position For Flow
Set the bread box on the counter near an outlet, but leave a few inches of space behind it for ventilation. If your toaster oven vents from the back, choose a box with an open back or cut a small ventilation hole (painted to match). This keeps the appliance safe while maintaining the clean look.
Finishing Touch: Top It Off
- Use the flat top of the bread box as a mini landing zone. A small wooden cutting board, a jar of wooden spoons, or a simple ceramic salt pig works well. Keep it minimal—just one or two items—so the surface doesn't get cluttered again.
- A tiny potted succulent adds a fresh, airy vibe.
8. Stack a Microwave on a Shelf Cart
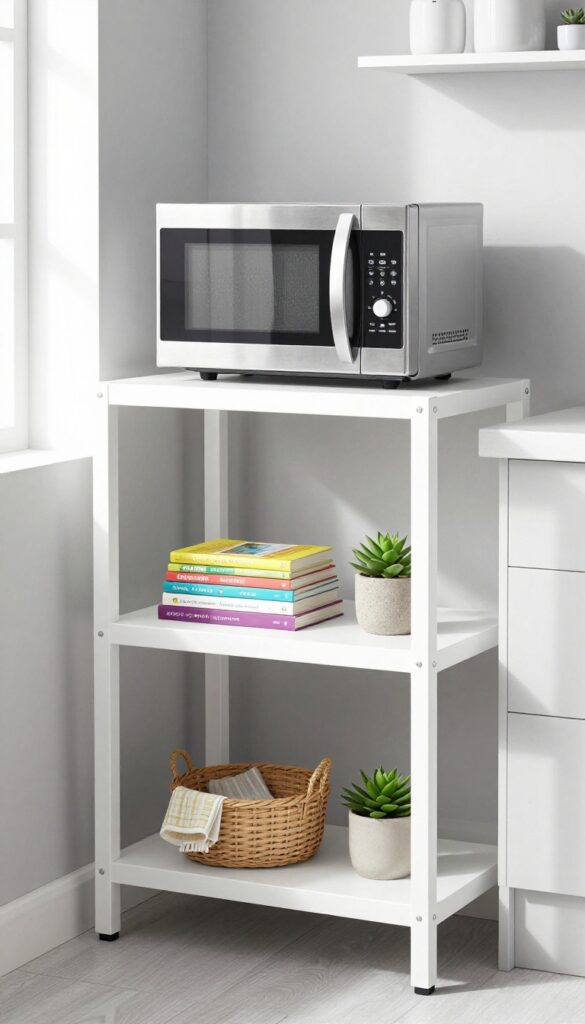
If your microwave is hogging precious counter space, a two-tier shelf cart can solve that problem in a stylish way. This idea keeps the microwave off the counter while adding extra storage for cookbooks or baskets below. It’s a practical solution that also brings a light, airy feel to your kitchen.
A two-tier shelf cart is a simple way to free up counter space and keep your microwave accessible without sacrificing style. The open design keeps the kitchen feeling open and airy, while the lower tier offers a spot for cookbooks, a small basket of linens, or even a few decorative jars. Choose a cart in a light wood or white finish to maintain that breezy vibe, and roll it to a corner or against a wall where it won’t block traffic.
This setup works especially well in small kitchens where every inch counts, and it’s easy to move if you need to rearrange.
Best Materials
Look for a cart made from light wood like bamboo or pine, or a sleek metal frame with a white or pale gray finish. These materials keep the look airy and prevent the cart from feeling heavy. Avoid dark woods or bulky designs that could weigh down the space.
Styling Tip
Use the bottom tier for a mix of practical and pretty items. Stack a couple of colorful cookbooks flat, place a small basket for kitchen towels, and add a tiny potted plant for a fresh touch. This keeps the cart functional while adding personality.
Layout Tip
Position the cart near an outlet so the microwave can plug in easily, and make sure the top shelf is sturdy enough to support the weight. If your cart has wheels, lock them once it’s in place to prevent any accidental rolling.
9. Create a Smoothie Station with a Caddy
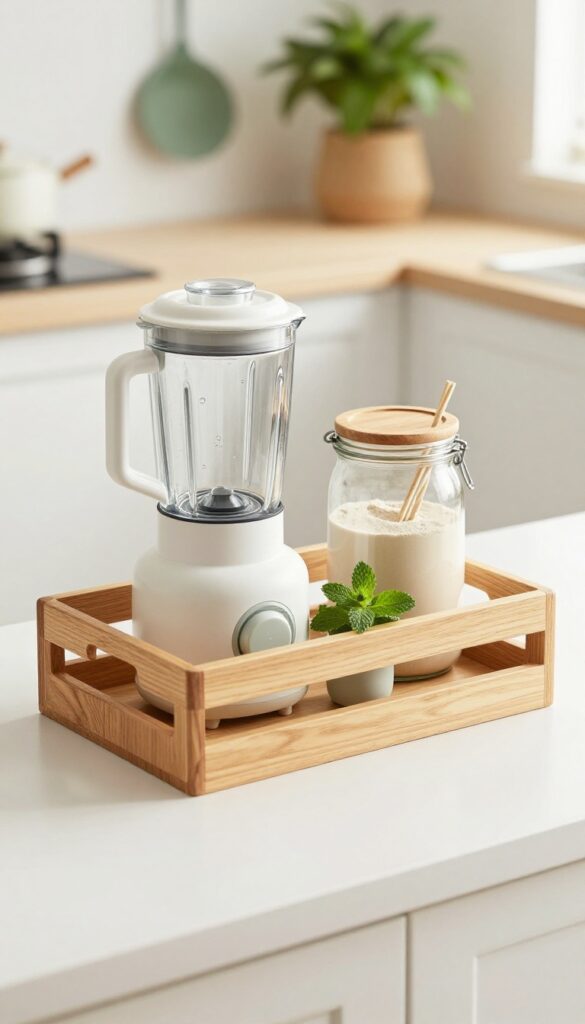
Mornings can be rushed, but a dedicated smoothie station makes healthy breakfasts almost automatic. By corralling your blender, protein powder, and reusable straws in a small caddy, you cut down on time and clutter. The key is choosing a caddy that feels intentional—not just a plastic bin—so it adds to your kitchen's light and airy vibe.
A smoothie station doesn't need much counter space. A rectangular wooden or wire caddy works perfectly to hold the blender base, a jar of protein powder, and a few straws. Keep it near the sink or fridge for easy access to water and fruit.
The visual effect is neat and purposeful, like a little café corner in your own kitchen.
Best Materials
For a light and airy look, choose a caddy in natural wood, white wire, or clear acrylic. Wood adds warmth without weighing down the space, while wire or acrylic keeps things visually open. Avoid dark or heavy materials that might feel bulky on the counter.
Storage Tip
Use small glass jars or canisters inside the caddy for protein powder, chia seeds, or flax. This keeps everything visible and easy to grab. Label them with simple tags or a chalk marker for a clean, organized feel.
Finishing Touch
Add a small plant or a sprig of herbs next to the caddy to soften the look. A tiny pot of mint or basil ties the station to the kitchen's overall greenery and makes the counter feel fresh and inviting.
10. Use a Pegboard for Handheld Appliances
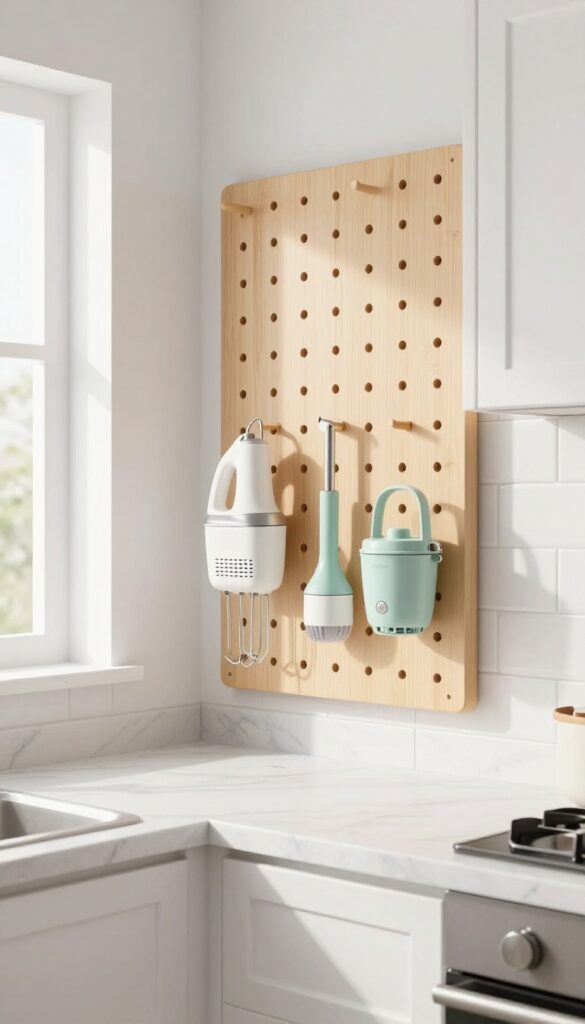
Pegboards aren't just for garages. In the kitchen, they can turn a blank backsplash into a highly functional spot for your most-used handheld appliances. Think of it as a display that's also storage—your hand mixer, immersion blender, and even a small food processor can hang within arm's reach.
The key is choosing a pegboard that feels intentional, not industrial. A light wood or white version keeps the space airy, while black adds a subtle graphic punch. Mount it between the counter and upper cabinets, and suddenly that awkward gap becomes the most organized zone in your kitchen.
Mounting a pegboard on the backsplash is a game-changer for freeing up drawer space. Instead of digging through a jumble of cords and attachments, you can grab exactly what you need at a glance. The visual effect is both practical and stylish—tools become part of the decor, especially if you choose appliances in coordinating colors.
This idea works best in a kitchen with a clean, uncluttered backsplash, and it's ideal for small spaces where every inch counts. To keep it from looking messy, limit the pegboard to your most-used items and leave some hooks empty for breathing room.
Best Materials
- For a light and airy feel, opt for a solid wood pegboard painted in a soft white or pale gray. If you prefer a more modern look, a metal pegboard with a matte finish works well—just avoid anything too shiny. The hooks and accessories should match the pegboard finish for a cohesive appearance.
- Plastic pegboards are an option, but they can look cheap; stick with wood or metal for a polished result.
Layout Tip
- Position the pegboard at least 6 inches above the countertop to leave room for cleaning and small countertop items. Place the heaviest appliance, like a stand mixer attachment, on the strongest hooks near the center. Lighter tools like spatulas and measuring cups can go on the sides.
- Leave a few inches of empty space around the edges so the arrangement doesn't feel cramped.
Styling Note
- To keep the look intentional, group appliances by color or size. For example, if your hand mixer is white, pair it with a white immersion blender and a light wood cutting board. Add a small plant or a ceramic jar on the counter below to soften the industrial vibe.
- Avoid overcrowding—three to five items is the sweet spot for a balanced display.
11. Add a Pull-Out Shelf for a Stand Mixer
Stand mixers are wonderful tools, but they're heavy, bulky, and often end up living on the counter just because hauling them out of a cabinet feels like a workout. A pull-out shelf solves that perfectly—your mixer stays tucked away in a lower cabinet, then glides out smoothly when you need it. No more wrestling with a 20-pound appliance or sacrificing precious counter space.
This idea is all about making your kitchen work for you, not the other way around. By installing a sturdy pull-out shelf in a base cabinet, you create a dedicated home for your mixer that's both hidden and instantly accessible. The shelf should be rated to hold the weight, and soft-close hardware makes the experience feel seamless and polished.
When you're done mixing, just slide it back in and your countertops stay clear.
Best Placement
Choose a lower cabinet near an outlet and close to your main prep area. If you bake often, position it under the counter where you roll out dough or frost cakes. Avoid placing it too far from your work zone—you want to pull it out and start mixing without crossing the kitchen.
Weight & Hardware
Not all pull-out shelves are created equal. Look for heavy-duty slides rated for at least 100 pounds, and make sure the shelf itself is solid plywood or metal. Soft-close slides are worth the extra cost—they prevent the shelf from slamming shut when loaded, which protects both the shelf and your mixer.
Styling The Shelf
Keep the area around the shelf clutter-free so the mixer has room to breathe. You can line the shelf with a non-slip mat to keep the mixer from sliding, and add a small hook inside the cabinet door for measuring cups or spatulas. A light inside the cabinet makes it easier to see what you're grabbing.
12. Use a Decorative Ladder for a Slow Cooker
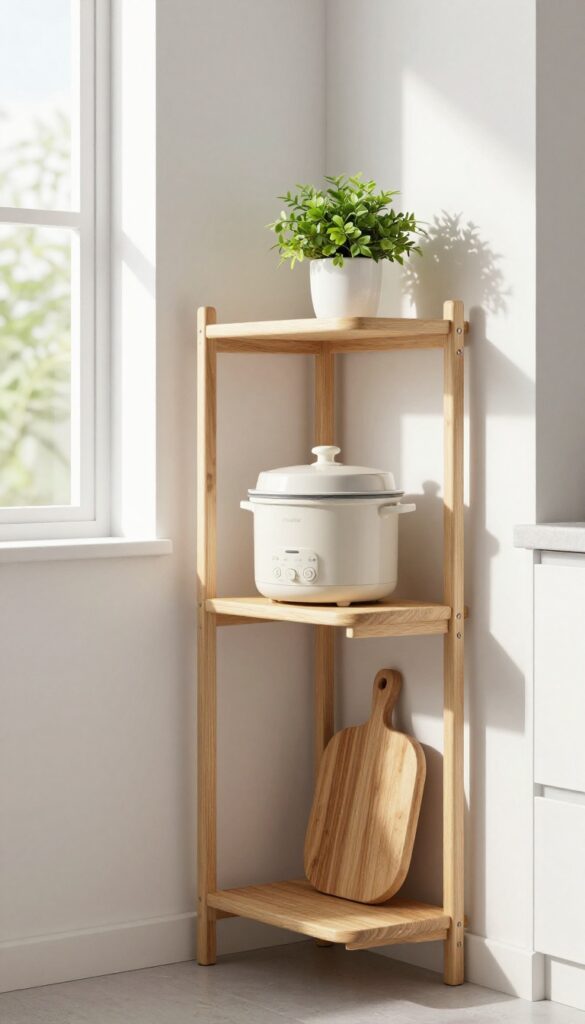
A slow cooker or Instant Pot is a lifesaver for meal prep, but it's also bulky and awkward to store. Tucking it away in a cabinet means hauling it out every time you want to use it, which defeats the purpose of a countertop appliance. A small leaning ladder shelf solves this by keeping the cooker accessible while adding a charming, airy touch to your kitchen.
The open design lets the ladder feel like decor, not clutter, and the vertical storage frees up precious counter space.
Leaning ladder shelves come in various widths and heights, so you can find one that fits your space perfectly. Place it against a wall near an outlet, and set your slow cooker on a lower rung where it's easy to reach. The ladder's slatted structure keeps the area feeling light and open, which aligns with the light and airy angle.
You can also use the upper rungs for small baskets or a few cookbooks to complete the look. This setup works especially well in galley kitchens or breakfast nooks where floor space is tight but you want to add a touch of rustic charm.
Best Materials
Go for a wooden ladder in a light finish like pine or bamboo to keep the look airy. Avoid dark stains or heavy metals, which can feel too bulky. A natural wood tone blends seamlessly with most kitchen styles, from farmhouse to modern.
Styling Tip
Keep the ladder uncluttered. Let the slow cooker be the main focus, and add just one or two small accents, like a wooden cutting board leaning against a rung or a small plant on the top shelf. This prevents visual overload and maintains the light, practical vibe.
Small-space Fix
If your kitchen is very narrow, choose a ladder that's no wider than the slow cooker itself. Position it in a corner or beside the fridge where it won't block traffic. The vertical design makes use of empty wall space without eating into your floor area.
13. Group a Kettle and Coffee Maker on a Marble Slab
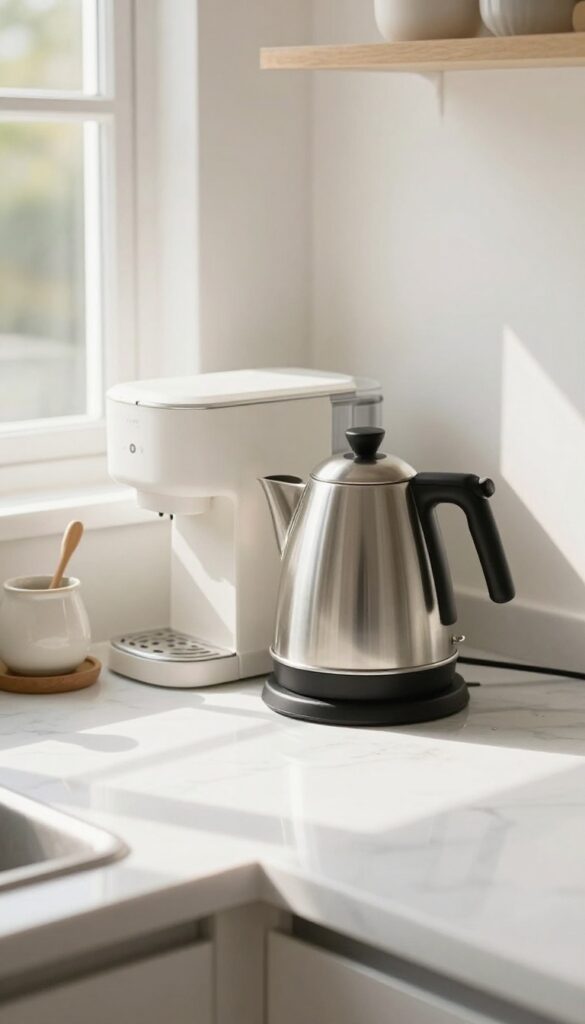
Morning routines feel smoother when your coffee and tea stations are easy to reach. Instead of letting your kettle and coffee maker sit separately and clutter the counter, bring them together on a single marble or wood slab. This simple trick defines the zone, protects your countertops from heat and spills, and instantly makes the area look intentional.
Plus, it's one of those small changes that makes your kitchen feel more put-together without a full remodel.
A dedicated beverage station keeps your daily essentials in one spot and cuts down on countertop chaos. By grouping your kettle and coffee maker on a slab, you create a visual anchor that tells the eye this is the hot-drink zone. It's practical too—the slab catches drips and heat, so your counter stays safe.
Choose a marble slab for a classic, airy look or a warm wood board for a cozy feel. Either way, you'll wonder why you didn't do it sooner.
Best Materials
- Marble or marble-look quartz is ideal for a light, airy kitchen—it reflects light and feels fresh. Wood slabs (like acacia or teak) add warmth and work well in rustic or Scandinavian-style spaces. Both are heat-resistant and easy to wipe clean.
- Avoid porous materials like unsealed limestone, which can stain from coffee splashes.
Layout Tip
- Place the kettle and coffee maker side by side, not one behind the other, so you can access both easily. Leave a small gap between them for airflow and to prevent heat buildup. If you have a toaster or blender, keep those in a separate zone to avoid crowding.
- A small tray or caddy can hold sugar, stir sticks, and tea bags nearby.
Finishing Touch
Add a small plant or a salt lamp beside the slab to soften the look and bring in a natural element. Keep the color palette neutral—white, beige, or pale wood—to maintain the light and airy feel. A ceramic mug or two on the slab makes the station feel ready to use.
FAQ
How do I choose which appliances to keep on the counter?
Keep daily-use appliances like coffee makers and toasters on the counter. Store occasional-use items like slow cookers in cabinets.
What's the best way to hide small appliances?
Use an appliance garage or a decorative bread box. These keep appliances accessible but out of sight when not in use.
How can I prevent countertop clutter?
Limit yourself to one or two appliance zones. Use trays, caddies, or shelves to group items and keep surfaces clear.
What materials work best for appliance zones?
Wood, marble, and metal trays are durable and easy to clean. Choose materials that complement your kitchen's style.
Can I create appliance zones in a small kitchen?
Absolutely. Use vertical space with shelves or pegboards, and opt for compact appliances to maximize counter space.
Conclusion
Organizing your kitchen countertops into appliance zones doesn't have to be complicated. With a few simple tools like trays, shelves, and caddies, you can create a space that feels both functional and beautiful.
Start with one zone that matches your daily routine, and build from there. Your kitchen will thank you.