10 Kitchen Table Painting Ideas That Refresh Old Pieces
Your kitchen table sees it all—morning coffee spills, homework sessions, and late-night snacks. Over time, that wear adds character, but sometimes you just want a fresh look without buying new. Painting is the quickest way to transform a tired table into something you love again.
The key is choosing a finish that feels warm and inviting, not cold or overly perfect. A lived-in look means embracing slight imperfections, soft colors, and textures that make you want to run your hand across the surface. These ten ideas range from subtle updates to bold transformations.
Each one keeps the table functional while adding personality. Grab a brush and let's get started.
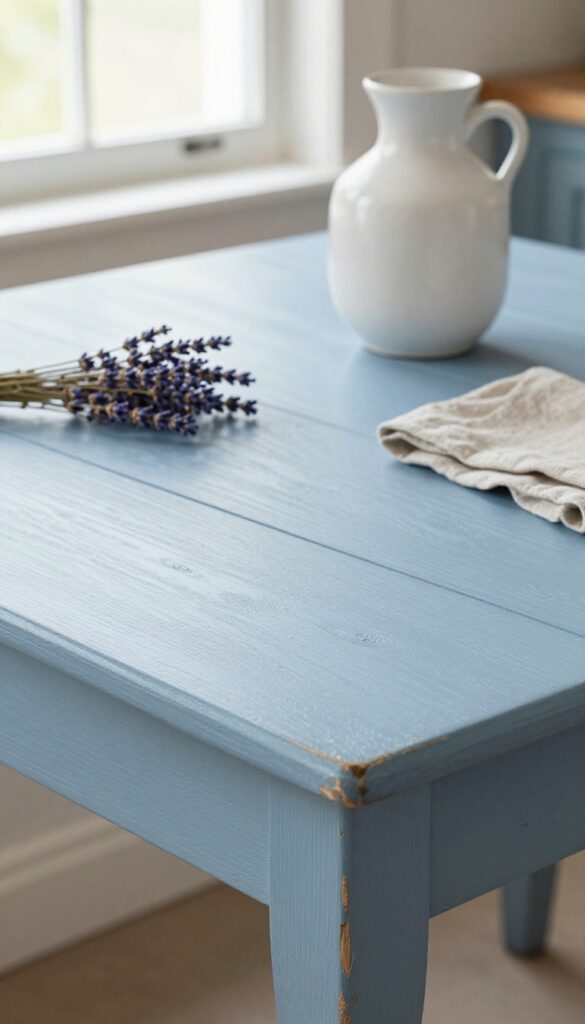
1. Chalk Paint with a Distressed Finish
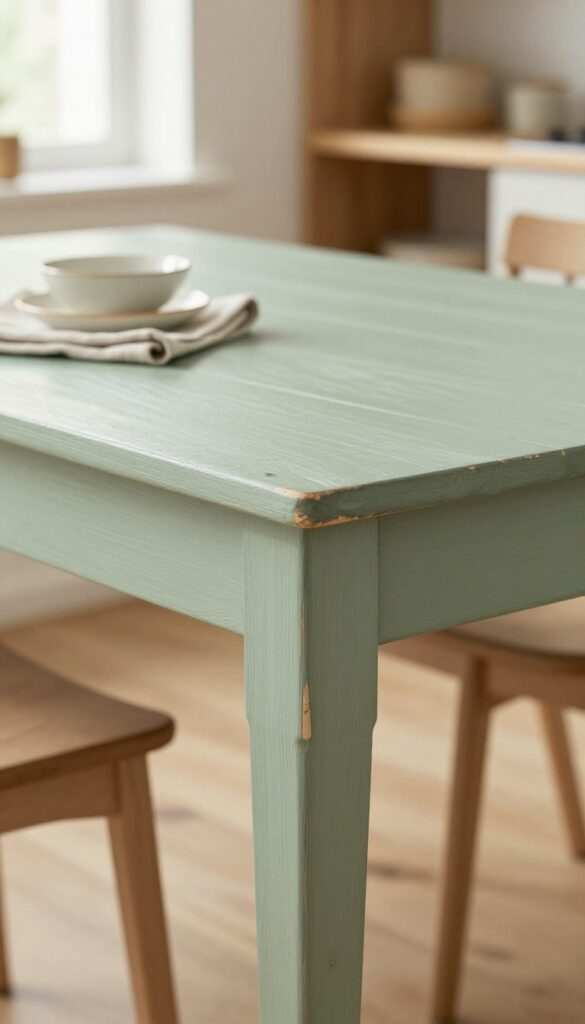
A coat of chalk paint can turn a tired kitchen table into something that feels collected and cozy. The matte finish and soft color palette make it a natural fit for homes that lean warm and lived-in. Best of all, you don’t need to strip or sand before you start—just clean, paint, and let the transformation begin.
Chalk paint adheres to almost any surface without sanding. Apply two coats in a soft sage or warm gray, then sand edges lightly for a naturally worn look. Seal with wax for a matte, touchable finish.
This technique works especially well on farmhouse tables or simple wooden pedestal designs, where the distressed edges add character without feeling overdone. Pair it with linen napkins and ceramic dishes to keep the mood relaxed.
Best Colors
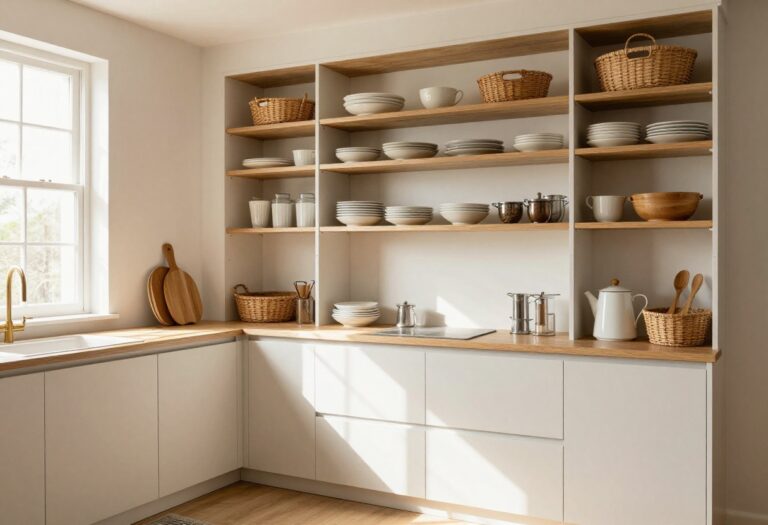
Soft sage, warm gray, or muted blue-gray are top choices for a lived-in feel. These shades blend easily with butcher block counters, open shelving, and natural wood floors. Avoid stark white or high-contrast colors—they can make the distressing look harsh instead of subtle.
Finishing Touch
After the wax cures, buff the surface with a soft cloth for a smooth, low-sheen glow. For extra durability on a table that gets daily use, add a second coat of wax or switch to a matte polyurethane. A clear furniture wax is easier to maintain and can be reapplied yearly.
Where It Fits Best
This finish shines in casual dining rooms, breakfast nooks, or eat-in kitchens with a cottage or farmhouse style. It also works well in small apartments where you want a table that feels cozy without being heavy. Avoid this look in ultra-modern spaces with glossy finishes—it will feel out of place.
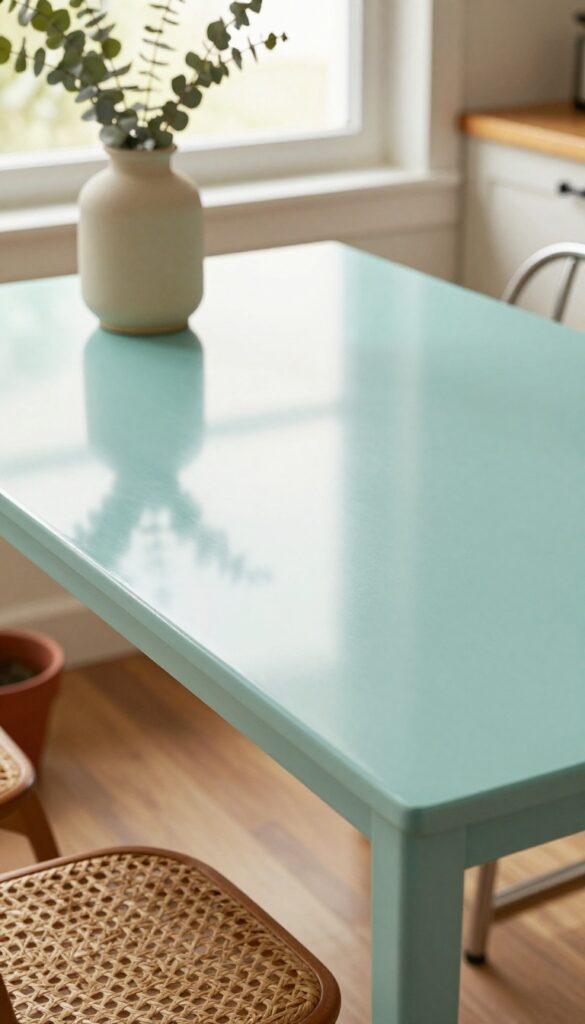
2. Two-Tone Top and Base
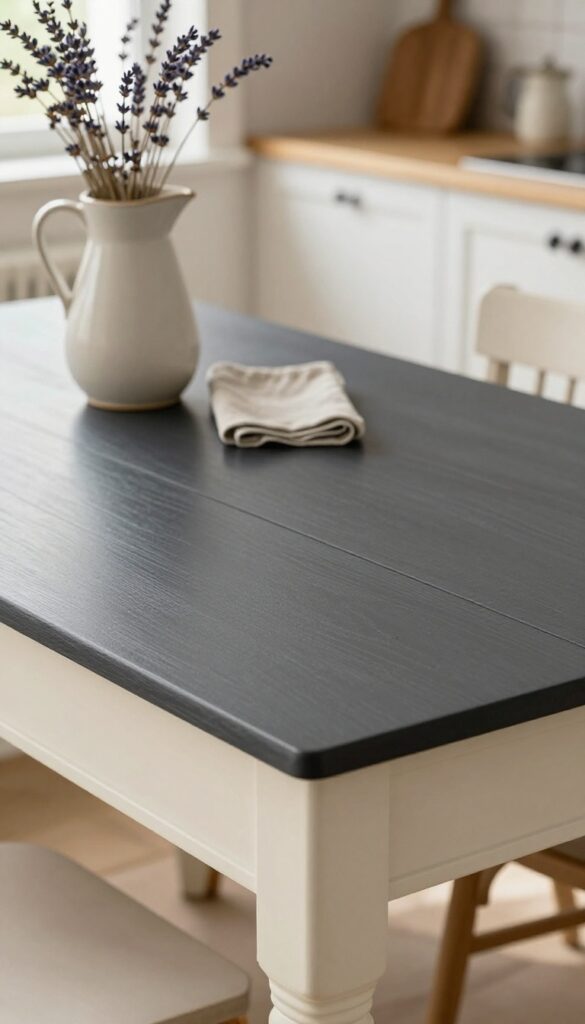
A two-tone paint scheme is one of the easiest ways to give an old kitchen table a fresh, custom look without buying new furniture. By painting the tabletop a darker shade and the base a lighter one, you create a subtle contrast that adds depth and makes the piece feel intentional. This approach works especially well in kitchens where you want the table to anchor the space without feeling too heavy or dark.
The trick to pulling off a two-tone table is choosing colors that complement each other and fit your kitchen's existing palette. A charcoal or navy top paired with a creamy white base is a classic combo that feels both grounded and airy. The darker surface hides everyday wear and tear, while the lighter legs keep the piece from visually overpowering a small room.
This look works in farmhouse, modern, or transitional kitchens and can be achieved with just a weekend of painting.
Best Colors
- For the tabletop, go with a deep, matte finish like charcoal, navy, or even a muted forest green. These colors hide scratches and spills better than lighter shades. For the base and apron, stick to a warm off-white, cream, or soft taupe.
- Avoid stark white—it can look too harsh against darker tops. If your kitchen has warm wood tones, a navy top with a warm ivory base creates a cozy, collected feel.
Finishing Touch
After painting, seal the tabletop with a durable polyurethane or furniture wax to protect against heat and moisture. A matte or satin finish keeps the look soft and lived-in. For extra character, lightly sand the edges of the base before painting to let a bit of the original wood peek through—this adds a subtle worn-in vibe that fits the warm, lived-in angle.
Small-space Fix
- In a compact kitchen, a two-tone table with a dark top and light base can make the room feel larger. The light legs visually recede, so the table doesn't block sight lines. Pair it with matching light chairs or benches to keep the airy feel.
- A round or oval shape also helps the table fit snugly into a corner or small nook without feeling cramped.
3. Milk Paint for a Timeworn Patina
Milk paint brings a soft, chalky finish that looks like it’s been around for decades. The beauty is in the imperfections—it naturally chips and fades, letting the wood grain show through in spots. A muted blue or dusty rose feels especially charming in a farmhouse or cottage kitchen, where the table becomes a relaxed, lived-in centerpiece.
Unlike modern paints that aim for a flawless surface, milk paint embraces wear and tear. You apply it unevenly—thin in some areas, thicker in others—so the finish develops character over time. The result is a table that looks like a beloved antique, even if you just painted it last weekend.
It’s an ideal choice if you want your kitchen to feel warm, collected, and personal.
Best Colors For A Soft Patina
- Stick with muted, earthy tones that feel natural and weathered. Sage green, dusty blue, and faded brick red all work beautifully. Avoid anything too bright or glossy—milk paint’s charm is its matte, chalky texture.
- A single coat often gives the most authentic aged look.
Application Tip
- Don’t try for perfect coverage. Use a wide brush and let some strokes be thicker than others. After it dries, lightly sand the edges and corners to reveal the original wood or previous paint layers.
- This creates that timeworn, gently distressed effect.
Finishing Touch
Seal with a clear wax or a matte polyurethane for durability, especially on a kitchen table that sees daily use. The wax will deepen the color slightly and add a soft sheen, while still keeping the finish breathable and natural.
4. Stained Top with Painted Base
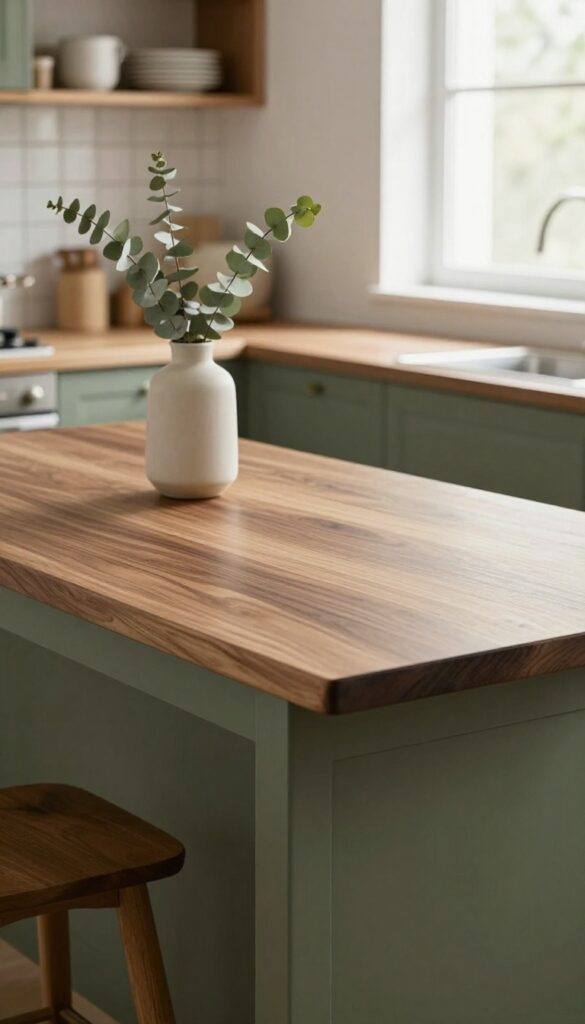
This two-tone approach gives your table a custom, furniture-store look without the price tag. By stripping the top back to bare wood and applying a rich stain, you get to show off the natural grain and warmth. Meanwhile, a painted base in a contrasting color adds personality and anchors the piece in your space.
It’s a perfect way to bridge rustic charm with modern flair.
The contrast between a glossy stained top and a matte painted base creates visual interest and makes the table feel intentional. The stained surface is durable for daily use, while the painted base can be easily refreshed if you want to change the color scheme later. This idea works especially well in kitchens with mixed materials—think butcher block counters, open shelving, and ceramic tiles.
Best Color Combos
- Walnut stain pairs beautifully with olive green or navy for a grounded, earthy look. Espresso stain with a mustard yellow base adds unexpected warmth. For a softer feel, try a honey oak stain with a sage green base.
- The key is to pick a base color that complements your kitchen’s existing palette without competing with the wood tone.
Finishing Touch
After staining, seal the top with a polyurethane finish rated for high-use surfaces. For the base, use a high-adhesion primer and a satin or semi-gloss paint that can handle occasional scuffs. Add felt pads under the legs to protect your floors and make the table easy to slide.
Where It Fits Best
This style shines in farmhouse, transitional, or eclectic kitchens. It also works well in a breakfast nook with a mix of upholstered and wooden chairs. Avoid pairing it with overly ornate or heavily patterned chairs—let the table be the star.
5. Ombre Fade from Light to Dark
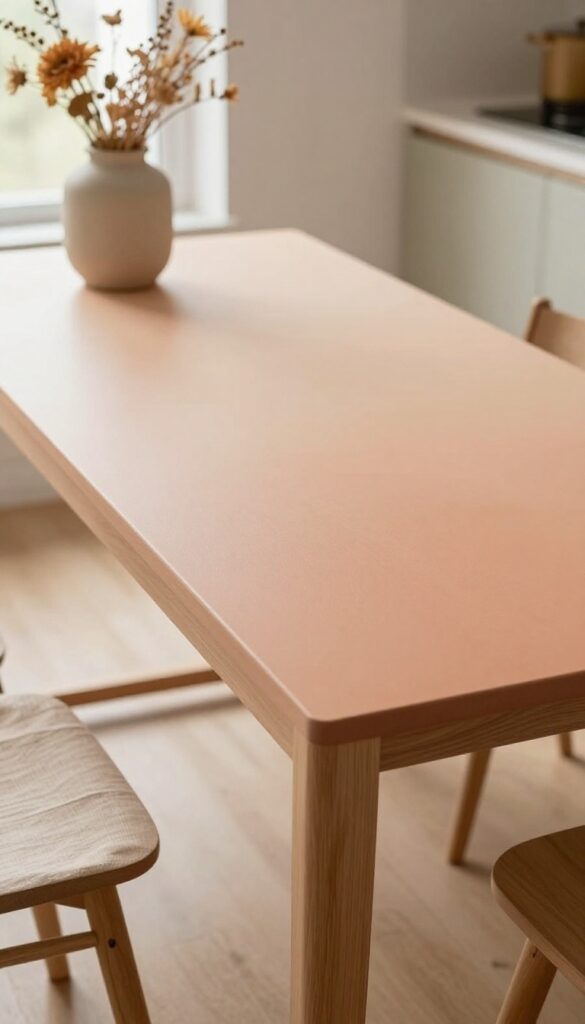
An ombre finish brings a soft, artistic touch to a kitchen table without overwhelming the space. By blending three shades of the same color—like pale peach melting into terracotta—you create a subtle gradient that shifts from one end to the other. The effect is calming yet intentional, perfect for a warm, lived-in kitchen where you want a hint of personality without going full bold.
Start by choosing a color family that complements your kitchen's existing palette. Warm tones like peach, coral, and terracotta work beautifully for a cozy feel, while cool blues from sky to navy can keep things airy. The key is a seamless transition: use a sponge or dry brush to soften where one shade meets the next, working in thin layers.
This technique works best on a rectangular or oval table, where the gradient has room to travel. Finish with a protective matte sealer to keep the paint looking soft and durable for everyday use.
Best Colors
Stick with warm, earthy hues for that lived-in vibe: think blush to rust, sage to forest green, or butter yellow to ochre. If your kitchen leans neutral, a gradient from cream to warm taupe adds subtle depth without shouting.
Texture Mix
Pair the painted tabletop with natural wood legs or a raw edge to ground the look. The contrast between the smooth, blended surface and the organic grain keeps the piece from feeling too polished.
Finishing Touch
Style the table with simple ceramics and a linen runner in the lightest shade of your gradient. This pulls the eye along the table and reinforces the ombre effect without competing with it.
6. Painted Stripes for a Custom Look
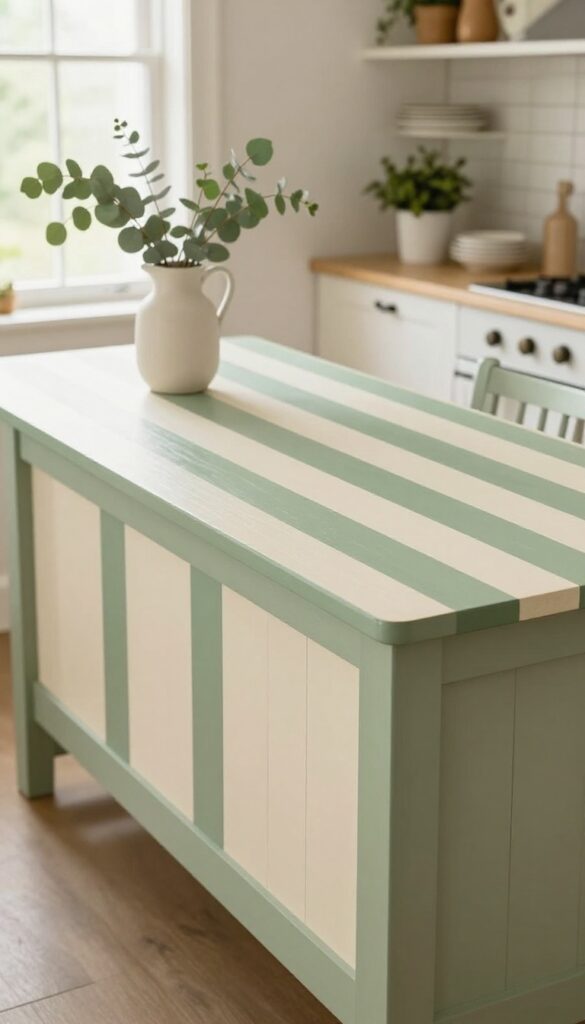
Stripes bring a tailored, graphic energy to a kitchen table without overwhelming the room. The trick is keeping the palette soft and the lines clean. White paired with a muted blue or sage green feels fresh but not loud, and running the stripes lengthwise makes the table feel longer and more graceful in the space.
This is one of those projects that looks like it took serious skill, but tape and patience are all you really need.
Tape off wide stripes along the tabletop and paint alternating colors, like white and soft blue. Keep the stripes running lengthwise to elongate the table. Finish with a durable polyurethane topcoat.
The result is a custom look that adds personality without clashing with your existing decor. It works especially well on rectangular farmhouse tables or simple drop-leaf designs. For a warmer feel, swap the white for a creamy off-white and choose a dusty blue or sage green for the accent stripe.
Best Colors
- Stick with two colors that have a similar undertone. White and navy feels crisp but can be stark; white and soft blue or white and sage green feel more relaxed and lived-in. If you want contrast without the coldness, try warm white and a muted terracotta or dusty mauve.
- The key is to keep the base color light so the stripe reads as an accent, not a pattern overload.
Finishing Touch
After the paint is fully dry, apply at least two coats of water-based polyurethane. Sand lightly between coats with fine-grit sandpaper for a smooth, durable finish that can handle daily meals and occasional spills. A matte topcoat keeps the look soft and natural, while satin adds a subtle sheen that's still low-key.
Small-space Fix
If your table is small or narrow, keep the stripes thin—about two inches wide—and use only two or three stripes down the center. This adds visual interest without making the table feel busy. Pair with simple chairs in a neutral tone so the table remains the focal point.
7. High-Gloss Lacquer for a Retro Vibe
Nothing says mid-century quite like a glossy, reflective tabletop. A high-gloss lacquer finish in a punchy color like cherry red or deep teal turns an ordinary kitchen table into a statement piece. The shine bounces light around the room, making even a small breakfast nook feel more open and energetic.
It’s a bold move, but one that pays off with a playful, nostalgic charm that feels right at home in a lived-in kitchen.
Lacquer isn’t just about color—it’s about that glass-smooth, mirror-like surface that feels almost too pretty to use. But don’t worry, it’s surprisingly durable once cured. The key is patience: sanding between coats is non-negotiable if you want that flawless finish.
Start with a primer, then apply thin layers of high-gloss enamel or spray lacquer, sanding lightly with fine-grit paper after each coat dries. Three to four coats usually do the trick. The result?
A table that looks like it came straight out of a 1950s diner, but with your personal color twist.
Best Colors For That Retro Pop
- Cherry red is the classic choice—it’s bold, cheerful, and instantly evokes vintage diners. Deep teal is a close second, offering a slightly more sophisticated take that pairs beautifully with brass or chrome legs. If you want something softer, try mustard yellow or pale mint.
- Stick with saturated shades that have a bit of depth; pastels can look washed out under glossy light. Test a sample on a small area first to see how the color shifts in your kitchen’s natural light.
Finishing Touches That Ground The Look
- Balance the high shine with matte or textured elements nearby. A woven jute rug under the table, linen napkins, or a matte ceramic vase with dried flowers keep the room from feeling too slick. For seating, go with mid-century wooden chairs or simple metal stools—anything with clean lines.
- Avoid adding too many glossy surfaces; let the table be the star. A small lamp with a fabric shade on a nearby counter can soften the overall effect.
Maintenance And Longevity
- High-gloss lacquer is tough but not indestructible. Use coasters for hot dishes and placemats for heavy plates to prevent scratches. Clean with a soft, damp cloth and mild soap—no abrasive sponges.
- Over time, you might notice minor wear on high-contact areas, but a fresh coat of lacquer every few years can bring it back to life. If you’re worried about perfection, consider using a lacquer specifically designed for furniture, which tends to be more resistant to heat and moisture.
8. Chalkboard Paint for Function and Fun
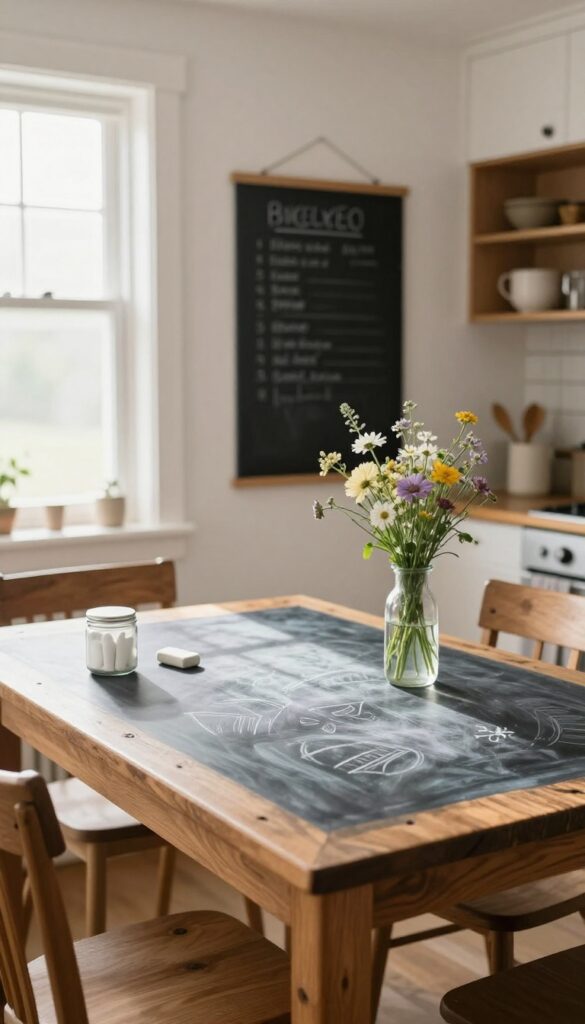
A kitchen table that doubles as a message board? That's the magic of chalkboard paint. It turns an ordinary surface into something interactive and personal, perfect for jotting down grocery lists, leaving sweet notes for family, or letting kids doodle while dinner's being prepped.
The look is playful yet intentional, and it works especially well in homes where the kitchen is the true hub of daily life.
Painting your tabletop with chalkboard paint is a surprisingly easy DIY that adds instant personality. Choose a high-quality, low-odor chalkboard paint for best results, and apply at least two even coats. Once dry, season the surface by rubbing chalk over the entire top and wiping it off—this prevents ghosting later.
Seal with a clear wax for extra durability, especially if you plan to use the table for meals. Keep a small jar of chalk and a soft eraser nearby so the table stays functional and fun without feeling messy.
Best Colors
Classic black is the most popular choice, but don't overlook dark green, navy, or even a warm charcoal. These deeper shades hide smudges better and create a sophisticated backdrop for white and pastel chalk. If your kitchen leans light and airy, a dark tabletop adds grounding contrast.
Finishing Touch
To keep the chalkboard surface looking fresh, wipe it clean with a damp cloth every few days and re-season with chalk as needed. A small tray or caddy for chalk and erasers keeps everything organized and within reach. For extra charm, hang a mini chalkboard sign nearby with the day's menu or a sweet quote.
9. Color-Blocked Geometric Shapes
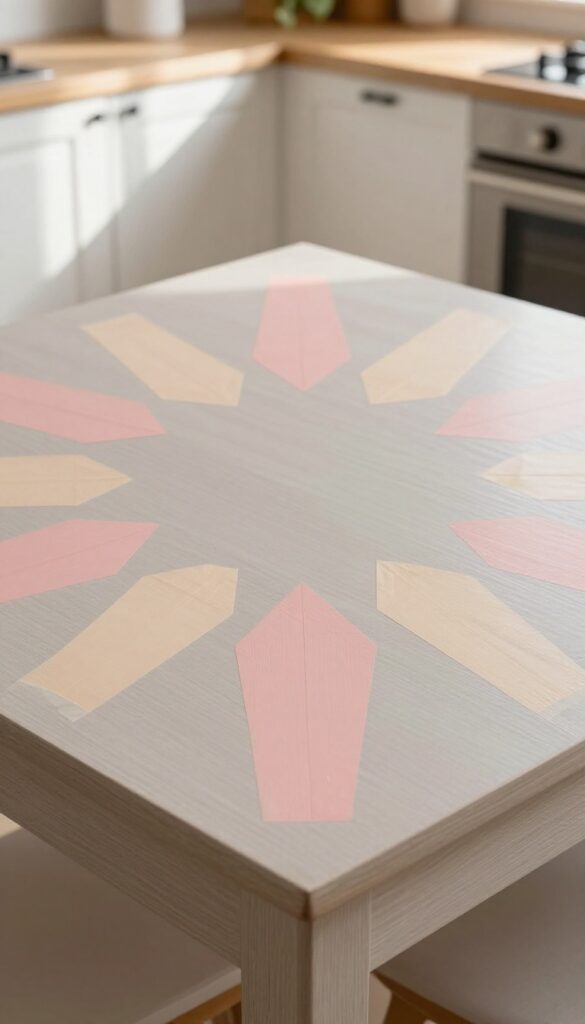
Masking off triangles or diamonds on your tabletop and painting each section a different pastel or earth tone gives an old kitchen table a fresh, modern update. The rest of the table stays neutral, so the pattern pops without feeling chaotic. This look works especially well on round or square tables, where the geometric shapes can radiate from the center or wrap around the edges.
Color blocking with geometric shapes is a playful yet refined way to breathe new life into a tired table. By keeping the base neutral—think soft white, warm gray, or light wood stain—the painted sections become the focal point. Pastel pinks, muted blues, and sage greens create a soft, lived-in feel, while earthy terracottas, ochres, and deep greens lean more grounded and cozy.
The key is to use painter's tape to create clean lines and to seal the design with a durable topcoat so it holds up to daily use. This idea is perfect for a kitchen that needs a subtle pop of color without committing to a full paint job on cabinets or walls.
Best Colors
- Stick with three to four harmonious shades. For a warm, lived-in palette, try dusty rose, pale peach, and warm beige. If you prefer earth tones, go with muted terracotta, olive green, and creamy off-white.
- Avoid high-contrast combos like black and white, which can feel too stark for a cozy kitchen.
Layout Tip
On a round table, paint concentric rings of color or alternating pie-slice wedges. For a square table, try a checkerboard of diamonds or a central square with a border. Leave at least a few inches of neutral wood or paint around the edges to ground the design and keep it from feeling busy.
Finishing Touch
Once the paint is fully dry, apply two coats of a water-based polyurethane or furniture wax. This protects the design from scratches and spills. Pair the table with simple, solid-color chairs in a neutral tone so the tabletop remains the star.
10. Whitewashed Overlay for a Beachy Feel
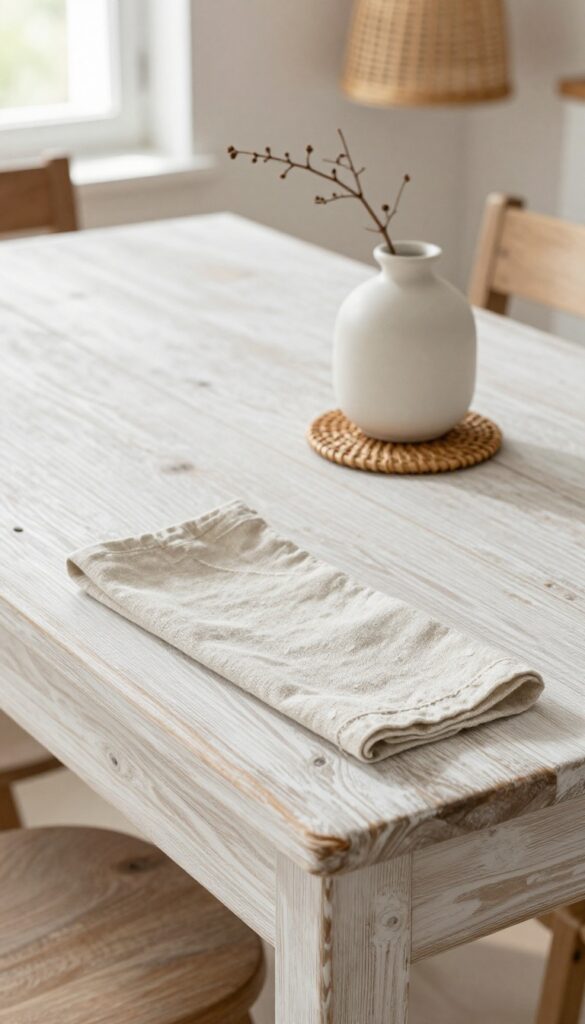
A whitewashed kitchen table brings that relaxed, breezy coastal vibe without requiring a full renovation. The technique is simple: thin white paint with water (about a 1:1 ratio) and brush it over bare wood, then wipe off the excess with a rag. What's left is a translucent, weathered finish that softens the grain and adds instant character.
It's forgiving, fast, and perfect for anyone wanting a lived-in look that still feels fresh.
This approach works beautifully on older tables with existing wear—the whitewash actually enhances the imperfections, making them part of the charm. For a warm, lived-in kitchen, pair the table with natural textures like linen napkins, a rattan pendant light, and wooden stools. The key is keeping the rest of the space simple so the table remains the focal point.
Whitewashing also brightens a dark corner, making even a small breakfast nook feel airy and open.
Best Wood Types
Pine, oak, and ash take whitewash beautifully because their open grain holds the pigment. Avoid dense woods like maple or cherry—they tend to look blotchy. If you're unsure, test on the underside first.
Color Variations
For a warmer finish, mix white paint with a tiny drop of raw umber or a warm beige. For a cooler, driftwood look, use a gray-tinted white or add a hint of blue. The ratio can be adjusted: more water gives a subtler effect, more paint adds coverage.
Finishing Touch
Seal the table with a matte polyurethane or wax to protect against spills and daily use. A matte finish keeps the weathered look intact, while satin adds a subtle sheen. Reapply every couple of years if the table gets heavy use.
FAQ
Do I need to sand my kitchen table before painting?
It depends on the paint. Chalk paint and milk paint adhere well without sanding, but for best results with latex or acrylic paints, a light sanding helps the primer stick. Always clean the surface thoroughly first.
What type of paint is most durable for a kitchen table?
For high-traffic tables, use a water-based enamel or a paint specifically formulated for furniture. Top with a clear polyurethane or wax for extra protection against spills and scratches.
How can I make a painted table look lived-in?
Distress edges with sandpaper, apply paint unevenly, or use a dry brush technique. Choose muted, earthy colors and avoid a perfectly smooth finish. A matte or satin sheen also adds to the worn feel.
Can I paint a laminate kitchen table?
Yes, but you'll need a bonding primer first. Lightly sand the laminate to create texture, then apply a primer made for slick surfaces. Follow with two coats of furniture paint and a durable topcoat.
How long should I wait between coats of paint?
Follow the paint manufacturer's instructions, but generally 2-4 hours for water-based paints and 24 hours for oil-based. Lightly sand between coats for a smoother finish.
Conclusion
Painting your kitchen table is one of the most rewarding DIY projects—it's affordable, customizable, and instantly changes the feel of your space. Whether you go for a subtle whitewash or a bold color-blocked design, the result is a piece that feels uniquely yours. Remember, the goal is a table that looks good and lives well.
Embrace the small imperfections, choose colors that make you smile, and enjoy the process. Your refreshed table will be the heart of your kitchen for years to come.