15 Kitchen Eating Area Ideas for Casual Family Meals
The kitchen eating area is where your family gathers for breakfast before school, quick lunches, and weeknight dinners. It needs to be comfortable and inviting, but also functional—especially when space is tight. Storage-smart decor keeps the clutter at bay while making mealtime feel special.
You don't need a huge kitchen to create a cozy spot for casual meals. With a few clever choices, you can carve out a dining nook that works hard and looks good.
Think benches with hidden compartments, tables with shelves, and wall-mounted solutions that free up floor space. These 15 ideas blend practicality with style, so your family can enjoy meals together without the mess taking over.
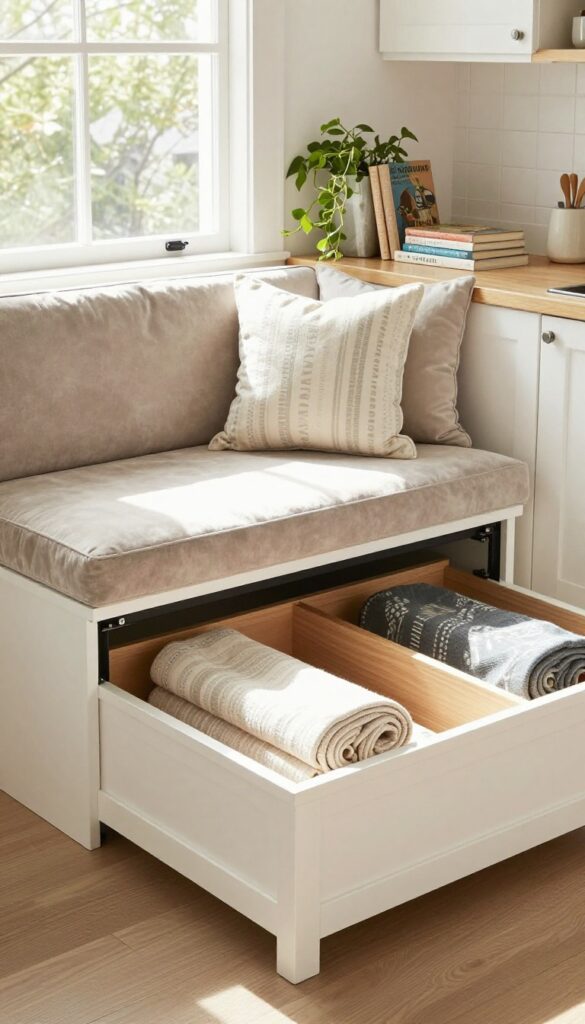
1. Built-In Banquette with Under-Seat Drawers
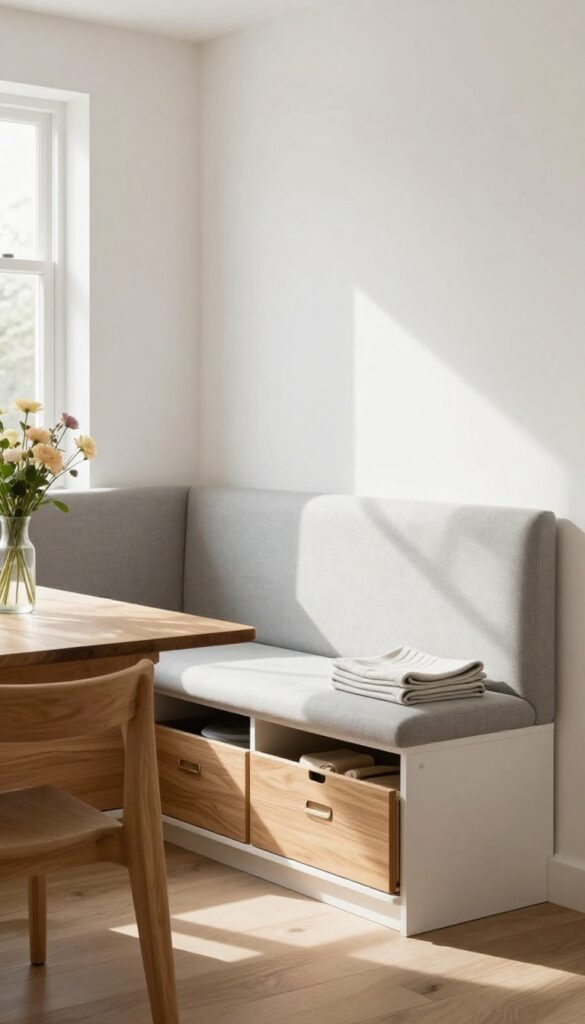
A built-in banquette turns an empty corner or wall into a cozy, space-saving dining nook. The continuous seating makes room for more family members without the clunky feel of individual chairs, and the upholstered bench invites everyone to linger over breakfast or homework. Adding deep drawers beneath the seats transforms unused space into a hidden catchall for table linens, extra placemats, or kids’ art supplies—keeping clutter out of sight while you eat.
Start by measuring your available wall space and deciding on the bench depth (typically 18–24 inches). Custom cabinetry or a simple DIY frame with plywood boxes works well. For the seat, choose a durable fabric like performance velvet or Crypton that can withstand spills and daily wear.
Top the bench with a cushioned seat that lifts up or slides out to access the drawers below. Paint the base in a light, airy color like soft white or pale gray to keep the nook feeling open, or go bold with a navy or sage green for a more dramatic look. Finish with a long, narrow table that leaves enough legroom, and add a few toss pillows for extra comfort.
Best Materials
- For the frame, use birch plywood or MDF with a smooth painted finish—they’re sturdy and easy to clean. The seat cushion should have a high-density foam core wrapped in Dacron for comfort, covered with a stain-resistant fabric. Drawer slides need to be full-extension ball-bearing type so you can reach the back without digging.
- If you’re on a budget, repurpose an old dresser by removing the top and mounting it under the bench.
Layout Tip
Place the banquette against a wall that doesn’t have a window or doorway to avoid blocking natural light. Leave at least 36 inches between the table edge and the opposite wall or counter so people can slide in and out easily. If your kitchen is narrow, consider a corner banquette with a round table to maximize walking space.
Finishing Touch
Add a shallow floating shelf above the banquette for a few framed photos, a small plant, or a stack of cookbooks. This draws the eye upward and makes the nook feel like a designed vignette rather than just a place to eat. A warm-toned pendant light hung low over the table completes the cozy, inviting atmosphere.
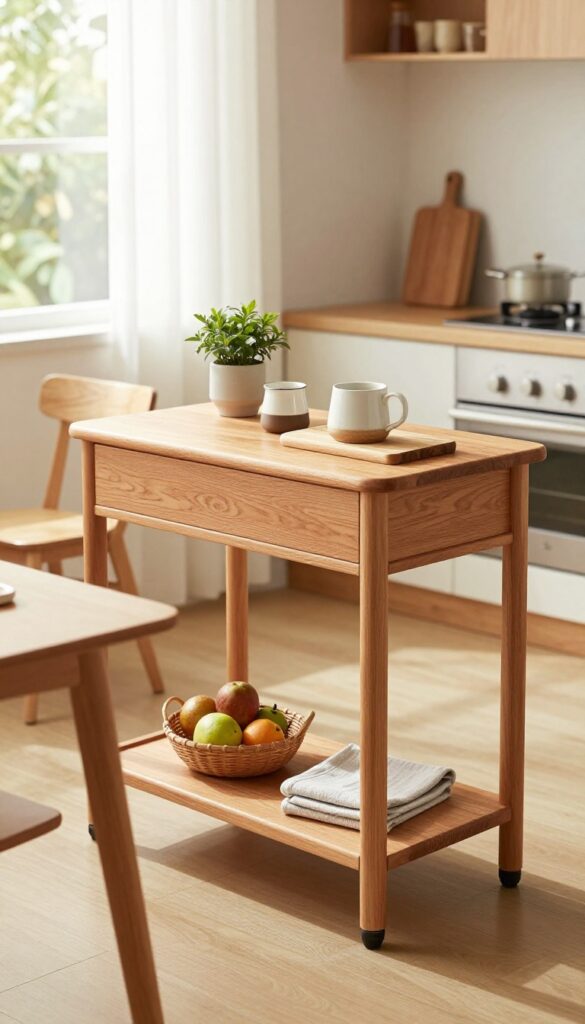
2. Farmhouse Table with Open Shelving Base
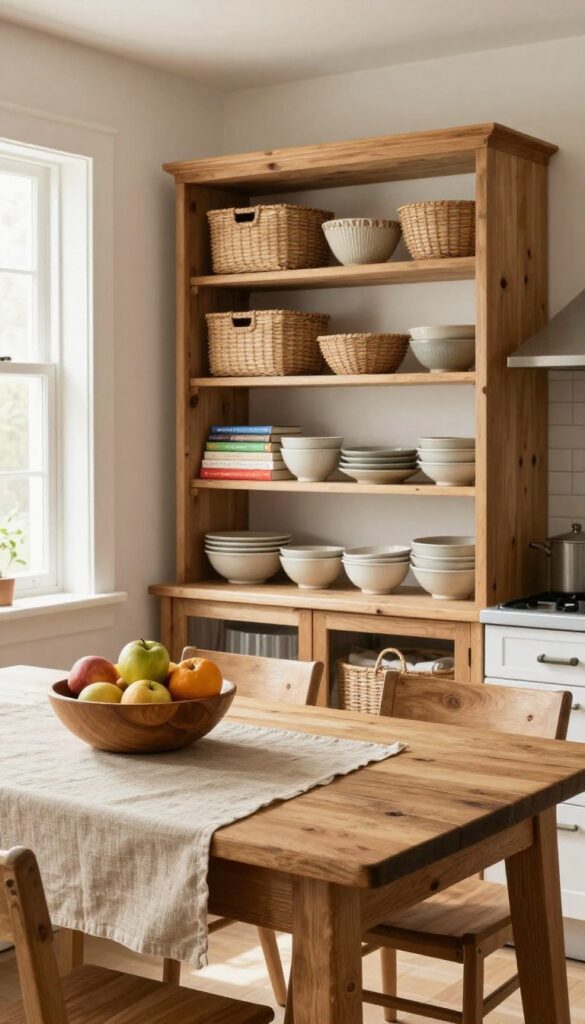
A farmhouse table with built-in open shelving underneath is a smart way to blend dining and storage in one piece. Instead of a solid base, the shelves keep everyday items like napkins, cookbooks, or serving bowls within arm’s reach. This setup works especially well in smaller kitchens where every inch of storage counts, and it adds that cozy, lived-in look without feeling cluttered.
Choose a farmhouse-style table with a built-in shelf or two underneath. Perfect for stacking baskets of napkins, storing cookbooks, or keeping a few serving dishes within easy reach. The open design keeps things visible and accessible, so you can grab what you need without leaving your seat.
Plus, it’s a natural spot to display a few decorative pieces—think a small vase or a stack of linen napkins—to tie the whole look together.
Best Materials
Go for solid wood like oak or pine for the tabletop to get that authentic farmhouse feel. The shelf base can be painted white or a soft gray to keep the piece feeling light and airy. If you’re worried about durability, look for a finish that’s easy to wipe down—kids and dinner spills won’t stand a chance.
Storage Tip
Use woven baskets or fabric bins on the shelves to hide odds and ends while still keeping them handy. For a more open look, stack a few colorful cookbooks or ceramic serving pieces. Just avoid overfilling—leave some breathing room so the table doesn’t feel weighed down.
Finishing Touch
Add a simple runner or a set of placemats to define the dining area and soften the wood surface. A low centerpiece—like a wooden bowl filled with fruit or a cluster of candles—keeps the view clear while adding warmth. The result is a table that feels both practical and inviting.
3. Wall-Mounted Drop-Leaf Table with Floating Shelves
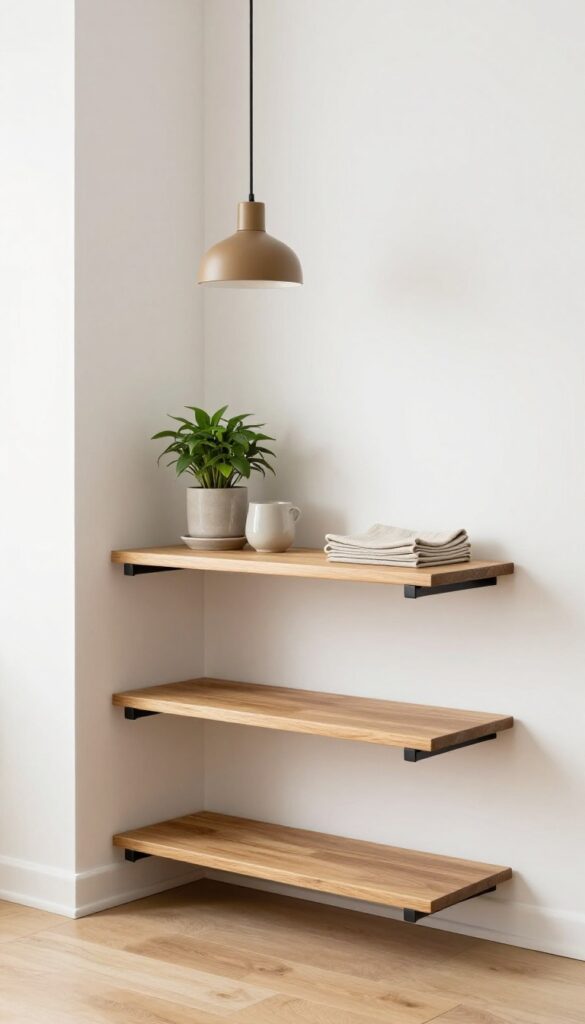
When every inch of floor space counts, a drop-leaf table attached to the wall is a game-changer. It folds flat when you need to scoot past, then opens up for a quick breakfast or homework session. Floating shelves above keep dishes and glasses within arm’s reach, turning a bare wall into a mini dining station that feels intentional, not makeshift.
This setup works best in narrow kitchens or eat-in nooks where a traditional table would block traffic. Choose a table with a finish that matches your cabinetry or adds a warm wood tone for contrast. The shelves above should sit 12–18 inches above the tabletop so you can grab a mug without bumping your head.
Style them with everyday ceramics, a small plant, and a stack of linen napkins for a look that’s both practical and polished.
Best Materials
Solid wood or a high-quality veneer in oak or walnut gives the table durability and warmth. For the shelves, go with the same wood or a painted finish that ties into your wall color. Metal brackets in matte black or brass add an industrial touch that feels intentional.
Layout Tip
Mount the table at standard dining height (28–30 inches) so chairs slide under easily. Leave at least 36 inches of clearance in front for pulling out chairs. If the table is in a hallway, fold it down when not in use to keep the path open.
Finishing Touch
Add a small pendant light or a swing-arm sconce above the table to define the zone. A warm bulb around 2700K makes the space feel cozy, even when the table is just a narrow ledge.
4. Corner Breakfast Nook with Corner Cabinets
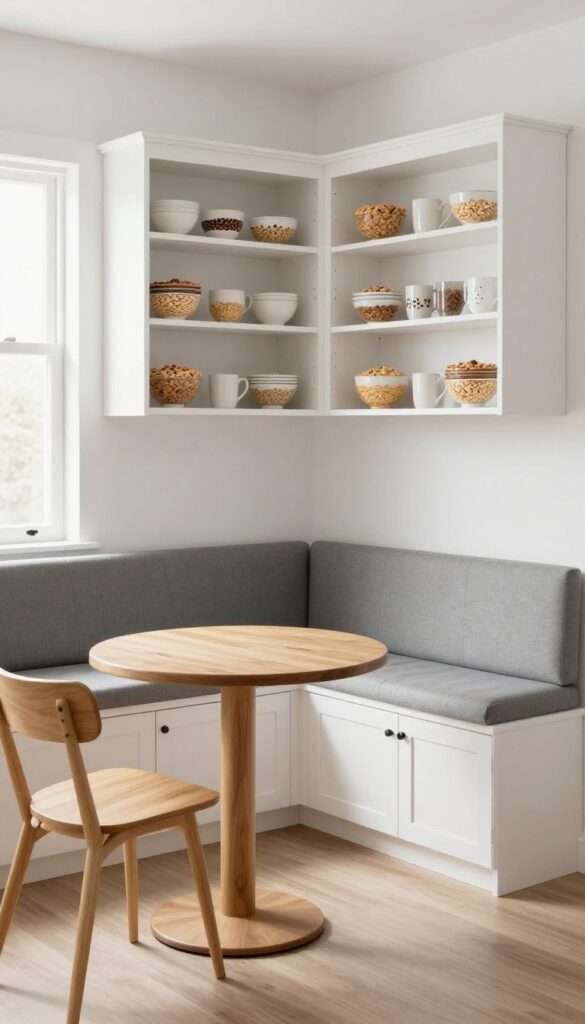
That awkward corner where two counters meet often ends up as a catch-all for mail, keys, or random clutter. Instead of letting it go to waste, turn it into a cozy breakfast nook with built-in seating and overhead cabinets. The L-shaped bench tucks neatly into the corner, while cabinets above keep mugs, cereal boxes, and small appliances within easy reach but out of sight.
It’s a storage-smart solution that makes the most of every inch without sacrificing style.
A corner breakfast nook with corner cabinets is the ultimate space-saving move for busy families. The built-in bench creates a defined dining spot that feels intimate and intentional, while the cabinets above eliminate counter clutter. Choose open shelves for frequently used items or closed doors for a cleaner look.
Add cushions in a washable fabric for comfort, and you’ve got a spot that works for quick breakfasts, homework, or evening tea.
Layout Tip
Measure the corner carefully before building. The bench should be deep enough for comfortable seating—about 18 to 20 inches—and the table should leave at least 12 inches of legroom. A round or pedestal table makes it easier to slide in and out of the bench.
Storage Tip
Use the corner cabinets for items you reach for daily, like coffee mugs, cereal bowls, or a toaster. Install pull-out shelves or lazy Susans to make everything accessible. If you opt for open shelves, stack items by color or material for a styled look.
Finishing Touch
Add a small pendant light or a swing-arm lamp above the table to define the nook. A patterned cushion or a few throw pillows in a durable fabric like outdoor canvas add comfort and personality without worrying about spills.
5. Round Pedestal Table with a Lazy Susan Center
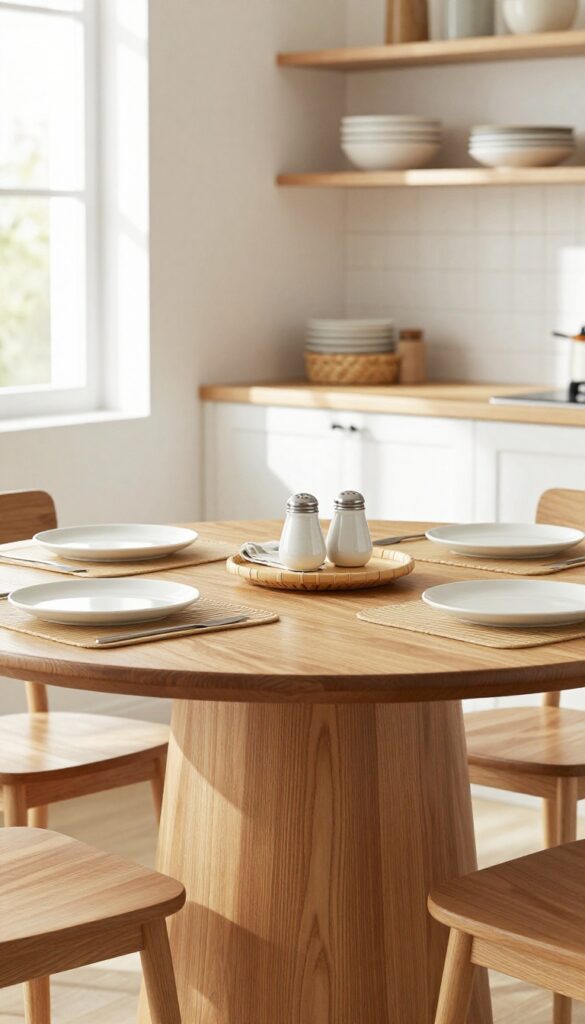
A round pedestal table is a smart choice for busy kitchens. Without bulky legs, you can squeeze in extra chairs when needed, and the open base makes the space feel airier. Adding a lazy Susan in the middle turns the table into a self-serve station—condiments, napkins, and salt and pepper stay within easy reach, cutting down on clutter during meals.
This setup works especially well in compact eat-in kitchens or breakfast nooks. The pedestal base allows for flexible seating, and the lazy Susan keeps everyday essentials organized. Choose a table with a warm wood or painted finish to tie into your kitchen's color scheme.
For a cohesive look, match the lazy Susan material to your tabletop or go with a contrasting ceramic or acrylic piece for visual interest.
Best Materials
Solid wood pedestal tables (like oak or walnut) bring warmth and durability, while a painted white or navy finish can brighten a darker corner. For the lazy Susan, consider a bamboo or acacia wood insert for a natural feel, or a clear acrylic one for a modern, almost invisible organizer. Metal pedestal bases (brass or black) add an industrial touch that pairs well with mixed materials.
Layout Tip
Place the table in the center of the eating area, leaving at least 36 inches of clearance on all sides for chairs and traffic flow. A round table works well in square or narrow rooms—just ensure there's enough space to pull out chairs comfortably. If the table is near a wall, consider a half-round or drop-leaf pedestal table for flexibility.
Storage-smart Finishing Touch
Maximize the lazy Susan's function by using small, stackable containers for sugar packets, sweeteners, and toothpicks. A two-tier lazy Susan doubles storage for oils, vinegars, and spices. Keep the centerpiece minimal—a small vase of fresh herbs or a salt cellar—so the table stays organized and visually clean.
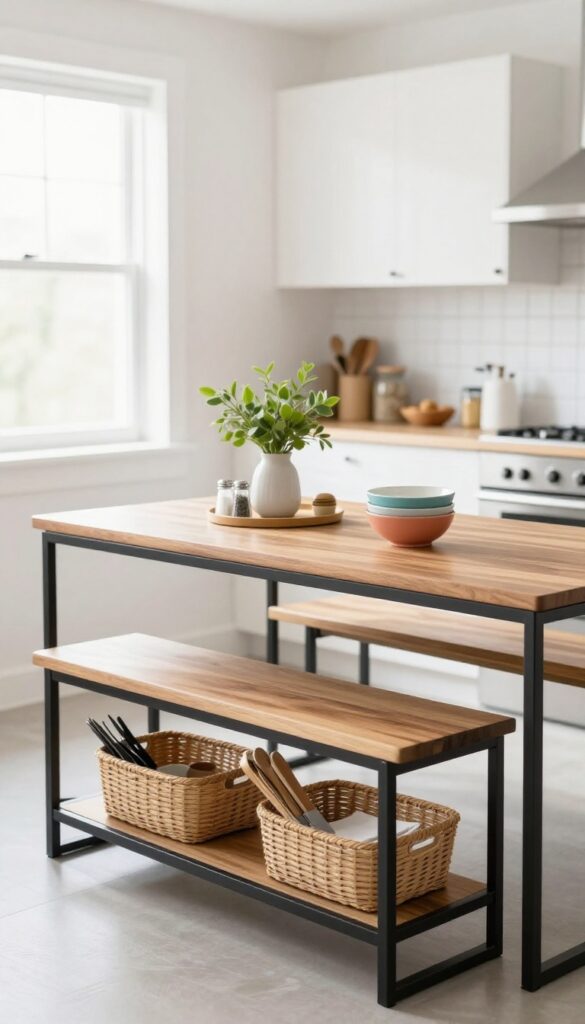
6. Bench Seating with Storage Baskets Underneath
Swapping out individual chairs for a long bench instantly changes the feel of a kitchen eating area. It creates a more casual, communal vibe—perfect for families who eat together every day. The real win here is the storage potential: woven baskets tucked under the bench keep essentials close but out of sight, so the space stays tidy without feeling sterile.
A bench lined with baskets does double duty as seating and storage. It’s especially handy in a kitchen where every square inch counts. The baskets can hold kids’ bibs, placemats, napkins, or even small toys, making cleanup a breeze.
Plus, the bench itself encourages a cozy, diner-style look that feels inviting rather than formal.
Best Materials
Go for a solid wood bench—oak or pine in a warm stain—to anchor the space. Pair it with natural seagrass or water hyacinth baskets for texture. If your kitchen leans modern, try a sleek white bench with black metal legs and dark woven baskets for contrast.
Layout Tip
Place the bench against a wall or under a window to maximize floor space. Leave enough room for the baskets to slide out easily—about 6 inches of clearance in front. For a longer table, use a bench on one side and chairs on the other to keep the layout balanced.
Storage Strategy
Assign each basket a category: one for everyday placemats, another for cloth napkins, and a third for kids’ art supplies or small toys. Label the baskets with chalkboard tags or woven labels so everyone knows where things go. This system makes tidying up a quick, no-think task.
7. Bar Cart as a Mobile Kitchen Island
A bar cart isn't just for cocktails anymore. Parked right next to your eating area, it becomes a flexible extra surface that rolls wherever you need it. Think of it as a mini kitchen island on wheels—perfect for small spaces or open layouts where a permanent island would feel cramped.
Load it with the stuff your family reaches for daily, and you'll wonder how you ever managed without it.
The beauty of a bar cart is its mobility. When you're prepping breakfast, wheel it closer to the counter. During meals, tuck it beside the table for easy access to napkins, condiments, or water glasses.
After dinner, roll it against the wall to free up floor space. Choose a cart with two or three tiers to maximize vertical storage, and look for one with a sturdy frame that can handle a bit of weight. A butcher-block top adds prep space, while a metal or acrylic design keeps the look airy.
What To Stock
- Keep it practical: coffee mugs, cereal bowls, small plates, and a basket of snacks like granola bars or fruit. Use the lower shelf for bulkier items like a toaster or a small blender. Add a tray for corralling salt, pepper, and napkins so everything stays tidy.
- If you have kids, store their cups and bowls on the bottom tier where they can reach them.
Styling It Right
- Treat the cart as a decor moment, not just storage. Layer in a small plant, a wooden cutting board, or a ceramic pitcher for visual warmth. Stick to a neutral base—white, black, or natural wood—then add a pop of color with a tea towel or a set of colorful mugs.
- Keep the top surface mostly clear so it still functions as prep space.
Best Placement
- Slide the cart next to the kitchen table or an island. In a galley kitchen, park it at the end of the counter to create a pseudo-island. Make sure it doesn't block traffic flow—leave at least 36 inches of walking space around it.
- If your eating area is tight, a narrow cart (12–18 inches wide) fits in even the smallest nook.
8. Window Seat with Lift-Up Storage
A window seat is one of those features that instantly makes a kitchen eating area feel more inviting. But when you add hidden storage under the cushion, it becomes a powerhouse of practicality. The hinged top lifts to reveal a deep compartment perfect for stashing bulky items that clutter up your cabinets.
It’s a cozy nook for breakfast and a secret stash for table linens, all in one.
The key to making this work is choosing a durable fabric for the cushion that can handle daily use and occasional spills. A performance velvet or indoor-outdoor fabric in a warm neutral keeps it looking polished. Paint the seat frame the same color as your trim or cabinetry for a built-in look, or go with a contrasting shade to make it a focal point.
Add a few toss pillows in complementary patterns to soften the space and encourage lingering.
Best Materials
- For the seat base, plywood or MDF with a sturdy frame is ideal. Use marine-grade plywood if moisture is a concern near the window. The cushion should be at least 4 inches thick with high-density foam wrapped in batting for comfort.
- Choose a fabric with a high rub count (over 30,000) for longevity.
Storage Tip
- Organize the interior with shallow bins or dividers so items don’t become a jumbled mess. Store rarely used items like holiday platters or extra serving bowls. For easy access, keep tablecloths and placemats rolled and tied with fabric straps.
- Add a layer of cedar lining to deter moths and keep linens fresh.
Finishing Touch
Install a small shelf above the window seat for a few cookbooks, a trailing plant, or a collection of ceramic pitchers. This draws the eye upward and makes the seat feel like a designed alcove rather than just a storage box. A plug-in sconce on either side provides task lighting for reading or morning coffee.
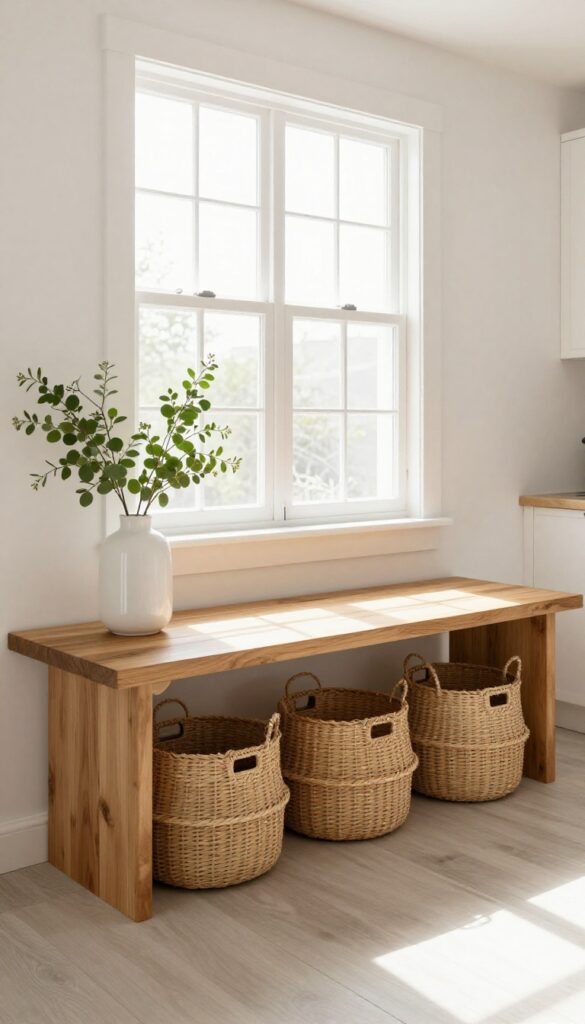
9. Narrow Console Table Behind a Sofa or Bench
That sliver of space behind a dining bench or kitchen banquette often goes unused. But a slim console table tucked right behind the seating turns dead air into a functional landing zone. It’s perfect for setting down serving dishes, water pitchers, or a stack of plates before everyone sits down.
The key is keeping it shallow—no more than 12 inches deep—so it doesn’t eat into walking room.
A narrow console table behind a bench or sofa creates an instant drop zone for mealtime essentials. Use baskets on the lower shelf to corral napkins, cutlery, or placemats so they’re always within reach but out of sight. The top surface can hold a tray for salt and pepper shakers, a small vase, or even a stack of colorful bowls.
This setup works especially well in open-plan kitchens where the dining area doubles as a pass-through. It keeps clutter off the table and gives the room a finished, layered look.
Best Materials
Go for a console with a slim metal frame and a wood or laminate top. A black or brass base keeps the piece light and airy, while a warm oak or walnut top adds texture. Avoid bulky designs—the whole point is to stay out of the way.
Storage Tip
Use woven baskets or slim bins on the shelf to store everyday items like cloth napkins, kid-friendly utensils, or a stack of small plates. Label the baskets if you want an extra tidy look. Keep the top surface mostly clear so it stays ready for serving.
Finishing Touch
Add a small table lamp or a low-profile vase with fresh greenery. The lamp creates a warm glow during evening meals, and the greenery softens the hard edges of the console. Just keep the scale small so nothing blocks the view across the table.
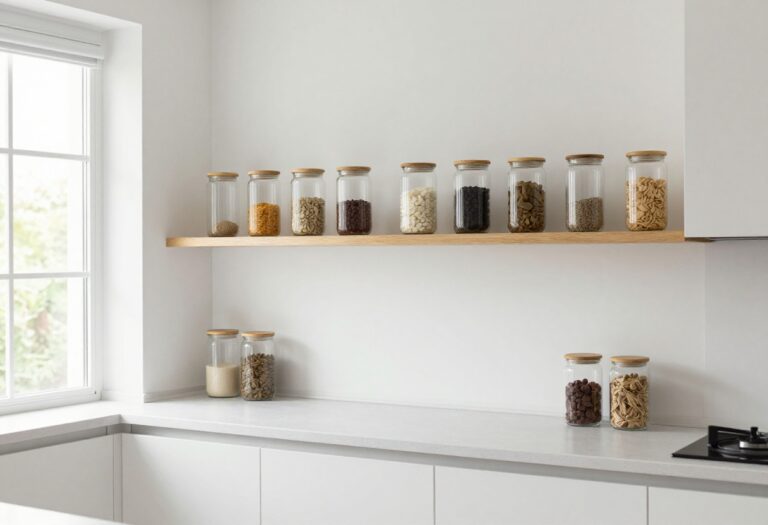
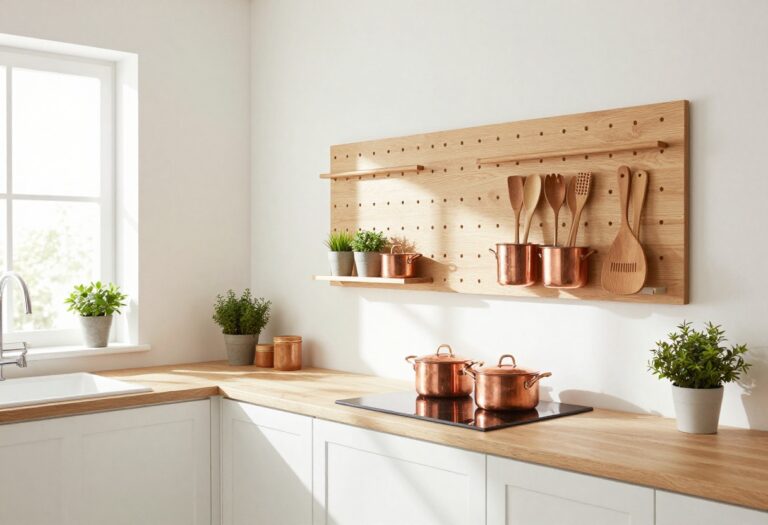
10. Peg Rail on the Wall for Mugs and Utensils
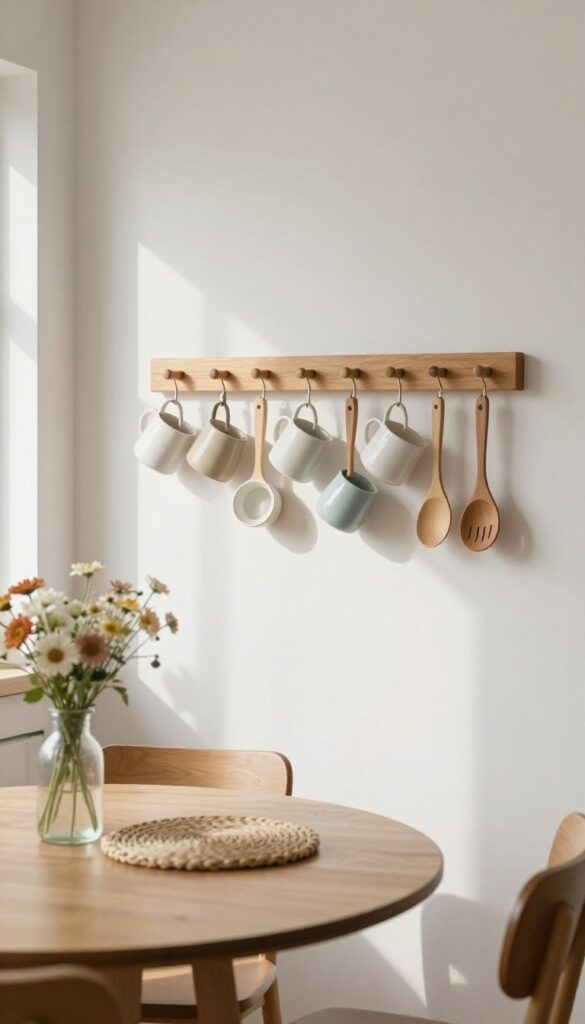
A peg rail does more than just hold things—it changes the whole feel of a wall. Mount one above your eating area, and suddenly you have a display spot that’s both useful and warm. Mugs hang within easy reach, utensils dangle like kitchen jewelry, and that empty stretch of wall becomes a cozy focal point.
It’s the kind of detail that makes a family kitchen feel lived-in without trying too hard.
A peg rail is a simple strip of wood with pegs, mounted horizontally on the wall. It turns vertical storage into a decorative feature. Hang your favorite ceramic mugs, wooden spoons, or small pots directly on the pegs.
The best part? You free up cabinet space while adding texture and color at eye level. Choose a rail that matches your trim or go for a contrasting stain to make it pop.
Place it about 12 to 18 inches above the table so items are easy to grab but don’t interfere with sightlines. This idea works especially well in narrow kitchens where every inch of wall counts. For a cohesive look, stick to a color palette—white mugs with brass pegs, or earthy pottery with black iron.
The rail itself becomes a shelf alternative that feels more casual and approachable.
Best Materials
- Wood is the classic choice—oak, walnut, or pine depending on your kitchen’s finish. For a modern twist, go with a black metal rail and brass pegs. If you prefer a rustic farmhouse vibe, reclaimed wood with iron hooks fits right in.
- The key is contrast: dark pegs against a light wall, or light wood against deep paint. Avoid plastic or overly shiny finishes that can look cheap.
Styling Tip
- Mix hanging items with a small shelf above the rail for extra layers. Place a tiny plant, a salt cellar, or a recipe card on top. Keep the arrangement balanced but not too symmetrical—three mugs on one side, a utensil crock on the other.
- Swap out seasonal mugs or add a small garland during holidays to keep the display fresh.
Small-space Fix
- In a tiny eating nook, a peg rail eliminates the need for a bulky cabinet. Use it to hang everyday items like coffee mugs and measuring spoons. You can even mount a narrow fold-down table beneath the rail and use the pegs to hold kitchen towels or oven mitts.
- It turns a blank wall into a multitasking station without taking up floor space.
11. Fold-Down Table with Built-In Storage Cubby
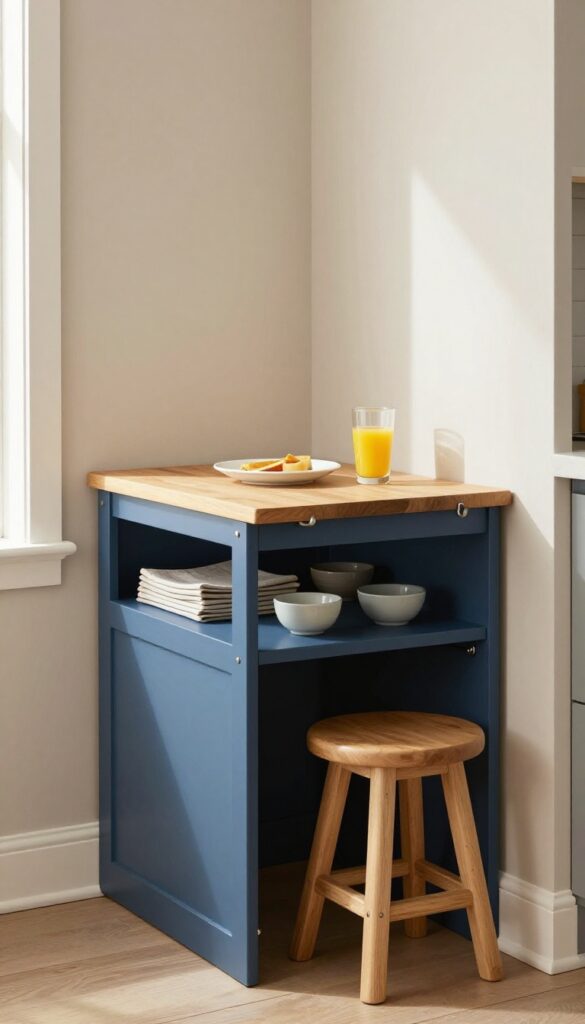
Tight on floor space but still want a spot for quick breakfasts or homework sessions? A fold-down table paired with a built-in cubby unit makes the most of every inch. The table attaches to the wall and folds flat when not in use, while the cubbies below keep essentials like placemats, napkins, and small bowls organized and within reach.
It’s a clever solution that feels intentional and polished, not makeshift.
This setup works especially well in narrow kitchens or breakfast nooks where a full table would feel cramped. The key is to choose a table depth that’s deep enough for plates and glasses but shallow enough to keep the walkway clear. The cubby unit should be the same width as the table for a built-in look.
For a cohesive feel, paint the table and cubbies the same color as the wall or use a contrasting stain to make the unit stand out as a feature.
Best Materials
Solid wood or high-quality plywood gives the table a sturdy feel and stands up to daily use. For the cubbies, consider a durable laminate or painted MDF that’s easy to wipe clean. If you want a warmer look, go with oak or walnut; for a modern vibe, try a matte black or navy finish.
Layout Tip
Mount the table at standard dining height—around 28 to 30 inches from the floor. Leave at least 12 inches of clearance below the table for legroom when seated. Position the cubbies so the top of the unit sits just below the table’s bottom edge, creating a seamless line.
Finishing Touch
Add a small hook or magnetic strip on the side of the cubby unit to hang a few lightweight stools or a dish towel. This keeps everything accessible and off the floor, reinforcing the storage-smart angle without sacrificing style.
12. Crate-Style Shelving Unit as a Table Base
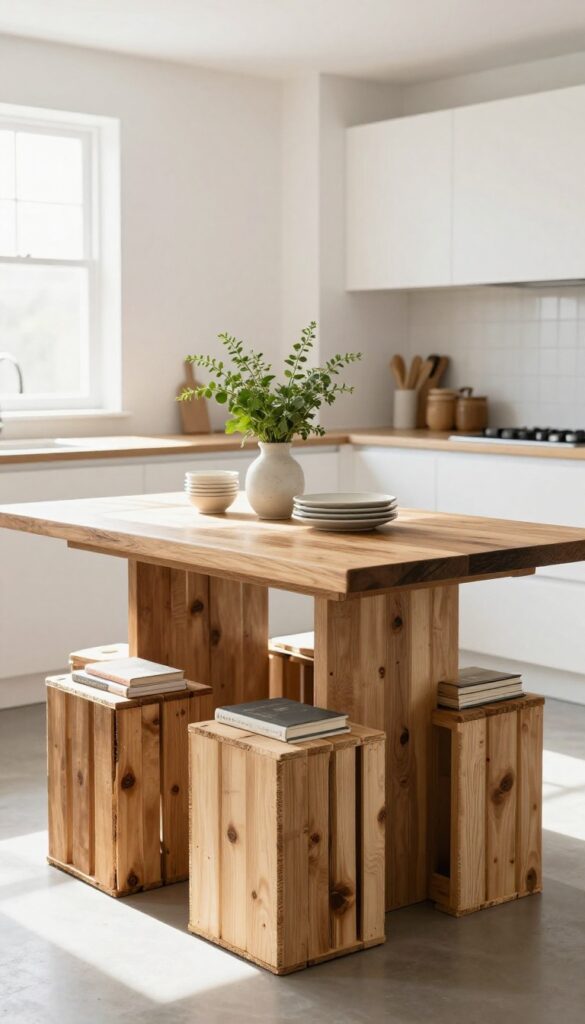
A kitchen table doesn't have to sit on four plain legs. Swap out the standard base for a stack of wooden crates, and you instantly add storage and character. The crates become open cubbies for cookbooks, wine bottles, or extra dishes, while the tabletop above stays clean and functional.
It's a clever way to bring rustic charm into a space that needs both style and practicality.
This idea works especially well in eat-in kitchens or breakfast nooks where floor space is tight. By using the crates as a base, you eliminate the need for a separate storage unit or hutch. The crates can be arranged in a square or rectangle to support a standard tabletop, or stacked in a longer row for a bench-style setup.
Either way, the look is casual and inviting, perfect for family meals.
Best Materials
Go with unfinished pine crates for a light, airy feel, or opt for reclaimed wood crates if you want more texture and warmth. The tabletop should contrast slightly—a solid butcher block or a painted wood top in white or navy works well. Avoid glass or glossy surfaces, as they clash with the rustic vibe.
Storage Tip
Use the crates to store items you reach for often. Keep cookbooks and a small vase of herbs on the top layer, then tuck napkins, placemats, or extra plates in the lower cubbies. For a cohesive look, stick to a color palette for the items inside—neutral linens and ceramic dishes keep things tidy.
Small-space Fix
If your eating area is compact, use just two crates as a base for a narrow table. Or stack crates in an L-shape to fit into a corner. The open storage helps the space feel less cluttered because everything has a designated spot.
13. Magnetic Knife Strip on the Wall Near the Table
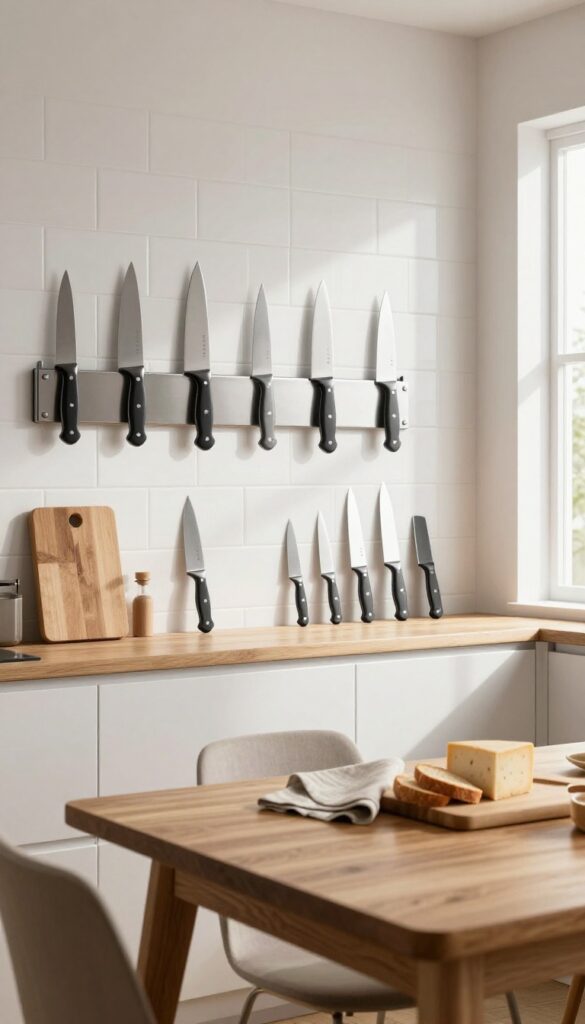
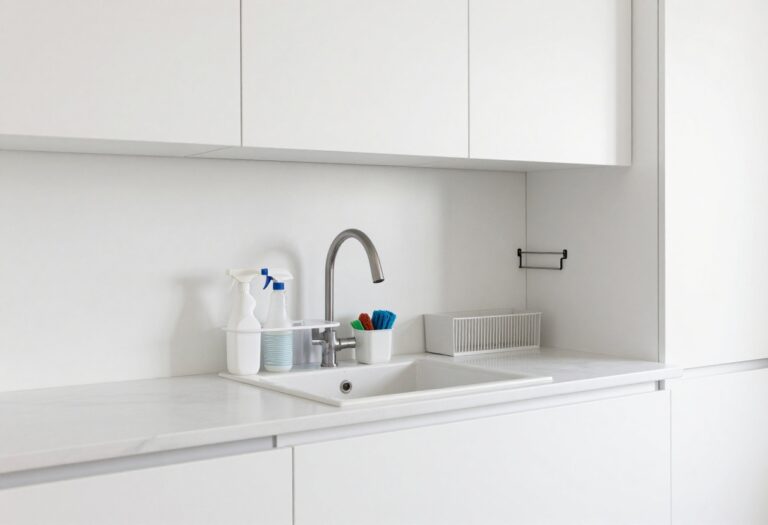
A magnetic knife strip mounted on the wall right next to your eating area is one of those small tweaks that changes how you use the space. It keeps sharp blades off the counter, freeing up precious work surface, and puts them within arm's reach when you're slicing bread, cheese, or fruit at the table. The look is clean and modern, and it adds a subtle industrial edge that pairs well with wood or neutral tones.
Mounting a magnetic strip near the table turns knife storage into a functional design feature. It eliminates the need for a bulky knife block and makes it easy to grab a blade without leaving your seat. Choose a strip that matches your hardware finish—brass, matte black, or stainless steel—to tie the look together.
Position it at a height that's easy to reach from the table but out of the way of kids if needed. This idea works especially well in open-plan kitchens where the eating area is part of the cooking zone.
Best Placement
- Mount the strip on the wall closest to where you typically sit or serve food. If your table is against a wall, place it directly above or beside the table. For a kitchen island with seating, attach it to the side facing the stools.
- Keep it at least 12 inches above the counter to avoid accidental bumps.
Styling Tip
Pair the magnetic strip with a small wooden cutting board and a linen napkin nearby to create a mini serving station. The contrast of metal against natural textures softens the industrial feel and makes the area look intentional.
Material And Finish
Opt for a stainless steel or brass strip with a strong magnet. A wooden-backed strip can add warmth if you prefer a less industrial look. Match the finish to your cabinet hardware or light fixtures for a cohesive design.
14. Hanging Pot Rack Over a Small Table

High ceilings can make a small kitchen table feel lost. Instead of leaving all that vertical space empty, put it to work with a hanging pot rack. It’s a clever way to store cookware while adding a warm, professional-kitchen vibe to your eating area.
The best part? It frees up lower cabinets so you can finally organize dishes and pantry staples without playing Tetris.
A hanging pot rack does double duty: it’s both storage and decor. Choose a round or rectangular rack that fits the footprint of your table below. Hang it low enough to reach comfortably but high enough to avoid bumping heads.
Stainless steel or black iron racks work well in most kitchens. Arrange pots and pans by size, with hooks for ladles and spatulas. The visual weight overhead anchors the table and makes the whole area feel intentional.
Best Materials
Go for matte black or brushed nickel if your kitchen has modern finishes. Wrought iron or copper adds rustic warmth. Avoid shiny chrome—it shows fingerprints and can feel too flashy for a casual eating area.
Storage Tip
Use the rack for items you grab daily: frying pans, saucepans, and a colander. Reserve deep pots for lower cabinets. This keeps the overhead look curated and clutter-free.
Lighting Note
If your table doesn’t have a pendant light, consider a rack with integrated hooks for a small lamp or hang a simple cord light from the center. It creates a cozy glow right where you eat.
15. Under-Table Drawer for Flatware and Napkins
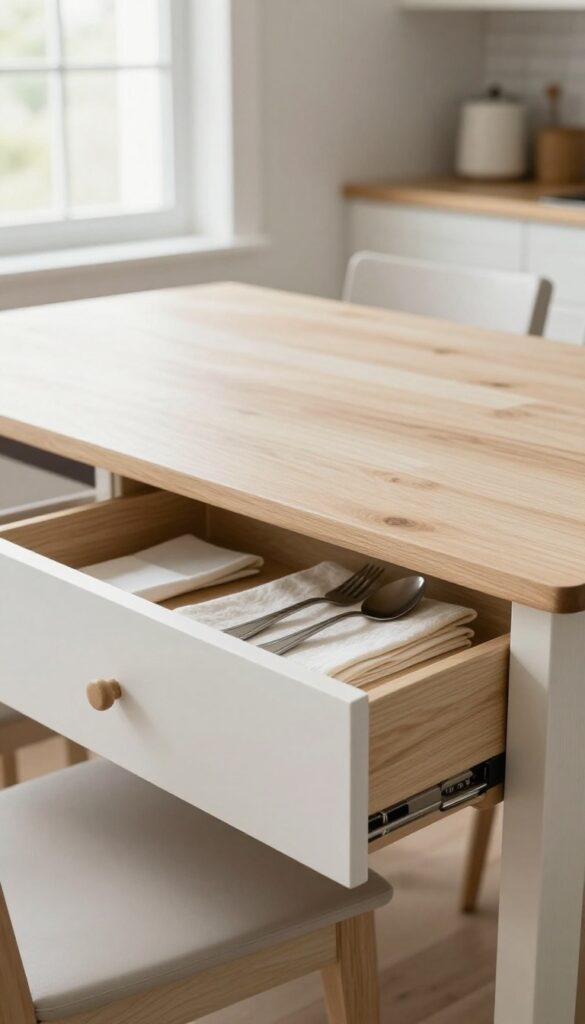
You know that moment when everyone’s seated and someone realizes the forks are still in the kitchen drawer? An under-table drawer fixes that elegantly. This built-in solution tucks a shallow drawer right under the tabletop, keeping flatware, napkins, and placemats within arm’s reach but completely hidden when not in use.
It’s a practical upgrade that makes everyday meals feel more effortless and polished.
This idea turns your dining table into a self-contained dining station. The drawer is typically installed on the end or side of a rectangular table, accessible from one or both sides. It works best with a table that has a solid apron or a thick top to accommodate the drawer mechanism.
The result is a clean, uncluttered tabletop and a seamless way to set the table in seconds.
Best Materials And Finishes
- Match the drawer’s wood or finish to your table for a built-in look. For a modern farmhouse vibe, use a white oak drawer with a matte lacquer. In a more contemporary space, a sleek walnut or black-stained drawer adds contrast.
- Consider soft-close slides for a quiet, premium feel. If your table is vintage, replicate the original wood tone or paint the drawer in a complementary color like navy or sage.
Storage Organization Tip
- Use adjustable dividers or small trays inside the drawer to keep flatware sorted. Store napkins flat in a slim organizer, and roll placemats for easy grabbing. Keep heavier items like serving spoons toward the back.
- The drawer depth is usually 2–3 inches, so choose compact, stackable organizers that maximize every inch.
Styling And Placement Idea
- Place the drawer on the side of the table where the host usually sits, so they can easily pass out utensils. If the table is against a wall, install the drawer on the accessible long side. For a round table, a single drawer on one side works well.
- Add a small cutout or pull handle that blends with the table’s design—brass or leather pulls add a subtle, stylish touch.
FAQ
How can I add storage to a small kitchen eating area without making it feel cramped?
Use vertical space with wall-mounted shelves or peg rails. Choose furniture with built-in storage, like benches with drawers or tables with shelves. Keep the color palette light to maintain an open feel.
What type of seating works best for a storage-smart kitchen nook?
Built-in benches with under-seat storage are ideal. They maximize seating and hide clutter. If space is tight, consider stools that can tuck under the table when not in use.
Can I use open shelving in a kitchen eating area without it looking messy?
Yes, by grouping items in baskets or bins. Stick to a cohesive color scheme and display only what you use regularly. Keep frequently used items accessible and store less attractive ones in closed containers.
How do I make a drop-leaf table feel like a permanent dining spot?
Add a stylish tablecloth or runner, and place a small centerpiece like a vase or candle. Use comfortable chairs that can be pushed aside when the table is folded. Wall art or a mirror above helps anchor the space.
What are some budget-friendly storage ideas for a kitchen eating area?
Repurpose a bar cart or a small bookshelf as a storage unit. Use baskets from thrift stores under a bench. Install a simple peg rail or magnetic strip.
DIY crate shelving is also affordable and charming.
Conclusion
Creating a kitchen eating area that's both stylish and storage-smart doesn't require a major renovation. With a few thoughtful additions—like a banquette with drawers or a wall-mounted table—you can transform your space into a functional hub for family meals.
The key is to choose pieces that serve double duty and keep everyday items within easy reach. Your family will appreciate the cozy, organized spot, and you'll love how much easier mealtime cleanup becomes.