13 Kitchen Niche Ideas That Turn Small Walls Useful
Kitchens often have those odd little wall spaces—too narrow for cabinets, too shallow for shelves. Instead of ignoring them, you can turn these niches into some of the most useful spots in your kitchen.
The best part? Most of these ideas are simple enough to tackle over a weekend, giving your kitchen a fresh look without a full renovation.
Whether you want extra storage, a place to show off your favorite pieces, or just a way to make the room feel more complete, these 13 kitchen niche ideas will help you make every inch count.
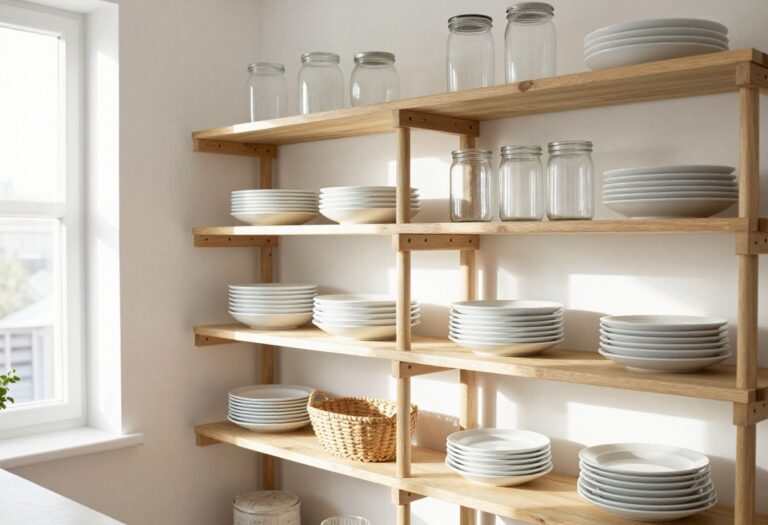
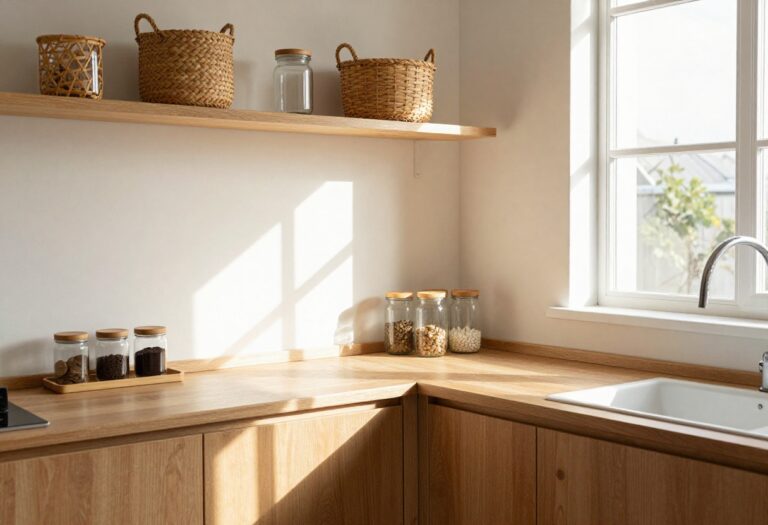
1. Floating Shelf for Daily Dishware
A shallow kitchen niche is the perfect spot for a slim floating shelf. Instead of letting that small recess go to waste, turn it into a dedicated home for your everyday plates, bowls, and mugs. The key is keeping things tidy—matching dishware stacks create a clean, intentional look that feels both practical and polished.
This idea works best in a niche that's not too deep—just enough to hold a standard dinner plate. A single floating shelf keeps the visual weight light and makes grabbing a plate for breakfast effortless. Choose a shelf material that complements your countertops or backsplash for a seamless feel.
White or cream dishware keeps the look airy, while earthy tones add warmth. Stack plates vertically or in small piles, and use the front edge to hang mugs from small hooks for extra function.
Best Materials
Go with a solid wood shelf stained to match your cabinets or a sleek metal shelf for a modern touch. If your niche is near the stove, opt for heat-resistant materials like stainless steel or treated wood. A matte finish hides fingerprints better than glossy.
Shelf Styling Tip
Keep stacks uniform—same color, same size. Add a small plant or a ceramic salt cellar at one end for a soft, lived-in feel. Avoid overcrowding; leave a little breathing room so the shelf looks curated, not cluttered.
Budget-Friendly Swap
- No floating shelf? Use a sturdy wooden cutting board or a repurposed piece of butcher block cut to size. Sand and seal it, then mount with simple L-brackets hidden underneath.
- Costs under $20 and looks custom.
2. Spice Rack Within Arm’s Reach
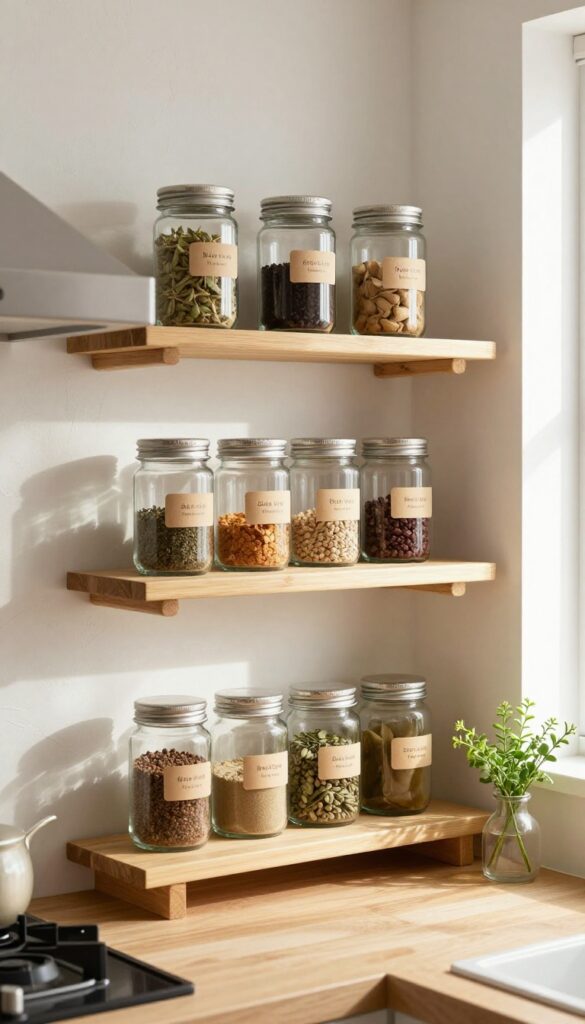
That skinny gap between the counter and the stove hood, or the shallow recess beside the fridge—it’s too small for cabinets but perfect for a spice rack. Instead of digging through a drawer while your onions burn, you can grab oregano or cumin in one smooth motion. The key is to make it feel intentional, not like an afterthought.
With the right shelves or tins, that little niche becomes a functional, stylish focal point that saves you time and counter space.
A narrow niche can hold a surprising amount of spice jars when you use vertical space wisely. Think tiered shelves that let you see every label at a glance, or magnetic tins that stick to a metal strip mounted on the back wall. The goal is to keep your most-used spices within easy reach while adding a bit of visual interest to an otherwise blank spot.
This works especially well in galley kitchens or any layout where every inch counts. Plus, it’s a weekend-friendly project—no contractor needed, just a few shelves and some organization.
Best Materials
- Go with warm wood shelves (like bamboo or oak) to soften the look, or sleek metal for an industrial vibe. Clear glass jars with matching labels keep things uniform and easy to scan. If you prefer a cleaner look, try magnetic tins in a matte finish—they’re space-saving and modern.
- Avoid plastic; it feels cheap and can trap odors.
Layout Tip
Mount shelves at slightly different heights to accommodate tall spice bottles. Place the most-used spices (salt, pepper, garlic powder) at eye level, and less frequent ones higher or lower. If the niche is very shallow, use a single magnetic strip instead of shelves—it’s a game-changer for tight spots.
Styling Detail
Add a small LED strip under the top shelf to light up the jars—it makes the niche feel built-in and polished. Stick to a color theme for your labels: black and white for a crisp look, or copper and cream for warmth. A tiny plant or a wooden spoon on the top shelf adds a finishing touch without clutter.
3. Coffee Station With a Compact Footprint
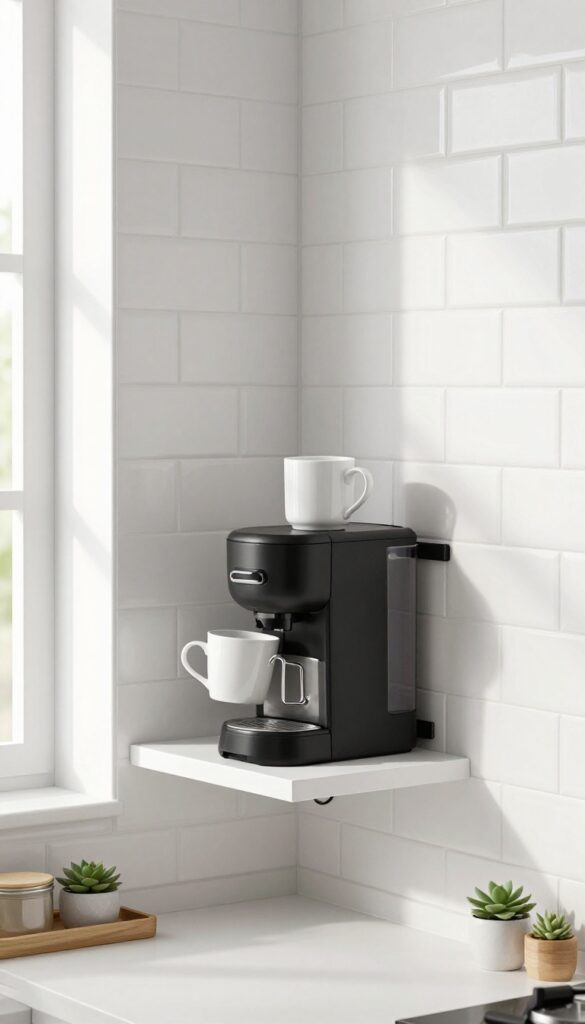
A kitchen niche doesn't have to be large to be useful. Even a narrow, shallow recess can become a dedicated coffee station that saves counter space and makes your morning routine feel intentional. By fitting a coffee maker, a few mugs, and canisters into the niche, you create a compact but complete coffee corner that looks custom and feels efficient.
The key is keeping everything within arm's reach without cluttering the surrounding countertops.
This idea works especially well in galley kitchens or small apartments where every inch counts. The niche acts like a built-in coffee bar, giving you a designated spot for brewing without sacrificing valuable prep area. To make it feel polished, choose a coffee maker that fits snugly and leave a little breathing room on either side for steam.
Stack mugs on a small shelf or use a rail underneath the niche to hang them, freeing up the base for canisters or a tray. A small hook underneath the niche is a clever touch for hanging cups, adding both function and a café-inspired look.
Best Colors
Stick with a cohesive palette that blends with your kitchen. White or light gray niches keep the space airy, while a dark navy or charcoal backdrop makes the coffee station pop. If your niche is shallow, a glossy tile backsplash inside it reflects light and makes the area feel larger.
Storage Tip
- Use the vertical space. Install a narrow shelf above the coffee maker for canisters or a small plant. Below, add a magnetic strip on the wall inside the niche for storing metal scoops or a bottle opener.
- Every inch counts, so think about what you reach for most and keep it visible.
Finishing Touch
Add a small under-cabinet light or a puck light inside the niche. It makes the coffee station feel like a dedicated zone and helps you see what you're doing early in the morning. A warm LED strip along the top edge adds a soft glow that elevates the whole kitchen.
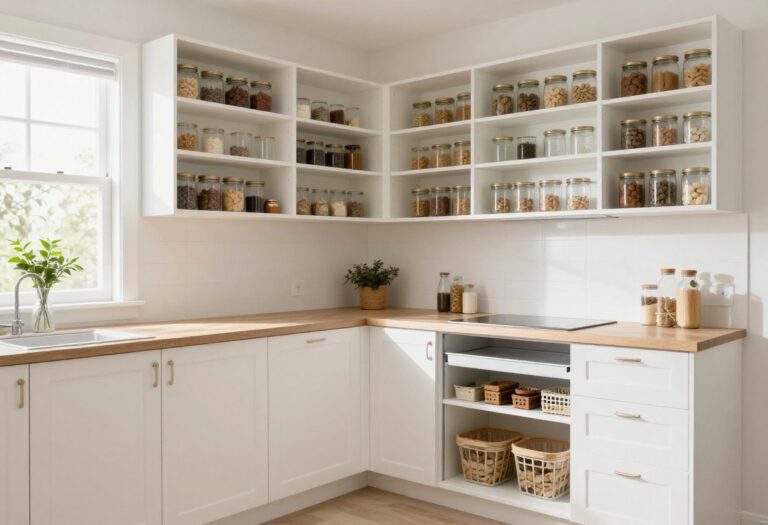
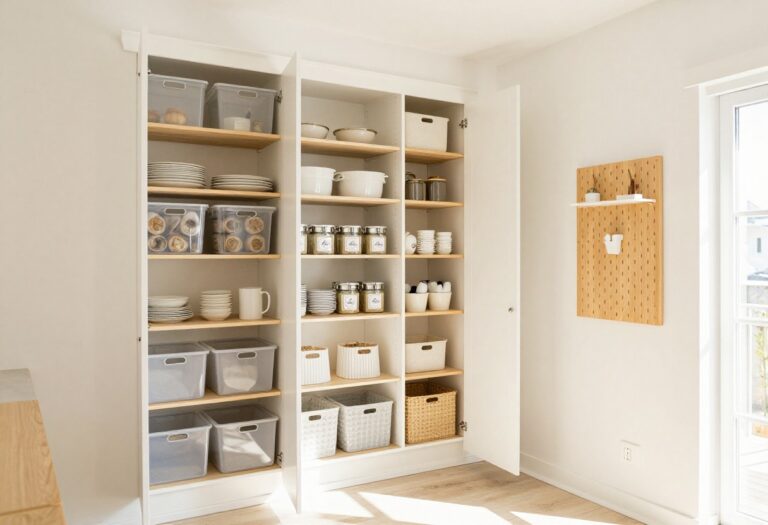
4. Open Pantry for Dry Goods
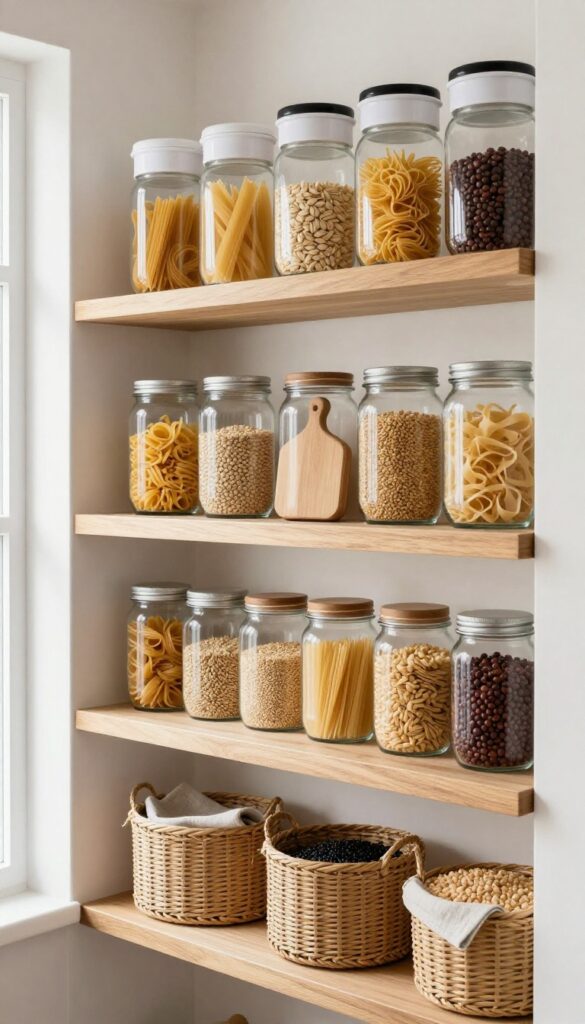
A deeper kitchen niche can become a mini pantry that feels more like a curated market display than a storage closet. By swapping closed cabinets for open shelving and using uniform glass jars and baskets, you turn dry goods into part of the room's decor. The look is clean, intentional, and surprisingly calming—everything has a place, and you can see exactly what you have at a glance.
For a weekend-friendly refresh, start by clearing out the niche and measuring the depth. Install sturdy floating shelves or a simple wood shelf system that can hold the weight of glass jars. Stick to a neutral palette for the containers—clear glass with white or black lids, plus natural woven baskets for bulkier items like potatoes or onions.
Arrange jars by category: pastas together, grains together, snacks on lower shelves for easy grabbing. The visual rhythm of matching containers turns a purely functional spot into a design feature.
Best Materials
- Go with clear glass jars for most dry goods—they keep food fresh and create a uniform look. For items that need darkness (like flour or coffee), use opaque ceramic canisters with airtight seals. Add a few woven or seagrass baskets on the bottom shelf for larger bags of rice or root vegetables.
- The mix of glass and natural textures keeps the shelf from feeling too sterile.
Shelf Styling Tip
- Create visual breaks by grouping jars in odd numbers and leaving a little breathing room between clusters. Place taller jars in the back or on upper shelves, shorter ones in front. Tuck a small wooden cutting board or a stack of linen napkins between jars to soften the look.
- A tiny plant or a salt cellar can add a finishing touch without cluttering the view.
Budget-Friendly Swap
- If matching jars feel pricey, reuse pasta sauce or pickle jars—just remove labels and soak off the glue. Spray-paint the lids in a single color (like matte black or brushed brass) to tie them together. Mix in thrifted glass bottles for vinegar or oil.
- The result looks intentional without costing much.
5. Herb Garden With Natural Light
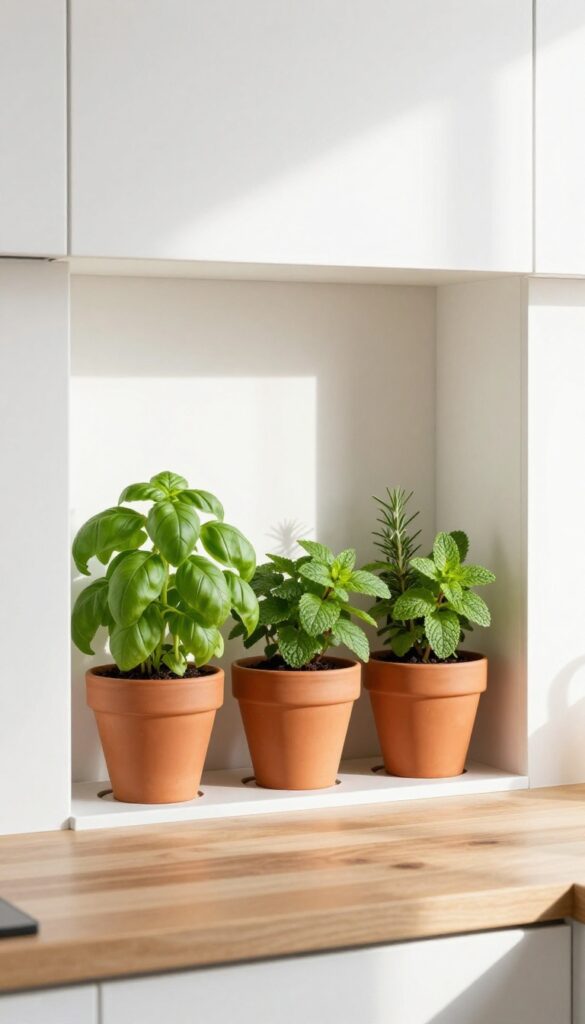
A kitchen niche near a window is prime real estate for something alive and useful. Instead of letting that spot collect random bottles or dust, turn it into a mini herb garden. Small pots of basil, mint, or rosemary not only add a pop of green but also give you fresh flavors right at your fingertips.
It's a simple weekend project that instantly makes your kitchen feel more vibrant and intentional.
If your niche catches natural light, it's practically begging for herbs. This idea works best in a shallow niche where you can line up a few small pots or a long planter. Choose herbs you actually cook with—basil for pasta, mint for drinks, rosemary for roasted veggies.
The visual effect is fresh and lively, and the practicality is unbeatable: you'll never forget to buy herbs again. Plus, the scent of fresh herbs every time you walk by is a subtle but lovely bonus.
Best Herbs To Start
- Stick with hardy, sun-loving herbs that thrive indoors. Basil, mint, chives, and oregano are forgiving choices that grow quickly. Rosemary and thyme need a bit more light but do well in a south-facing niche.
- Avoid dill or cilantro unless you're prepared for frequent replanting—they're more finicky. Start with two or three pots so the niche doesn't feel crowded, and rotate them if they start to stretch toward the light.
Pot And Planter Ideas
- Uniform pots in a neutral tone—like terracotta, matte white, or soft sage—keep the look cohesive. If your niche is narrow, a single long planter with drainage holes works better than individual pots. Add a drip tray underneath to catch water.
- For a budget-friendly swap, use clean tin cans or small ceramic ramekins, just drill a drainage hole. Grouping pots at different heights using small risers adds visual interest without taking up more space.
Care And Maintenance Tip
- Herbs need consistent moisture but hate soggy roots. Water when the top inch of soil feels dry, and make sure the niche isn't drafty. Rotate the pots every few days so all sides get light.
- Trim leaves regularly to encourage bushy growth—plus, you get to use them in dinner. If the niche gets direct afternoon sun, consider a sheer curtain to prevent scorching. A small watering can stored nearby makes daily care effortless.
6. Cutting Board and Tray Storage
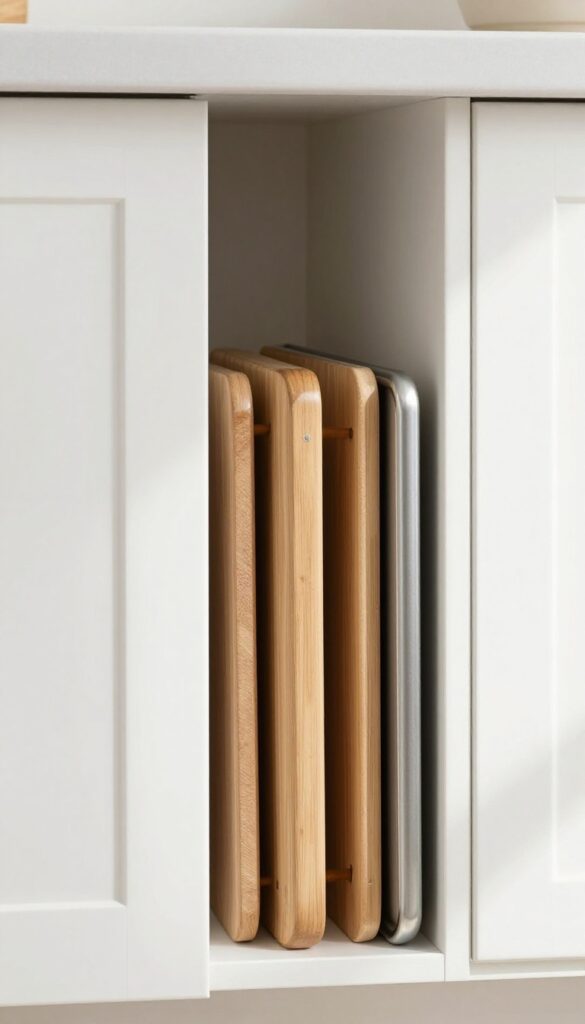
If your kitchen feels cluttered every time you reach for a baking sheet, a narrow niche might be your new best friend. Vertical storage for cutting boards, trays, and sheet pans keeps them accessible without stacking or sliding. It turns a slim gap between cabinets or beside the fridge into a tidy, grab-and-go station.
The best part? It looks clean and intentional, not like you just shoved things in a corner.
A vertical niche for cutting boards and trays is a weekend-refresh project that instantly upgrades your kitchen's functionality. You don't need a full renovation—just a shallow recess in the wall or between studs, fitted with simple wooden dividers. The dividers keep everything upright and separated, so you can slide out a board without disturbing the rest.
This idea works especially well near the prep zone or beside the stove, where you need quick access to these everyday tools. For a polished look, choose dividers in a wood tone that complements your cabinets or countertops. If you're renting, a freestanding version using a slim cabinet or open shelving with dividers can achieve the same effect without permanent changes.
Best Materials
Go with natural wood or bamboo for the dividers—they're warm, durable, and easy to cut to size. For the niche itself, paint it the same color as your wall or backsplash to make it blend in, or use a contrasting shade for a subtle pop. If you want extra durability, line the back with a sheet of metal for a magnetic spice rack or knife strip.
Layout Tip
Place the niche where you naturally reach for cutting boards and trays—next to the sink, near the stove, or beside the refrigerator. Make sure the depth is enough to hold your largest baking sheet (usually about 2 inches deep). The width should be just a bit wider than the widest item you plan to store.
Styling Detail
Keep the look cohesive by storing only wood or neutral-toned boards and trays. Add a small plant or a pretty jar on the top shelf if the niche extends higher. The vertical lines created by the dividers add a subtle architectural detail that makes the kitchen feel more custom.
7. Cookbook Display With a Reading Nook Feel
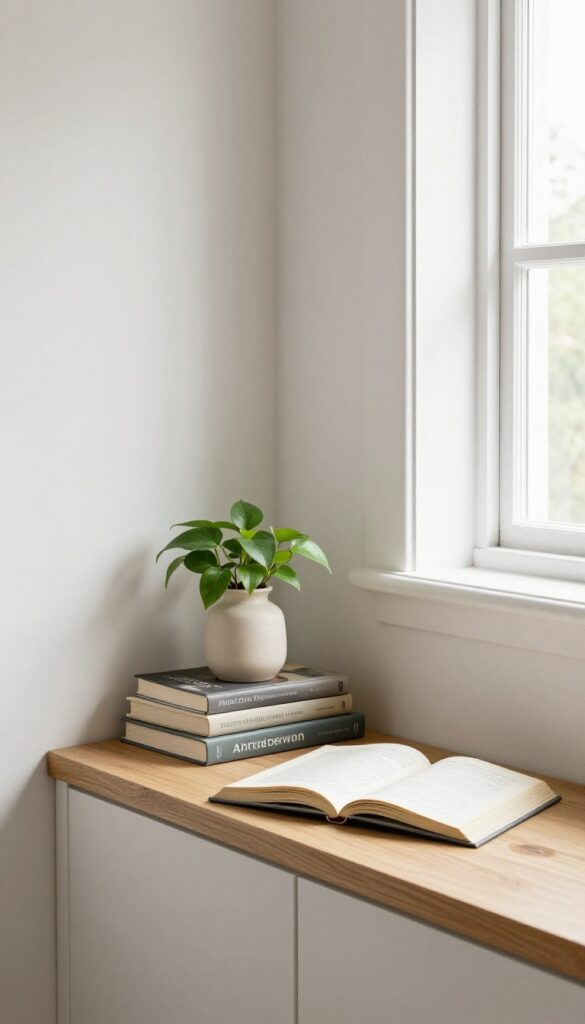
Turn a small kitchen niche into a cozy little reading corner that’s all about your favorite cookbooks. Stack a few well-loved titles, add a small plant or a ceramic vase, and suddenly that unused wall space feels intentional and inviting. It’s a practical way to keep recipes handy while giving your kitchen a warm, lived-in personality.
This idea works best in a niche that’s at least 12 inches deep and 24 inches wide—enough to hold a couple of books upright and still have room for a decorative accent. The key is to treat it like a mini bookshelf, not a catch-all. Choose three to five cookbooks with cohesive spine colors or neutral covers for a curated look.
Prop one open to a favorite recipe page for an extra personal touch. Add a small trailing plant like pothos or a minimalist ceramic object to soften the edges. The result is a functional display that feels more like a styled vignette than storage.
Shelf Styling Tip
Keep the layout simple: stack two books horizontally, lean one vertically, and place your plant or object on top of the stack. This creates visual variety without looking cluttered. Rotate the open book seasonally to keep the display fresh.
Lighting Idea
If the niche doesn’t get natural light, add a small battery-operated puck light or a slim LED strip under the shelf above. Warm white light (2700K) makes the books and decor feel cozy, not sterile.
Budget-Friendly Swap
- No room for a full shelf? Use a single floating shelf at eye level. Display just two cookbooks and a small plant.
- It’s a quick weekend project that takes 15 minutes and costs under $30.
8. Wine Rack for Bottles and Glasses
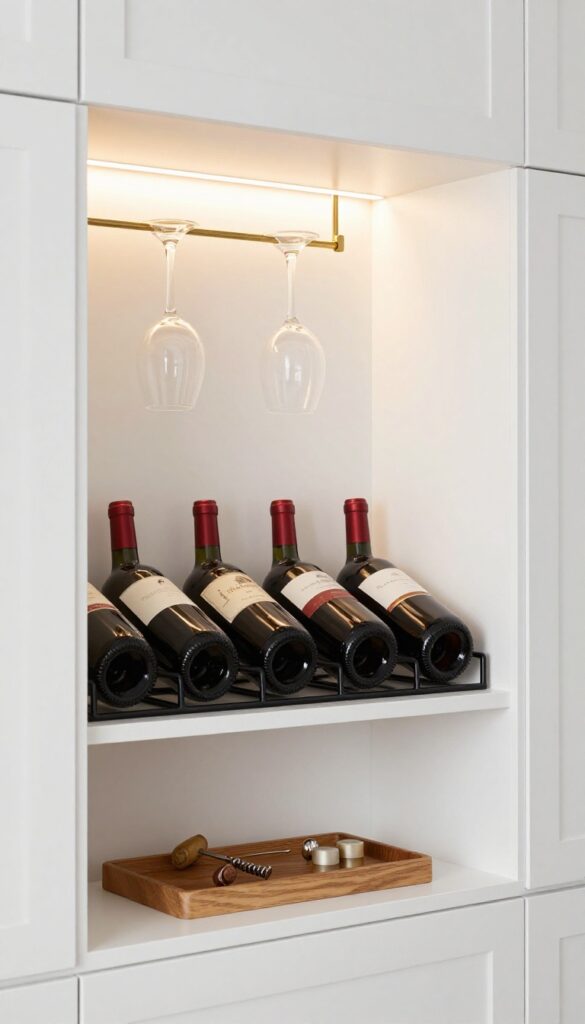
A kitchen niche can become a sleek little bar station without taking up any floor space. By fitting a compact wine rack or a few glass holders into that recess, you instantly add both storage and style. It feels intentional and curated, not like you're just cramming bottles into a random corner.
This idea works especially well in a narrow niche between cabinets or beside the fridge. The key is to keep it streamlined—think a single row of bottles and a couple of stemware hooks above. Choose a finish that blends with your kitchen's hardware, like black metal for a modern look or warm brass for a touch of elegance.
The result is a functional, attractive spot that makes grabbing a glass feel like a small ritual.
Best Layout Tip
Position the wine rack at eye level or just below, with glasses hanging above. This keeps everything within easy reach and creates a balanced, symmetrical display. If your niche is shallow, opt for a wall-mounted rack that holds bottles horizontally rather than a deep shelf.
Finishing Touch
Add a small LED strip under the top shelf to highlight the bottles and glasses. Soft, warm light makes the whole setup feel like a cozy wine bar. You can also place a tiny tray or coaster on the bottom shelf for corkscrews and stoppers.
Budget-Friendly Swap
Instead of a custom wine rack, use a simple wooden crate or a metal grid panel with hooks. Spray-paint it in a matte finish to match your kitchen. For glass holders, adhesive stemware racks are inexpensive and easy to install under any shelf.
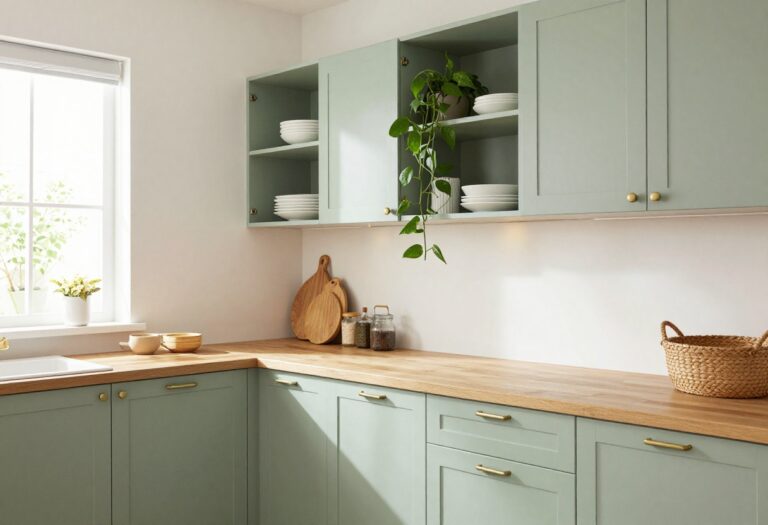
9. Art or Photo Gallery
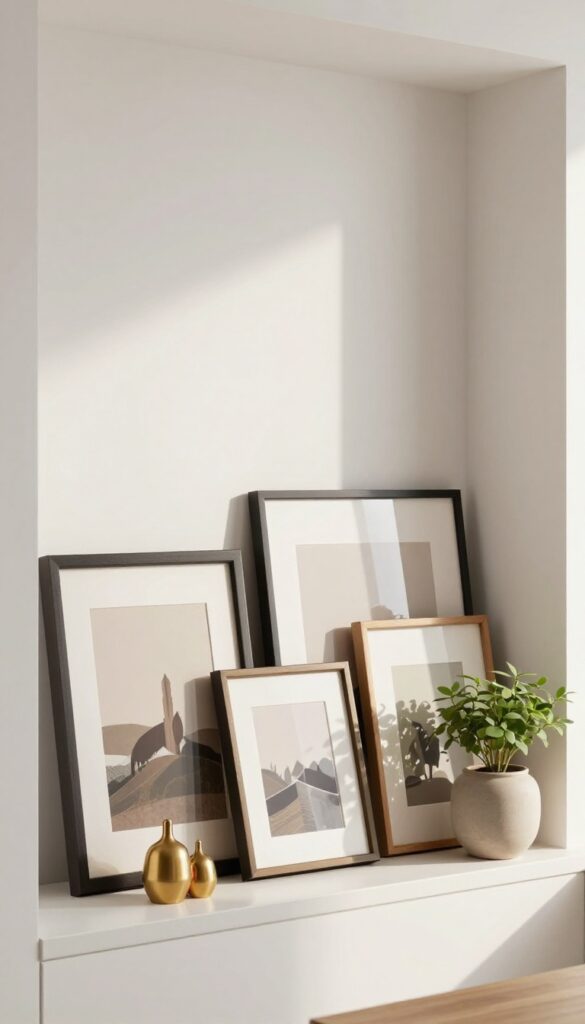
A shallow niche can feel like an awkward leftover space, but with a few framed pieces, it becomes one of the most personal spots in your kitchen. Think of it as a mini gallery wall that doesn't demand a big wall or a lot of effort. Leaning art instead of hanging it keeps the look relaxed and easy to swap out whenever you want a change.
This idea works especially well in a breakfast nook or near a coffee station, where you naturally pause and look around. Choose frames that complement your kitchen's existing finishes—black or brass for a modern touch, natural wood for warmth. Mix in a small plant or a ceramic object to add depth, but keep it simple so the art stays the focus.
Best Art Choices
Go with pieces that feel personal but not too precious—a favorite print, a postcard from a trip, or a child's drawing in a nice frame. Black-and-white photography works well in most kitchens because it won't clash with colorful cabinets or countertops. For a cohesive look, stick to one color palette across all the frames.
Layout Tip
- Instead of hanging everything perfectly level, lean frames against the back wall of the niche. Vary the heights by placing smaller frames in front of larger ones. This casual arrangement makes it easy to swap art without measuring or patching holes.
- If the niche is deep enough, add a small shelf at the back to create two layers of display.
Finishing Touch
Add a small LED picture light or a strip light at the top of the niche to highlight the gallery. Warm light makes the art feel inviting, especially in the evening. If your niche is near a sink or prep area, choose frames with glass or acrylic to protect against splashes and grease.
10. Utensil and Gadget Organizer
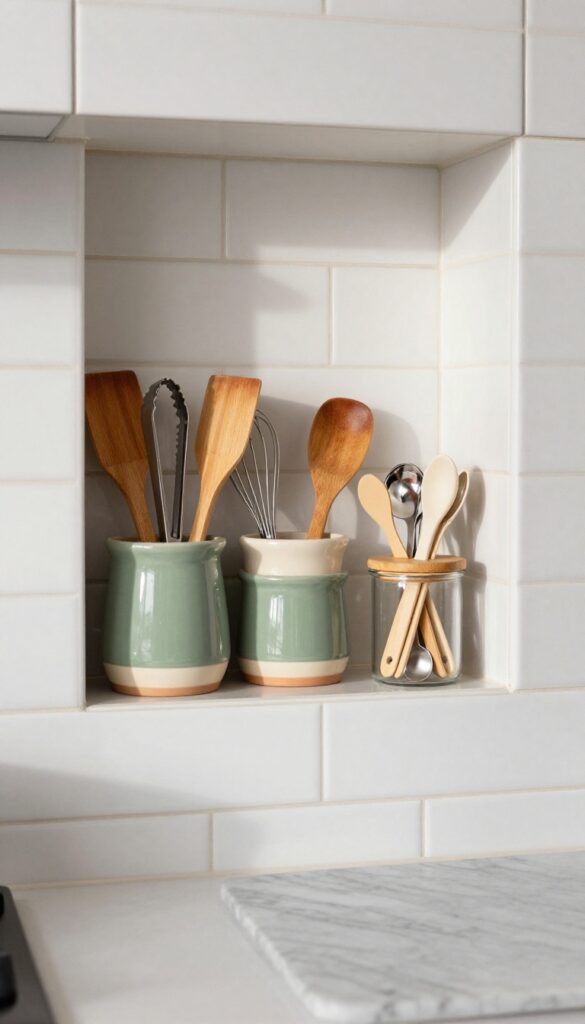
That narrow niche next to the stove or sink often goes wasted, but it's actually prime real estate for your most-used tools. Instead of digging through drawers mid-recipe, set up a dedicated spot for spatulas, tongs, and whisks. It keeps the counter clear and makes cooking feel smoother, not to mention it adds a nice visual break in your backsplash.
Turn a small wall niche into a functional organizer that's both practical and stylish. By placing crocks or jars in the niche, you can store frequently used utensils within easy reach without sacrificing counter space. This setup works especially well near the stove or prep area, where you need quick access to spatulas, whisks, and tongs.
The niche keeps everything corralled and out of the way, reducing clutter while adding a curated look. Mix in a few wooden spoons or a silicone spatula for texture, and choose crocks that complement your kitchen's color palette—matte ceramic for a modern feel, or earthy stoneware for a rustic touch.
Best Materials
- For a practical and stylish look, opt for ceramic or stoneware crocks that are easy to clean and heavy enough to stay put. If your niche is deeper, consider using glass jars with lids for smaller gadgets like vegetable peelers or measuring spoons. Avoid plastic—it tends to look cheap and can warp over time near heat.
- Metal canisters work too, but stick with matte finishes to avoid fingerprints.
Layout Tip
- Place the crocks toward the back of the niche so they don't protrude into the walkway. If your niche is wide enough, group two or three crocks together—one for long utensils, one for short tools, and one for wooden spoons. This creates a tidy, intentional arrangement that's easy to maintain.
- For a narrow niche, a single tall crock works perfectly.
Finishing Touch
Add a small plant or a salt cellar on the side to soften the utilitarian look. A trailing pothos or a small succulent adds life and color, making the niche feel like a styled vignette rather than just storage. Keep the plant low-maintenance so it doesn't become a chore.
11. Magnetic Knife Strip

A magnetic knife strip mounted inside a kitchen niche is one of those upgrades that feels both practical and polished. Instead of rummaging through a cluttered drawer, your most-used knives are right there, visible and ready. It also frees up valuable drawer space for utensils or gadgets.
The sleek, professional look instantly elevates the niche, turning a small wall into a functional focal point.
Mounting a magnetic knife strip inside a niche is a smart way to reclaim drawer space and keep your knives within easy reach. The strip holds knives securely, and the open display adds a clean, professional vibe to your kitchen. Choose a strip that matches your hardware finish—brushed nickel, matte black, or brass—for a cohesive look.
This idea works best in a narrow niche between countertops or beside the stove, where you need quick access while cooking. It's a weekend-friendly project that takes minutes to install but changes your daily routine.
Best Materials
- Look for a magnetic strip with strong neodymium magnets and a durable finish. Stainless steel is a popular choice because it resists rust and cleans easily. For a warmer feel, consider a wooden magnetic strip with embedded magnets—it adds texture and blends with butcher block or open shelving.
- Avoid plastic strips; they can look cheap and may not hold heavier knives securely.
Layout Tip
- Position the strip at a height that feels natural when you reach for a knife—typically about 12 to 18 inches above the counter. If your niche is deep, mount the strip slightly forward so knives don't hit the back wall. Arrange knives with the blades facing upward for safety and easy grabbing.
- Leave a few inches of empty space on each end to avoid overcrowding.
Finishing Touch
- To make the niche feel intentional, add a small LED strip light underneath the magnetic strip. The light will highlight the knives and create a subtle glow, making the niche look like a custom feature. Use a plug-in or battery-operated light to keep installation simple.
- Pair with a matching magnetic bar for spice jars or tools to complete the look.
12. Small Appliance Garage
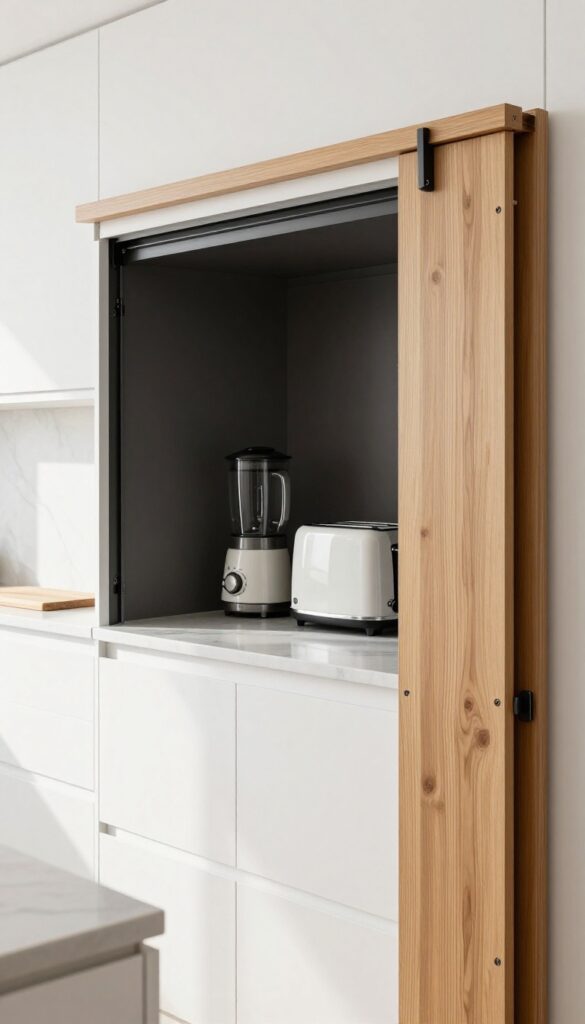
A small appliance garage is a lifesaver for anyone who loves cooking but hates a cluttered counter. Think of it as a hideaway for your toaster, blender, or stand mixer—tucked behind a roll-up door or a simple curtain. It’s the kind of detail that makes your kitchen feel instantly more organized without sacrificing convenience.
Plus, it’s a weekend-friendly project that instantly upgrades your workflow and your visual space.
Best Placement
The ideal spot for an appliance garage is near your main prep zone, so you can pull out the toaster or mixer without crossing the kitchen. If you have a deep niche next to the fridge or above the counter, that’s prime real estate. For a more seamless look, align the garage with your upper cabinets or backsplash—matching the door finish keeps it feeling built-in.
Door Style Options
- Roll-up doors are the classic choice—they slide up and disappear, leaving the counter clear. But a curtain is a budget-friendly alternative that adds softness, especially in a cozy or farmhouse kitchen. Go with a fabric that coordinates with your window treatments or rug for a pulled-together look.
- If you’re handy, a tambour door (like a roll-top desk) adds vintage charm.
Styling The Interior
- Don’t just shove appliances in and call it done. Line the back wall with peel-and-stick tile or a small strip of marble to catch splatters and add visual interest. Use a small riser or lazy Susan to keep smaller gadgets accessible.
- And if the niche is deep enough, add a plug strip inside so you can leave everything plugged in—just close the door and go.
13. Decorative Vignette With Seasonal Charm
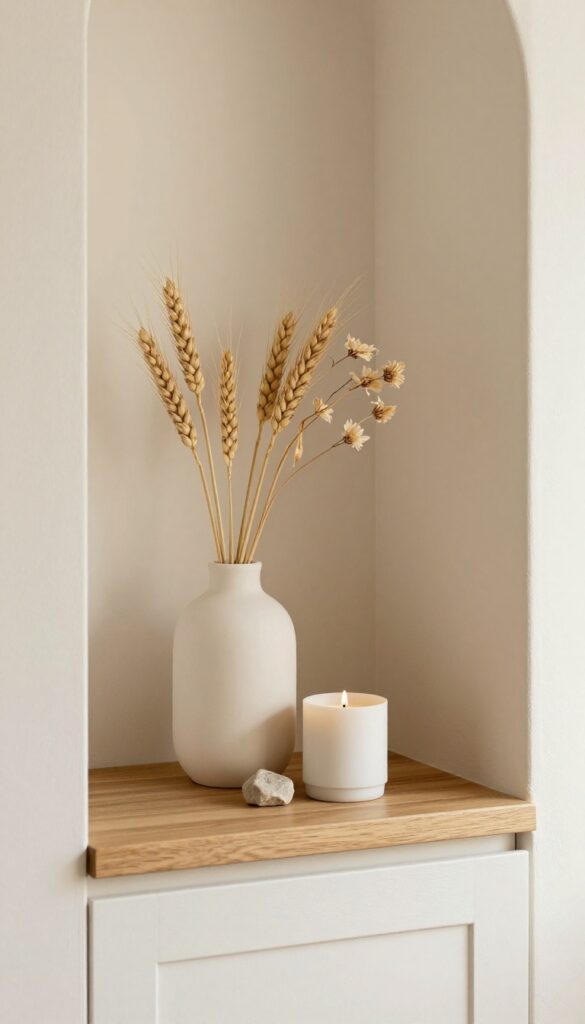
A kitchen niche doesn’t have to be purely functional. Turn it into a tiny stage for seasonal decor that shifts with the calendar. Think a simple vase of dried flowers in fall, a cluster of white candles in winter, or a bright ceramic piece in spring.
It’s an easy way to keep the kitchen feeling fresh and personal without a full remodel.
This idea works best in a shallow niche, like the space between cabinets or beside a range hood. The key is restraint—choose one or two small objects and let them breathe. A single sculptural vase, a petite candle holder, and a natural stone or wood accent create a balanced trio.
Swap out one piece each season to change the mood instantly. The vignette becomes a conversation starter and a visual pause in a busy kitchen.
Best Colors
Stick with a neutral base—soft whites, warm beiges, or pale grays—so the seasonal accents pop. For spring, add pastel greens or blush pinks; for fall, ochre and rust tones. The background should stay quiet to let the vignette shine.
Texture Mix
Combine matte ceramics with rough natural textures like linen, driftwood, or stone. A smooth glass vase next to a chunky knit coaster adds depth. The contrast makes the display feel curated, not cluttered.
Shelf Styling Tip
Use a small tray or a wooden slab as a base to anchor the objects. This defines the space and makes swapping items effortless. Keep the tallest piece at the back or center, and leave some empty space around each item for a clean look.
FAQ
How deep should a kitchen niche be for storage?
Even a 4- to 6-inch-deep niche can hold spices, small jars, or floating shelves. For larger items like appliances, aim for at least 12 inches.
Can I add lighting to a kitchen niche?
Yes, battery-operated puck lights or LED strip lights are easy to install and make the niche feel intentional. They’re perfect for highlighting dishes or plants.
What if my niche is between studs?
Between-stud niches are great for shallow storage like spice racks or small shelves. You can also frame them out to create a custom look.
How do I keep a kitchen niche from looking cluttered?
Stick to a color scheme and use uniform containers or baskets. Limit the number of items to avoid a crowded feel—less is more.
Are kitchen niches expensive to build?
Not necessarily. You can add shelves or hooks without major construction. For a built-in look, a carpenter can frame one for a few hundred dollars.
Conclusion
Kitchen niches don’t have to be wasted space. With a little creativity and a weekend’s worth of effort, you can turn them into some of the most charming and functional parts of your kitchen.
Whether you choose a practical spice rack or a decorative vignette, each idea adds personality and purpose. Start with one niche that inspires you, and see how a small change can make your kitchen feel more complete.