13 Small Kitchen Bar Ideas for Compact Coffee Corners
Coffee corners don't need a lot of space or a big budget. Even the tiniest kitchen can have a dedicated spot for your morning brew. The trick is choosing the right setup that fits your layout and lifestyle.
Whether you have a narrow gap between cabinets or a blank wall, there's a solution that feels intentional and inviting. These 13 ideas focus on smart storage, clever placement, and affordable finds.
You'll see how a few simple changes can turn an overlooked corner into your favorite part of the kitchen. No major renovations required—just a little creativity and some budget-friendly picks.
1. Wall-Mounted Folding Shelf
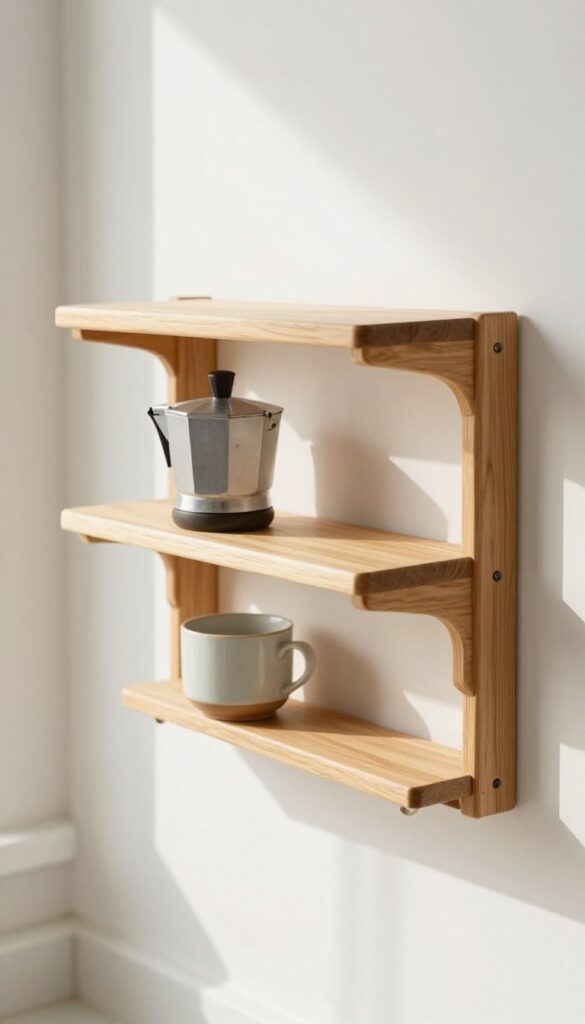
When every inch of counter space is precious, a wall-mounted folding shelf is a game-changer. It’s like having a secret coffee station that disappears when you’re done. Attach one near an outlet, and you’ve got a dedicated spot for your coffee maker without sacrificing permanent real estate.
The best part? It costs under $30 to DIY with a simple wooden board and hinges.
This idea is all about making the most of vertical space. A fold-down shelf attaches to the wall and flips up when not in use, so it’s completely out of the way. It’s perfect for tight kitchens, breakfast nooks, or even a hallway that could use a coffee corner.
Go with a warm wood finish to add a cozy touch, or keep it sleek in white for a modern look. The key is to install it at a height that’s comfortable for reaching your coffee maker and mugs.
Best Materials
- For a budget-friendly version, use a pine board and basic shelf brackets from the hardware store. Sand it smooth and apply a stain or paint that matches your kitchen. If you want something sturdier, opt for a solid oak or bamboo board—they hold up better to moisture and weight.
- Avoid particleboard, as it can sag over time.
Layout Tip
Mount the shelf about 12 to 18 inches below a cabinet or open shelving so you have room for a coffee maker and a small tray. Leave enough clearance above for steam to escape. If you’re placing it near a sink, choose a water-resistant finish and keep the shelf dry to prevent warping.
Finishing Touch
Add a small hook underneath to hang a mug or a dish towel. A magnetic strip on the edge can hold a metal scoop or a pair of scissors. Keep the styling minimal—just your coffee maker, a favorite mug, and maybe a tiny plant for a pop of green.
2. Rolling Bar Cart
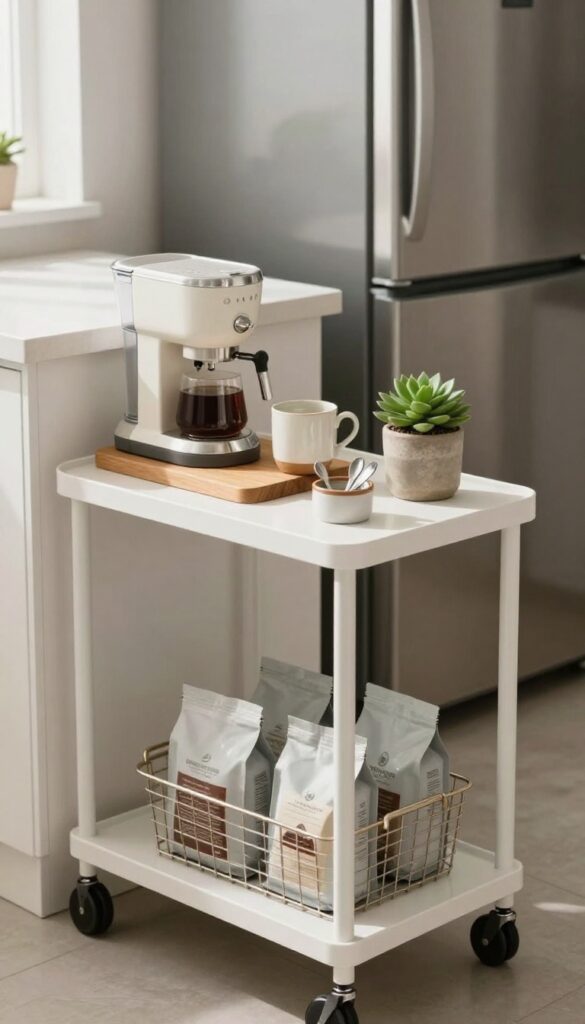
A rolling bar cart is the ultimate space-saving hack for tiny kitchens. It slides into those awkward gaps between counters or appliances, giving you a dedicated coffee station without taking up permanent counter space. Plus, you can wheel it wherever you need it—by the dining table for brunch or into the living room for an afternoon pick-me-up.
A narrow cart on wheels slides into gaps between counters or appliances. Stock it with your coffee essentials and move it wherever you need. Look for one with a towel rack or wine glass holder for extra function.
Best Budget-friendly Finds
You don't need to spend a lot to get a great rolling cart. Check thrift stores or online marketplaces for vintage metal carts that can be spray-painted to match your kitchen. Even basic IKEA carts work perfectly—just add a wooden cutting board on top for a warmer look.
Styling Your Cart
Keep it simple: a tray for your coffee maker, a small jar for spoons, and a couple of mugs. Add a plant or a small vase for greenery. If your cart has a lower shelf, use it for extra coffee bags or a pretty basket for filters.
Small-space Placement
Measure the gap between your fridge and counter or beside the stove. Most carts are about 18 inches wide, so they fit neatly in tight spots. If you have a narrow hallway leading to the kitchen, that works too—just make sure it doesn't block traffic.
3. Over-the-Sink Bamboo Tray
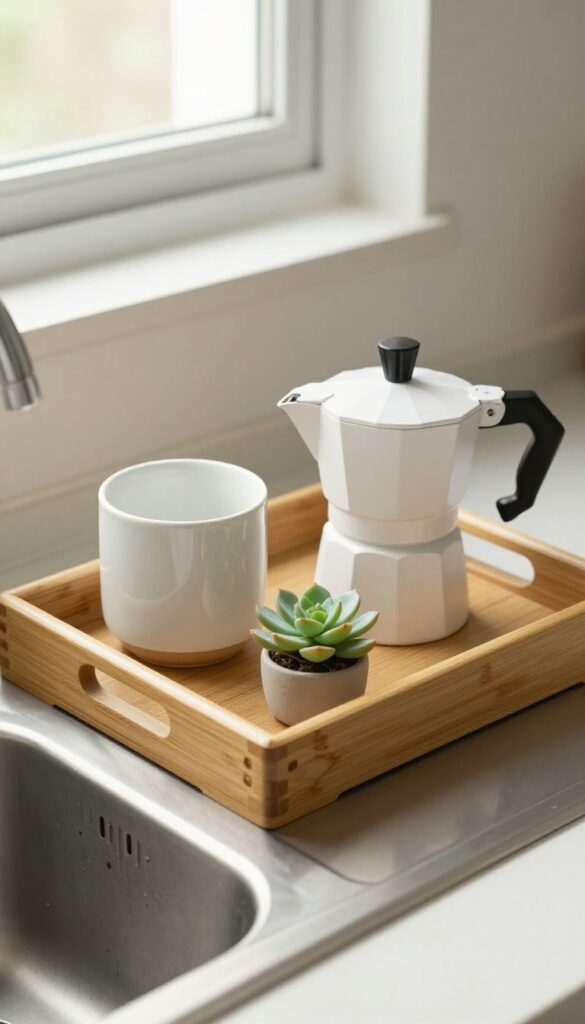
Your kitchen sink is prime real estate that usually goes to waste. A bamboo tray bridges that gap—literally. It turns the space above your basin into a dedicated coffee corner without sacrificing a single inch of counter.
The look is warm and natural, thanks to the bamboo, and it keeps your morning routine streamlined. Plus, it’s one of the easiest budget-friendly upgrades you can make.
A bamboo tray resting across the sink creates an instant coffee station that uses dead space and keeps counters clear. It’s perfect for small kitchens where every inch counts. The tray catches drips, holds your coffee maker or pour-over setup, and adds a cozy, natural texture.
Pair it with a small plant or a jar of stirrers for a warm touch. This idea works best in kitchens with a standard double or single sink—just measure the width first. The bamboo material is affordable, lightweight, and water-resistant, making it a practical choice for a budget-friendly makeover.
Best Materials & Colors
- Stick with natural bamboo for that warm, organic look—it complements most kitchen styles from modern to farmhouse. If you prefer a darker tone, go for walnut or teak, but bamboo is usually the most wallet-friendly. Avoid metal trays, as they can scratch the sink and feel less cozy.
- The color palette should stay neutral: think warm wood tones, white ceramics, and a hint of green from a small plant.
Layout Tip
- Position the tray so it sits securely on the sink edges—make sure it’s at least 2 inches wider than the sink opening on each side. Place your coffee maker on one side and a mug tree or spoon rest on the other. Keep the setup minimal: just the essentials.
- If you have a drying rack on the other side, balance the tray opposite to keep the workflow smooth.
Cozy Detail
- Add a tiny succulent or a small vase with fresh herbs on the tray. It softens the functional look and brings life to the space. A small jar filled with wooden stirrers or cinnamon sticks adds a cozy, aromatic touch.
- These little details make the coffee corner feel intentional and inviting without costing much.
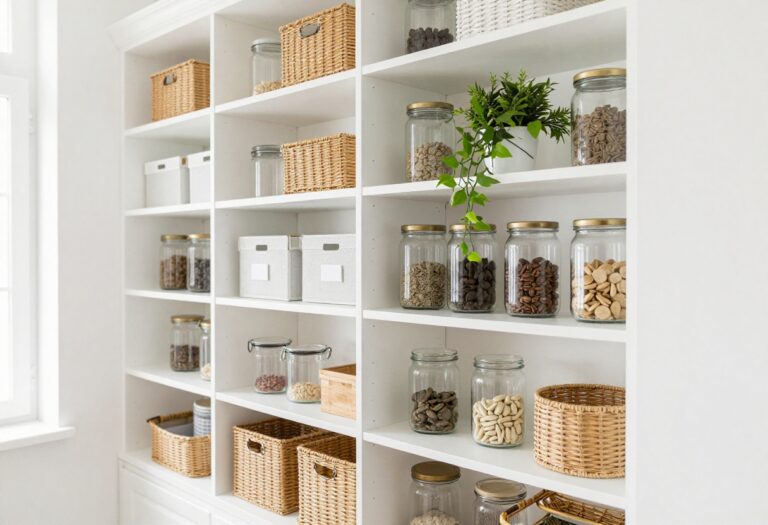
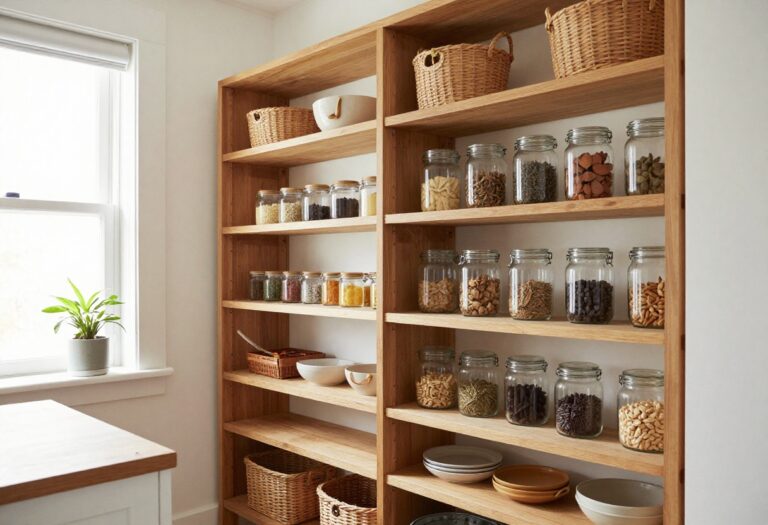
4. Corner Shelf Unit
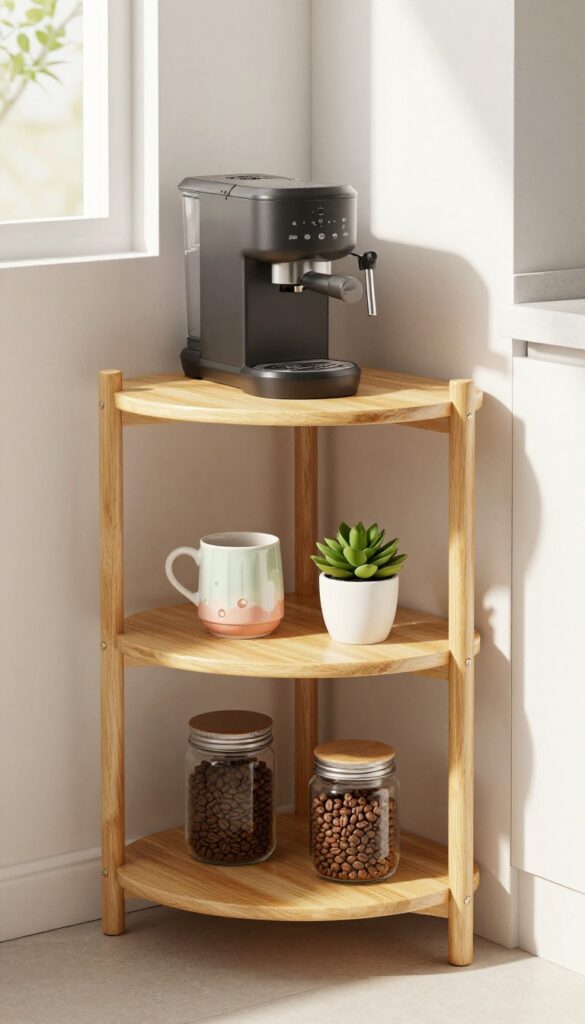
A tall, slim corner shelf is one of those smart buys that instantly makes your kitchen feel more put-together. It tucks into that awkward empty corner you never knew what to do with and gives you multiple tiers for your coffee setup. The best part?
It draws the eye upward, making the whole room feel taller and more open.
For a budget-friendly coffee corner, a corner shelf unit is a total game-changer. You can find affordable options in wood, metal, or even a mix of both, and they don't take up valuable counter space. Use the top shelf for your coffee machine, the middle for your favorite mugs, and the bottom for pods or beans.
It keeps everything organized and within reach without cluttering your counters.
Best Materials
Go for a slim unit in a light wood like pine or bamboo to keep the space feeling airy. If your kitchen leans industrial, a black metal frame with wooden shelves adds a cool contrast without breaking the bank.
Shelf Styling Tip
Mix functional and decorative items on each tier. Stack a couple of colorful mugs next to a small plant or a cute jar of sugar. This keeps the shelf looking intentional and not just like storage.
Small-space Fix
If your corner is really tight, look for a unit that's less than 12 inches wide. Some even come with hooks underneath for hanging cups, which is a genius way to save even more room.
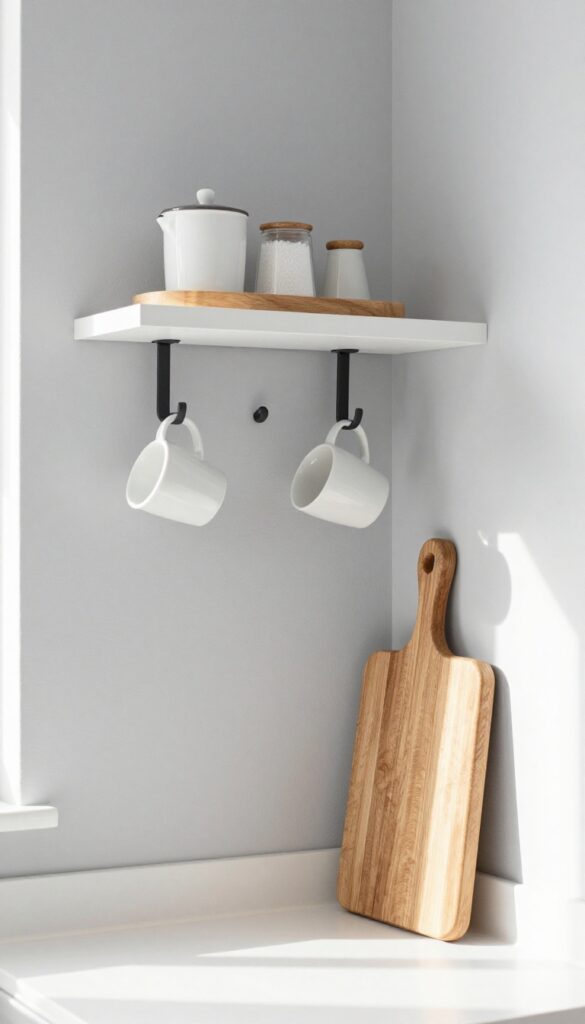
5. Magnetic Knife Strip for Mugs
If your mug collection is taking over the cabinets, it's time to put that wall to work. A magnetic knife strip—usually meant for knives—can hold metal or ceramic mugs with the help of small magnetic hooks. This trick clears out cabinet space and gives your coffee corner a cool, industrial-chic look that feels intentional, not cluttered.
Plus, it's a budget-friendly way to add storage without buying new furniture.
Installing a magnetic strip is straightforward and cheap. You can find strips for under $15 at most hardware stores. Mount it on the wall above your coffee maker, and hang your favorite mugs by their handles using magnetic hooks.
Below, add a slim floating shelf to hold the coffee machine or a small tray for pods and spoons. The result is a functional, visually interesting display that makes your morning routine feel a little more special.
Best Materials
Go for a stainless steel magnetic strip with a brushed finish—it's durable and matches most kitchen hardware. For the hooks, choose neodymium magnets with a rubber coating to protect your mugs. If you have ceramic mugs, make sure the hooks are strong enough (look for at least 5 lbs of pull strength).
Layout Tip
Mount the strip about 6 inches above your coffee maker so the mugs hang at eye level. Leave enough space below for a shelf or the machine itself. If your wall is narrow, use a shorter strip and stagger the mugs for a more dynamic look.
Budget-Friendly Swap
Instead of buying a new magnetic strip, repurpose an old knife bar from a thrift store. Clean it up, spray-paint it matte black for a modern vibe, and add magnetic hooks from Amazon (a 10-pack costs around $8). This whole setup can cost under $15.
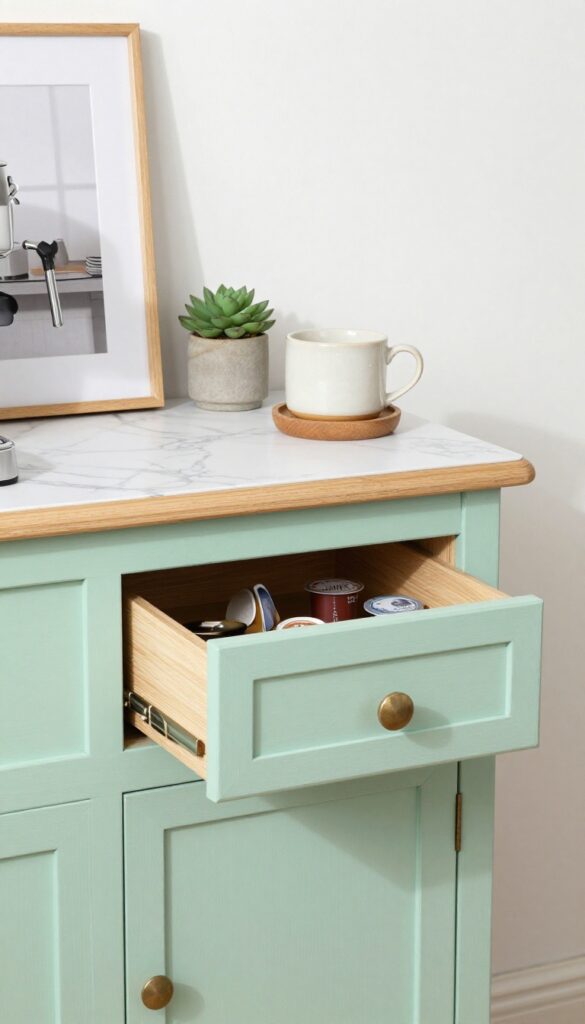
6. Under-Cabinet Coffee Drawer
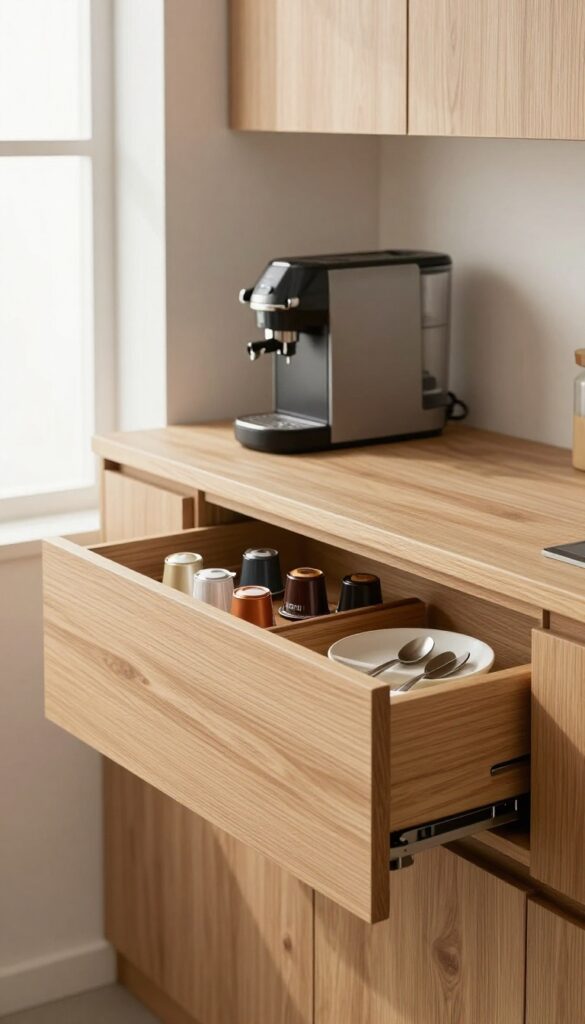
A hidden coffee station might sound like a luxury, but it’s actually one of the easiest budget-friendly upgrades you can make. Instead of dedicating precious counter space to pods and filters, you slide them into a shallow drawer mounted right under your upper cabinets. The counter below stays clear for just the machine, and everything you need is within arm’s reach.
It’s a simple DIY project that instantly makes your morning routine feel more organized.
Mounting a shallow drawer under an upper cabinet is a clever way to reclaim counter space without sacrificing convenience. You can buy a ready-made under-cabinet drawer or build one yourself with a few basic tools. The key is to keep it shallow—just deep enough for coffee pods, filters, and a few spoons.
Paint or stain it to match your cabinets, and add a small handle or a touch-latch mechanism for a seamless look. This idea works especially well in galley kitchens or any small space where every inch counts. The best part?
It costs under $30 if you DIY, making it a true budget-friendly win.
Best Materials
For a budget-friendly version, use plywood or MDF and paint it to match your existing cabinets. If you want a more polished look, opt for a pre-made metal drawer from a hardware store—it’s still affordable and adds a modern touch. Avoid solid wood, as it’s heavier and more expensive for a small drawer.
Storage Tip
Add small dividers or use adhesive-backed Velcro strips to keep pods and filters from sliding around. You can also line the drawer with a non-slip mat to prevent rattling. For spoons, attach a magnetic strip inside the drawer lid so they stay put when you open it.
Budget-Friendly Swap
Instead of buying a new drawer, repurpose an old silverware tray or a shallow plastic bin. Attach it to the underside of your cabinet with L-brackets or heavy-duty adhesive strips. It’s a zero-cost solution that works just as well.
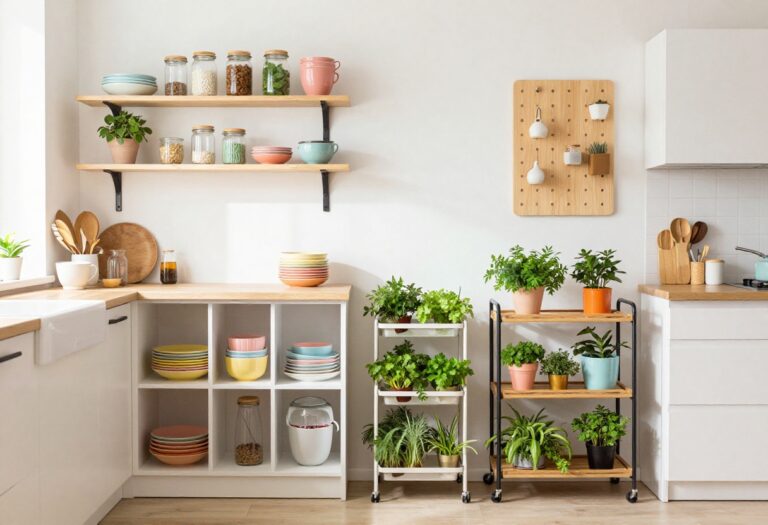
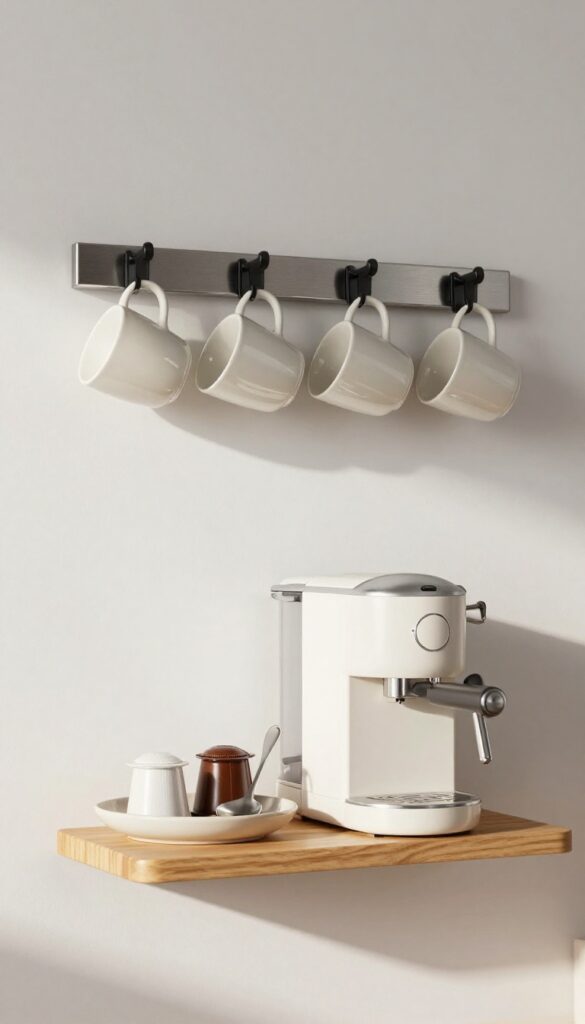
7. Floating Shelf with Hooks
A floating shelf is one of the easiest ways to carve out a coffee corner without sacrificing floor space. By adding hooks underneath, you turn a simple shelf into a compact station that holds your coffee maker and keeps mugs within arm's reach. The trick is choosing a shelf that blends with your existing hardware—think brushed nickel or matte black—so it feels intentional, not like an afterthought.
A tiny tray on top corrals the sugar and creamer, making the whole setup feel polished yet effortless.
This idea works especially well in tight kitchens or breakfast nooks where every inch counts. The shelf itself becomes the star, so pick one with clean lines and a finish that ties into your cabinet pulls or faucet. Wood tones warm up a modern space, while a sleek white shelf keeps things airy.
The hooks underneath should be sturdy enough for your favorite ceramic mugs, and spacing them evenly adds a sense of order. For the tray, a small ceramic or wooden dish keeps the essentials tidy and adds a touch of texture.
Budget-Friendly Swap
- You don't need to spend a lot to get this look. A basic floating shelf from a big-box store can be painted or stained to match your cabinets—just sand it lightly and apply a coat of paint in the same color as your trim or hardware. For the hooks, look for adhesive-backed mug hooks that stick right onto the shelf's underside; they're cheap, removable, and hold surprisingly well.
- The tray can be a thrifted soap dish or a small bamboo snack plate. Total cost: under $30.
Shelf Styling Tip
- Keep the shelf from looking cluttered by limiting what sits on top. The coffee maker should be the main focal point, with the tray of sugar and creamer off to one side. If you have room, a small plant or a framed photo adds personality without crowding.
- Choose items in a cohesive color palette—maybe warm neutrals or a pop of your favorite accent color—to keep the eye moving smoothly. And don't forget to leave a little breathing room around the coffee maker so it's easy to fill the water tank.
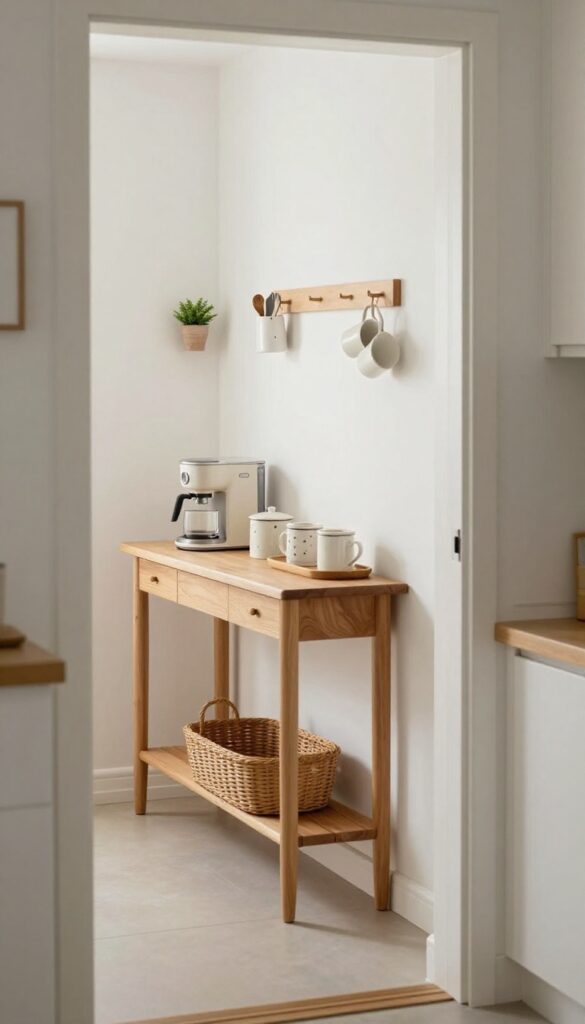
8. Repurposed Nightstand or Side Table
A small vintage nightstand or side table can become a charming coffee bar. Its drawer stores supplies, and the top holds the machine. Paint it a fun color or leave it as-is for a rustic feel.
A small vintage nightstand or side table can become a charming coffee bar. Its drawer stores supplies, and the top holds the machine. Paint it a fun color or leave it as-is for a rustic feel.
Best Colors
For a budget-friendly upgrade, try painting the nightstand a cheerful pastel like mint green or soft yellow. If you prefer a more rustic look, keep the original wood finish and just add a coat of clear wax for protection.
Layout Tip
Place the nightstand against a wall in your kitchen or dining area, and use the top surface for your coffee maker and a small tray for mugs. The drawer is perfect for storing coffee pods, filters, and a few spoons.
Finishing Touch
Add a small plant or a framed photo on top to make it feel intentional. A cute tablecloth or a piece of marble contact paper on the surface can also give it a polished look without spending much.
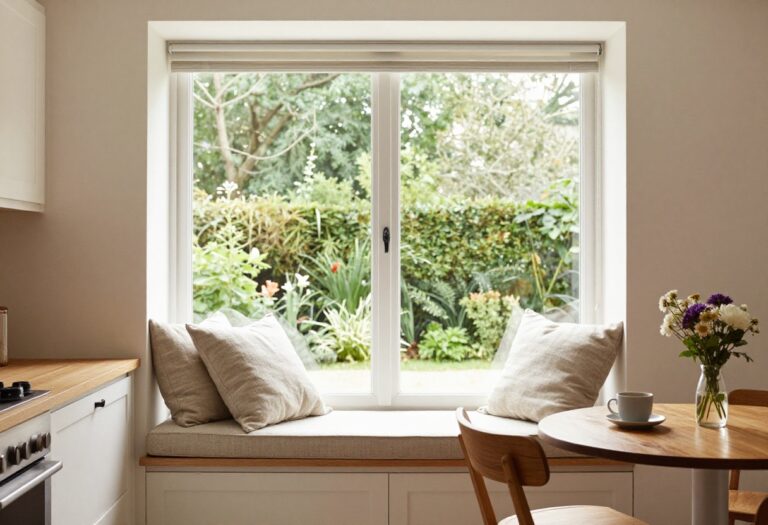
9. Window Sill Coffee Station

Wide window sills are often overlooked, but they make perfect little coffee ledges. By keeping the setup minimal—just a pour-over dripper, a kettle, and a few favorite mugs—you create a calm morning ritual spot that doesn't clutter your counter. The natural light streaming in makes the whole corner feel airy and inviting, almost like a tiny café nook.
This idea works especially well in kitchens with limited counter space. Instead of squeezing a coffee maker onto an already crowded surface, claim that window sill as your own. It’s budget-friendly because you likely already own the essentials, and it adds a charming focal point without any renovation.
Plus, the window sill keeps your coffee station at eye level, making it easy to grab a cup while you enjoy the view outside.
Best Materials
- Stick with natural or neutral materials to keep the look light and cohesive. A wooden pour-over stand adds warmth, while a ceramic dripper feels clean and classic. Use a small tray—maybe bamboo or stone—to corral your kettle and mugs.
- This prevents clutter and makes the setup feel intentional.
Styling Tip
- Keep the styling simple but thoughtful. Place one small plant or a single candle next to your coffee gear to soften the hard surfaces. Choose mugs in a unified color palette, like all white or soft pastels, so the arrangement feels curated rather than random.
- The key is restraint: less is more when you’re working with a small ledge.
Budget-Friendly Swap
- If you don’t have a wide sill, use a floating shelf mounted just below the window. You can find unfinished wood shelves at hardware stores for under $15. Paint or stain it to match your trim, and you’ve got an instant coffee ledge that looks custom.
- Add a small hook underneath for hanging a mug or two.
10. Pegboard Wall Organizer
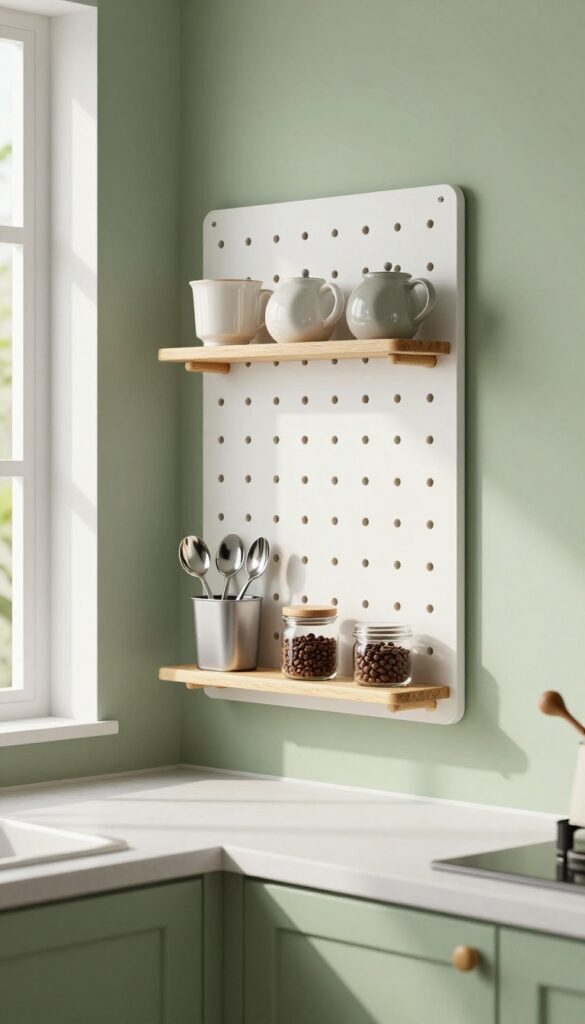
A pegboard wall is the kind of solution that makes you wonder why you didn't try it sooner. It turns an empty stretch of wall into a flexible command center for your coffee corner, keeping mugs, filters, and your favorite beans within arm's reach. The best part?
You can rearrange everything whenever the mood strikes without drilling new holes or committing to a permanent layout.
Pegboards are a budget-friendly dream because you can start small and build out over time. A single board painted to match your cabinets or backsplash feels intentional, not like an afterthought. Arrange a slim shelf for your pour-over setup, a few hooks for lightweight mugs, and a small bin for stirring spoons or tea bags.
The visual effect is clean and slightly industrial, but paint and thoughtful styling soften it into something that fits any kitchen personality.
Best Paint Colors
Stick with matte or satin finishes in shades that blend with your wall or cabinets—soft white, warm gray, or even a muted sage. A contrasting color like charcoal can work if your kitchen has neutral tones, but keep the board itself simple so the items on it pop.
Layout Tip
Mount the pegboard at eye level and leave a few inches of breathing room above your counter. This keeps the setup functional without crowding the workspace. Use a mix of hooks, small shelves, and cup hooks to vary the visual rhythm.
Budget-Friendly Swap
Skip expensive pegboard kits and buy a standard hardboard panel from a home improvement store. Cut it to size, sand the edges, and paint it yourself. Hardware like hooks and bins costs very little and can be found in bulk packs online.
11. Compact Console Table Behind a Door
Sometimes the best coffee bar spot is hiding in plain sight—literally behind a door. A slim console table tucked into a narrow hallway or right behind a door that opens into the kitchen can become your most functional corner. It’s a clever way to use dead space without spending much, and it keeps your coffee setup out of the main cooking zone.
Look for a console table no deeper than 12 to 14 inches so it doesn’t block the door swing. A simple wooden or metal table from a thrift store or budget-friendly retailer works perfectly. Top it with a tray that holds your coffee maker, a small canister of beans, and a couple of mugs.
A tiny stool or basket underneath can discreetly store a waste bin or extra supplies. This setup feels intentional and uncluttered, and it costs very little to put together.
Budget-Friendly Swap
Skip the expensive custom built-in and use a narrow folding table or a repurposed desk instead. Paint it the same color as the wall to make it blend in, or go for a contrasting shade like deep green or matte black to make it pop. Either way, you’ll save money and get a custom look.
Styling Tip
Keep the decor minimal to avoid visual clutter in a tight spot. A small plant, a ceramic mug for utensils, and a framed photo are enough. Use a wall-mounted hook for a favorite mug or a lightweight shelf above for extra storage without taking up floor space.
12. Stacked Crates or Cubes
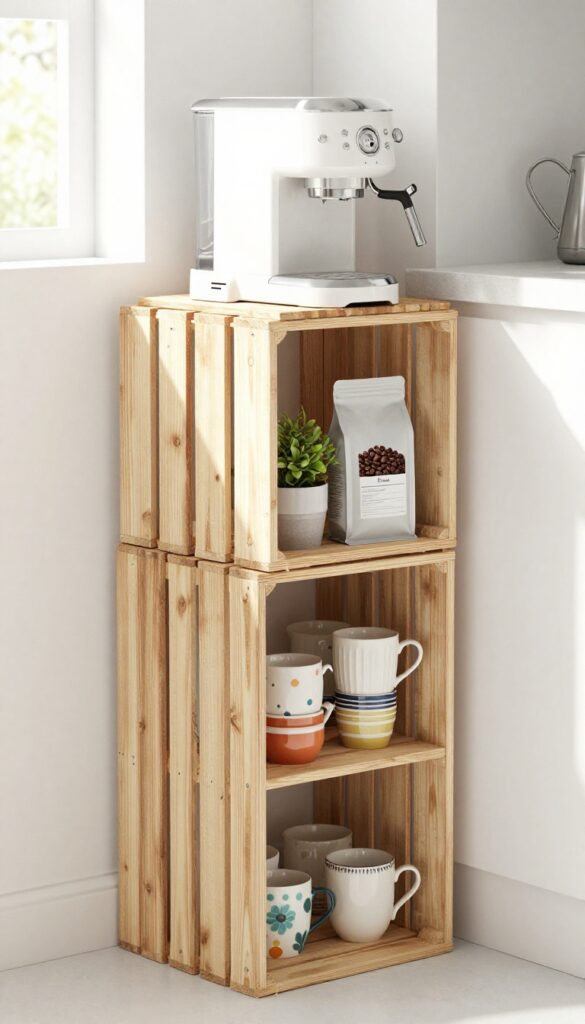
Rustic charm meets smart storage when you stack wooden crates or cube shelves vertically. This budget-friendly setup turns a tiny corner into a dedicated coffee station without any heavy construction. Each cube holds a different category—mugs in one, pods in another, accessories on top—so everything stays organized and easy to grab.
Topping the stack with a butcher block gives you a sturdy work surface for your machine or kettle.
Stacked crates or cube shelves create a vertical coffee station that feels both rustic and intentional. The open design keeps items visible and accessible, while the natural wood adds warmth to any kitchen corner. This idea works especially well in small spaces because it uses vertical real estate without taking up much floor area.
Plus, it's incredibly easy to customize: paint the crates to match your decor, swap in different sizes, or add baskets for hidden storage. The butcher block top ties it all together and provides a solid spot for your coffee maker or pour-over setup.
Best Materials
Go with unfinished pine crates for an affordable, farmhouse look, or choose sturdier plywood cubes if you prefer a cleaner edge. A solid butcher block top (even a small cutting board works) gives you a heat-resistant surface. For a touch of contrast, mix in a metal crate or wire basket on one shelf.
Layout Tip
Arrange the crates in a stable pyramid: two on the bottom, one centered above, and the butcher block on top. This creates a balanced silhouette and prevents tipping. If you have a wall nearby, secure the stack with a simple L-bracket for extra safety.
Budget-Friendly Swap
Skip expensive store-bought cubes and hit up a local hardware store for plain wooden crates—they often cost under $10 each. Lightly sand them and apply a coat of linseed oil for a warm, natural finish that looks way more expensive than it is.
13. Mounted Pipe Shelf with Industrial Flair
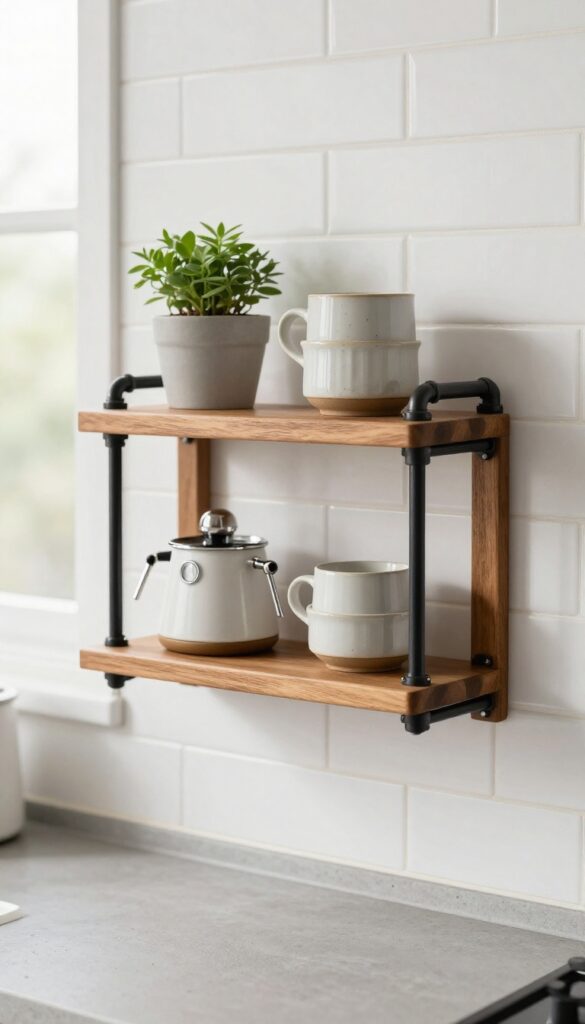
Black iron pipes and a thick wooden plank come together to create a shelf that’s equal parts rugged and refined. It’s the kind of DIY project that looks like you spent a fortune but actually costs less than a night out. The open design keeps your coffee corner feeling airy, while the sturdy build handles a heavy espresso machine without a wobble.
This shelf is a budget-friendly way to add serious character to a small kitchen. The contrast between dark metal and warm wood brings an industrial edge that pairs well with concrete countertops, subway tile, or even simple white cabinets. Plus, since it’s mounted on the wall, you free up precious counter space for your coffee setup.
Best Materials
Grab a 1×10 or 1×12 plank of pine, oak, or reclaimed wood—whatever fits your budget. For the pipes, use 1/2-inch black iron nipples, flanges, and elbows from the hardware store. Sand the wood smooth and seal it with a matte polyurethane to protect against coffee drips.
Shelf Styling Tip
Keep the look intentional by grouping your coffee essentials in odd numbers. Place a plant or a small art print on one end, your espresso machine in the middle, and a stack of mugs on the other side. This creates visual balance without looking cluttered.
Budget-Friendly Swap
If you’re on a tight budget, use a pre-cut shelf board from a home improvement store and spray-paint standard galvanized pipes black. You’ll get the same industrial look for half the price.
FAQ
How much counter space do I need for a coffee corner?
You only need about 12 inches of depth and 18 inches of width for a basic setup. A single-serve machine or pour-over kit fits easily on a small shelf or cart.
What's the most budget-friendly option?
A wall-mounted folding shelf or a repurposed nightstand costs very little. You can often find these items secondhand or use what you already have.
Can I create a coffee corner without drilling holes?
Yes. Use adhesive hooks for mugs, a rolling cart, or an over-the-sink tray. These options require no tools and are renter-friendly.
How do I keep my coffee corner organized?
Use small trays, jars, and baskets to group items. Keep only essentials on display and store extras in a drawer or cabinet nearby.
What style works best for small kitchens?
Stick with light colors and open shelving to avoid a cramped feel. Wood tones add warmth, while metal accents give a modern touch.
Conclusion
A small kitchen doesn't mean you have to skip a coffee corner. With a little creativity and some smart picks, you can carve out a spot that feels personal and practical. Start with one idea that fits your space and budget, then build from there.
The best coffee corners grow over time as you find what works for your routine. Keep it simple, keep it useful, and enjoy that first sip in a corner that's truly yours.