11 Kitchen Grocery Storage Ideas for Easier Meal Planning
Meal planning starts long before you fire up the stove. It begins with how you store your groceries.
When ingredients are easy to see and grab, you're more likely to use them—and less likely to let them wilt in the back of a cabinet. A clean, organized pantry isn't just about aesthetics; it's a practical tool that saves time and reduces food waste.
These 11 grocery storage ideas lean into a modern, space-aware approach that keeps your kitchen looking sharp while making meal prep feel effortless.
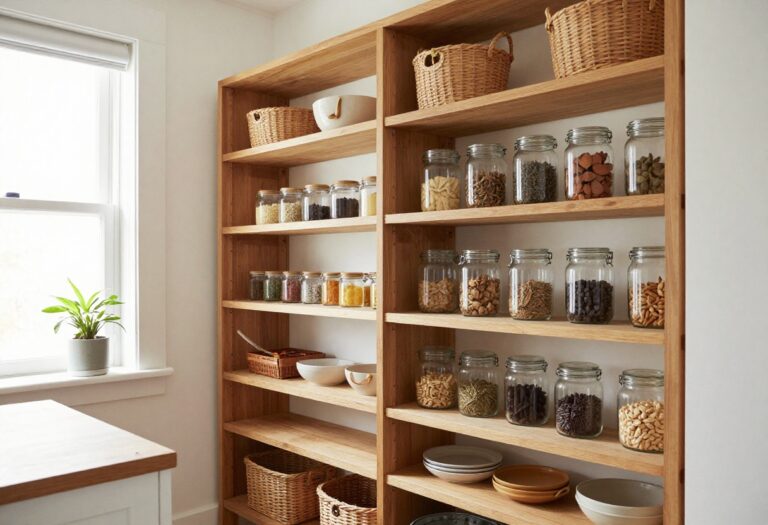
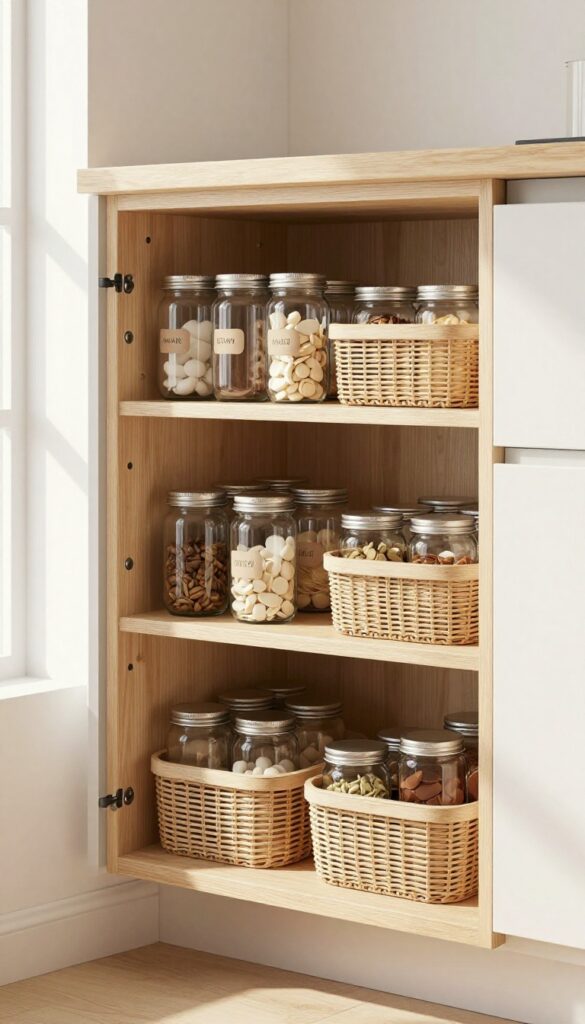
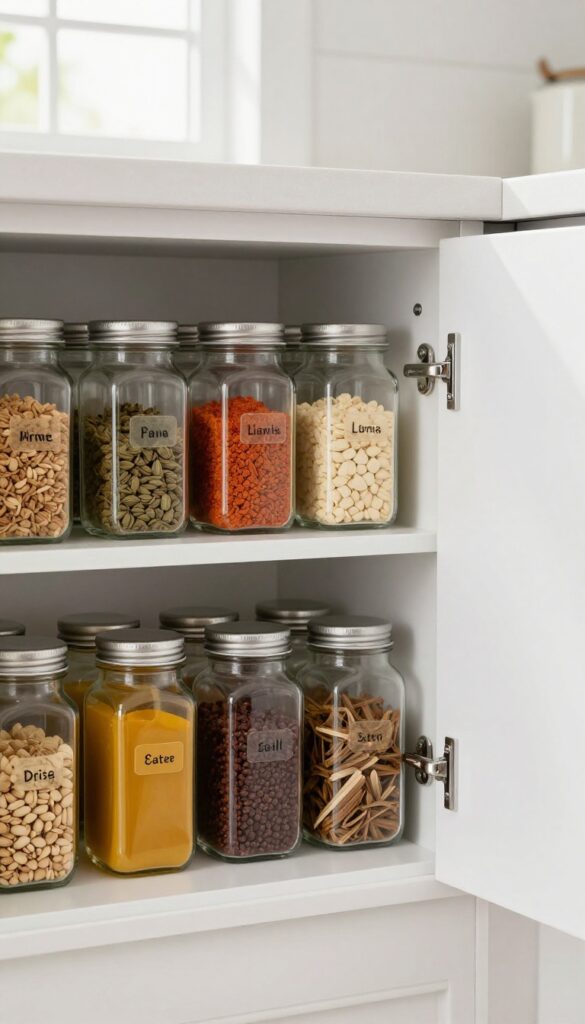
1. Clear Glass Jars for Dry Goods
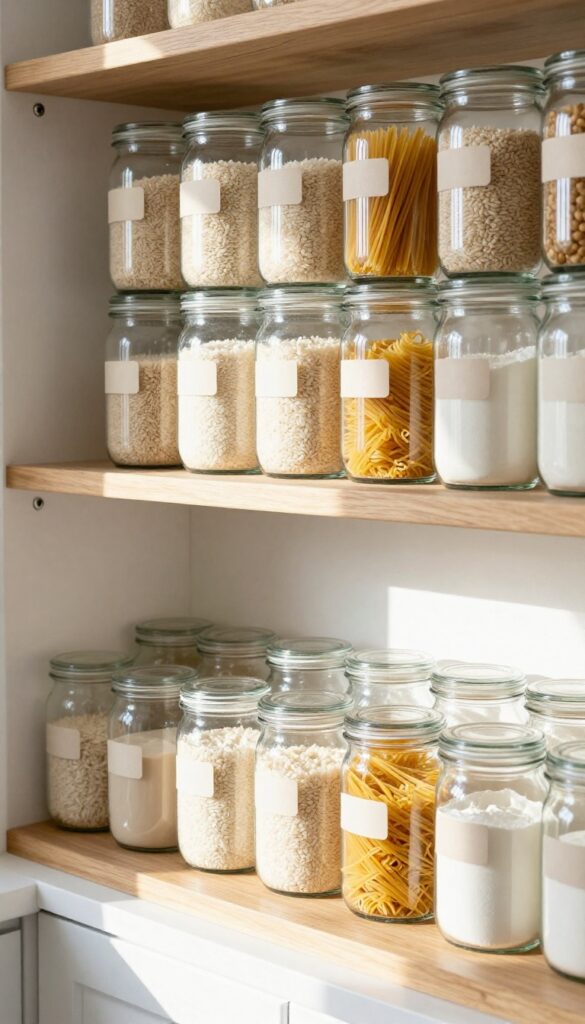
There's something quietly satisfying about opening a cabinet and seeing a neat row of identical glass jars filled with pantry staples. It streamlines your morning routine and makes meal planning feel less chaotic. Clear glass jars turn everyday dry goods into a visual inventory, so you can spot when you're running low on rice or pasta without rummaging through crumpled bags.
Transferring pasta, rice, flour, and cereal into uniform clear glass jars does more than just look tidy. It keeps pests out, makes stacking efficient, and gives your pantry a clean, modern feel. Label each jar with a simple chalk or vinyl tag for quick identification, and enjoy the calm that comes with an organized space.
Best Shapes For Stacking
Square or rectangular jars maximize vertical space and stack neatly without wobbling. Round jars work too, but they leave gaps. For a streamlined look, choose jars with straight sides and wide mouths so you can scoop easily.
Labeling That Lasts
Chalk labels let you rewrite contents as needed, while vinyl labels offer a crisp, permanent look. Stick to a simple font and place labels at the same height on every jar for a uniform appearance.
Where To Store Them
Open shelving turns your jars into decor, but deep cabinets work just as well. If you store them on counters, group them on a tray to contain any spills and create a cohesive vignette.
2. Pull-Out Pantry Shelves
Say goodbye to the dark abyss of deep cabinets where cans and jars go to hide. Pull-out shelves turn every inch of your pantry into accessible, organized storage. Instead of stacking items behind each other, you can slide out the entire shelf and see everything at a glance.
It’s a game-changer for meal planning because you’ll always know what’s on hand.
Fixed shelves might look tidy when you first organize them, but after a week of grabbing and restocking, the back row becomes a forgotten zone. Pull-out drawers or baskets solve that by bringing the contents to you. They work beautifully in base cabinets under the counter or in a dedicated pantry closet.
The clean, modern look of smooth-gliding shelves also adds a custom feel to your kitchen without a full renovation. For the best experience, choose full-extension slides so you can reach every item without stretching.
Best Materials
- Opt for sturdy wire baskets or solid wood drawers with a matte finish. Wire lets you see through to lower shelves, while wood gives a seamless, furniture-like look. Pair with soft-close glides for that satisfying, quiet shut.
- If you want a budget-friendly swap, try heavy-duty chrome baskets that slide on a track—they cost less but still do the job.
Layout Tip
Group similar items together: canned goods on one shelf, spices on a narrow pull-out, and snacks on another. Use clear bins or small dividers inside the drawer to keep things upright. For a tall pantry, install pull-out shelves at varying heights—deeper ones for pots and small appliances, shallower ones for jars and bottles.
Small-space Fix
- Even a narrow gap between the fridge and wall can become a pull-out pantry. Look for slim rolling carts or custom pull-out racks that fit into tight spots. Use them for oils, vinegars, and spices.
- It’s a clever way to turn wasted space into a functional storage zone without sacrificing style.
3. Magnetic Spice Rack on the Fridge
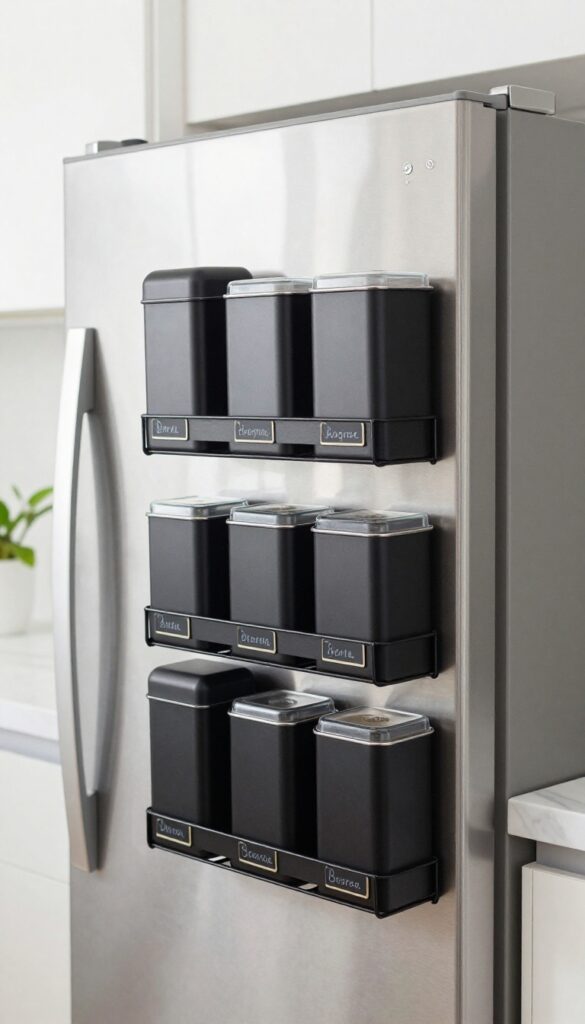
Your refrigerator's side is prime real estate that often goes unused. A magnetic spice rack turns that blank metal canvas into a functional, space-saving storage zone. It keeps your most-used spices at eye level and frees up precious counter space.
The look is sleek and intentional—especially when you stick to matching jars and clear lids.
Mount magnetic strips or small tins on the side of your refrigerator to store spices and small jars. Keeps them off the counter and within arm's reach while cooking. Use clear lids or labels to stay organized.
Best Materials
Go for stainless steel or matte black tins with magnetic backs—they hold firmly and resist rust. Glass jars with magnetic lids are another option if you prefer seeing the contents. Avoid plastic, which can feel cheap and may not hold up to heat near the stove.
Layout Tip
Arrange spices alphabetically or by frequency of use. Place your go-to spices (salt, pepper, garlic powder) at the front, and less common ones toward the back. Leave a gap between rows so you can grab jars without knocking others off.
Finishing Touch
Add small chalkboard labels or a label maker for a uniform look. If your fridge isn't magnetic, attach a thin metal sheet to the side with strong adhesive strips. This also works on metal cabinets or a magnetic backsplash panel.
4. Stackable Produce Bins
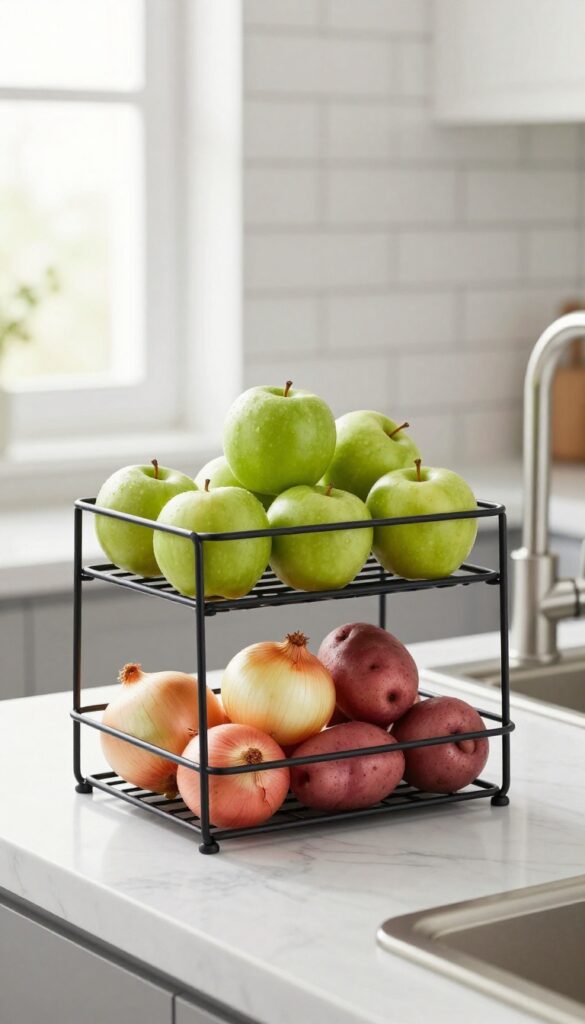
Baskets and bins for produce don't have to be boring or bulky. Stackable wire or plastic bins bring a clean, modern look to your kitchen while solving the age-old problem of buried vegetables. Open fronts mean you can see everything at a glance, and the airflow keeps apples, onions, and potatoes fresher longer.
Whether you stash them on a countertop or tuck them into a lower cabinet, they make grabbing ingredients feel effortless.
Stackable produce bins are a smart upgrade for any kitchen that values both style and function. The key is choosing bins with a sleek, uniform look—think matte black wire or translucent plastic with smooth lines. Place a two-tier stack on your counter near the prep zone for everyday fruits and veggies, or use a taller three-tier unit in a pantry cabinet.
The open design encourages you to grab what you need without digging, and the stackable feature lets you customize the height based on your space. For a cohesive look, match the bin finish to your cabinet hardware or appliances.
Best Materials
Wire bins with a powder-coated finish feel airy and modern, while clear plastic bins keep the focus on the colorful produce. Avoid solid metal or dark opaque bins that hide what's inside. For a warmer vibe, bamboo bins with wire fronts add texture without losing visibility.
Layout Tip
Position your stackable bins on a countertop between the sink and stove for easy access while cooking. If counter space is tight, install a pull-out shelf inside a lower cabinet and place the bins there—just make sure the shelf slides smoothly so you can reach the back row.
Styling Detail
Keep the bins organized by type: leafy greens in the top bin, root vegetables below. Add a small chalkboard label on the front of each bin for a polished, café-inspired touch. This also helps family members know where to put groceries away.
5. Over-the-Door Rack for Snacks and Pouches
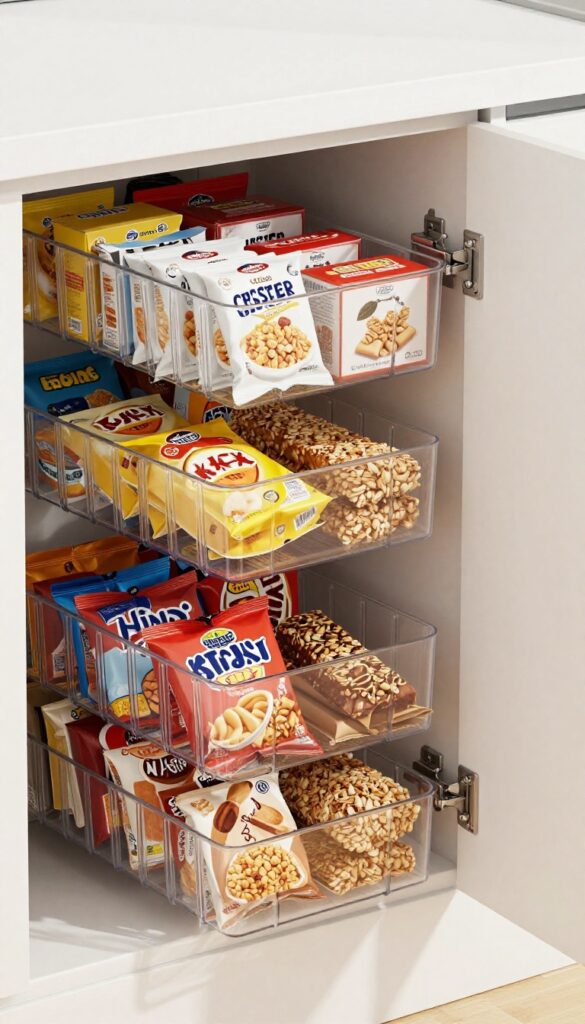
Pantry doors and cabinet fronts are prime real estate for extra storage, yet they often go unused. An over-the-door organizer turns that blank surface into a grab-and-go station for snacks, pouches, and small boxes. It’s a simple swap that keeps everyday items visible and within easy reach—no digging through deep shelves required.
For families, this means kids can help themselves without making a mess, and for meal planners, it frees up shelf space for bulkier staples.
An over-the-door rack is a low-commitment upgrade that instantly adds organized storage without drilling holes or rearranging cabinets. Look for a clear or mesh version so you can spot what you need at a glance. Hang it on the inside of your pantry door to keep snacks hidden from view when the door is closed, or use it on a cabinet door near the prep area for quick access to baking essentials or tea bags.
The key is to group items by type—pouches on one row, granola bars on another—so the rack stays tidy and functional. This setup works especially well in smaller kitchens where every inch counts, and it’s easy to swap out contents as your meal plan changes.
Best Materials
Clear plastic racks let you see everything instantly, which is perfect for busy mornings when you’re grabbing a snack on the go. Mesh or wire options add a more industrial, airy feel and often hold heavier items like canned goods or spice jars. For a modern look, choose a slim metal frame with coated wire in white or black—it blends into the door without adding visual clutter.
Storage Tip
Maximize the rack by using small baskets or bins inside the pockets to corral loose items like single-serve nut butters or seasoning packets. Label each row with a chalk tag or simple sticker so everyone in the household knows where things go. This keeps the system from turning into a jumble and makes restocking a breeze.
Small-space Fix
If your pantry door is too narrow for a standard over-the-door rack, look for a version designed for slim gaps or use a hanging pocket organizer that hooks over the top of the door. Another option is to install a tension rod inside a cabinet and hang small baskets from it—similar effect, zero drilling required.
6. Lazy Susan for Corner Cabinets
Corner cabinets are notorious for becoming black holes of mismatched lids and forgotten spice jars. A Lazy Susan turns that awkward depth into one of the most functional spots in your kitchen. With a simple spin, everything becomes visible and reachable—no more crouching or blindly fishing around.
It’s a small upgrade that makes meal prep feel smoother and your pantry look infinitely more organized.
A Lazy Susan is the unsung hero of corner cabinet storage. Whether you choose a single tier for tall bottles or a two-tier version for maximizing vertical space, the rotating mechanism puts every item at your fingertips. Oils, vinegars, condiments, and even canned goods can live here without getting lost.
The key is to group like items together and keep the spin action clear of obstructions. For a modern, clean look, opt for a clear acrylic or matte white Lazy Susan that blends into the cabinet rather than adding visual clutter. This idea works best in lower corner cabinets, but you can also install a smaller version in an upper corner for spices and extracts.
Best Materials
- Clear acrylic Lazy Susans keep the visual weight light and let you see contents at a glance. For a warmer feel, bamboo or wood adds texture while still being functional. Metal options with a brushed nickel or chrome finish work well in modern kitchens.
- Avoid plastic that feels flimsy—invest in a sturdy base with a smooth rotation mechanism.
Layout Tip
- Measure your cabinet depth and width before buying. A standard 10-inch or 12-inch diameter Lazy Susan fits most corner cabinets, but a two-tier version needs extra vertical clearance. Place taller bottles on the bottom tier and shorter jars on top.
- Keep the most-used items toward the front of the spin path so you don't have to rotate the entire unit every time.
Storage Tip
- Use small bins or dividers on the Lazy Susan to keep similar items corralled. For example, group all vinegars together in one section and oils in another. This prevents bottles from sliding around when you spin it.
- Label the top of each bin for even quicker access during meal prep.
7. Under-Shelf Baskets for Extra Space
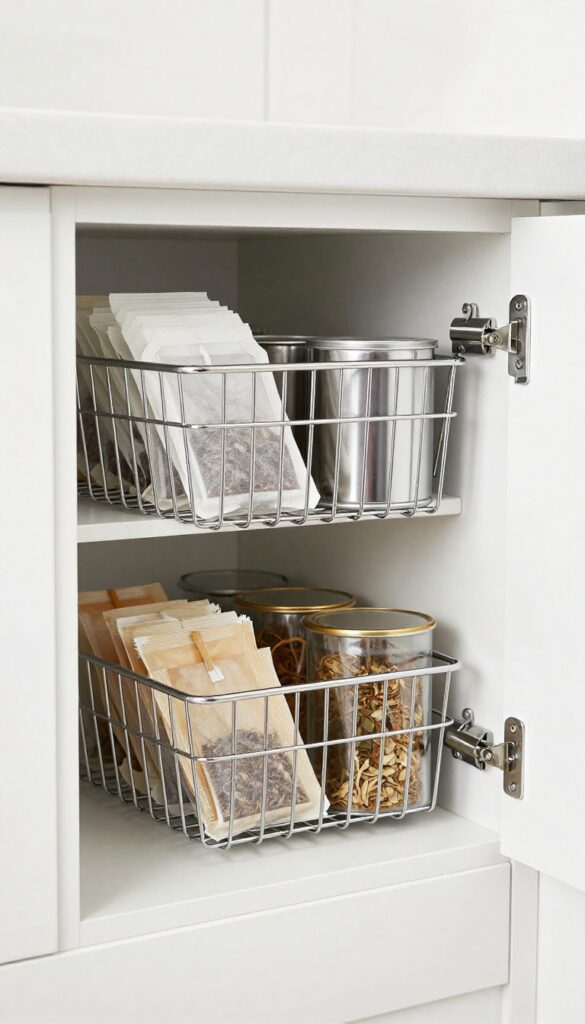
Ever feel like you're running out of room in your cabinets? Under-shelf baskets are a simple fix that instantly doubles your storage. These wire baskets clip right onto existing shelves, giving you a spot for lightweight items like tea bags, spice packets, or small cans.
It's a smart way to use every inch of vertical space without any major renovation.
Under-shelf baskets are the unsung heroes of kitchen organization. They slide onto the bottom of a shelf, creating a whole new layer of storage underneath. Perfect for cabinets or pantry shelving, they keep small items visible and easy to grab.
Choose a sleek wire finish to keep the look modern and clean, or go with a coated metal in white or black to match your hardware. The best part? They're easy to install—just clip them on and you're done.
Use them for lightweight pantry staples, snack packs, or even cleaning supplies. They're especially handy in upper cabinets where you'd normally waste that awkward space between the shelf and the items below.
Best Materials For A Clean Look
- Stick with metal wire baskets in chrome, stainless steel, or matte black. These materials feel modern and resist rust in a kitchen environment. Avoid plastic or rattan if you're going for a sleek, space-aware vibe—they can look cluttered or dated.
- A coated wire basket in white blends into light cabinets, while black adds a subtle contrast against white shelves.
Storage Tip: Group By Use
- Keep baskets organized by category: one for tea and coffee, another for spices, a third for snack packs. This makes meal prep faster because you know exactly where everything lives. Use small bins inside the basket to stop items from sliding around.
- For a clean visual, stick to one or two basket sizes per cabinet so the look stays uniform.
Small-space Fix
- In a tiny kitchen or narrow pantry, under-shelf baskets are a game changer. They add storage without taking up counter or floor space. Install them on the bottom of upper cabinets for extra spice storage, or under a shelf in a deep pantry for cans and jars.
- Just make sure the items below have enough clearance—leave at least 3 inches of space beneath the basket.
8. Airtight Canisters for Baking Essentials
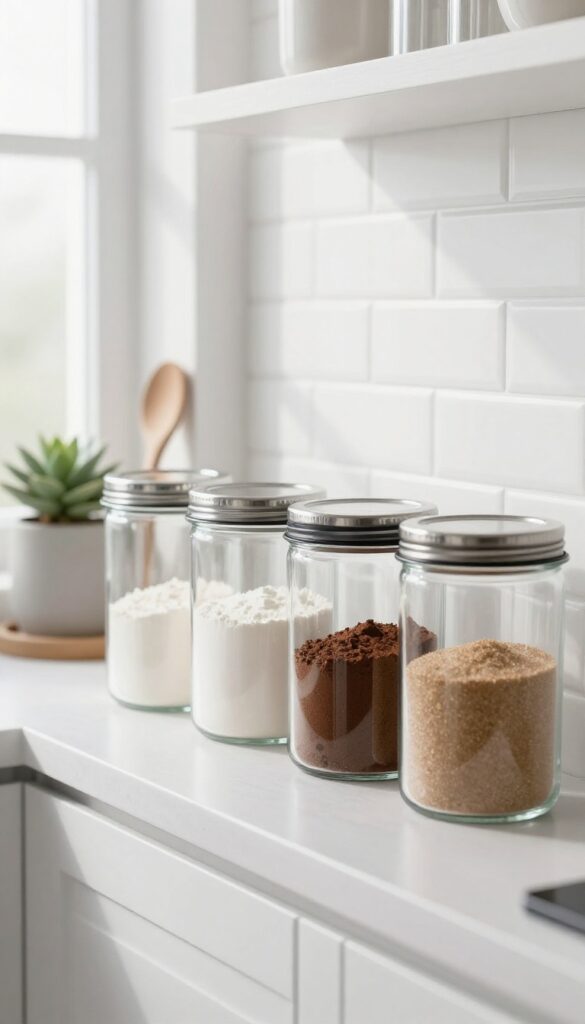
Baking is easier when your go-to ingredients are within arm's reach and ready to go. Airtight canisters turn pantry staples like flour, sugar, and cocoa powder into a streamlined, stylish display. They keep everything fresh, prevent messy spills, and create a clean, modern look on open shelves or countertops.
Plus, having a uniform set adds instant visual order to your kitchen.
Clear glass or matte ceramic containers with airtight lids are the way to go. They protect ingredients from moisture and pests while letting you see what's inside at a glance. Group them on a shelf near your mixing station for a functional, photo-worthy setup.
Label each canister with a simple tag or chalkboard sticker for easy identification. This small swap makes meal prep feel more intentional and less cluttered.
Best Materials
Glass canisters with rubber seals are a top pick because they're non-porous and easy to clean. For a warmer feel, matte ceramic with bamboo lids adds texture. Avoid plastic if you want a premium look and longer durability.
Shelf Styling Tip
Arrange canisters by height from left to right or cluster them in odd numbers. Add a small plant or a wooden spoon holder nearby to soften the lineup. Keep the area around them clear to maintain that airy, modern vibe.
Storage Tip
Use wide-mouth canisters for flour and sugar so you can scoop easily. Narrower ones work well for baking powder, salt, and cocoa. Store them in a cool, dark cabinet if your counter gets direct sunlight to preserve freshness longer.
9. Drawer Dividers for Utensils and Gadgets
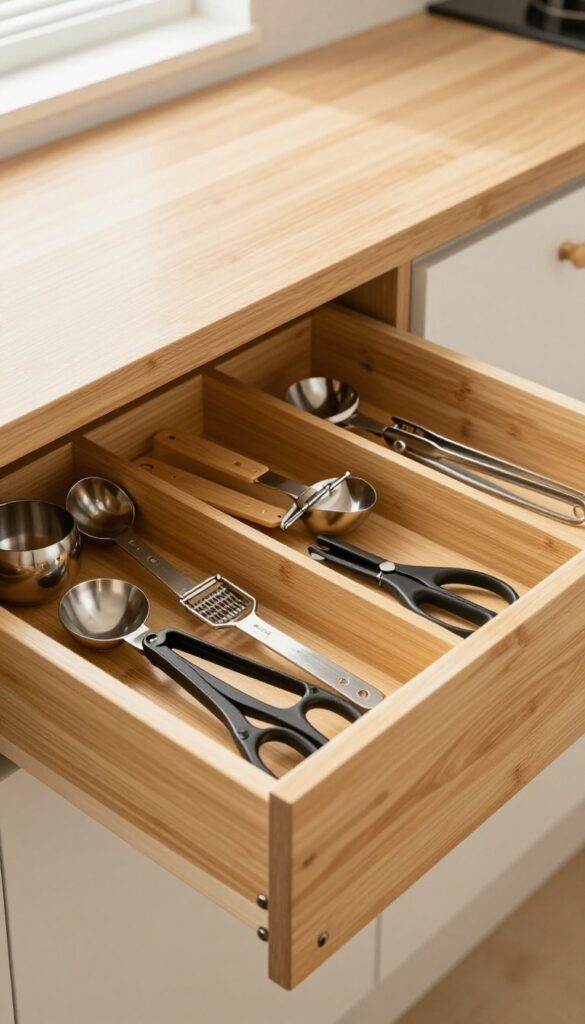
A cluttered drawer full of tangled measuring spoons and mismatched peelers can slow down even the simplest meal prep. Drawer dividers bring instant order, turning chaos into a system where every tool has a home. The result is a kitchen that feels calmer and more efficient, with drawers that slide open to reveal neatly arranged essentials ready to grab and go.
Adjustable drawer dividers are a small investment that pays off every time you cook. They keep utensils, gadgets, and small tools separated so you never have to dig around for what you need. This idea works especially well in deep drawers where items tend to pile up.
By creating designated zones for measuring spoons, peelers, scissors, and tongs, you streamline your workflow and reduce counter clutter. The clean, modern look of uniform dividers also adds a polished touch to your kitchen interior.
Best Materials
Bamboo dividers bring warmth and a natural texture that complements modern kitchens. For a sleek, minimalist look, clear acrylic or matte black metal dividers blend in without visual noise. Wood tones work well with warm cabinetry, while metal suits cool, industrial spaces.
Layout Tip
Group items by frequency of use. Place everyday tools like spatulas and tongs in the front section, and reserve the back for less-used gadgets like pastry brushes or citrus zesters. Adjustable dividers let you customize the width of each compartment to fit your collection perfectly.
Small-space Fix
In a narrow drawer, use a single long divider to create two rows. Store long utensils on one side and shorter gadgets on the other. This maximizes every inch and prevents items from shifting around when you open and close the drawer.
10. Wall-Mounted Pegboard for Pots and Pans
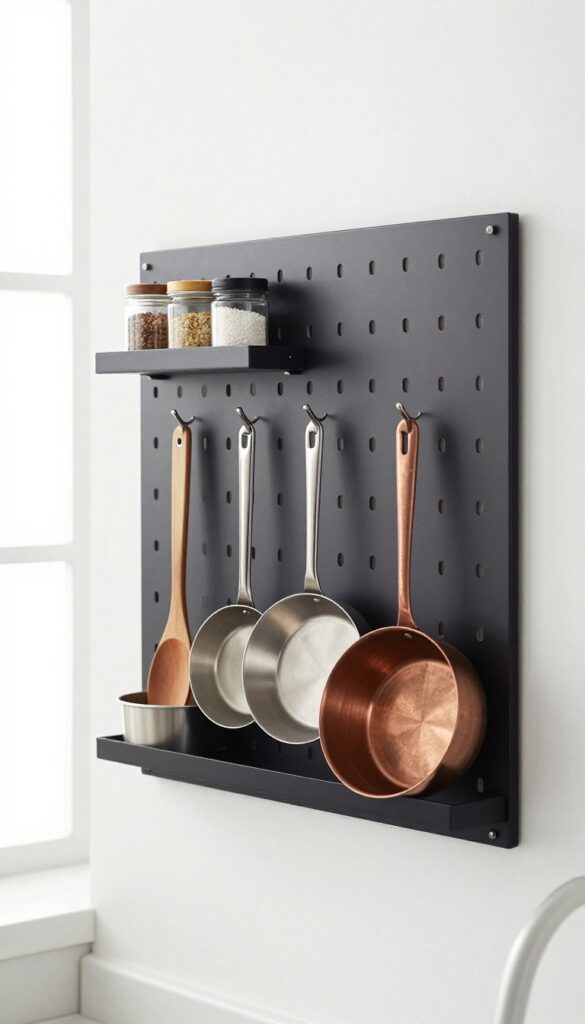
A pegboard isn't just for tools in the garage. In a modern kitchen, it becomes a sleek, customizable storage solution that puts your most-used cookware front and center. By mounting a pegboard on an empty wall, you free up cabinet space and turn heavy pots and pans into a functional display.
The clean lines and open layout keep the room feeling airy and organized, especially when you stick to a cohesive color palette.
A pegboard system works best on a wall near the stove or prep area, so you can grab a pan without digging through a cabinet. Choose a board that fits your space—full wall panels or smaller framed sections both work. Paint the pegboard to match your wall or go for a contrasting color like matte black or warm wood tone for visual interest.
Use a mix of hooks, shelves, and baskets to hold pots, pans, lids, and utensils. The key is to arrange items by frequency of use, keeping everyday pans at arm's reach and specialty pieces higher up. This setup not only saves space but also adds an industrial-chic touch that feels intentional and curated.
Best Materials And Finishes
- For a modern look, choose a metal pegboard with a powder-coated finish in white, black, or brushed steel. Wood pegboards offer warmth and work well in Scandinavian or farmhouse kitchens. If you prefer a seamless look, paint the pegboard the same color as your wall so the cookware pops.
- Avoid glossy finishes that show fingerprints—matte or satin is more forgiving.
Layout And Arrangement Tips
- Group similar items together: hang pots on heavy-duty hooks, use shallow shelves for spice jars or oils, and add small baskets for measuring spoons or tongs. Leave a few inches of space between items so the board doesn't look cluttered. Place the most-used pans at eye level and larger stockpots lower down.
- Consider adding a magnetic strip for knives or a small rail for dish towels.
Small-space Fix
In a tiny kitchen, a pegboard can turn an unused wall or the side of a cabinet into prime storage. Opt for a narrow board between counter and upper cabinets, or mount one on the back of a pantry door. Use slim hooks and compact shelves to maximize every inch without overwhelming the space.
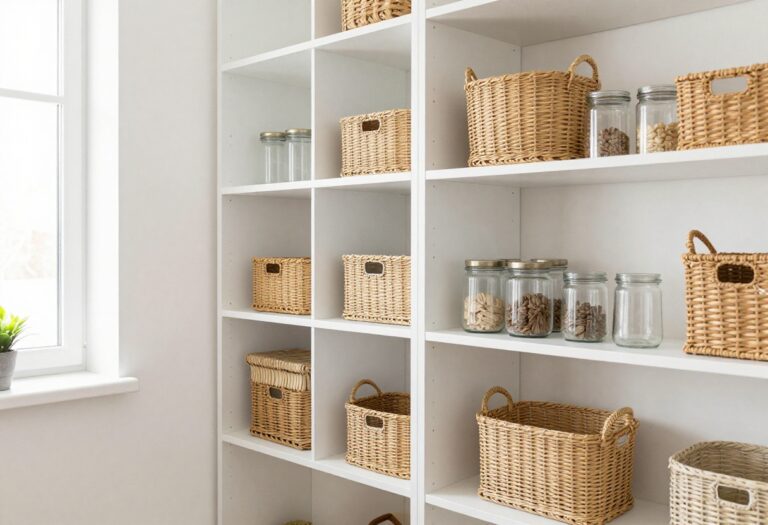
11. Labeled Baskets for Themed Groups
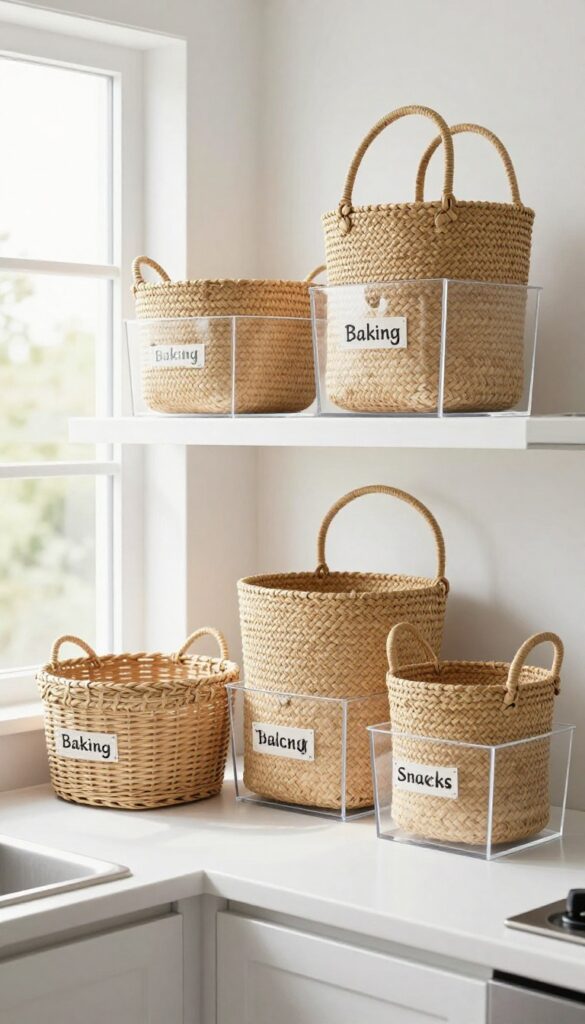
Open shelving can quickly turn chaotic without a system. Labeled baskets bring order without sacrificing style, letting you group pantry staples by category so everything has a home. The look is clean and intentional, with woven or clear bins adding texture while keeping contents visible or neatly hidden.
Group similar items like breakfast foods, baking supplies, or snacks in labeled baskets. Use woven or clear bins that slide out easily. This system makes it simple to find what you need and restock after shopping.
The labels add a graphic element that feels modern and curated, not cluttered.
Best Materials
Woven seagrass or rattan baskets add warmth and texture, balancing sleek cabinets. Clear acrylic or polypropylene bins work well for a minimalist look, letting you see contents at a glance. Both options are lightweight and easy to pull out, making restocking a breeze.
Labeling Tips
Use a label maker for crisp, uniform tags, or write on chalkboard labels for a softer feel. Stick to simple categories like "Baking," "Snacks," or "Pasta & Grains." Position labels on the front facing out so they're readable even when baskets are stacked.
Layout Tip
Arrange baskets by frequency of use: everyday items at eye level, less-used supplies on higher or lower shelves. Keep heaviest baskets on lower shelves for safety. This layout makes meal prep faster because you grab one basket instead of hunting through multiple packages.
FAQ
What is the best way to store dry goods to keep them fresh?
Use airtight containers like glass jars or BPA-free plastic canisters. Store them in a cool, dark place away from heat sources. Label each container with the contents and purchase date to track freshness.
How can I maximize storage in a small pantry?
Install pull-out shelves or stackable bins to use vertical space. Add over-the-door racks for lightweight items. Use clear containers to see contents easily, and group similar items together in labeled baskets.
Are there any storage solutions that help reduce food waste?
Yes. Use clear containers so you can see what you have. Store produce in breathable bins to extend freshness.
Keep a first-in, first-out system by placing newer items behind older ones. Regularly check and rotate your stock.
What should I look for in grocery storage containers?
Choose containers that are airtight, stackable, and easy to clean. Glass is durable and doesn't absorb odors, while plastic is lightweight and shatterproof. Make sure they are BPA-free and dishwasher safe for convenience.
How do I organize a fridge for better meal planning?
Group similar items together: dairy on one shelf, meats in a drawer, produce in crispers. Use clear bins for small items like yogurt or cheese. Label shelves if needed.
Keep frequently used items at eye level for easy access.
Conclusion
A well-organized kitchen makes meal planning feel less like a chore and more like a creative process. By implementing a few of these grocery storage ideas, you'll save time, reduce waste, and enjoy a cleaner, more functional space.
Start with one or two changes that fit your cooking style, and build from there. Small adjustments can make a big difference in how your kitchen works for you every day.