10 Open Cabinet Kitchen Ideas for Airy Everyday Storage
Open shelving and glass-front cabinets have a way of making a kitchen feel bigger, brighter, and more inviting. But the idea of ditching closed cabinets can feel a little intimidating—what about dust, clutter, and mismatched mugs?
The trick is to treat open storage as a design feature, not just a place to stash things. With a few intentional choices, you can create a kitchen that feels both airy and perfectly functional.
These ten ideas are all about making that switch feel doable, even on a casual weekend refresh.
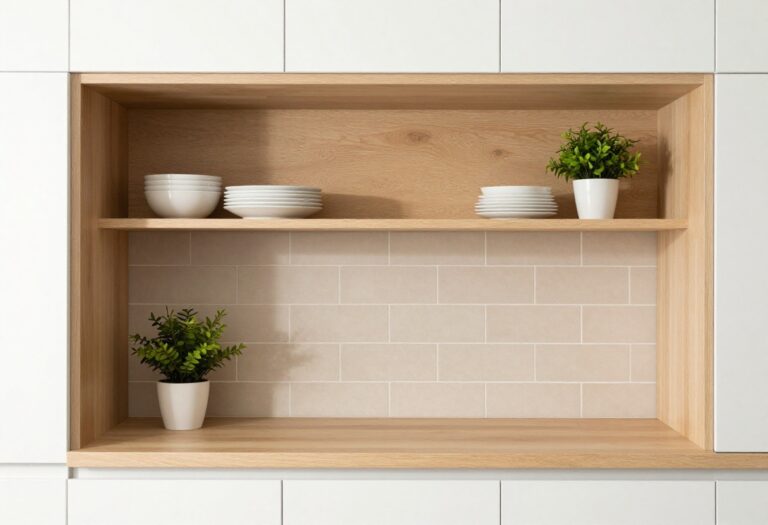
1. Float a Single Shelf Above the Sink
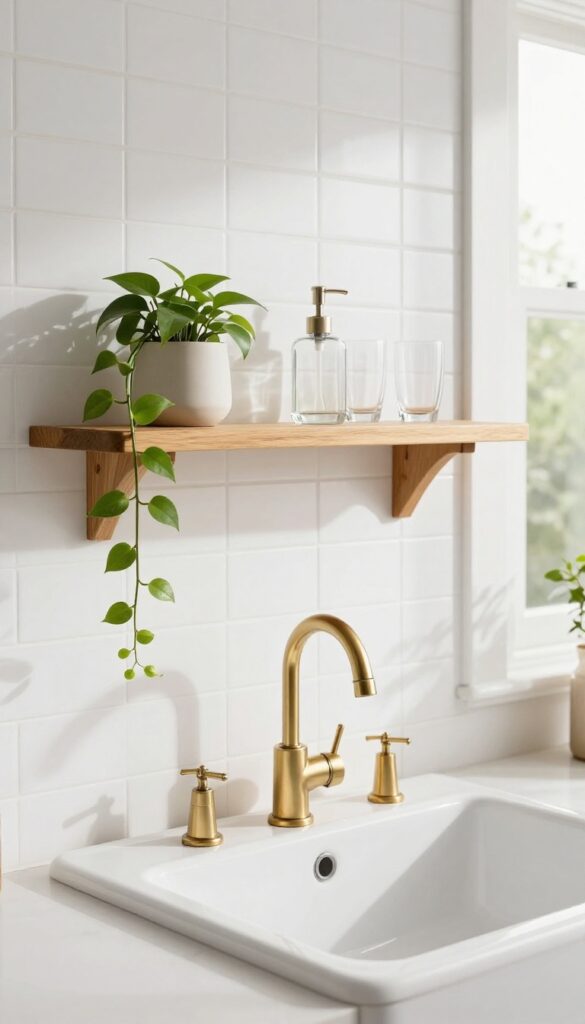
The area above the sink often goes underutilized—either left bare or cluttered with a bulky dish rack. Swapping that blank wall or old window sill for a slim floating shelf changes everything. It keeps daily essentials within arm’s reach while giving the kitchen an airy, open feel.
No full renovation needed, just one simple weekend swap.
A single floating shelf above the sink creates a focal point that’s both practical and visually light. Instead of a heavy cabinet that crowds the space, this open shelf lets the eye travel freely, making the kitchen feel larger. Choose a wood tone that complements your countertops or go with a crisp white to blend in.
Style it minimally: a small trailing plant, a ceramic soap dispenser, and one or two everyday glasses. That’s it. The key is restraint—too many items defeat the purpose.
This setup works especially well in smaller kitchens where every inch counts, but it also adds character to larger spaces by breaking up expanses of tile or backsplash.
Best Materials
Solid wood like oak or walnut adds warmth, while a glossy white or black shelf feels modern and blends into the background. For a budget-friendly option, try a floating shelf in bamboo or a high-quality laminate that mimics real wood. Avoid glass—it shows water spots too easily above the sink.
Shelf Styling Tip
Keep the shelf shallow—no deeper than 6 inches—so it doesn’t interfere with the sink or make washing up feel cramped. Group items in odd numbers and leave plenty of negative space. A small succulent or air plant adds life without demanding maintenance.
Small-space Fix
In a tiny kitchen, this shelf can double as a drying spot for hand-washed items. Just place a slim bamboo mat underneath to catch drips. It’s a clever way to reclaim counter space while keeping the look intentional and uncluttered.
2. Mix Open and Closed Upper Cabinets
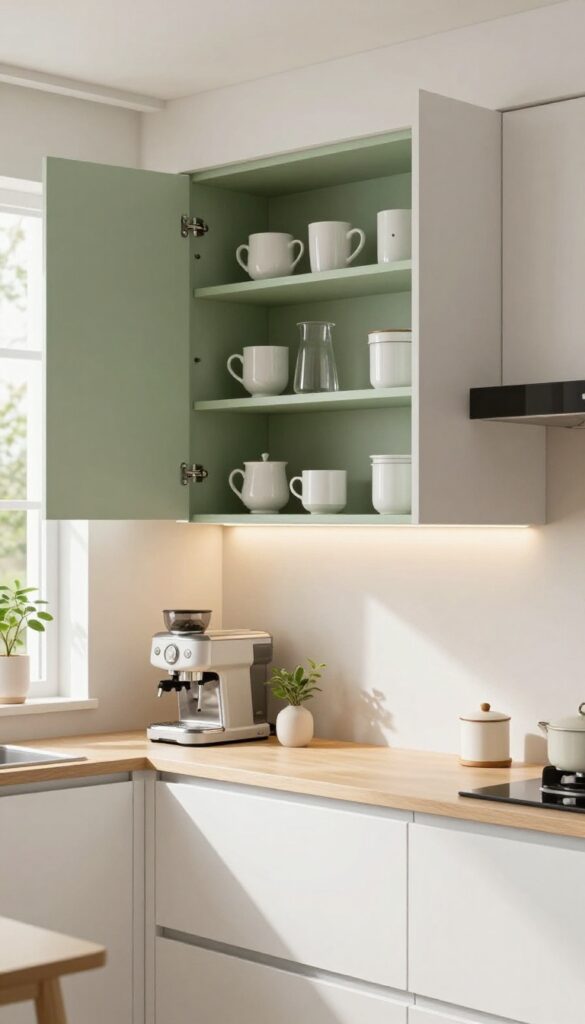
Not every upper cabinet needs to be exposed. By removing doors from just a few key spots—like above your coffee station or main prep zone—you get the best of both worlds. The open sections feel airy and intentional, while the closed cabinets keep less attractive items hidden.
Paint the interior a soft neutral or a subtle pop of color to make the open shelves pop against the rest of the cabinetry.
This approach creates visual rhythm in your kitchen. The contrast between open and closed sections adds depth and keeps the overall look curated rather than chaotic. It’s also a weekend-friendly project: you can remove doors, paint interiors, and style shelves in a single afternoon.
Focus on high-use areas where you’ll actually enjoy seeing your everyday dishes, glasses, or canisters.
Best Colors For Interior Contrast
A soft sage green or pale terracotta inside the open cabinets adds warmth without overwhelming the space. If you prefer a cleaner look, go with a warm white or light beige that still offers a subtle shift from the cabinet exterior. The goal is to make the open section feel like a deliberate design feature, not an afterthought.
Storage Tip: Group By Use
Keep your most-used items on the open shelves—coffee mugs next to the machine, everyday plates near the prep area. Limit each shelf to two or three types of items to avoid visual clutter. Use small baskets or ceramic canisters for odds and ends like tea bags or utensils.
Finishing Touch: Add Under-shelf Lighting
A slim LED strip under the open shelf casts a warm glow on your displayed items and makes the kitchen feel larger at night. Choose a warm color temperature (2700K–3000K) to keep the mood cozy. It also highlights the painted interior, making the color choice really pay off.
3. Install Glass-Front Cabinet Doors
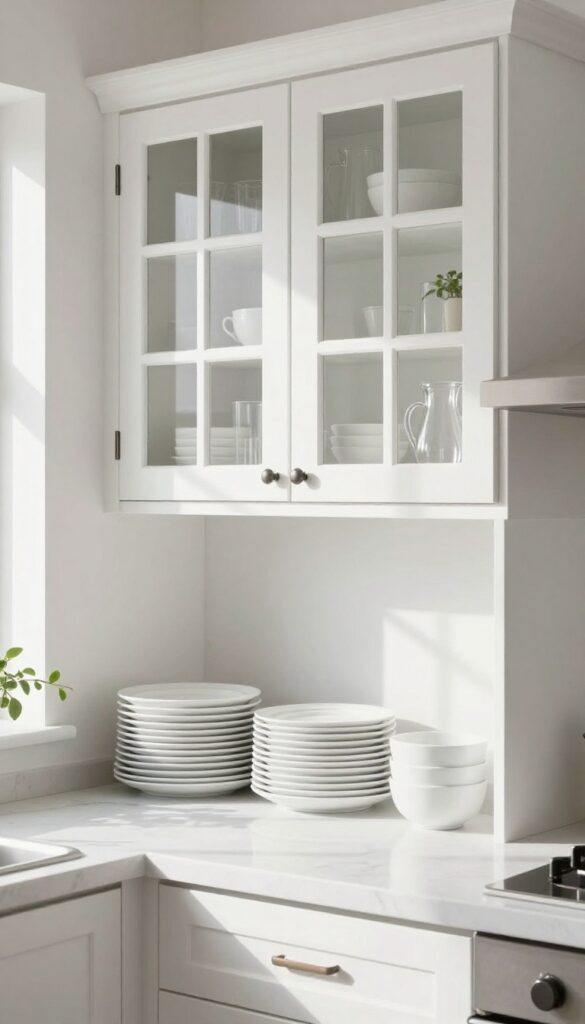
Glass-front doors are the perfect compromise between closed cabinets and open shelving. They let you display your favorite dishes while keeping everything behind a protective barrier. Clear glass gives a truly open feel, while frosted or textured glass softens the view and hides less-than-perfect stacks.
Swapping solid doors for glass-front ones instantly makes your kitchen feel larger and more airy. The key is treating the inside of the cabinet as part of your decor—organize dishes by color or size, and keep items neatly stacked. This works especially well in upper cabinets, where you want to avoid a heavy visual block.
For a weekend refresh, consider ordering custom glass inserts or even replacing just a few doors to create a focal point.
Best Glass Types
Clear glass is ideal for a bright, open look, but it requires neat styling. Frosted or ribbed glass hides clutter while still letting light pass through. For a vintage touch, seeded glass adds subtle texture and hides minor imperfections.
Cabinet Styling Note
Group similar items together—white plates with white bowls, clear glasses with glass pitchers. Add a few neutral linens or a small plant to break up the uniformity. Avoid overcrowding; leave some breathing room so the eye can rest.
Budget-Friendly Swap
If replacing entire doors isn't in the budget, try adding glass inserts to existing doors. Many hardware stores sell ready-made inserts that fit standard cabinet sizes. You can also remove the center panel and have a local glass shop cut a piece to size.
4. Create a Dedicated Mug Wall
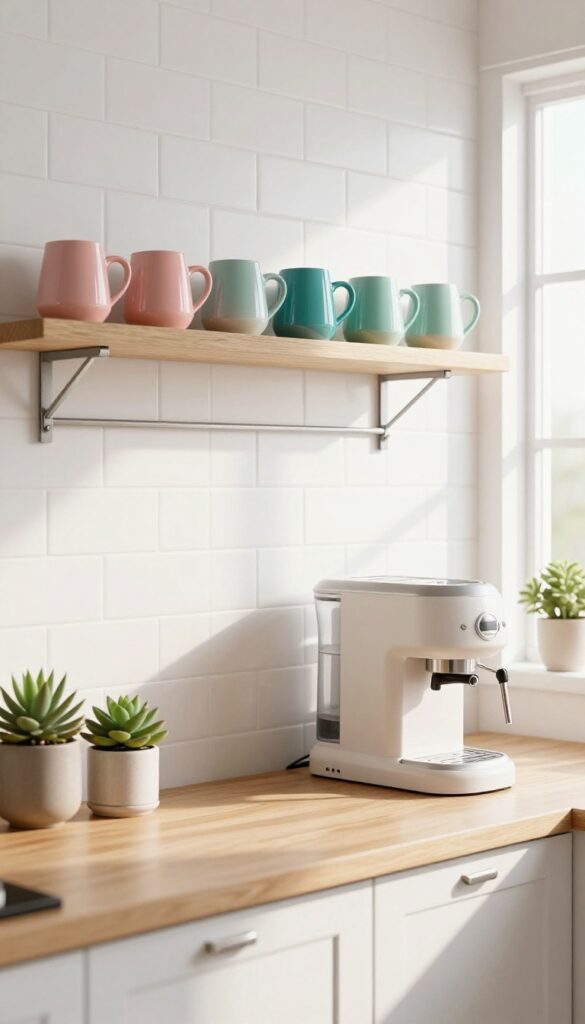
A mug wall turns a narrow strip of wall or the side of a cabinet into a functional display. By mounting a simple rail and hooks, you free up cabinet space while showcasing your favorite mugs as decor. This setup works especially well near a coffee or tea station, adding both charm and easy access to your morning routine.
Arranging mugs by color or style creates a graphic, intentional look that feels curated rather than cluttered. The visual repetition of mugs along a rail adds rhythm to the kitchen, and the open storage keeps everyday items within arm's reach. This weekend-friendly project requires minimal tools and instantly makes your kitchen feel more personal and airy.
Best Mug Styles
Stick with mugs that have a uniform hook-friendly handle—classic diner mugs, ceramic tumblers, or matte stoneware work beautifully. Mixing solids with subtle patterns keeps the wall interesting without overwhelming the eye. Avoid overly large or oddly shaped mugs that might crowd the rail.
Rail Placement Tip
Mount the rail about 12 to 18 inches above the counter so mugs hang at a comfortable height. If placing on a cabinet side, center the rail vertically for balance. Leave at least 2 inches between hooks so mugs don’t clink together.
Color Flow
Group mugs in a gradient or stick to two or three complementary tones that tie into your kitchen’s palette. For a cohesive look, pull colors from your backsplash or countertop. A monochromatic row feels calm and modern, while a rainbow arrangement adds playful energy.
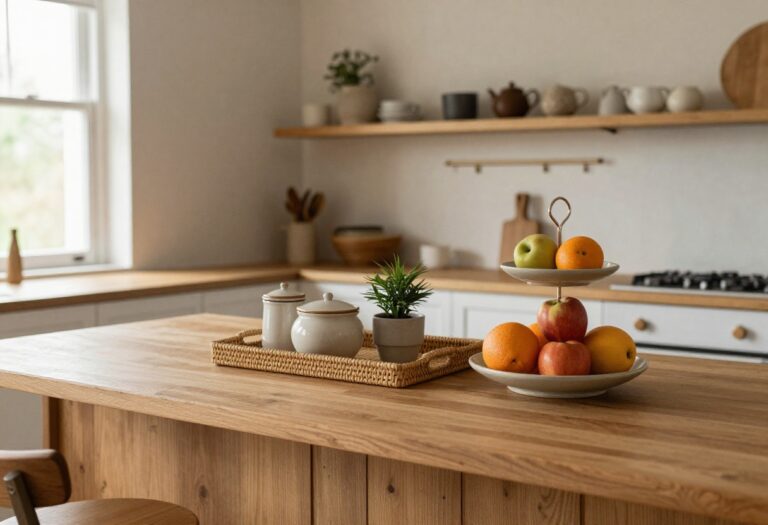
5. Use Open Shelving for a Pantry Wall
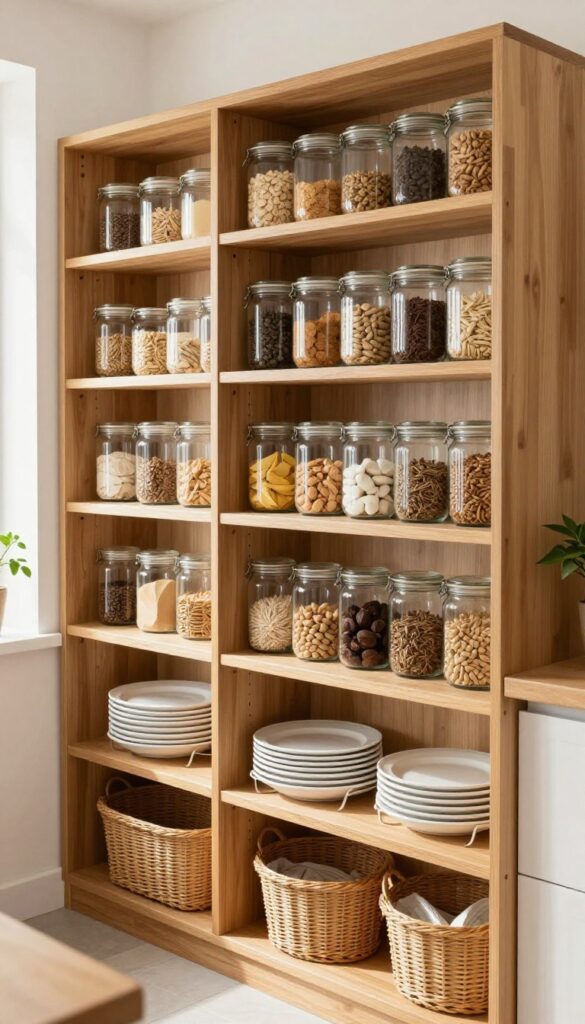
Pantry storage doesn't have to hide behind closed doors. By swapping upper cabinets on one wall for deep open shelves, you turn everyday ingredients into a visual feature. The trick is uniformity—matching glass jars for dry goods, wooden risers for plates, and woven baskets for loose items keep the look collected rather than cluttered.
This setup feels especially right for a weekend refresh because it's mostly about editing and reorganizing what you already own.
Replace upper cabinets on one wall with deep open shelves to create an airy pantry. Store dry goods in matching glass jars, stack plates on wooden risers, and keep baskets for odds and ends. The uniformity of containers keeps the visual noise low while everything stays accessible.
Container Strategy
Stick to one or two container families—clear glass for visibility and woven baskets for texture. Label jars with simple chalkboard tags or vinyl labels. This consistency is what makes open shelving feel intentional instead of messy.
Shelf Depth And Spacing
Go deeper than standard shelves—at least 16 inches—so you can fit cereal boxes and tall canisters. Space shelves 12 to 14 inches apart to accommodate both small spice jars and large flour containers without wasted vertical room.
Styling For Everyday Use
Group items by frequency of use: daily staples at eye level, backups on top shelves, and rarely used gadgets on the bottom. Add a few small plants or a pretty cutting board as visual breaks, but keep the focus on function.
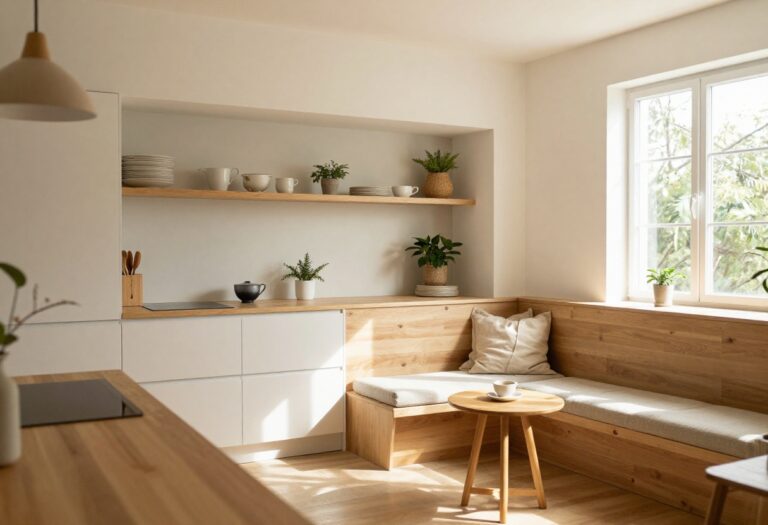
6. Add a Slim Shelf Under Upper Cabinets
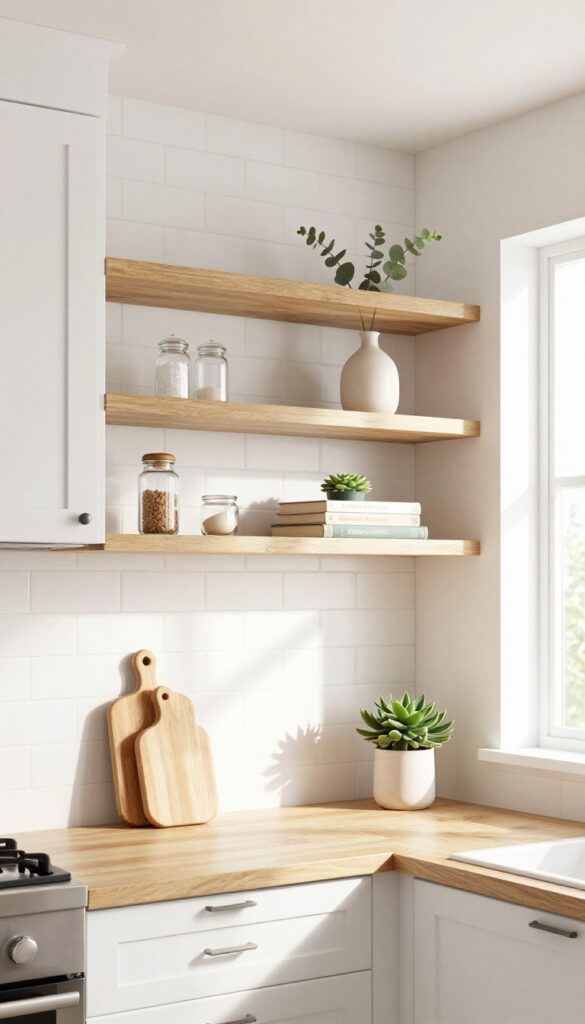
That strip of wall between your counter and upper cabinets is prime real estate. A slim shelf here turns dead space into a functional ledge for everyday items, making your kitchen feel more open and organized. It's a low-commitment upgrade that takes an afternoon to install and instantly gives your counters room to breathe.
A narrow shelf, just 4 to 6 inches deep, fits perfectly in the gap without protruding into your work area. Use it to hold small spice jars, olive oil bottles, or a stack of your most-used cookbooks. The key is keeping it intentional—limit what you display to items you reach for daily.
This keeps the shelf from looking cluttered and maintains that airy, open feel you're going for. For a weekend-friendly refresh, choose a shelf that matches your cabinet hardware or adds a subtle contrast, like warm wood against white cabinets.
Best Materials
- Go with a solid wood shelf for warmth or a sleek metal shelf for an industrial touch. Floating shelves with hidden brackets look clean and modern. If your kitchen has a lot of natural light, a light oak or bamboo option keeps things bright.
- For a more budget-friendly route, a painted MDF shelf can be just as charming and easy to clean.
Shelf Styling Tip
- Group items in small clusters of three or five for visual balance. Start with the tallest item at the back, like a salt cellar or a small vase, then layer shorter jars in front. Leave a few inches of empty space between groups so the shelf doesn't feel packed.
- This creates a curated look that feels effortless and intentional.
Where It Fits Best
This idea works especially well in galley kitchens or small L-shaped layouts where counter space is tight. Place the shelf above your coffee station or prep zone so your most-used spices and tools are within arm's reach. Avoid putting it over the sink or stove, where heat and moisture can damage items or make cleaning tricky.
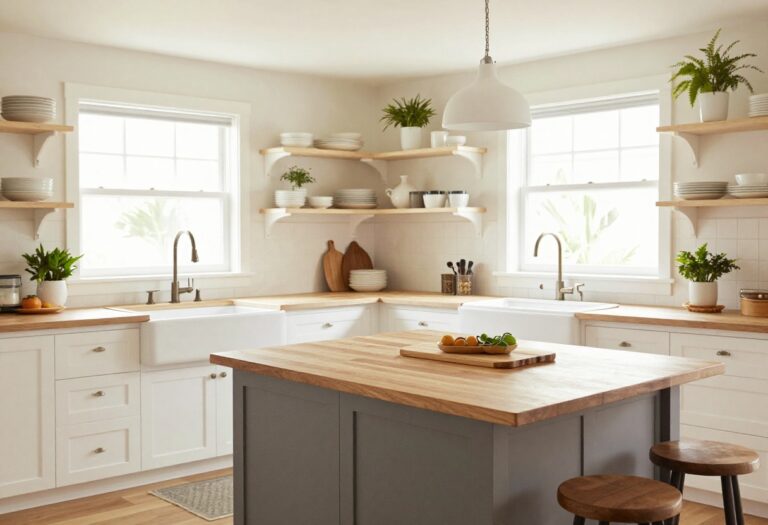
7. Style a Corner With Open Corner Shelves
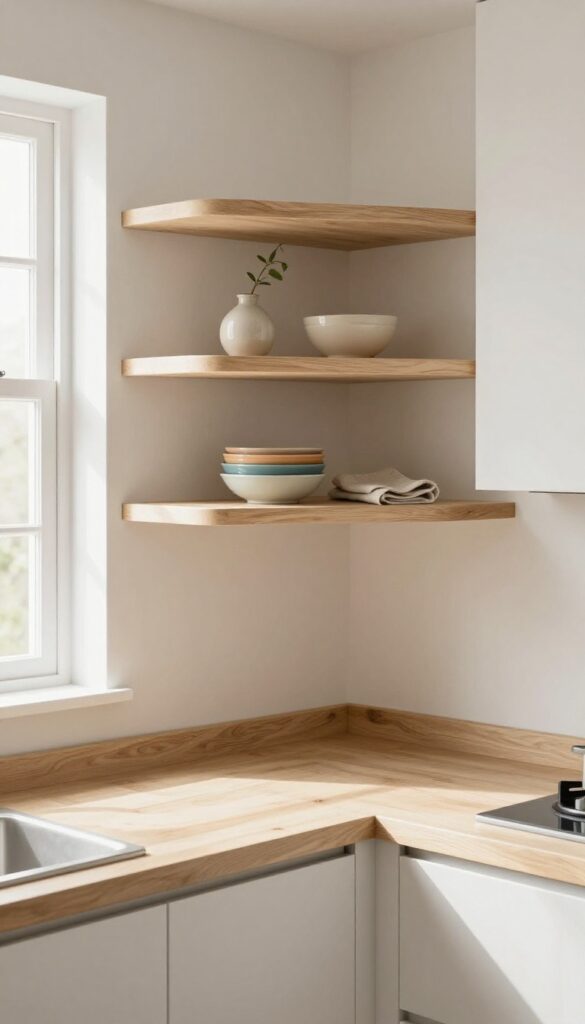
Awkward corner cabinets often become black holes for mismatched lids and forgotten pans. Swap them for open corner shelves—curved or angled—to turn that dead space into a focal point. The open design makes the corner feel larger and more intentional, while displaying a few ceramic pieces, a small plant, or a stack of colorful bowls adds personality without clutter.
Open corner shelves are a weekend-refresh friendly upgrade that instantly brightens a dark corner. By removing cabinet doors and bulky hardware, you create a sense of airiness that makes the kitchen feel more spacious. Choose shelves in a material that complements your existing cabinetry—warm wood for a farmhouse look, sleek metal for industrial, or painted MDF for a seamless blend.
The key is to keep styling minimal: group items in odd numbers, vary heights, and leave some negative space so the eye can rest.
Best Materials
For a clean, modern look, go with floating white oak shelves that match your countertops. If you prefer a more rustic vibe, reclaimed wood with visible grain adds warmth. For a budget-friendly option, paint MDF shelves the same color as your walls so they recede and let your display pieces shine.
Shelf Styling Tip
Stick to a cohesive color palette—like earthy ceramics, a single green plant, and a stack of neutral linen napkins. Avoid overcrowding; three to five items per shelf is plenty. Rotate seasonal pieces to keep the corner feeling fresh without a full redesign.
Small-space Fix
In a tiny kitchen, use curved corner shelves to soften the sharp angle and make the space feel more fluid. Install them at varying heights to draw the eye upward, which visually raises the ceiling. Add a small LED puck light underneath the top shelf to highlight your favorite pieces and banish shadows.
8. Hang a Pot Rack Over an Island or Stove
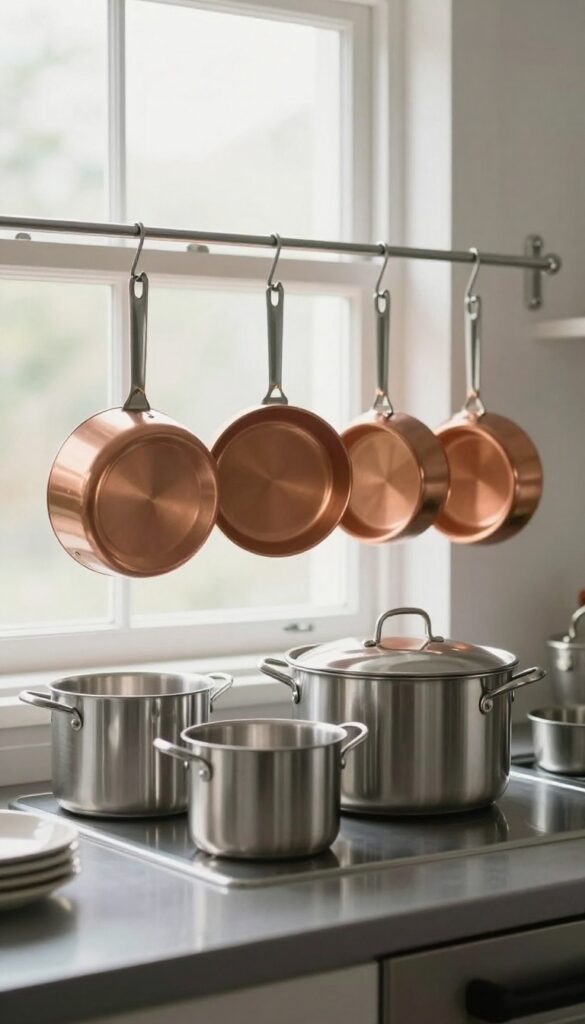
Hanging your pots and pans isn’t just a space-saver—it’s a way to turn everyday cookware into a design feature. A pot rack above the island or stove keeps heavy pieces within arm’s reach while freeing up cabinet real estate. The key is choosing a rack that feels intentional, not cluttered.
Whether you go for a sleek metal bar or a rustic wooden ladder, the look should blend with your kitchen’s personality.
A hanging pot rack is open storage that doubles as decor. Choose a sleek metal rack or a wooden ladder-style rack to match your kitchen's vibe. Hang pots and pans by size, and let the copper or stainless steel finishes add warmth and texture.
It frees up cabinet space and keeps cookware within easy reach.
Best Materials
For a clean, modern look, opt for a stainless steel or matte black rack. If your kitchen leans rustic or farmhouse, a wooden ladder rack with iron hooks adds warmth. Copper racks bring a warm glow and patina over time, perfect for a touch of vintage charm.
Layout Tip
Hang the rack so it’s centered over the island or stove, about 18–24 inches above the counter. This leaves enough headroom for tall cooks while keeping pots accessible. Arrange pans by size on the outer hooks and heavier pots in the center for balance.
Finishing Touch
- Group matching cookware sets together for a cohesive look. Add a few hanging utensils or a small herb bundle for extra texture. Keep the arrangement tidy—too many mismatched pieces can feel chaotic.
- A few empty hooks also give the display room to breathe.
9. Display a Collection of Cutting Boards
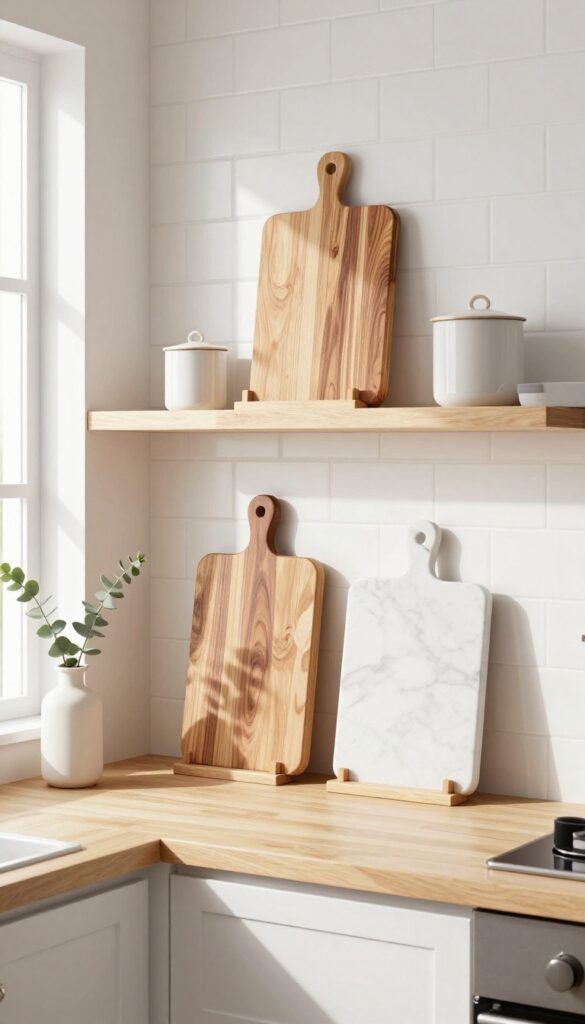
Cutting boards are the unsung heroes of kitchen decor—they work hard every day, but they can also pull their weight visually. Leaning a few wooden or marble boards against the backsplash or propping them on an open shelf adds natural texture and warmth without feeling cluttered. The best part?
You can swap them out by season or mood, making this one of the easiest ways to refresh your kitchen's look in minutes.
Think of your cutting boards as functional art. A mix of materials—like warm acacia wood, cool marble, and rich walnut—creates depth and visual interest. Lean them against the backsplash behind the stove or stack them on an open shelf near your prep area.
They're always within reach for chopping, but they also soften the hard surfaces of tile and countertops. Rotate them with the seasons: light bamboo for spring, dark walnut for fall, or a marble slab for holiday entertaining. This small swap keeps your kitchen feeling fresh without spending a dime.
Best Materials For Visual Impact
- Wooden boards bring warmth and organic texture, while marble or slate adds a sleek, modern contrast. Mixing both in the same display creates a balanced, layered look. For a cohesive palette, stick to neutral tones like beige, gray, and cream, or add a pop of color with a painted or resin board.
- Avoid plastic boards in the display—they tend to look utilitarian and can cheapen the aesthetic.
Shelf Styling Tip
- Prop boards vertically at different heights using small bookends or a simple wood block. Layer smaller boards in front of larger ones for depth. If your shelves are narrow, lean just two or three boards against the wall and let them breathe—overcrowding defeats the airy feel you're going for.
- Leave a little negative space around each board so the eye can rest.
Weekend Refresh Idea
- Switch out your boards seasonally or when you're craving a change. Store off-season boards in a cabinet or drawer. For a quick weekend refresh, pull out a board with a different grain or color and rearrange the group.
- It takes five minutes and instantly shifts the room's mood. Add a small vase of fresh herbs or a simple salt cellar next to the boards to complete the vignette.
10. Use Open Cabinets for a Coffee or Tea Station
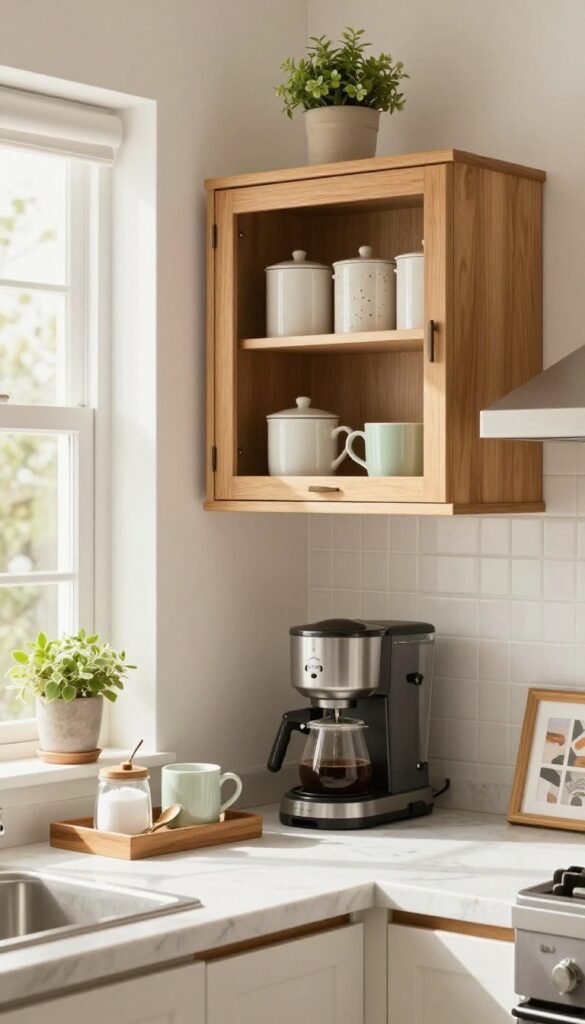
Carving out a dedicated beverage nook in your kitchen adds both function and charm. By using open shelving or a glass-front cabinet, you can turn a small corner into a morning ritual hub. This setup keeps your coffee or tea essentials within easy reach while preventing countertop clutter.
The visual effect is tidy and intentional, with mugs and canisters acting as decor. It works especially well in galley kitchens or near a window where natural light highlights the display.
Designate a small section of open shelving or a glass-front cabinet as a dedicated beverage station. Keep your coffee maker, a few favorite mugs, and canisters of beans or tea bags neatly arranged. Add a small tray for sugar and spoons.
This focused zone keeps the rest of the kitchen clutter-free and makes your morning routine feel special.
Best Materials
Stick with natural materials like wood shelves and ceramic canisters to keep the look warm and grounded. A marble or butcher block countertop below adds durability and a touch of luxury. Glass jars for coffee beans or tea bags let you see what you have while adding texture.
Shelf Styling Tip
- Group mugs by color or material for a cohesive display. Stack a few small plates or saucers between mugs to add visual rhythm. Leave some breathing room between items so the shelf doesn't feel crammed.
- A small plant or a framed photo can soften the look.
Small-space Fix
If counter space is tight, mount a narrow shelf above the coffee maker to hold mugs and canisters. Use a wall-mounted magnetic strip for spoons or a small hook for a tea infuser. Every inch counts, and vertical storage keeps the station compact.
FAQ
Do open cabinets make a kitchen look messy?
Not if you keep them intentionally styled. Stick to a limited color palette, use matching containers, and only display items you use regularly. A quick weekly dusting and occasional edit will keep things looking fresh.
How do I keep open shelves from getting dusty?
A light dusting once a week with a microfiber cloth is usually enough. For items you don't use often, consider storing them in closed cabinets and rotating seasonal decor onto the shelves.
Can I mix open and closed storage in a small kitchen?
Absolutely. In fact, mixing both is a great way to balance openness with hidden storage. Use open shelves for your prettiest items and closed cabinets for everything else.
What should I put on open kitchen shelves?
Stick to items that are both functional and attractive: everyday dishes, glassware, cookbooks, plants, and jars of dry goods. Avoid plastic packaging, mismatched containers, and rarely used gadgets.
Are glass-front cabinets a good alternative to open shelves?
Yes, they offer a similar airy feel but with less dust and more flexibility. You can display items neatly inside while keeping them protected. Frosted glass is a great option if you want a softer look.
Conclusion
Open cabinet storage doesn't have to mean sacrificing style or practicality. With a little thought and a weekend's worth of effort, you can transform your kitchen into a space that feels lighter, more organized, and genuinely inviting. Start with one small change—a single shelf or a mug wall—and see how it shifts the whole room's energy.
The best part? You can always tweak and rearrange as your needs evolve.