10 Kitchen Corner Organization Ideas for a Tidier, Warm Kitchen
Kitchen corners have a reputation for becoming dumping grounds—mismatched lids, rarely-used gadgets, and that one spice jar you forgot existed. But with a little intention, these awkward spots can become some of the most functional areas in your kitchen.
The trick is to choose solutions that feel natural to your space and your daily habits, not just Pinterest-perfect but impossible to maintain.
Here are ten ideas that balance smart storage with the cozy, lived-in warmth that makes a kitchen feel like home.
1. Lazy Susan for Deep Corner Cabinets
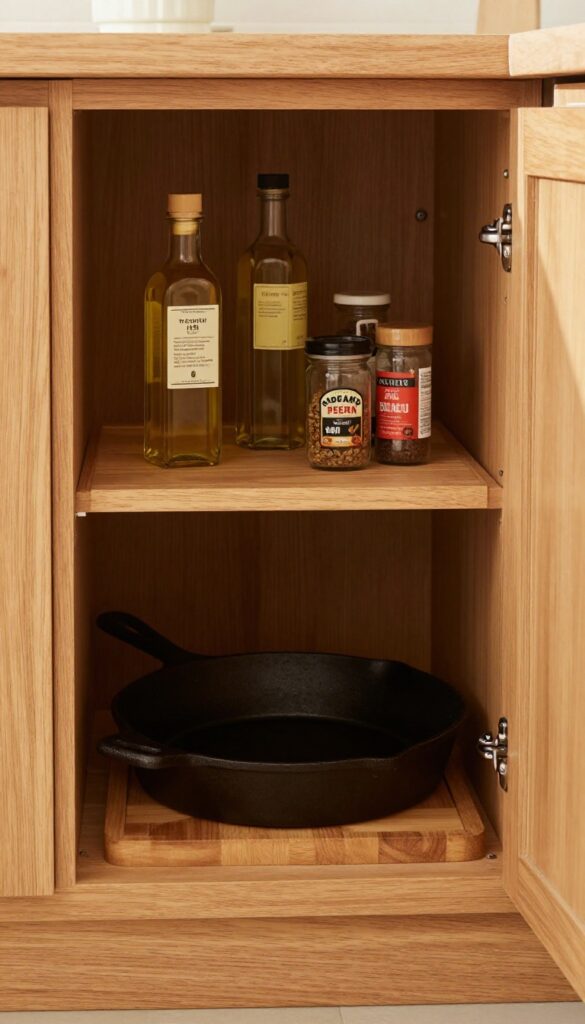
Deep corner cabinets are notorious for swallowing up pots, pans, and small appliances into a dark abyss. You know the drill—you have to get on your hands and knees, rummage around, and inevitably find that one lid you needed at the very back. A two-tier lazy Susan changes all that by bringing everything into plain view with a simple spin.
It’s one of those upgrades that feels almost too simple, but once you have it, you’ll wonder how you ever lived without it. The best part? It keeps your kitchen feeling warm and lived-in because everything you need is right where you can see it, not hidden away in a messy pile.
A lazy Susan isn't just for the pantry—it's a game-changer for those deep base cabinets that always seem to become a black hole. By installing a sturdy two-tier version, you can store heavier items like cast iron skillets and Dutch ovens on the bottom tier, while reserving the top for everyday oils, vinegars, and spice jars. The spinning action makes every item instantly accessible, so you never have to dig or unstack again.
This idea works especially well in kitchens with corner cabinets that are otherwise hard to reach, turning wasted space into a smooth, spin-and-grab station. For a warm, lived-in feel, choose a wooden lazy Susan or one with a natural finish that complements your cabinetry.
Best Materials
- For durability and a touch of warmth, opt for a bamboo or solid wood lazy Susan. These materials hold up well against heavy cookware and add a natural texture that softens the kitchen's look. If you prefer something more modern, clear acrylic or metal options work too, but wood tends to feel cozier and more inviting.
- Make sure the base is sturdy and has a non-slip surface or liner to keep items from sliding when you spin.
Layout Tip
Arrange items by frequency of use: place daily essentials like olive oil, salt, and your go-to spices on the top tier, and reserve the bottom for occasional-use pots or small appliances. To avoid a jumbled mess, group similar items together—keep all baking spices in one spot and cooking oils in another. This way, you can grab what you need without spinning the tray back and forth multiple times.
Finishing Touch
Add a small adhesive label or a piece of chalkboard tape on the cabinet door to remind yourself what's on each tier. This simple detail keeps the system organized and makes it easy for everyone in the household to find and put things back. For an extra cozy touch, line the cabinet floor with a pretty patterned shelf liner that peeks out when you open the door.
2. Open Shelving with Baskets
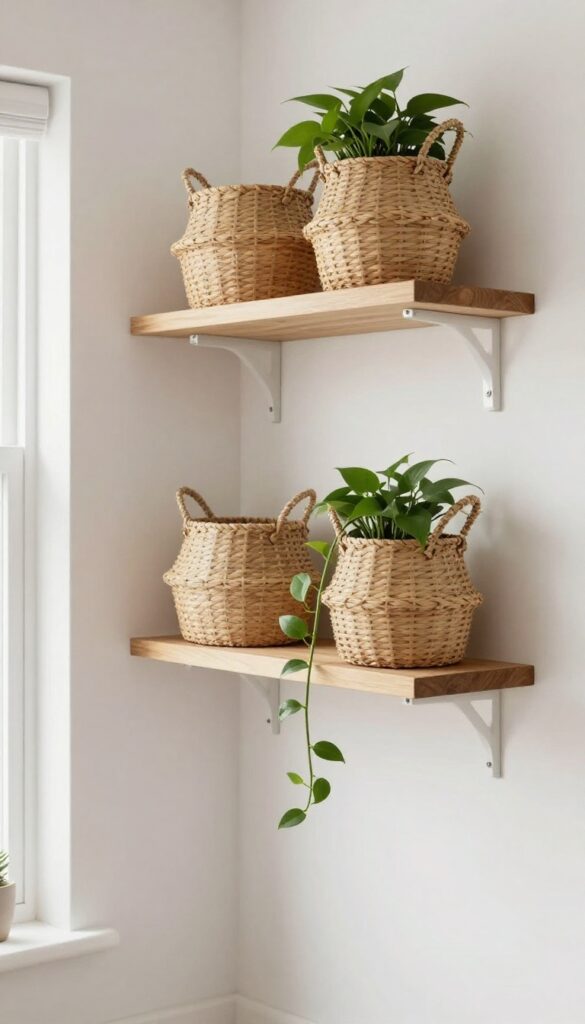
An unused corner can quickly become a dead zone in the kitchen—too small for a cart, too awkward for extra cabinets. Floating shelves change that. By mounting a couple of sturdy shelves and topping them with woven baskets, you get hidden storage that still feels airy and intentional.
The baskets hide the clutter of linens or snack bags while adding a soft, natural texture that makes the corner feel cozy rather than cold.
This setup works best in a corner that's visible but not in the main traffic path. Go for baskets in a warm neutral like seagrass or rattan to keep the look cohesive. Use them to store dish towels, pot holders, or even bulk pasta and rice in sealed bags.
The key is to keep the baskets uniform in color and size so the shelf reads as organized, not chaotic. Leave a few inches of space between baskets for visual breathing room.
Best Materials
Stick with natural fibers like seagrass, rattan, or water hyacinth for the baskets. They add warmth and contrast nicely against painted drywall or tile. For the shelves, choose solid wood with a matte finish—avoid glossy or metal shelves, which can feel too modern and clash with the cozy vibe.
Shelf Styling Tip
- Don't fill every inch of the shelf with baskets. Leave one end open for a small plant or a stack of cookbooks. This breaks up the repetition and makes the corner feel styled, not just stuffed.
- A trailing pothos or a small ceramic vase adds a soft, lived-in touch.
Layout Tip
Mount the shelves at slightly different heights if the corner is tight. A higher shelf for lighter baskets and a lower one for heavier items keeps the eye moving upward and makes the space feel taller. Use L-brackets that match your cabinet hardware for a seamless look.
3. Corner Drawer Pull-Outs
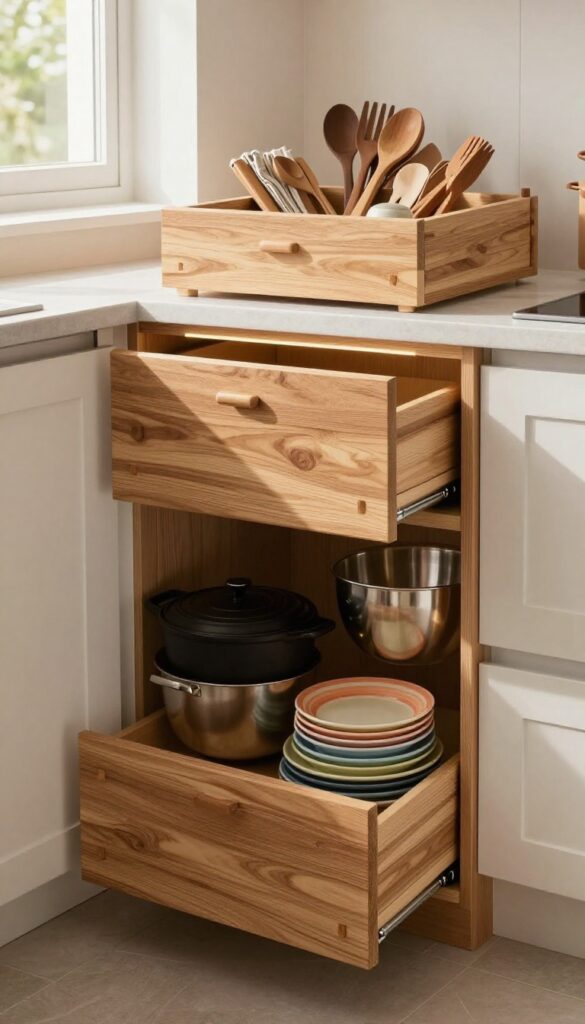
That dark, awkward corner cabinet where things go to disappear? It doesn't have to be that way. Custom pull-out drawers turn wasted space into the most functional spot in your kitchen.
Instead of crouching and fishing around for that one baking sheet, everything glides right out into plain view. It's a smart upgrade that makes your kitchen feel instantly more organized and spacious.
Corner cabinets are notorious for being black holes of forgotten cookware. But with full-extension pull-out drawers, you can store heavy items like stand mixers, Dutch ovens, or stacks of mixing bowls without the struggle. The key is to customize the drawer heights so tall pots and small spice jars each have a perfect home.
When everything has a place and slides out smoothly, you'll wonder why you didn't do this sooner.
Best Materials
Soft-close plywood drawers with dovetail joints are worth the investment—they hold up to heavy cookware and feel smooth for years. For a warmer look, choose a wood tone that matches your cabinets, or go with a contrasting color like navy or sage for a pop of personality. Metal drawer inserts or peg-style dividers keep lids and cutting boards upright and easy to grab.
Layout Tip
Work with a cabinet maker to design drawers that fit your specific corner—some are L-shaped, others are diagonal. Consider a two-tier system: a shallow top drawer for utensils and linens, and deeper bottom drawers for pots and small appliances. Make sure the slides extend fully so you can see everything at a glance.
Finishing Touch
Add a slim LED strip under the counter above the pull-outs. The light turns on automatically when you open the drawer, making it easy to find that tiny measuring spoon or the right lid. It's a small detail that makes the corner feel intentional and bright.
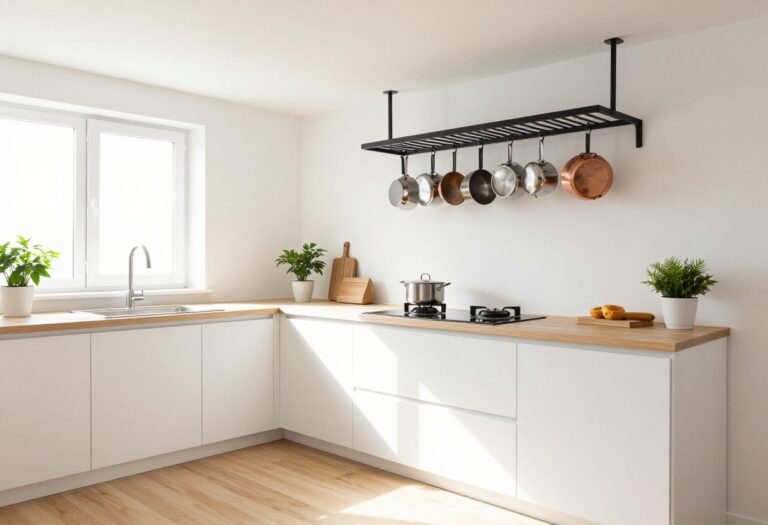
4. Wall-Mounted Magnetic Strip
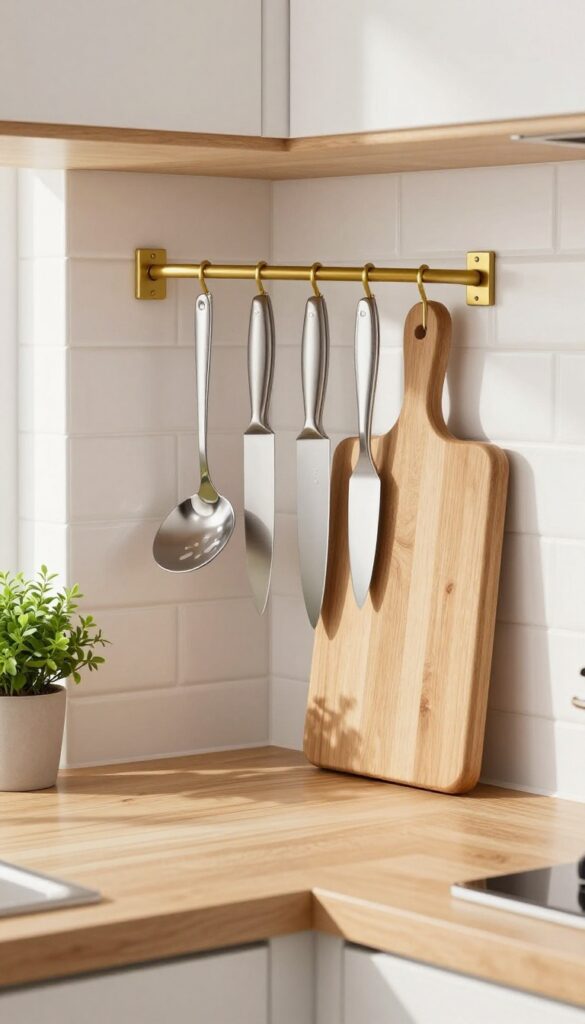
A wall-mounted magnetic strip is one of those kitchen upgrades that feels almost invisible until you start using it. In a tight corner near your prep area, it turns wasted vertical space into a handy home for knives, metal utensils, or even small spice tins. The best part?
It keeps your countertops and drawers clutter-free while putting everything you reach for most right where you need it.
A wall-mounted magnetic strip is a smart, space-saving solution that works especially well in narrow corners where cabinets or shelves won't fit. By mounting it near your main prep zone, you can free up drawer space for larger tools and keep your daily essentials visible and accessible. The visual effect is clean and almost sculptural—especially when you arrange knives or utensils in a neat row.
For a warm, lived-in feel, choose a strip with a wood or brass finish instead of stark stainless steel. This small swap makes the strip feel like part of the decor, not just a hardware afterthought.
Best Materials And Finishes
- For a look that blends into a cozy kitchen, opt for a magnetic strip with a natural wood backplate or a warm brass rail. Stainless steel is still practical but can feel cold in a lived-in space. If your kitchen has open shelving or visible hardware, match the strip's finish to your cabinet pulls or faucet for a cohesive feel.
- A matte black strip can also work well in industrial or modern farmhouse kitchens.
Placement And Layout Tip
Mount the strip on the wall directly behind your cutting board or stove, but keep it at least a few inches away from the counter to avoid splashes. A vertical strip in a narrow corner can hold longer items like spatulas and tongs, while a horizontal strip above a small counter works best for knives. Test the height by holding your most-used knife—the handle should be easy to grab without stretching.
Styling And Finishing Touch
- To keep the strip looking intentional, limit it to items you use daily. Add a small wooden tray or ceramic dish on the counter below to catch any drips from washed utensils. If you hang spice tins, group them by color or label them with a chalk marker for a personal touch.
- This setup not only saves space but also turns your tools into a functional wall display.
5. Corner Shelf with Hooks
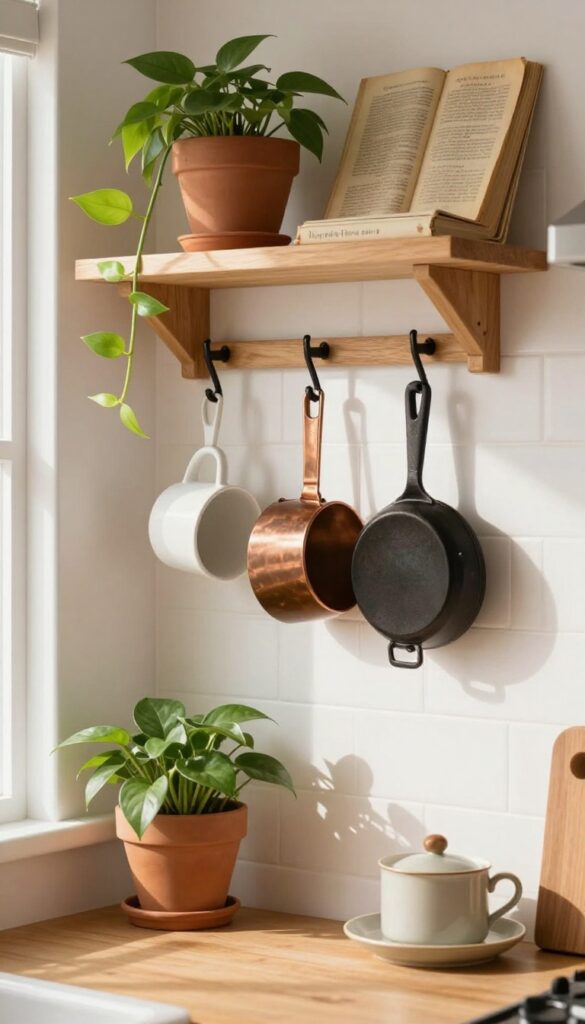
Corners are the forgotten real estate of any kitchen. They tend to collect stray bottles, dusty spice jars, or just empty air. But a small shelf tucked into that corner changes everything.
It draws the eye upward, makes use of dead space, and gives you a spot to show off something pretty. Adding hooks underneath turns it into a double-duty organizer without taking up any counter room at all.
This idea works especially well in a tight galley kitchen or above a compact coffee station. The shelf itself can be a simple floating design or a small wooden bracket shelf. The hooks below give you a place to hang lightweight items like mugs, measuring cups, or even a small skillet.
The result is a corner that feels intentional and warm, not forgotten. Choose a shelf in a wood tone that matches your cabinets or go for a contrasting black metal for a more industrial feel. Keep the shelf styled with just one or two items—a small trailing plant and a favorite cookbook, for example—so it doesn't look crowded.
Best Materials
- Solid wood or bamboo adds natural warmth and blends with most kitchen styles. For a more modern look, try a black metal shelf with a wood top. The hooks should match the shelf finish—brass or matte black are both sturdy and stylish.
- Avoid plastic shelves here; they won't give the same lived-in feel.
Shelf Styling Tip
- Keep the shelf decor minimal but meaningful. A small ceramic vase with dried eucalyptus, a single cookbook propped open, or a tiny framed photo all work well. The key is to leave some breathing room so the shelf doesn't become clutter.
- The hooks underneath will already add visual busyness, so the shelf itself should feel calm.
Storage Tip
- Use the hooks for items you reach for daily. Mugs are a natural choice, but you can also hang a small kitchen towel or a set of measuring spoons on a ring. If the shelf is near the sink, hang a dish brush or a small scrubby.
- Keep everything within easy reach to make the corner truly functional.
6. Tiered Spice Rack Inside Cabinet Door
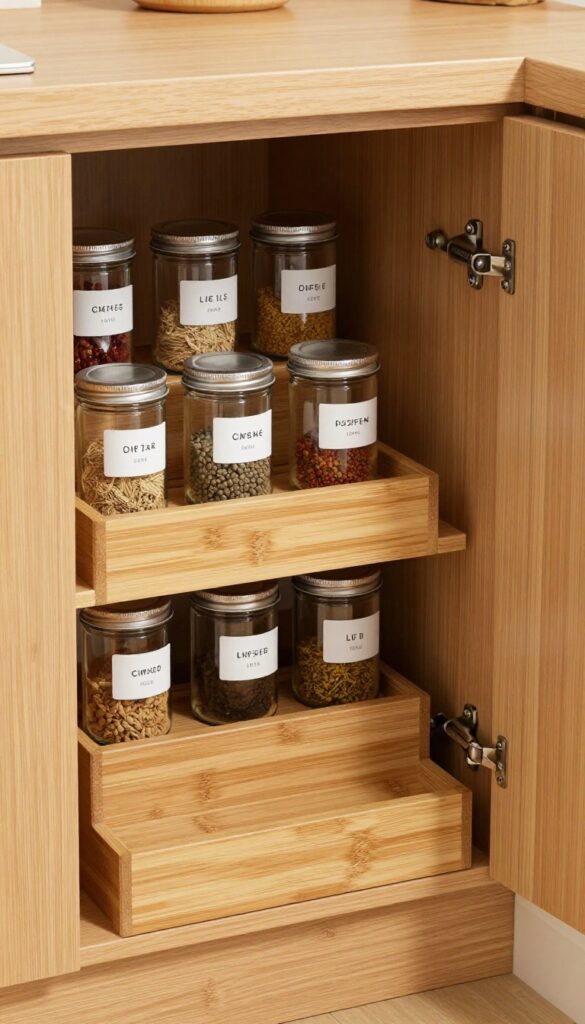
Corner cabinets often become black holes for baking pans and rarely-used gadgets. But the inside of the door? That's prime real estate just waiting to be claimed.
A tiered spice rack mounted on the back of a corner cabinet door turns wasted vertical space into a neatly organized spice library. Every jar is visible at a glance, and your counter stays blissfully clear of those mismatched spice tins that always seem to multiply.
Mounting a tiered spice rack on the inside of a corner cabinet door is a smart, space-aware solution that instantly frees up counter and shelf space. The rack typically holds small jars in stepped rows, so even the back row is easy to reach. Label each jar with the spice name facing outward, and you'll never dig through a cluttered drawer again.
This trick works especially well in galley kitchens or small apartments where every inch counts. Plus, it keeps your spices away from heat and light, which helps them stay fresh longer.
Best Materials
- Look for a rack made from bamboo, stainless steel, or coated wire. Bamboo adds a warm, natural touch that fits the lived-in aesthetic, while metal feels more modern and is easy to wipe clean. Avoid plastic racks that can warp or look cheap over time.
- If your cabinet door is thin, choose a lightweight rack that won't strain the hinges.
Storage Tip
- Use uniform small glass jars with airtight lids for a cohesive look. Label each jar with a simple white label and black text—no need for fancy calligraphy. Arrange spices alphabetically or by frequency of use (most-used at eye level).
- This system makes grabbing cumin or cinnamon feel almost automatic.
Small-space Fix
If your corner cabinet door is narrow, opt for a single-tier rack instead of a double. You can also install a slim magnetic strip on the door to hold metal spice tins. For deeper cabinets, consider a rack that attaches to the door but also has a small shelf below for taller bottles like vanilla extract.
7. Rolling Cart in a Corner Gap
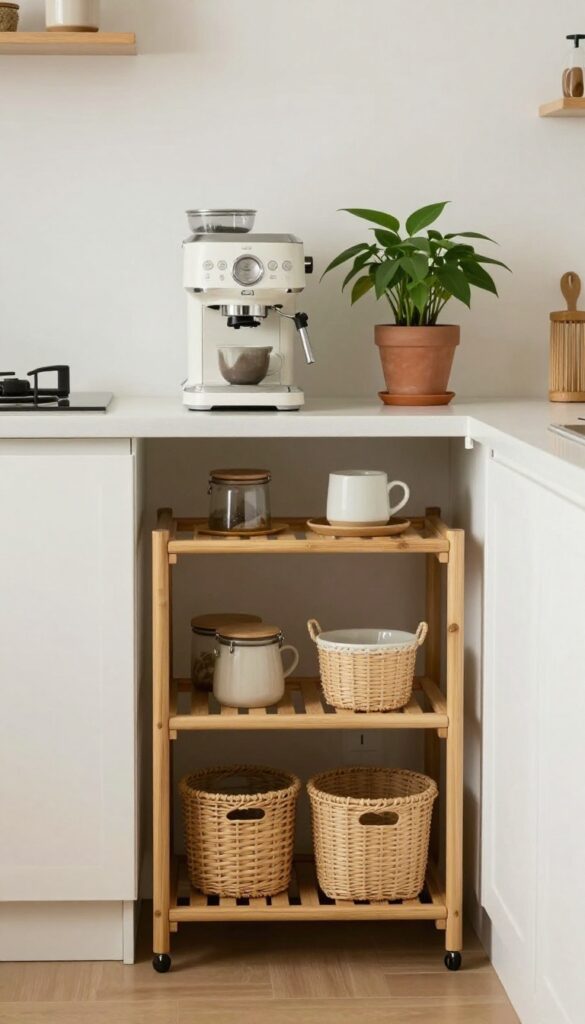
That awkward gap between your counter and the wall or next to the fridge can feel like wasted real estate. A slim rolling cart slides right in, turning dead space into a functional mini zone. It’s the kind of solution that feels smart without looking temporary—the cart’s wheels let you pull it out for easy access, then tuck it back out of the way.
In a warm, lived-in kitchen, this cart becomes a natural part of the flow, holding everyday essentials within arm’s reach.
A rolling cart in a narrow gap is a game-changer for small kitchens. It adds storage without a renovation, and because it’s on wheels, you can move it wherever you need extra surface space. Use it for overflow pantry items like canned goods and spices, or set it up as a coffee station with your machine, mugs, and syrups.
The key is choosing a cart that fits the gap snugly—measure first, then look for one with shelves that suit your needs. For a warm, lived-in feel, opt for wood or a wood-and-metal combo, and style it with a small plant or a woven basket to soften the look.
Best Materials For A Cozy Look
- A wooden cart with a natural finish brings warmth, while a white or black metal frame feels more industrial. For a lived-in vibe, go with a bamboo or acacia wood cart—they patina nicely over time and add texture. If your kitchen has open shelving, match the cart’s wood tone to your shelves for a cohesive look.
- Avoid glossy or overly modern finishes if you’re aiming for that cozy, relaxed feel.
Layout Tip: Zone It By Use
- Treat the cart as a dedicated zone. If it’s a coffee station, keep the top shelf for the machine and mugs, the middle for syrups and pods, and the bottom for a small trash bin or extra supplies. For pantry overflow, group similar items in baskets or bins—this keeps the cart looking tidy and makes it easy to grab what you need.
- Place the cart near an outlet if you’re plugging in appliances, and leave a few inches of clearance so the wheels can roll freely.
Finishing Touch: Add A Soft Element
To keep the cart from feeling too utilitarian, add a small cutting board or a ceramic tray on top. A little plant—like a pothos or a succulent—brings life, and a linen towel draped over the handle adds softness. These touches make the cart feel intentional and part of the room’s decor, not just a storage afterthought.
8. Corner Pegboard Wall
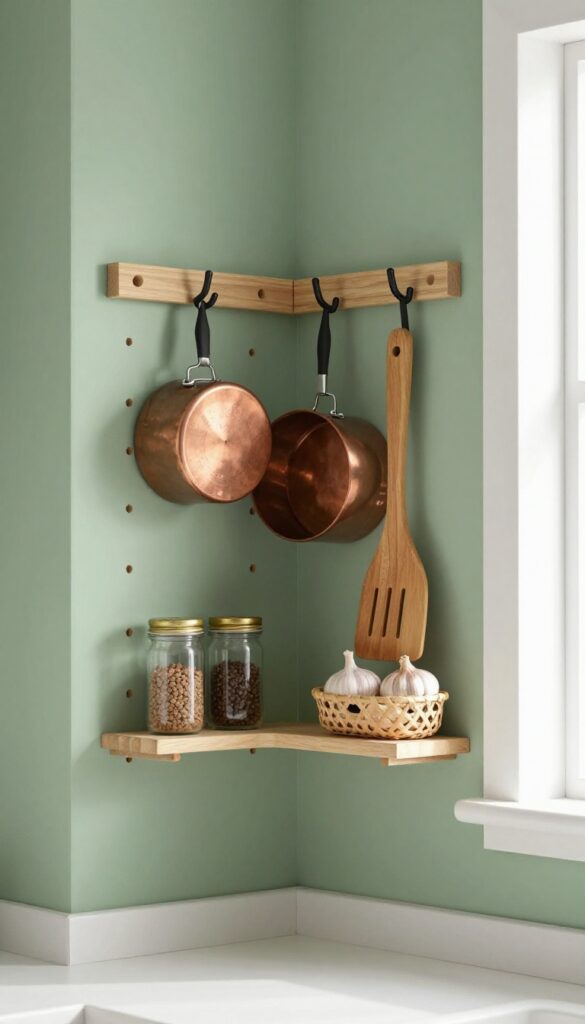
A corner wall often gets ignored—too awkward for shelves, too small for a cart. But cover it with a pegboard, and suddenly that dead zone becomes one of the most flexible spots in your kitchen. The beauty of a pegboard is that it adapts to whatever you need: hooks for pots and ladles, small shelves for spices or oils, and little bins for garlic or onions.
It turns a blank corner into a warm, lived-in display that changes as your cooking habits do.
Pegboards aren't just for garages anymore. In a kitchen corner, they create a vertical storage system that keeps everyday tools visible and within arm's reach. Because you can rearrange the accessories anytime, the setup can grow with you—whether you're a minimalist who hangs only a few utensils or a collector who wants every whisk and spatula on display.
The key is choosing a warm wood or a soft, muted color for the pegboard itself, so it feels like intentional decor rather than a workshop leftover.
Best Colors & Materials
- Skip the standard white pegboard—it can feel too industrial. Instead, go for a natural birch or bamboo finish that brings warmth, or paint the pegboard a soft sage green or dusty blue to blend with your cabinets. For a truly custom look, use a reclaimed wood pegboard or one with a live edge.
- The accessories (hooks, shelves, bins) should be in black or brass for contrast, or match the pegboard color for a more seamless feel.
Layout & Styling Tip
- Arrange items by frequency of use: keep daily tools like spatulas and tongs at eye level, and store less-used gadgets (like a pastry brush or citrus reamer) higher up. Mix in a small shelf for a jar of wooden spoons or a tiny plant to soften the look. Leave some empty pegboard space—it prevents visual clutter and lets the arrangement breathe.
- A small LED strip light above the pegboard casts a warm glow and makes the corner feel intentional.
Small-space Fix
Even the tiniest corner works—just use a smaller pegboard cut to fit. If your corner is really narrow, opt for a single column of pegboard and use only slim hooks for measuring spoons or a tea towel. You can also mount the pegboard on the wall at an angle (like a corner shelf) to maximize the usable surface without sticking out too far.
9. Under-Shelf Baskets for Corner Shelves
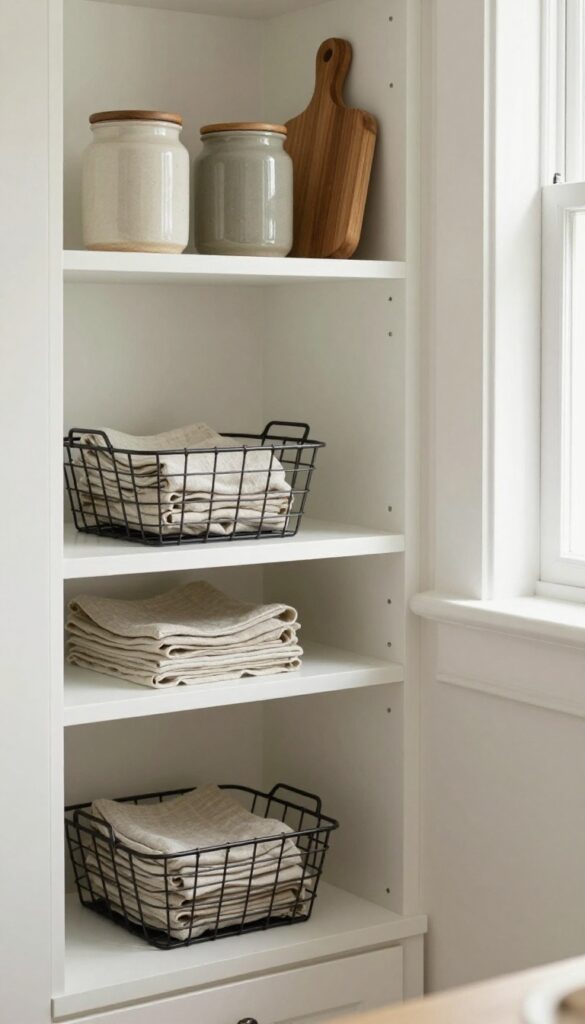
Corner shelves can be tricky—they often end up as dumping grounds for random items, or worse, they sit mostly empty because reaching the back feels like a workout. But there’s a clever way to make that awkward spot work harder without sacrificing style. Clip-on wire baskets attach right under the shelf, creating instant storage that’s both invisible from above and surprisingly roomy.
These baskets are perfect for lightweight kitchen essentials that tend to clutter countertops or drawers. Napkins, tea towels, plastic wrap, and even small spice packets can live here, freeing up prime real estate elsewhere. The best part?
They don’t eat into your shelf space at all—you’re just using the underside. In a warm, lived-in kitchen, the metal adds a subtle industrial touch that pairs nicely with wood or white shelves. Keep the baskets in a matte black or brushed brass finish to tie into your cabinet hardware.
For a cozy feel, line the basket with a small cloth napkin or a piece of linen to soften the look and keep items from slipping through.
Best Materials
- Go for sturdy wire with a coated finish—either black, white, or brass. Avoid thin, flimsy metal that might warp under weight. The coating also prevents scratches on your shelf and gives a more polished appearance.
- If your kitchen leans rustic, choose an aged bronze or copper tone.
Storage Tip
- Use these baskets for items you grab often but don’t want on display. Think dish towels, reusable bags, or even a small collection of wooden spoons. Group similar items together so you can quickly find what you need.
- For corner shelves that are lower down, store heavier items like cast iron lids or small mixing bowls—just make sure the clips are rated for the weight.
Shelf Styling Note
- To keep the look intentional, match the basket style across all shelves in the same corner. If you have multiple corner shelves, use the same finish for consistency. Let the baskets peek out just slightly so they feel like a design feature, not an afterthought.
- Pair them with a trailing plant on the shelf above to soften the metal lines.
10. Corner Banquette with Hidden Storage
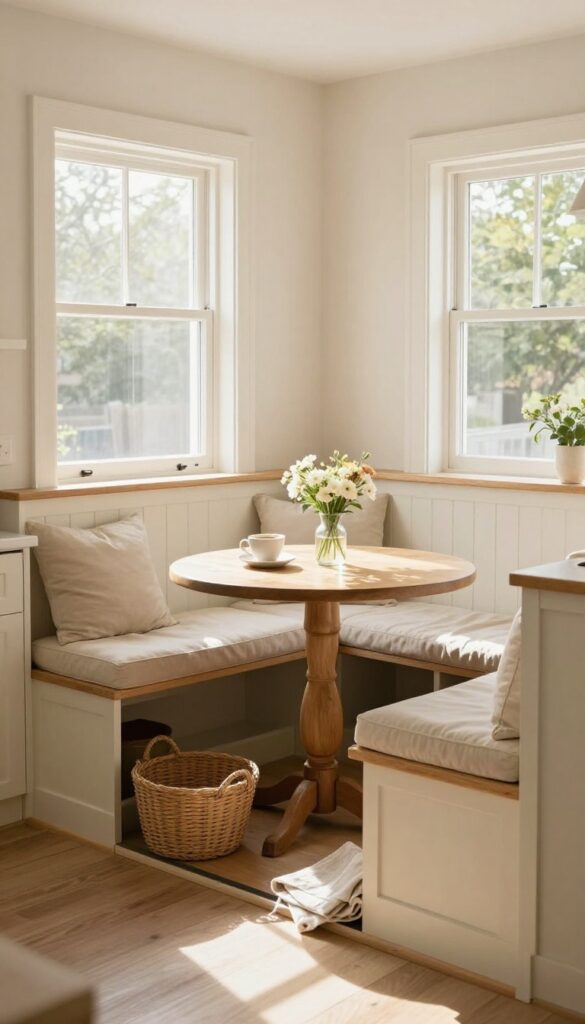
A corner banquette does double duty as both a cozy dining nook and a secret storage powerhouse. By building in a bench with lift-up seats, you can stash everything from holiday platters to extra table linens out of sight. It’s the kind of smart, space-saving solution that makes your kitchen feel bigger and more intentional—without sacrificing warmth or style.
A corner banquette turns an awkward, unused corner into a favorite spot for morning coffee or casual dinners. The hidden storage underneath keeps rarely-used items neatly tucked away, so your kitchen stays clutter-free. Choose a warm wood tone or a soft painted finish to match your cabinetry, and add cushions in a durable, washable fabric for comfort.
This idea works especially well in eat-in kitchens or breakfast nooks where every square inch counts.
Best Materials
Opt for plywood or MDF for the bench base, painted to match your trim or cabinets. For the seat cushions, go with a performance fabric like Sunbrella or a heavy-duty cotton blend that can handle spills and daily use. A solid wood top adds warmth and a furniture-like feel.
Storage Tip
Install gas-lift hinges on the seat lids so they stay open safely while you load or unload items. Use shallow bins or dividers inside to keep smaller items like napkins and placemats organized. Label the bins so you can grab what you need without digging.
Layout Tip
Leave at least 12 inches of clearance between the bench and the table edge for easy seating. If your corner is tight, consider a custom triangular bench that fits the exact dimensions. Pair with a round or pedestal table to make getting in and out easier.
FAQ
What is the best way to organize a deep corner cabinet?
A lazy Susan or pull-out drawers are the most effective solutions. They make items easy to access and prevent things from getting lost in the back.
How can I organize a small kitchen corner without cabinets?
Use open shelving with baskets, a rolling cart, or a pegboard. These options add storage without permanent installation and keep the space feeling open.
Are corner organization ideas expensive?
Not necessarily. Many ideas like under-shelf baskets, magnetic strips, or DIY pegboards are budget-friendly. Custom pull-outs cost more but can be a worthwhile investment.
How do I keep corner shelves from looking cluttered?
Use baskets or bins to group items, and limit what you display. Stick to a color scheme and leave some empty space for a balanced look.
Can I organize a corner without losing counter space?
Yes. Wall-mounted solutions like shelves, pegboards, or magnetic strips keep the counter clear. Rolling carts can be moved out of the way when not in use.
Conclusion
A tidy kitchen doesn't require a complete overhaul—just a few smart tweaks to those tricky corners. Each of these ideas is designed to fit your daily rhythm while keeping the space warm and welcoming.
Start with one corner that bothers you most, and see how a small change can make the whole room feel more put-together. The goal isn't perfection; it's a kitchen that works for you and still feels like home.