10 Cozy Kitchen Notice Board Ideas for Notes, Menus, and Weekly Plans
Kitchen notice boards often get relegated to cluttered corners or forgotten altogether. But with a little thought, they can become a warm, layered focal point that keeps your daily life organized without sacrificing style.
Whether you're pinning this week's menu, a grocery list, or a sweet note from your kid, the right board makes everything feel intentional. A cozy kitchen thrives on texture and warmth—think soft fabrics, natural wood, and soft lighting.
Notice boards fit right into that vibe when you choose materials and layouts that feel inviting rather than purely functional. The trick is to layer in personal touches while keeping the overall look cohesive.
1. Fabric-Covered Corkboard with Ribbon Grid
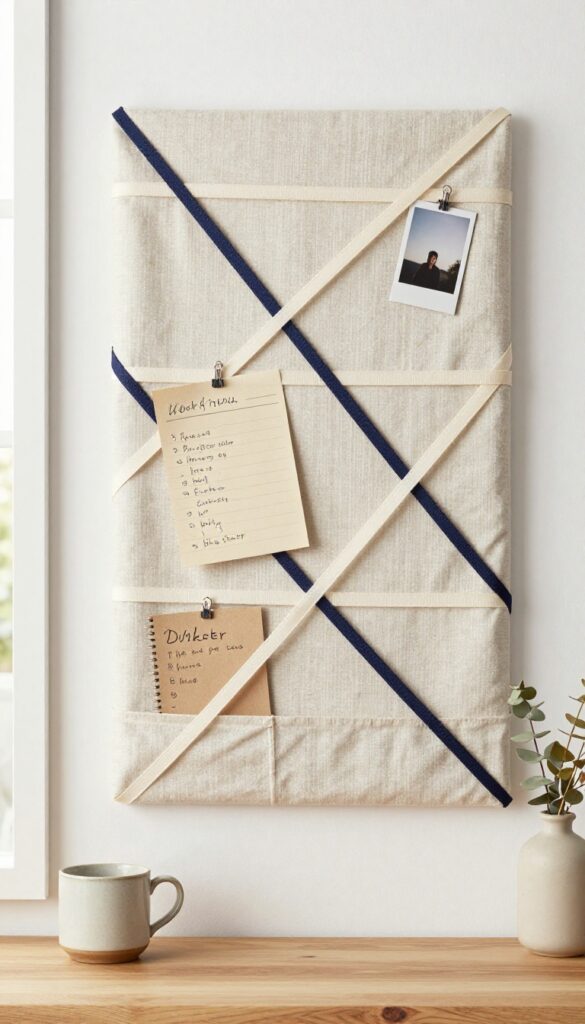
Plain corkboards can feel a little too office-like for a cozy kitchen. By wrapping yours in a soft fabric and adding a ribbon grid, you get a notice board that feels more like decor than utility. The fabric adds warmth and texture, while the ribbons create neat little pockets for tucking notes, menus, and photos—no pins required.
It’s an easy weekend project that instantly makes your kitchen feel more layered and personal.
Start with a standard corkboard—any size works, but a medium rectangular one is great for above a desk or beside the fridge. Choose a linen or cotton fabric in a warm neutral like oatmeal, soft taupe, or muted sage. Cut the fabric a few inches larger than the board, wrap it tightly around, and secure it on the back with staples or adhesive.
Then, use grosgrain or cotton ribbon in a contrasting or complementary color—think cream with a thin navy stripe, or blush pink with natural jute. Crisscross the ribbons diagonally or in a grid pattern, stapling or pinning them to the back. The result is a soft, tactile surface where you can slide in weekly menus, grocery lists, and kids’ artwork without damaging anything.
It softens the hard lines of a kitchen and adds a cozy, collected feel.
Best Fabric And Ribbon Pairings
- For a truly cozy look, stick with natural materials. Linen in oatmeal or stone pairs beautifully with a muted sage or dusty rose ribbon. If your kitchen leans modern, try a textured cotton in charcoal with a cream or tan ribbon.
- The key is contrast—not too loud, but enough that the grid reads clearly. Avoid shiny fabrics or slick ribbons; they won’t hold notes as well and can feel out of place in a relaxed kitchen.
Placement And Layout Tips
- Hang the board at eye level in a spot you pass often—next to the phone charging station, beside the coffee maker, or on a narrow wall between cabinets. If you have a small kitchen, a long horizontal board works well above a countertop. Keep the layout loose: you don’t need to fill every square.
- Leave some blank space so the fabric and ribbon can breathe, and swap out notes seasonally to keep it feeling fresh.
Finishing Touches For Extra Charm
- Add a small clip or two at the bottom for hanging a tea towel or a pair of scissors. You can also tuck a dried sprig of lavender or a few pressed leaves under a ribbon for a subtle decorative touch. If you want to incorporate a small hook on the side for keys or a lightweight apron, that works too.
- The goal is to make the board feel like part of the kitchen’s decor, not an afterthought.
2. Magnetic Chalkboard with Wooden Frame
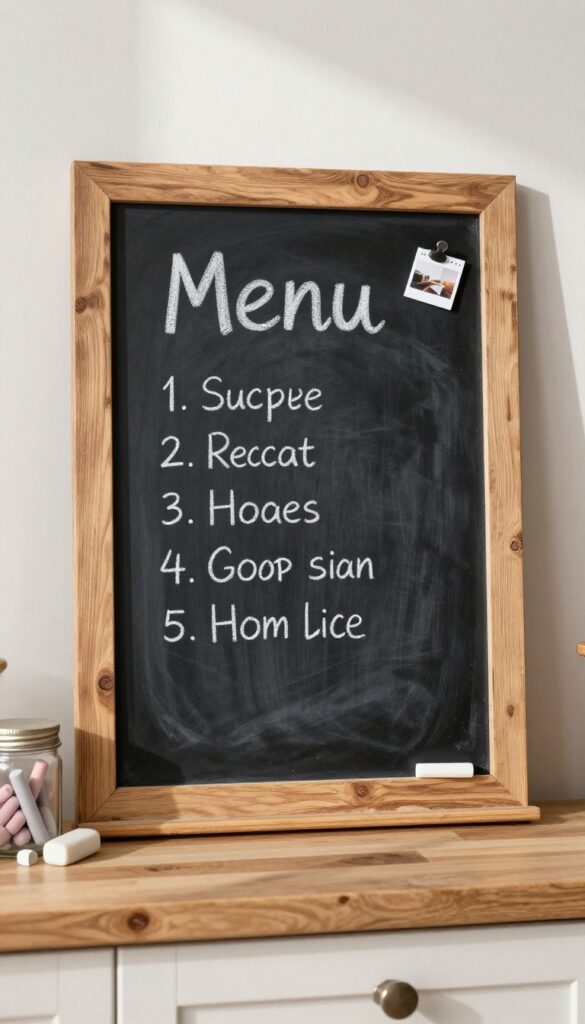
A large magnetic chalkboard framed in reclaimed wood brings rustic charm. Use chalk markers for menus and small magnets for clipping recipes or to-do lists. The dark surface contrasts beautifully with light walls and makes notes pop.
This idea combines the nostalgia of a chalkboard with the practicality of magnets, all wrapped in a warm wooden frame. It works especially well in farmhouse, cottage, or modern rustic kitchens, but can adapt to any style with the right frame choice. The dark matte surface is forgiving—no need to stress over perfect handwriting—and the wood adds texture that softens the look.
Place it near the coffee station or by the pantry door for daily use.
Best Materials
Look for a solid wood frame with visible grain, preferably reclaimed pine or oak. The chalkboard surface should be smooth and magnetic-friendly—avoid cheap particleboard that warps. Use liquid chalk markers for crisp, erasable writing, and choose neodymium magnets for a strong hold on heavier papers.
Styling Tip
Keep the board from feeling cluttered by dividing it into zones: a weekly menu on top, a to-do list in the middle, and a small inspirational quote or doodle at the bottom. Use matching mini clips or washi tape to attach photos or recipe cards. Add a small shelf underneath for chalk and erasers.
Small-space Fix
In a tiny kitchen, mount the board on the side of a cabinet or the back of a door to save wall space. Choose a narrower frame (like 18" x 24") to fit tight spots. The dark color can make a small area feel deeper, so pair it with a light wall to keep the space airy.
3. Hanging Wire Memo Board with Clips
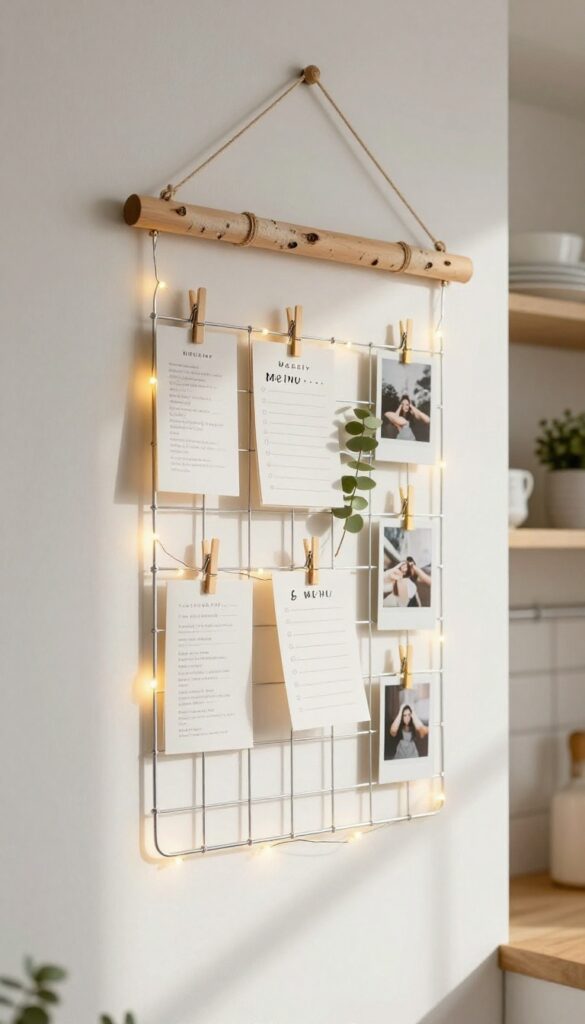
A wire grid suspended from a wooden dowel or metal rod brings a light, airy feel to kitchen walls while keeping notes and menus within easy reach. Small clothespins or mini clips hold cards, photos, and lightweight papers without the bulk of a traditional corkboard. This open design works especially well in smaller kitchens where you want to avoid visual clutter, and it adds a cozy, layered look when paired with warm wood tones or soft greenery.
The hanging wire memo board is a practical yet stylish solution for organizing daily reminders, meal plans, and favorite recipes. Its transparent structure lets the wall color peek through, making the space feel larger and more open. You can customize the grid size and dowel finish to match your kitchen's style—think natural birch for a Scandinavian vibe or black metal for an industrial touch.
The clips make swapping out papers effortless, so you can update your menu board or pin up a new grocery list in seconds. For a cozy layered effect, weave a strand of fairy lights through the grid or tuck a few dried herbs between the wires.
Best Materials And Finishes
- Choose a wire grid with a powder-coated finish to prevent rust in humid kitchen conditions. A wooden dowel with a light stain or matte varnish adds warmth, while a slim metal rod keeps the look sleek. For the clips, opt for natural wood clothespins or brass mini clips—they add texture and patina over time.
- Avoid plastic clips that can look cheap and may break under constant use.
Small-space Layout Tip
- Hang the board on a narrow wall between cabinets or next to the fridge where counter space is limited. Position it at eye level so you can easily read notes and clip new ones. If your kitchen is extra tight, choose a grid that’s no wider than 18 inches to keep the area from feeling crowded.
- Pair it with a small shelf underneath to hold a coffee mug or a tiny plant for a finishing touch.
Cozy Styling Detail
- Layer the board with a mix of paper items and small objects. Tuck a sprig of eucalyptus or a dried lavender bundle into the grid for a soft, fragrant accent. Add a mini string of warm LED lights woven through the wires to create a gentle glow during evening hours.
- This turns a purely functional board into a cozy focal point that feels personal and inviting.
4. Tiered Shelf with Clipboards
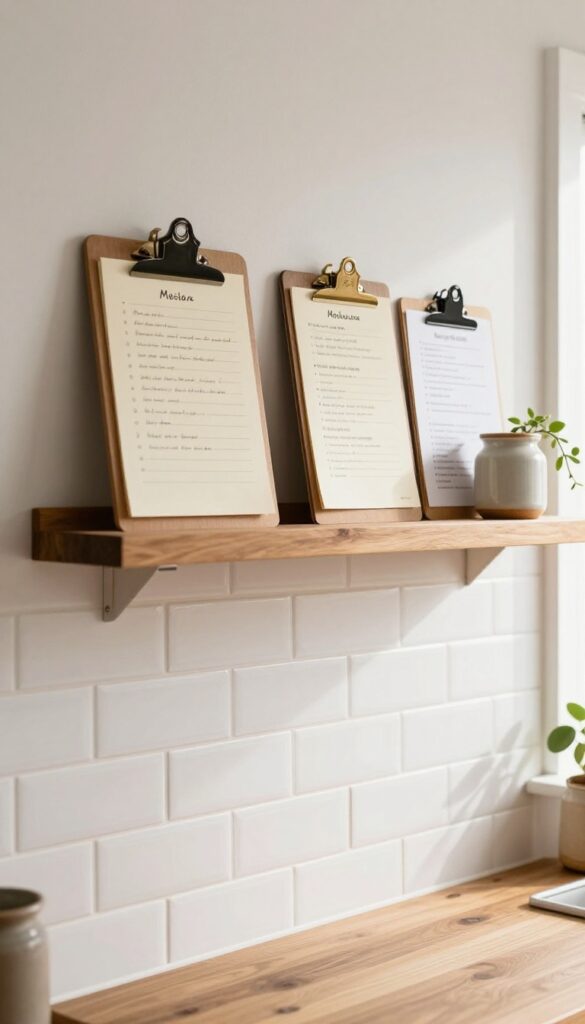
Layering is one of the coziest tricks in decor, and this idea brings that depth to your kitchen wall without feeling cluttered. A narrow shelf with a few vintage-style clipboards creates a functional display that changes as often as you like. Each clipboard holds its own category—menu plans, grocery lists, or reminders—so everything has a place.
The mix of wood, paper, and metal adds warmth, and the vertical layers make even a small wall feel intentional.
Start by choosing a slim shelf that fits your wall space—floating shelves work best for a clean look. Lean two or three clipboards against the wall, angling them slightly for a relaxed, collected feel. Use clipboards in different finishes (brass, black, or natural wood) to add visual interest.
The key is keeping the papers neat: trim notes to fit, use uniform cardstock, or add a small photo or recipe card for personality. Swap out the contents weekly to keep the board feeling fresh and useful.
Best Materials
For a cozy, layered look, mix a warm wood shelf (walnut or oak) with clipboards in aged brass or matte black. Avoid shiny plastic—stick to metal, wood, or bamboo. The paper itself matters too: cream or off-white cardstock feels softer than bright white, and handwritten notes add a personal touch.
Layout Tip
- Place the shelf at eye level, about 12–18 inches above your counter or backsplash. If you have a small wall, use two clipboards side by side; for wider spaces, stagger three at different heights. Leave a few inches between each clipboard so they don’t crowd each other.
- A small plant or ceramic jar on the shelf adds balance.
Finishing Touch
Add a tiny hook underneath the shelf to hang a key ring or a small pair of scissors for cutting notes. This keeps the area practical without breaking the visual flow. A warm LED strip under the shelf can highlight the clipboards in the evening, making the whole setup feel like a curated vignette.
5. Framed Fabric Bulletin Board with Pockets
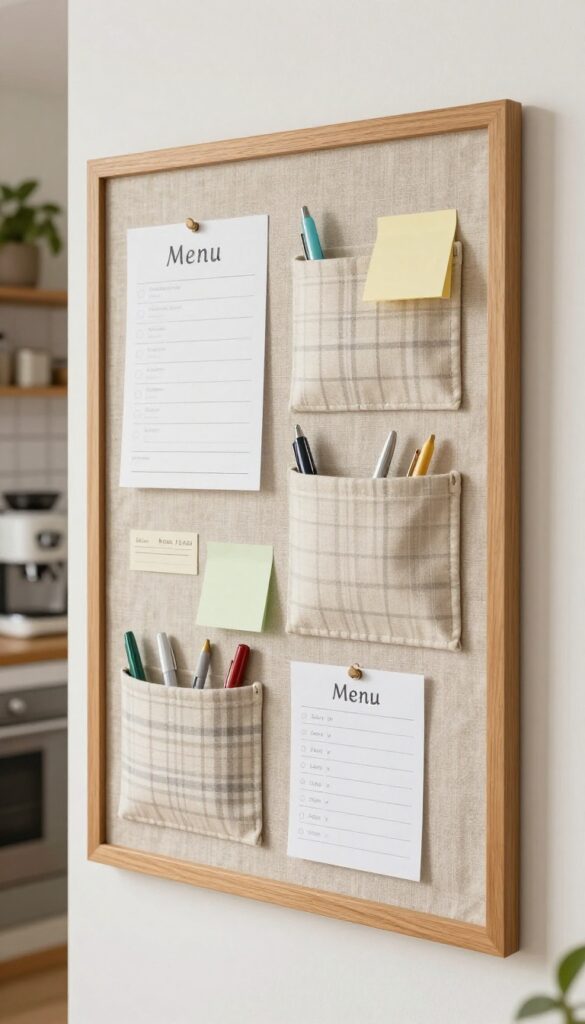
A framed fabric bulletin board brings a soft, tailored look to your kitchen while keeping notes and menus within easy reach. By swapping out the glass for a fabric-covered foam board, you get a pinable surface that feels more like furniture than a typical corkboard. Adding small fabric pockets at the bottom gives you a neat spot for pens, sticky notes, or envelopes, so everything stays organized without cluttering the surface.
This idea works beautifully in a cozy kitchen where you want a touch of texture and warmth. The fabric can match your curtains, cushions, or a favorite dish towel, making the board feel intentional rather than tacked on. Choose a linen or cotton blend in a soft neutral or muted pattern to keep the look layered and inviting.
The frame itself can be a thrifted find or a simple wooden one painted to complement your cabinets. Hang it near your coffee station or by the fridge so it becomes a natural gathering spot for meal plans and grocery lists.
Best Materials
- Opt for a deep picture frame (at least 1.5 inches deep) so the foam board fits snugly. Use a high-density foam board covered with a tightly woven fabric like linen or cotton twill. For the pockets, choose a coordinating fabric that's sturdy enough to hold small items.
- Adhesive Velcro strips or fabric glue work well for attaching the pockets without sewing.
Layout Tip
Position the board at eye level in a spot that gets good natural light but isn't in the way of food prep. If you have a small kitchen, consider a narrow vertical frame to save counter space. Use the top portion for pinning notes and the pocket section for supplies, keeping the layout clean and functional.
Finishing Touch
Add a small hook or magnet strip on the side of the frame to hang a pair of scissors or a key ring. This little detail makes the board even more practical while maintaining the polished, furniture-like appearance. Choose hardware that matches your cabinet pulls for a cohesive look.
6. Rustic Ladder with Hanging Baskets
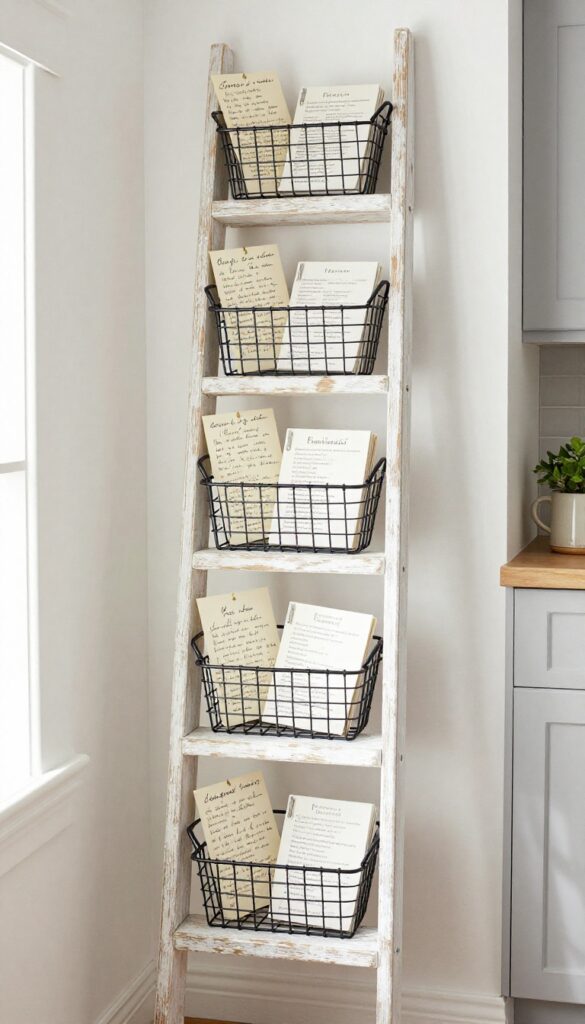
Leaning a small wooden ladder against the wall is an easy way to add vertical storage and a cozy farmhouse feel to your kitchen. The rungs become perfect perches for mini wire baskets, each holding different types of notes, menus, or plans. This setup keeps everything visible and accessible while adding texture and warmth to the room.
The ladder’s natural wood tones and the wire baskets’ industrial edge create a balanced, layered look that fits right in with a cozy, practical kitchen. You can use the baskets for meal prep lists, weekly menus, grocery reminders, or even small recipe cards. The best part?
You can easily rearrange them or swap baskets as your needs change. Place the ladder near a counter or island so you can grab a note while cooking. For a cohesive look, choose baskets in similar finishes—black or galvanized steel work well—and keep the ladder’s wood finish consistent with your other furniture.
Best Ladder Style And Placement
- Go for a ladder with a slightly distressed or whitewashed finish to enhance the rustic vibe. It should be tall enough to lean against the wall without looking too short—about 5 to 6 feet works for most kitchens. Place it in a corner or next to a cabinet where it won’t block traffic.
- Make sure the base sits securely on the floor; you can add small rubber pads to prevent slipping.
Basket Selection And Organization
- Mini wire baskets with handles are ideal because they’re lightweight and easy to hang over the rungs. Use three to five baskets spaced evenly apart. Label each basket with a small tag or chalkboard sticker for categories like “Menus,” “To-Do,” and “Notes.” Keep the contents tidy by clipping papers together or using small binder clips.
- This system is not only practical but also adds a charming, organized look to your kitchen.
Styling And Finishing Touches
- Add a few decorative elements to make the ladder feel intentional. Drape a small faux greenery garland over the top rung or tuck a sprig of dried lavender into one of the baskets. You can also hang a small chalkboard from the ladder for daily specials or reminders.
- Keep the surrounding wall simple—maybe a soft neutral paint color—so the ladder stands out as a focal point.
7. Pegboard with Custom Accessories
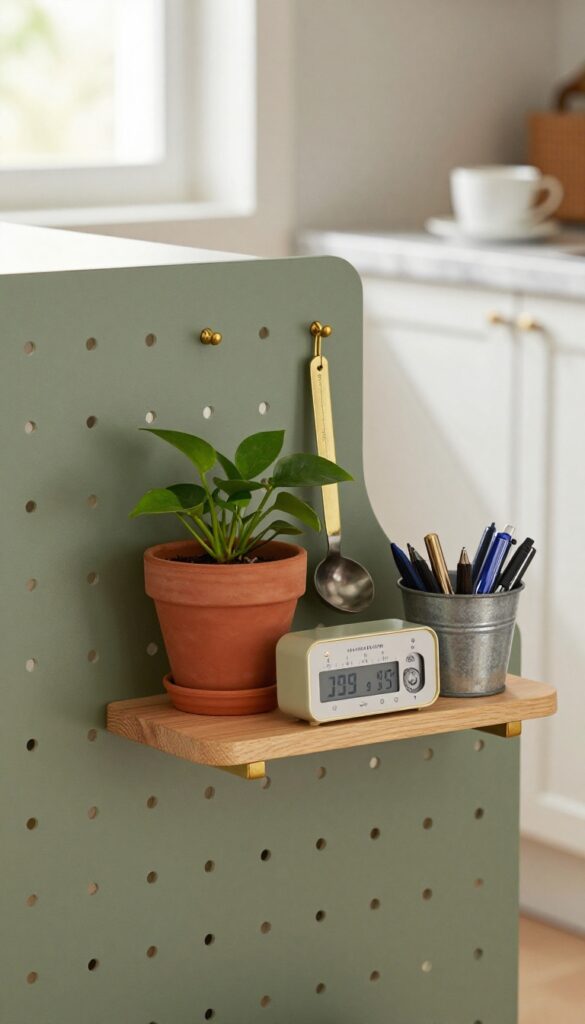
If you want a notice board that adapts to your changing needs, a pegboard is the way to go. Painted in a soft sage or warm gray, it blends into the kitchen without screaming “utility.” The real magic is in the accessories: small shelves for a plant or spice jar, hooks for scissors or measuring spoons, and tiny buckets for pens or clips. You can rearrange everything in minutes, so the board grows with you.
A pegboard notice board is the ultimate flexible solution for a busy kitchen. Unlike a fixed bulletin board, you can move hooks, shelves, and containers around as your needs shift. The key is to choose a color that feels intentional—soft sage or warm gray keeps it cozy and layered, not industrial.
Mount it on an empty wall near your prep area or coffee station, and you have a command center that also looks good. Add a small trailing plant in a pegboard-mounted pot for a touch of green, and swap out accessories seasonally to keep the board feeling fresh.
Best Colors For A Cozy Look
- Stick with muted, earthy tones that feel warm and inviting. Soft sage green, warm gray, or even a dusty blush work beautifully in a cozy kitchen. Avoid high-gloss finishes; a matte or satin paint helps the pegboard recede into the background.
- If your kitchen has white cabinets, a sage pegboard adds a gentle pop of color without overwhelming the space.
Accessories That Add Style And Function
- Mix small shelves, hooks, and mini buckets to create a layered look. Use a shelf to hold a tiny vase with a sprig of eucalyptus or a small spice jar. Hooks can hold a set of measuring spoons, a kitchen timer, or even a cute tea towel.
- Mini buckets or metal tins are perfect for storing pushpins, binder clips, or recipe cards. The trick is to keep the accessories in a consistent metal finish—brass or matte black—to tie everything together.
Layout Tips For Maximum Flexibility
- Plan your pegboard layout in zones. Keep frequently used items like scissors or a timer within easy reach, and place decorative elements like a small plant or a framed photo slightly higher. Leave some empty space so the board doesn't feel cluttered.
- As your needs change, simply move the hooks and shelves around—no need to patch holes or repaint.
8. Vintage Window Frame with Chicken Wire
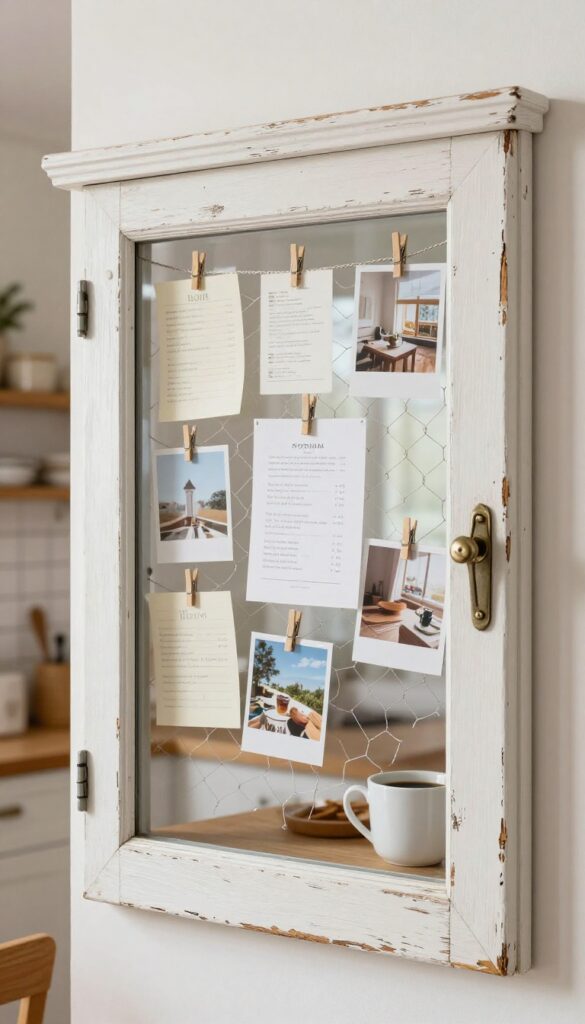
There’s something about repurposing old architectural pieces that instantly adds warmth and history to a kitchen. A vintage window frame, with its chipped paint and weathered wood, brings a cozy, layered feel that new decor just can’t replicate. By swapping out the glass for chicken wire, you create a functional memo board that keeps your meal plans, grocery lists, and favorite recipes right where you need them—without covering up your wall.
The see-through wire keeps the space feeling open and airy, which is perfect for smaller kitchens or any spot that could use a little visual breathing room.
This idea works beautifully in a kitchen that leans rustic, farmhouse, or even eclectic. The key is to find a window frame with character—maybe one with original hardware, peeling paint, or a slightly uneven shape. Once you remove the glass and staple chicken wire to the back, you’ve got a surface that’s both practical and pretty.
Mini clothespins or small binder clips let you swap out notes and photos in seconds. Hang it near your coffee station, above a desk nook, or beside the fridge where it’s easy to reach. The contrast between the rough frame and the delicate wire adds texture, while the notes themselves become part of the decor—a constantly changing collage of daily life.
Best Colors And Finishes
A weathered white or pale gray frame blends seamlessly with most kitchen palettes, especially if you have white cabinets or light walls. For a bolder look, try a frame with original chippy blue or green paint—it adds a pop of color without feeling overwhelming. If the frame is too dark, a quick coat of matte chalk paint in a soft neutral can tone it down while keeping that vintage vibe.
Styling And Layout Tip
Keep the notes and clothespins minimal to avoid visual clutter. Stick to one or two colors for your paper—cream and black work well—and let the frame itself be the star. You can also tuck a small dried herb bundle or a single sprig of eucalyptus into the wire for a subtle, seasonal touch that ties into the cozy angle.
Where To Hang It
- This piece works best on a wall that gets a little traffic but isn’t too busy. A spot between two upper cabinets or next to the pantry door is ideal. Make sure it’s at eye level so you can easily read and change notes.
- If you have a kitchen island with a blank wall behind it, that’s another prime location—it becomes a natural command center for the whole family.
9. Fabric-Covered Magnetic Board with Trim
If you love the convenience of a magnetic board but want something softer than cold metal, a fabric-covered version is the perfect middle ground. Start with a thin sheet of metal—often available at hardware stores or as a pre-cut panel—and wrap it with a patterned fabric that complements your kitchen's color palette. Frame the whole thing with decorative trim or simple molding to give it a finished, furniture-like look.
The result is a notice board that feels warm, layered, and surprisingly stylish.
This idea brings together the best of both worlds: the practicality of magnets and the cozy feel of textiles. Choose a fabric that ties into your kitchen's existing colors—maybe a subtle stripe, a small floral, or a geometric print. The trim can be painted to match your cabinets or left natural for contrast.
Hang it near your command center or coffee station for meal plans, grocery lists, and favorite recipes. It's an easy weekend project that instantly adds personality and organization.
Best Fabric Choices
- Look for medium-weight cotton or linen blends that won't wrinkle easily and hold up to daily use. Avoid very thick fabrics that might make magnets less effective. A pattern with a small repeat works well because it won't compete with the notes you'll pin up.
- If your kitchen has warm wood tones, try a fabric with touches of rust or olive. For a more neutral space, a classic ticking stripe or a subtle plaid adds texture without overwhelming.
Finishing Touch: Trim Options
- The trim is what elevates this board from a DIY project to a polished decor piece. Simple wood molding painted in a satin finish blends seamlessly with cabinetry. For a more decorative look, try a narrow picture frame molding with a slight profile.
- If you want a softer edge, fabric-covered buttons or ribbon trim can add a charming, handmade feel. The key is to keep the trim proportional to the board size—too chunky can overwhelm, too thin might look unfinished.
Styling Your Board
- Once your board is up, style it with a mix of functional and decorative elements. Use a combination of small magnets (wooden, ceramic, or painted) to hold notes and a few larger clips for thicker items like a weekly menu card. Leave some breathing room so it doesn't look cluttered.
- You can also pin a couple of favorite postcards or a small dried herb bundle for a personal touch. Change out the fabric seasonally if you like—it's easy to swap when you want a fresh look.
10. Rolling Cart with Chalkboard Side

A rolling cart is already a kitchen MVP, but turning one side into a chalkboard takes it from practical to playful. It’s the kind of idea that feels both intentional and spontaneous—perfect for jotting down tonight’s dinner or a grocery list that actually gets seen. The chalkboard surface adds a tactile, hand-drawn warmth that balances out all the stainless steel and marble.
Plus, the cart itself can roll wherever you need it: beside the island for extra prep space, tucked near the pantry, or even pulled into the dining area for a buffet. It’s flexible storage that doesn’t commit to one spot.
Paint one side of a slim rolling cart with chalkboard paint. Use the cart to store cookbooks or small plants, and write menus or reminders on the chalkboard side. The cart can move around the kitchen, offering flexibility and extra storage.
Best Cart Styles
Look for a cart with a flat, uninterrupted side panel—avoid ones with multiple shelves that break up the surface. A slim, two-tier cart in wood or metal works best. The chalkboard paint adheres better to a smooth surface, so sand lightly if the cart has a glossy finish.
Chalkboard Paint Tips
Use a magnetic chalkboard paint if you want to stick up photos or notes with magnets. Apply at least two thin coats, letting each dry completely. For a softer look, try a tinted chalkboard paint in a warm gray or muted green instead of standard black.
Styling The Cart
Keep the cart visually balanced: place a small potted herb or a stack of cookbooks on the top shelf, and use the bottom for bulkier items like a Dutch oven or extra linens. The chalkboard side becomes a natural focal point, so leave it mostly clear except for a few neatly written lines of text.
FAQ
What size notice board works best for a small kitchen?
For small kitchens, a vertical board around 18×24 inches or a narrow hanging wire grid works well. It keeps notes visible without taking up too much wall space. You can also use a slim pegboard or a tiered shelf to maximize vertical storage.
How do I keep my notice board from looking cluttered?
Stick to a color palette for your notes and use uniform clips or magnets. Rotate out old items weekly and limit the board to one or two categories, like menus and to-do lists. A layered look with intentional spacing feels cozy, not messy.
Can I use a notice board in a modern kitchen?
Absolutely. Choose a sleek magnetic board with a thin metal frame or a minimalist pegboard in a neutral color. Avoid overly rustic materials and keep the layout clean.
A fabric-covered board in a solid tone also works well in modern spaces.
What's the best way to attach a notice board without damaging walls?
Use removable adhesive strips or hooks designed for the weight of your board. For heavier boards, consider a French cleat system that distributes weight evenly. Always follow the manufacturer's instructions for your wall type.
How often should I update the content on my kitchen notice board?
Aim to refresh it weekly, especially for menus and plans. Swap out seasonal photos or notes to keep it feeling current. A quick tidy-up every few days prevents buildup and keeps the board functional and attractive.
Conclusion
A kitchen notice board doesn't have to be an afterthought. With a little creativity, it can become a warm, layered part of your decor that keeps your daily life running smoothly. Whether you lean toward fabric, wood, or metal, each of these ideas brings its own charm while staying practical.
The key is to choose something that fits your space and your habits. Start with one idea that speaks to you, and let it evolve as your needs change.