10 Small Kitchen Island Ideas – DIY Projects Can Build on a Budget
A kitchen island can completely change how your space feels and functions. But not everyone has the budget for a custom-built piece or the square footage for a massive center island. The good news?
You can build your own small kitchen island for a fraction of the cost. These DIY projects are designed for tight spaces and tighter budgets.
Each idea focuses on smart storage, clean lines, and materials that won't break the bank. Whether you're a seasoned builder or a first-timer with a drill, these 10 ideas will help you create a kitchen island that looks like a million bucks—without spending it.
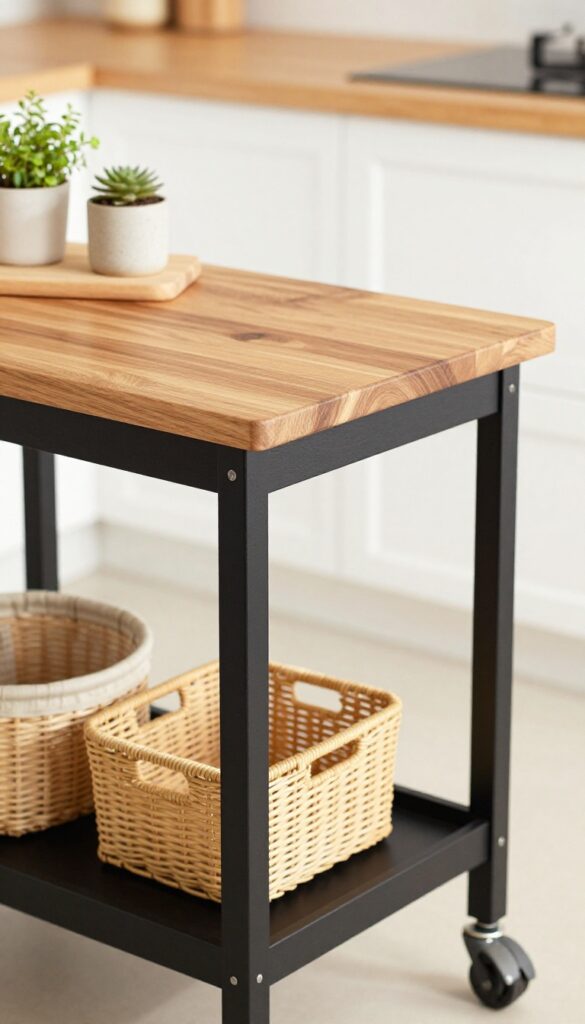
1. Rolling Butcher Block Cart
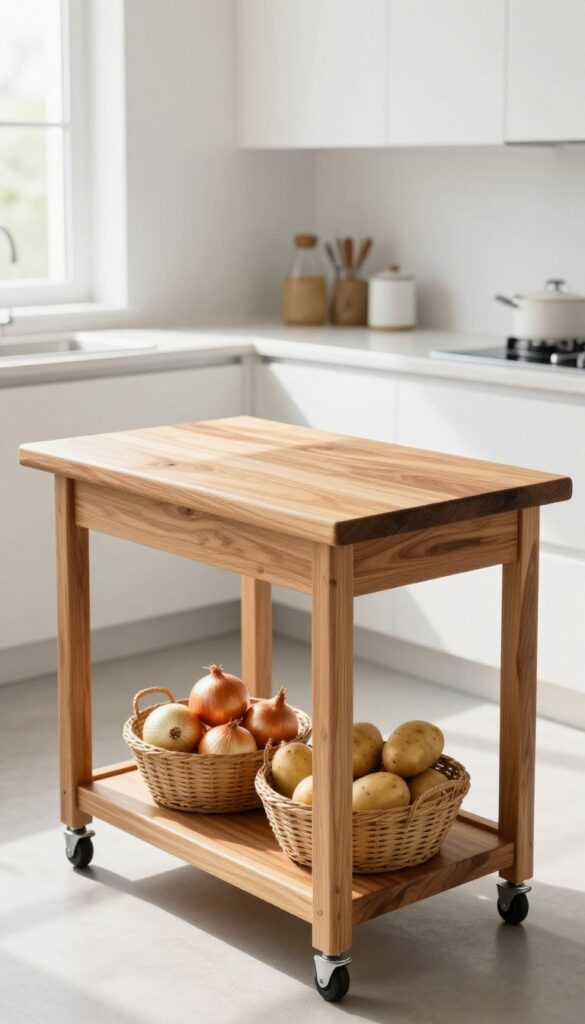
A rolling butcher block cart is the kind of project that delivers big impact without a big budget. It gives you a solid wood work surface wherever you need it, plus storage underneath that can hold everything from mixing bowls to produce. The best part?
You can build it in a weekend with basic tools and materials from the home center.
This mobile cart solves two problems at once: it adds counter space where you need it most, and it brings extra storage within arm's reach. A thick butcher block top offers a durable surface for chopping, rolling dough, or setting down hot pans. Below, a simple shelf or pair of shelves holds baskets, bins, or cookbooks.
Locking casters keep the cart stable when you're working, and let you roll it out of the way when you need floor space. The natural wood tones warm up any kitchen, and you can customize the stain or paint to match your existing cabinets or island.
Best Materials
Go with a solid hardwood like maple or oak for the top—it's tough enough for daily chopping and can be sanded and re-oiled over time. For the frame, pine or plywood keeps costs down while still looking clean. Add heavy-duty locking casters rated for at least 200 pounds so the cart stays put when you're working.
Storage Tip
Use the lower shelf for woven baskets or metal bins to corral potatoes, onions, or pantry overflow. Add a towel bar on one side to hang dish towels or pot holders—it's a small detail that makes the cart feel built-in.
Budget-Friendly Swap
If a full butcher block top feels pricey, use a thick cutting board or a piece of salvaged countertop instead. You can also skip the bottom shelf and use the cart as a simple prep station with a single open tier.
2. IKEA Hack with Two Base Cabinets
Two standard IKEA base cabinets become the foundation for a custom island that looks like it cost three times as much. By joining them side by side and topping with a solid wood counter, you get generous prep space and hidden storage without the custom cabinetry price tag. A few trim pieces along the front create a seamless, built-in appearance that fools even seasoned DIYers.
This island is a budget-friendly workhorse that adapts to any kitchen layout. The twin cabinets offer ample storage for pots, pans, or pantry items, while the wood countertop adds warmth and durability. Choose a counter material that complements your existing finishes—butcher block for a rustic feel, or a stained oak for a more modern farmhouse look.
The trim detail along the base and between the cabinets eliminates the gap and gives the island a cohesive, furniture-like silhouette. Paint or stain the cabinets to match your kitchen’s color scheme, or leave them white for a crisp contrast.
Best Materials & Finishes
- Opt for IKEA’s SEKTION base cabinets in a size that fits your space—typically two 24-inch or 30-inch boxes. For the countertop, a 1.5-inch-thick butcher block in oak or walnut offers a durable work surface that ages gracefully. Use 1×4 or 1×6 pine boards for the trim, painted the same color as the cabinets for a seamless look.
- Add a coat of polyurethane to the countertop for protection against spills and stains.
Layout & Storage Tip
- Position the island so there’s at least 36 inches of clearance on all sides for easy movement. Inside the cabinets, install pull-out shelves or drawer organizers to maximize every inch. Use one cabinet for everyday pots and pans, and the other for baking sheets and cutting boards.
- A small open shelf on one end (built from leftover wood) can hold cookbooks or a decorative bowl of fruit.
Finishing Touch
- Add a decorative corbel or furniture-style leg at each corner to elevate the look from basic to bespoke. Paint them the same color as the cabinets or go with a contrasting black for a touch of drama. A pair of brass or black cup pulls on the cabinet doors completes the custom feel.
- For extra seating, overhang the countertop by 12 inches on one side and tuck in two barstools.
3. Repurposed Dresser Island
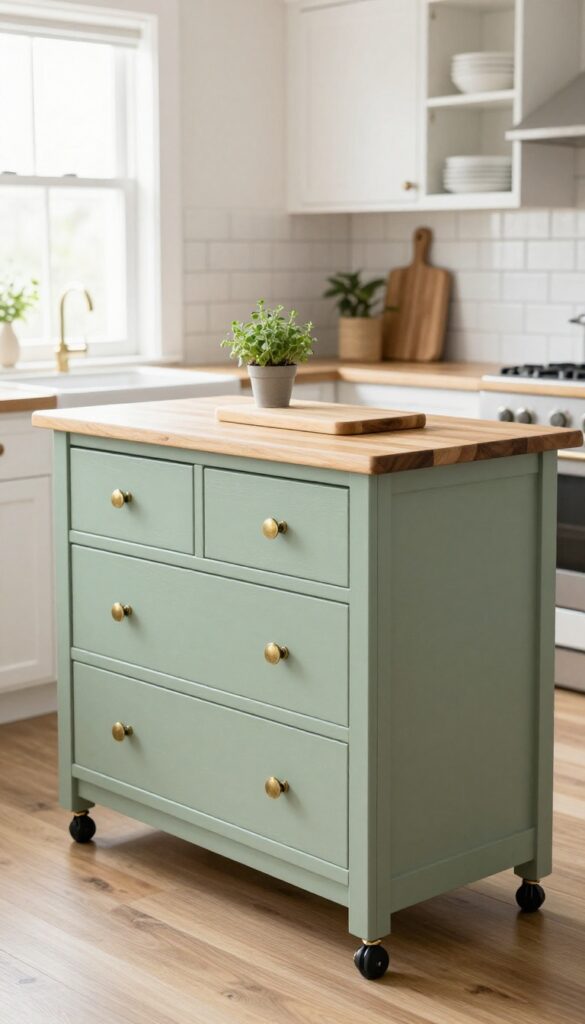
An old dresser doesn't have to end up on the curb. With a little creativity, it can become the centerpiece of your kitchen—a charming island that adds both character and function. The key is choosing a dresser with sturdy construction and a shape that works in your layout.
Once you add casters and a sealed wood top, you have a mobile work surface that hides a surprising amount of clutter.
This idea is a dream for budget-conscious DIYers who love vintage finds. The dresser's original drawers stay intact, offering instant hidden storage for utensils, linens, or small appliances. You can paint or stain the dresser to match your kitchen's palette, or leave it as-is for a rustic, farmhouse feel.
The sealed top provides a durable surface for food prep or serving, and the casters let you roll it out of the way when you need extra floor space. It's a practical, one-of-a-kind solution that adds warmth and nostalgia to your cooking space.
Best Materials
- Look for a solid wood dresser—avoid particleboard or veneer, which won't hold up to kitchen use. A mid-century or farmhouse style works beautifully, but any dresser with clean lines and functional drawers will do. For the top, use a food-safe polyurethane or a butcher block sealer to protect against spills and stains.
- Heavy-duty casters with locking mechanisms are a must for stability.
Storage Tip
Maximize the drawers by adding dividers or small bins to keep utensils, measuring cups, and spices organized. The top drawer can hold everyday cutlery, while deeper drawers store pots lids or mixing bowls. If you need more vertical storage, consider removing one drawer and adding a pull-out cutting board or a spice rack.
Finishing Touch
Add a towel bar to one side of the dresser for hanging dish towels or oven mitts. A small shelf above the island can hold cookbooks or a plant, tying the look together. For a cohesive feel, paint the dresser in a color that complements your cabinetry—soft sage, navy, or even a bold coral can make it pop.
4. Folding Drop-Leaf Island
A wall-mounted drop-leaf table on casters is the ultimate space-saving trick for tiny kitchens. When you need extra prep space or a quick breakfast spot, simply pull it out and lock the legs. When you’re done, fold the leaves down and tuck it against the wall—it takes up almost no room at all.
This DIY project gives you the flexibility of an island without the permanent footprint.
This clever island works like a drop-leaf dining table but on a smaller scale. Build a sturdy base with locking casters so it stays put when in use, then attach a hinged top that folds down flush against the wall. The result is a movable, stowable work surface that can double as a dining spot for two.
Finish it with a butcher block top for a warm, natural look that matches any kitchen style.
Best Materials
Use plywood for the base and a solid wood top like pine or oak for durability. Butcher block is ideal because it’s tough enough for chopping and looks great. Paint the base in a bright white or soft gray to keep the kitchen feeling open, or go for a bold color like navy for a pop of personality.
Small-space Fix
Add a narrow shelf underneath the folded leaves to store cutting boards, baking sheets, or a few cookbooks. This uses the vertical space without adding bulk. When the leaves are down, the shelf becomes a slim console for everyday items like a fruit bowl or a vase.
Finishing Touch
Install a magnetic knife strip on the side of the base that faces the wall when folded. It keeps knives accessible but hidden from view when the island is stowed. A pair of small hooks on the end can hold dish towels or oven mitts.
5. Pallet Wood Island with Open Shelving

Reclaimed pallets are a goldmine for budget-minded DIYers, and this island proves it. The rough-hewn wood brings instant farmhouse warmth, while open shelves keep everyday dishes and cookbooks within easy reach. Sanding and sealing the pallets well is key—you want the rustic texture, not splinters.
A thick butcher block top adds a smooth, warm contrast that ties the whole look together.
Building your own island from pallets is one of the most budget-friendly ways to add prep space and storage to a small kitchen. The open shelving keeps the piece feeling light and airy, which is crucial in a tight footprint. Choose a deep, rich stain for the butcher block top to create a visual anchor, and seal everything thoroughly so it holds up to daily use.
Best Wood Prep
- Start by selecting pallets with the HT (heat-treated) stamp—never use chemically treated ones. Dismantle carefully, remove all nails, and give the boards a good scrub. Sand with 80-grit, then 120-grit for a smooth-but-not-polished finish.
- Apply a food-safe sealer or a matte polyurethane to protect against spills and stains.
Open Shelf Styling
Keep the shelves from looking cluttered by grouping items in threes. Stack white dinner plates on one side, lean a couple of cookbooks on the other, and add a small potted herb or a wooden cutting board for texture. Use woven baskets on the bottom shelf to hide less attractive odds and ends.
Butcher Block Top Tip
A 2-inch-thick butcher block top gives you a sturdy work surface and a beautiful contrast to the pallet wood. Look for acacia or maple butcher block remnants at lumber yards or online for a steal. Apply mineral oil regularly to keep the wood hydrated and food-safe.
6. Metal Pipe and Wood Island
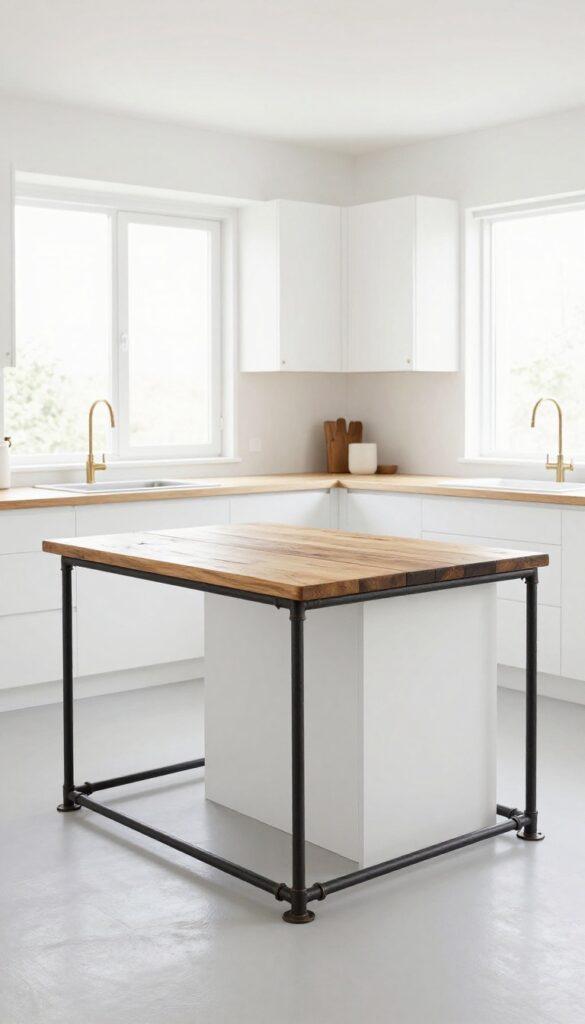
Black iron pipes and reclaimed wood bring rugged charm to a kitchen island that feels both sturdy and stylish. This DIY project keeps costs low by using plumbing supplies and salvaged lumber, making it a budget-friendly way to add an industrial focal point. The raw materials warm up over time, developing character that fits perfectly in modern farmhouse or loft-style kitchens.
A metal pipe and wood island is a standout piece that combines function with factory-inspired flair. The pipes serve as legs and can double as a towel bar or support for open shelving, adding utility without extra expense. Reclaimed wood tops offer a weathered patina that contrasts beautifully with the dark metal, creating a balanced look that feels intentional and lived-in.
This island works well in narrow kitchens because the open base keeps sightlines clear, making the space feel larger. Finish the wood with a food-safe oil to protect it without hiding the grain, and let the pipes develop a natural rust patina or seal them with matte clear coat for a cleaner finish.
Best Materials
- Choose black iron pipes (1-inch diameter works well) and fittings from a hardware store—they’re inexpensive and easy to cut. For the top, look for reclaimed oak, pine, or fir boards; a thickness of 1.5 to 2 inches gives a substantial feel. Sand the wood lightly to avoid splinters but keep the distressed look.
- Use flange fittings to attach legs to the floor or a base plate for stability.
Layout Tip
- In a small kitchen, keep the island narrow—around 24 inches deep and 36 to 48 inches long—so it doesn’t block traffic. Position it at least 36 inches from counters and appliances. The open pipe structure allows stools to tuck underneath, saving floor space.
- Add a pipe crossbar near the top to hang dish towels or pots.
Finishing Touch
Soften the industrial edge with a warm runner rug underneath and a couple of leather or canvas stools. Hang a single pendant light with an exposed bulb above to highlight the textures. Add a wooden cutting board or a small potted herb plant on the surface to bring life to the metal and wood combo.
7. Stock Cabinet with Corian Top

A single stock base cabinet from a home store, paired with a remnant Corian or quartz countertop, creates a sleek, durable island on a budget. This idea feels custom but costs a fraction of built-in cabinetry. The solid surface top resists stains and wipes clean easily, making it perfect for a busy kitchen.
Choose a cabinet with drawers for extra storage, and add a butcher block cutting board on top for prep space.
This island is all about smart compromises. A stock cabinet gives you instant storage without custom carpentry. A remnant countertop from a local stone yard saves money and reduces waste.
The result looks intentional and polished, not like a patchwork of leftovers. Style it with a few open shelves above for cookbooks or a small pendant light to define the zone.
Best Materials
Opt for a solid wood cabinet in a shaker style for a classic look that takes paint well. For the top, Corian or quartz remnants in a neutral tone like white, gray, or beige keep the island light and airy. Avoid busy patterns on a small surface—solid colors make the island feel larger.
Storage Tip
Maximize the cabinet’s interior with pull-out shelves or a drawer organizer. Use the top drawer for utensils and the lower cabinet for pots or small appliances. Add a towel bar on one end for a handy spot to hang dish towels.
Finishing Touch
Add a pop of color with bar stools in a contrasting shade like navy or mustard. A small vase of fresh herbs or a fruit bowl on the counter brings life to the island without cluttering it.
8. Wine Barrel or Crate Island
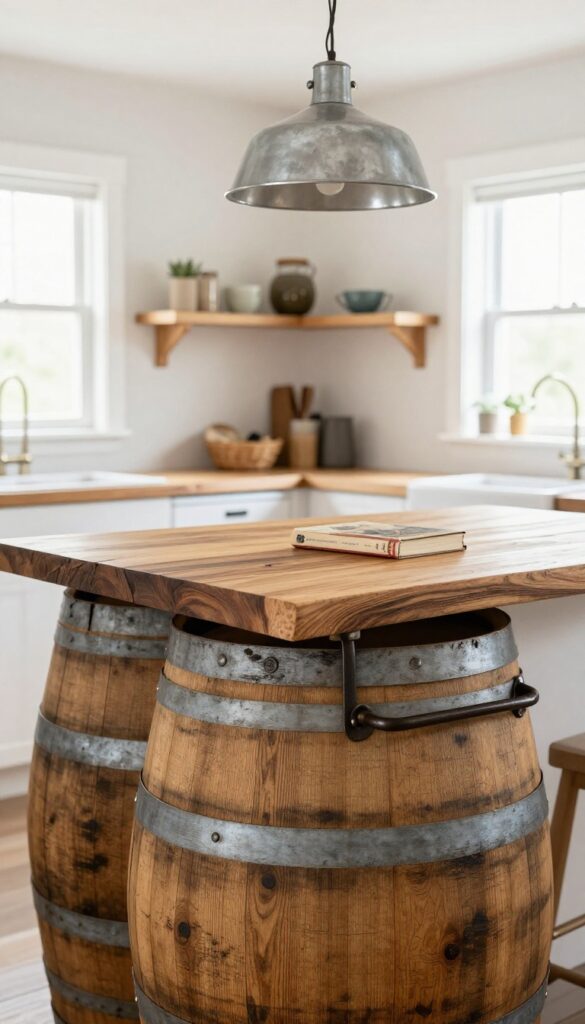
A wine barrel or wooden crate island brings instant rustic charm without the hefty price tag of custom cabinetry. The curved, weathered staves of a barrel or the slatted sides of a crate create texture and warmth that feels both grounded and inviting. This DIY approach works especially well in farmhouse, cottage, or industrial kitchens where you want a piece that feels like it has a story.
Stack two wine barrels or large wooden crates, secure them together, and top with a round wood slab. Adds warmth and a unique focal point.
Best Materials
Look for genuine oak wine barrels from local vineyards or homebrew shops—they already have a beautiful patina. For crates, choose sturdy pine or reclaimed wood with visible grain. The top should be a thick butcher block or live-edge slab, at least 2 inches thick, to provide a solid work surface.
Small-space Fix
If your kitchen is tight, use a single barrel or crate as a compact island with a smaller top. Add locking casters so you can roll it out of the way when needed. The round shape also softens traffic flow in narrow galley kitchens.
Finishing Touch
Seal the wood with a matte polyurethane or food-safe mineral oil to protect against spills. Add a wrought-iron towel bar to the side and a small shelf underneath for cookbooks or baskets. A pendant light with a galvanized metal shade overhead completes the look.
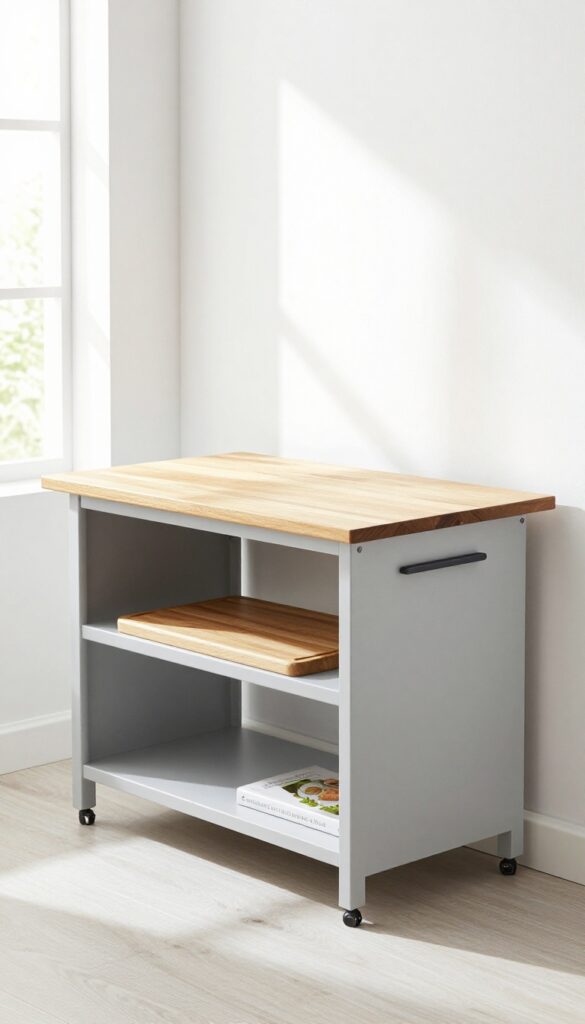
9. Caster-Mounted Kitchen Cart from Scratch
A rolling cart is one of the most flexible additions to a small kitchen. This DIY version gives you a sturdy work surface, extra storage, and the ability to tuck it away or pull it out whenever you need it. The butcher block top adds warmth, while the casters keep everything mobile.
Building your own kitchen cart from scratch is more budget-friendly than buying a pre-made one, and you can customize the size, finish, and storage exactly to your space. Start with a simple plywood frame, add a lower shelf for baskets or bins, and top it with a solid butcher block slab. Heavy-duty casters with locks make it stable when in use and easy to roll out of the way.
This cart works beautifully as a prep station, a coffee bar, or extra counter space for serving.
Best Materials
Use ¾-inch plywood for the frame and shelves—it's strong enough to hold heavy appliances or stacked dishes. For the top, a pre-cut butcher block counter remnant is ideal; it's durable, easy to clean, and looks expensive without the price tag. Choose casters rated for at least 200 pounds total, and go with locking wheels on at least two of them.
Storage Tip
Add a lower shelf that's tall enough for small appliances like a stand mixer or slow cooker. Use woven baskets or metal bins to corral pantry overflow, linens, or cookbooks. If you want hidden storage, add a slim drawer beneath the butcher block top for utensils or cutting boards.
Finishing Touch
Paint the frame in a matte black or navy blue for a sleek, modern look that contrasts with the warm wood top. Add a few brass or stainless steel hooks on the side for hanging towels, oven mitts, or measuring cups. A small cutting board propped against the back completes the styled-but-functional vibe.
10. Floating Shelf Island with Stools
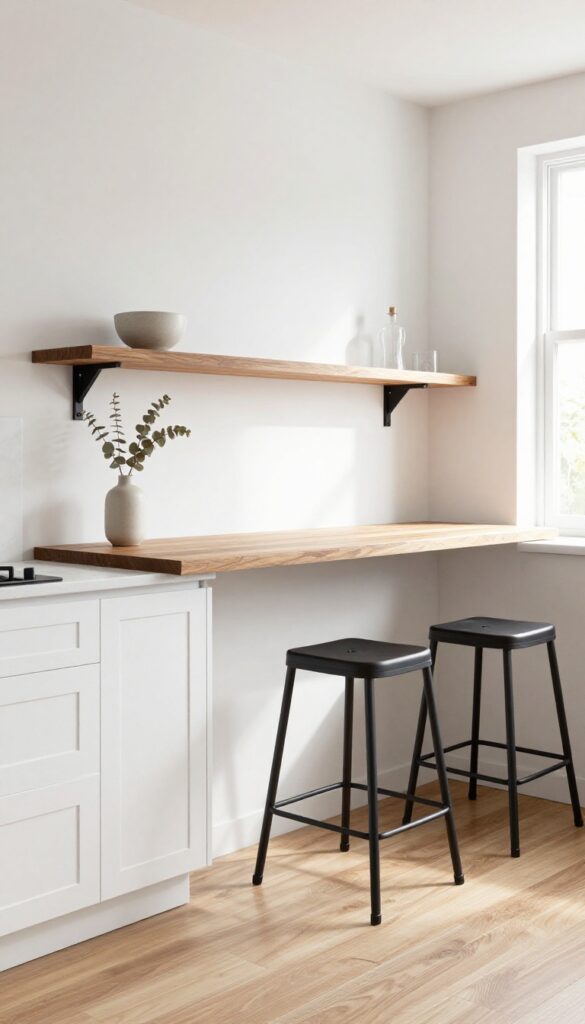
A floating shelf island is the ultimate small-kitchen hack. By mounting a thick wood slab directly to the wall with heavy-duty brackets, you create a slim eating bar that takes up zero floor space. It’s not a true island, but it gives you that same counter seating experience without the clutter.
Perfect for galley kitchens or narrow layouts where every inch counts.
This idea works best when you choose a slab that’s at least 2 inches thick and extends 24 inches from the wall—enough to tuck two stools underneath without blocking traffic. Go for warm oak or walnut to add a natural focal point, or paint the shelf to match your cabinets for a seamless look. The brackets should be rated for at least 200 pounds to handle daily use.
Style the shelf with a small fruit bowl, a vase of dried eucalyptus, and a couple of sleek stools in a contrasting material like black metal or woven rope. The result is a budget-friendly island alternative that feels intentional and airy.
Best Materials
Solid hardwood like oak, maple, or walnut gives the shelf a furniture-like feel. For a budget-friendly swap, use a butcher block countertop remnant and seal it with food-safe mineral oil. The brackets should be matte black or brushed steel for a modern touch.
Layout Tip
Mount the shelf at standard counter height (36 inches) so stools slide right under. Leave at least 12 inches of clearance between the shelf and the wall behind for easy cleaning. In a galley kitchen, place it on the side opposite the main work zone to keep the flow open.
Styling Detail
Keep the shelf surface clutter-free—just a few functional decor pieces. A low-profile fruit bowl, a small plant, and a pair of stools with slim legs maintain the clean, airy look. Add a hanging pendant light above to define the eating area without taking up counter space.
FAQ
How much does it cost to build a DIY kitchen island?
Most DIY kitchen islands cost between $50 and $300, depending on materials. Using reclaimed wood, stock cabinets, or IKEA hacks keeps costs low.
Do I need special tools to build a kitchen island?
Basic tools like a drill, saw, level, and sander are usually enough. Some projects may require a miter saw or pocket hole jig, but many can be done with simple hand tools.
How big should a small kitchen island be?
Aim for at least 24 inches wide and 36 inches long for a functional island. In tight spaces, a cart or drop-leaf design can work with smaller dimensions.
Can I add a sink or stove to a DIY island?
Adding plumbing or gas requires professional help and permits. Most DIY islands focus on prep space and storage without utilities to keep the project simple and budget-friendly.
What is the best countertop material for a budget island?
Butcher block is affordable, easy to cut, and durable. Plywood with a sealed finish, laminate, or remnant stone are also great budget-friendly options.
Conclusion
Building your own small kitchen island is one of the most rewarding DIY projects you can tackle. It saves money, adds exactly the storage and prep space you need, and gives your kitchen a personal touch that store-bought furniture just can't match.
Start with a design that fits your skill level and space, then enjoy the satisfaction of a custom island you built with your own hands. Whether you go for a rolling cart or a repurposed dresser, your kitchen will feel bigger, better organized, and more inviting.