15 Modern Kitchen Island Ideas With Sleek Practical Style for a Weekend Refresh
Your kitchen island is more than just extra counter space—it's the heart of your kitchen. Whether you're prepping meals, grabbing a quick bite, or hosting friends, a well-designed island makes everything easier. And the best part?
You don't need a full renovation to give yours a fresh, modern look. A weekend refresh is all about small changes that make a big impact. Think swapping out stools, adding a new finish, or rethinking your storage.
These 15 ideas are designed to be achievable, stylish, and totally practical for real homes. From minimalist designs to warm, textured touches, each idea brings something unique to the table. Let's dive into the details and find the perfect look for your space.
1. Two-Tone Island With a Dark Base and Light Top
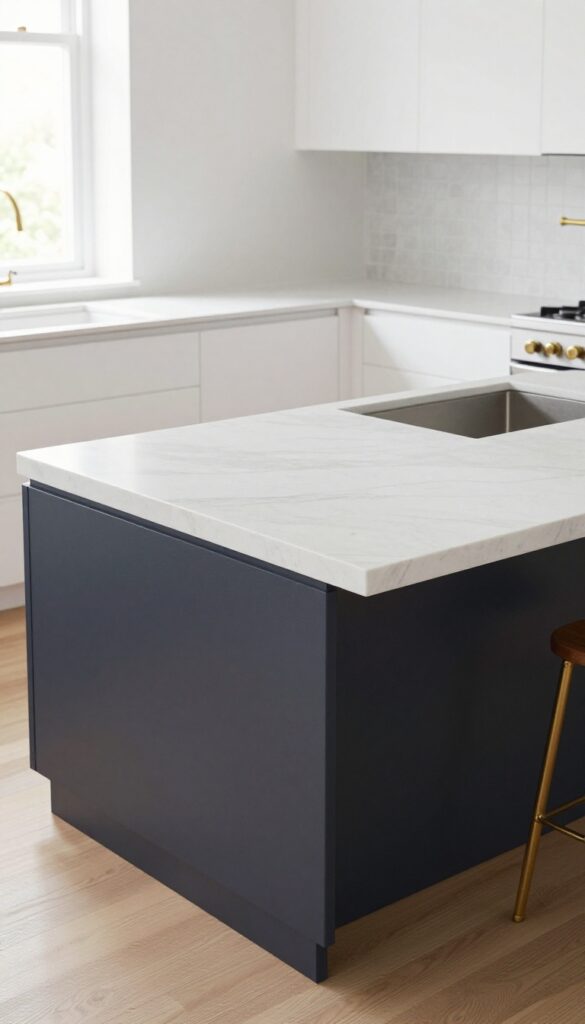
A two-tone kitchen island is an easy way to add instant personality without a full renovation. By pairing a dark navy or charcoal base with a light countertop—think white quartz or pale wood—you create a natural focal point that feels grounded but not heavy. This contrast works especially well in open-plan kitchens where the island needs to stand out without clashing with surrounding cabinets.
The key to pulling off this look is balance. The dark base anchors the space, while the light top keeps things airy. It's a weekend-friendly refresh if you're painting an existing island base or swapping out a countertop.
Stick to matte finishes on the base to avoid a glossy, formal feel, and choose a countertop with subtle veining or texture for added interest. This combo works in both modern and transitional kitchens, and it pairs beautifully with brass or black hardware.
Best Color Combos
Navy blue with a white marble-look quartz is a classic pairing that feels crisp and coastal. Charcoal gray with a warm oak butcher block brings in a more rustic, lived-in vibe. For something bolder, try deep forest green with a cream limestone top—it's unexpected but still sophisticated.
Finish Details
To keep the look practical for everyday life, choose a matte or satin paint on the base—it hides fingerprints and smudges better than high-gloss. For the countertop, a honed or leathered finish adds texture and reduces glare. Add a waterfall edge on one side for a sleek, custom touch.
Styling Tip
Let the island be the star by keeping the countertop clutter-free. A simple wooden cutting board, a small vase with fresh herbs, and a couple of bar stools in a neutral tone are all you need. Avoid adding too many accessories that compete with the two-tone effect.
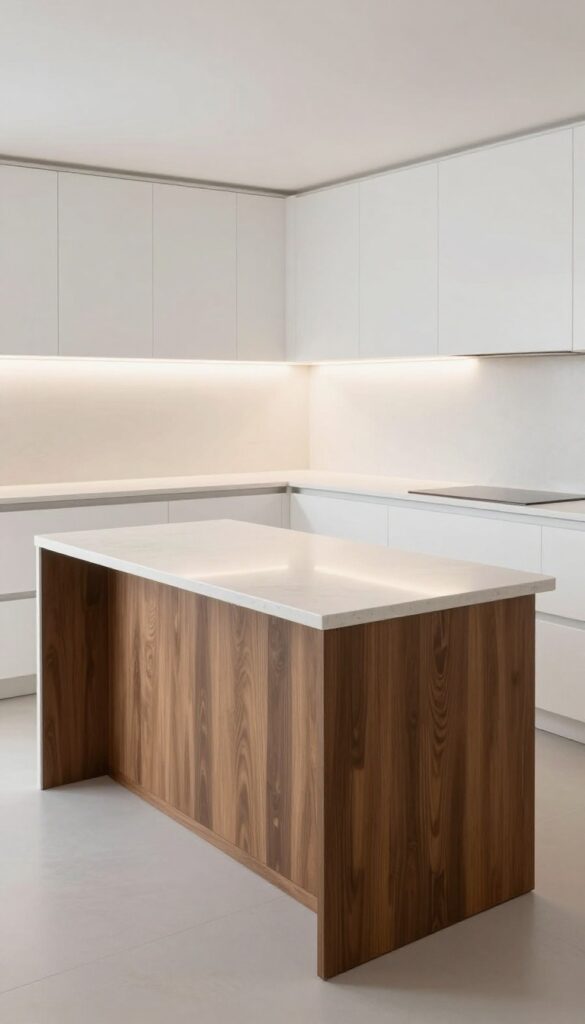
2. Waterfall Edge in Matte Quartz
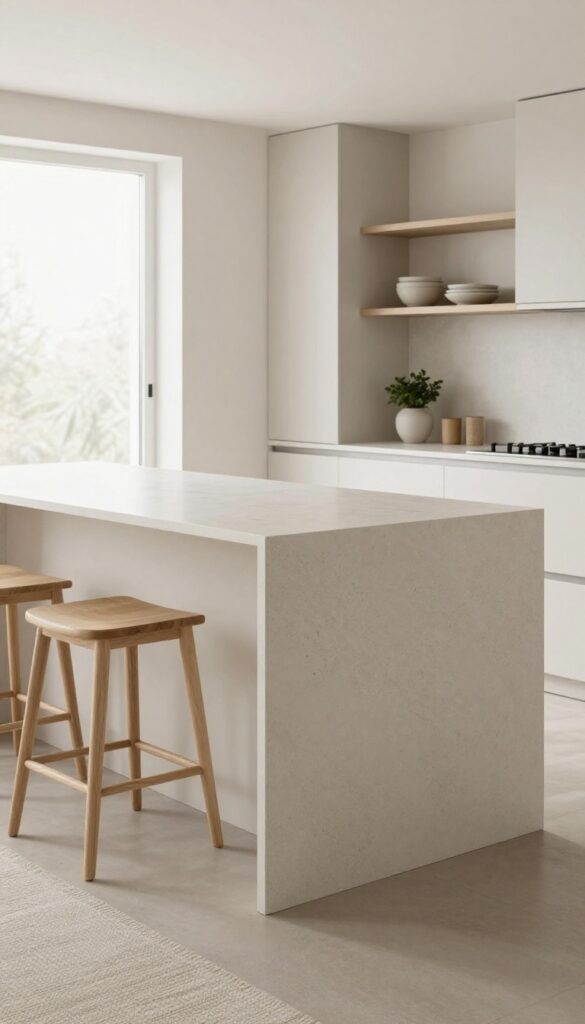
A waterfall countertop where the surface material flows down the sides to the floor creates a continuous, sculptural look. In matte quartz, this design feels both refined and approachable—no shiny glare, just a soft, stone-like finish that hides fingerprints and water spots. It's a statement piece that doesn't scream for attention, making it perfect for kitchens where you want modern style without the upkeep.
The waterfall edge in matte quartz is a go-to for anyone wanting a kitchen island that feels like a piece of furniture. The seamless drop from counter to floor gives the island a solid, anchored presence, while the matte finish keeps it from looking too polished or cold. This is a surface that can handle daily chopping, spills, and hot pans without showing wear, and a quick wipe with a damp cloth is all it takes to keep it looking fresh.
For a weekend refresh, you can swap out bar stools or add a textured runner to play off the smooth stone without changing the island itself.
Best Colors For A Matte Quartz Island
Stick with neutral tones like warm white, soft gray, or charcoal to keep the waterfall effect seamless. A light quartz with subtle veining adds depth without overwhelming the space, while a dark matte finish creates a dramatic anchor in an all-white kitchen. Avoid high-contrast patterns that might distract from the clean lines.
Layout Tip: Pair With Open Shelving
Balance the solid mass of a waterfall island with open shelving on the opposite wall. This keeps the kitchen feeling airy and prevents the island from dominating the room. Use the shelves for everyday dishes or a few cookbooks to echo the island's modern vibe.
Finishing Touch: Add Warmth With Wood
Matte quartz can feel cool, so introduce warmth through wooden bar stools or a butcher block cutting board left on the counter. A live-edge wood stool or a walnut cutting board adds organic texture that softens the stone's sleekness without clashing.
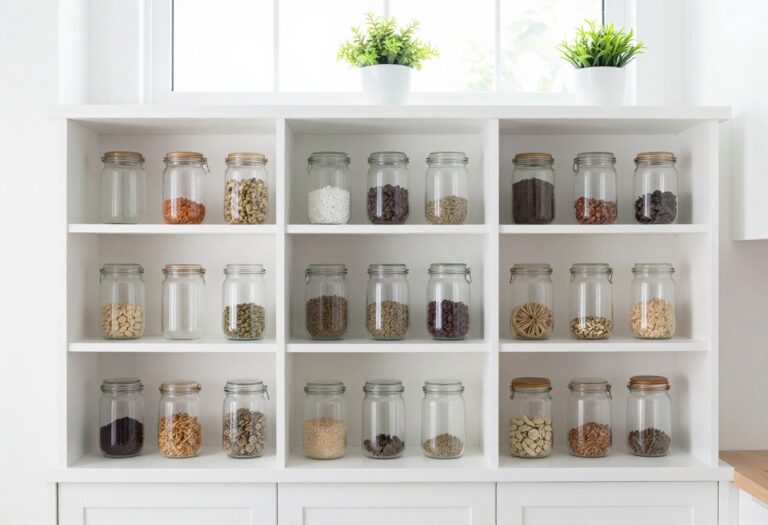
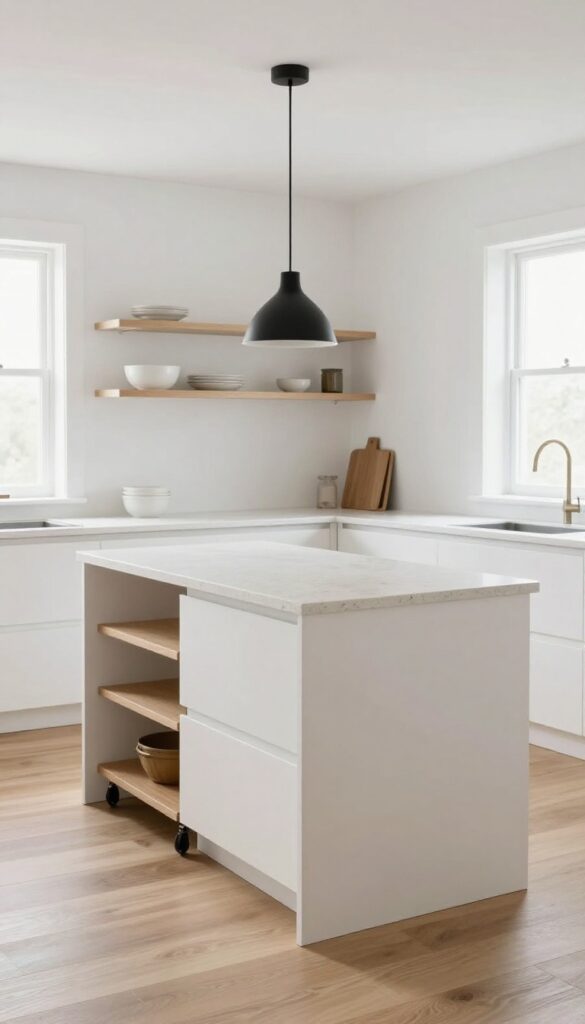
3. Open Shelving on One Side for Cookbooks
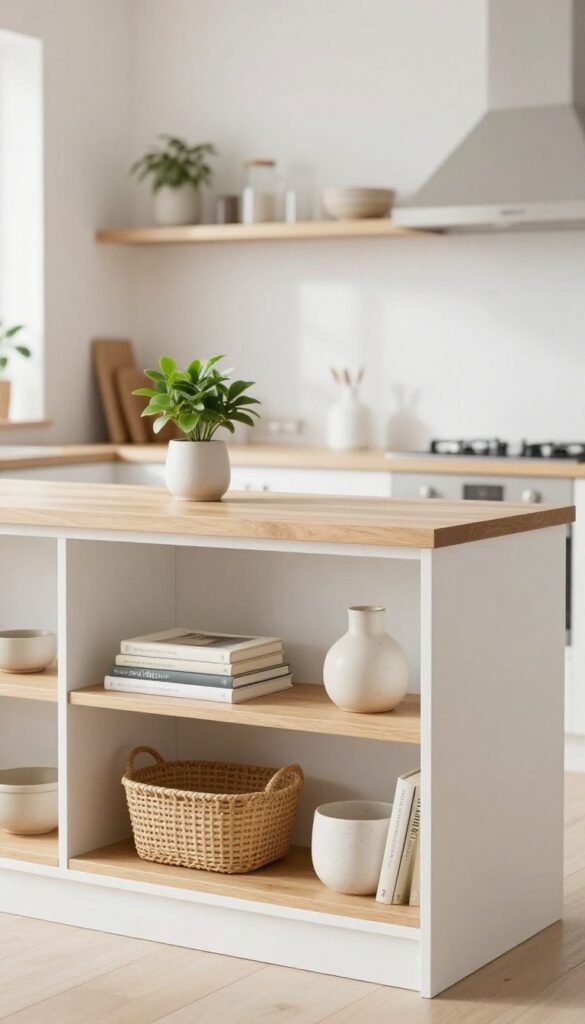
If your kitchen island feels like a bulky block taking up space, try swapping out the lower cabinets on one side for open shelves. This simple weekend-friendly swap instantly lightens the visual weight while giving you a spot to display your favorite cookbooks, ceramic bowls, or a small plant. It keeps everyday items within arm's reach and adds a personal, lived-in feel.
Open shelving on one side of the island turns a solid mass into a functional display area. It's perfect for smaller kitchens where you want to avoid a heavy look, or for larger spaces that need a touch of warmth. The shelves break up the island's silhouette and create an opportunity to show off pieces that reflect your style—like a stack of colorful cookbooks, a collection of handmade mugs, or a few woven baskets for extra storage.
Because the shelves are open, you'll want to keep things tidy, but that's part of the charm: it encourages you to curate rather than clutter.
Best Materials
- For a practical yet stylish look, choose materials that contrast with the island's base. If your island is painted white or a dark tone, go with warm wood shelves like oak or walnut to add texture. For a more modern vibe, floating metal shelves in black or brass work well.
- Just make sure the shelves are sturdy enough to hold cookbooks and ceramics—solid wood or thick metal brackets are your best bet.
Shelf Styling Tip
- Arrange items in small groupings rather than lining them up. Stack three cookbooks horizontally, then lean one vertically next to a small vase or a ceramic pitcher. Leave some breathing room between groups so the shelves don't feel crowded.
- Mix in a few everyday items like a wooden cutting board or a jar of utensils to keep it functional, not just decorative.
Small-space Fix
In a narrow kitchen, keep the shelves shallow—about 10 to 12 inches deep—so they don't intrude into walkway space. Use the lower shelf for items you grab often, like coffee mugs or small mixing bowls, and the upper shelf for cookbooks or decorative pieces. This keeps the island feeling open and airy while still adding storage.
4. Integrated Breakfast Bar With Comfortable Stools
A kitchen island that doubles as a breakfast bar is one of those practical upgrades that instantly makes your morning routine feel more relaxed. By extending the countertop to create an overhang, you carve out a casual dining spot without needing extra floor space. It’s especially great for open-plan layouts where you want to keep the conversation flowing while you cook.
The key to making this setup work is choosing stools that actually feel good to sit on. Look for options with back support and a footrest—your family and guests will thank you. For a weekend-refresh friendly update, swap out old counter stools for ones with cushioned seats in a durable fabric like linen or performance velvet.
Stick to a neutral palette like warm wood tones or black metal frames to keep the look cohesive with your existing decor.
Best Overhang Depth
Aim for at least 12 inches of overhang so there’s enough legroom. If you have the space, 15 inches is even more comfortable. Just make sure the island top is sturdy enough to support the extension—laminate or quartz work well.
Stool Height And Style
Counter-height stools (24–26 inches) are standard for a 36-inch island. For a cozy feel, choose stools with a low back and padded seat. Avoid backless styles if you plan to linger over coffee—they look sleek but aren’t great for longer sits.
Finishing Touch
Add a slim pendant light or two above the bar to define the zone. Go for warm-toned bulbs to make the space feel inviting. A small vase of fresh herbs or a fruit bowl on the counter adds a lived-in touch without cluttering the surface.
5. Slim Pull-Out Trash and Recycling Drawers
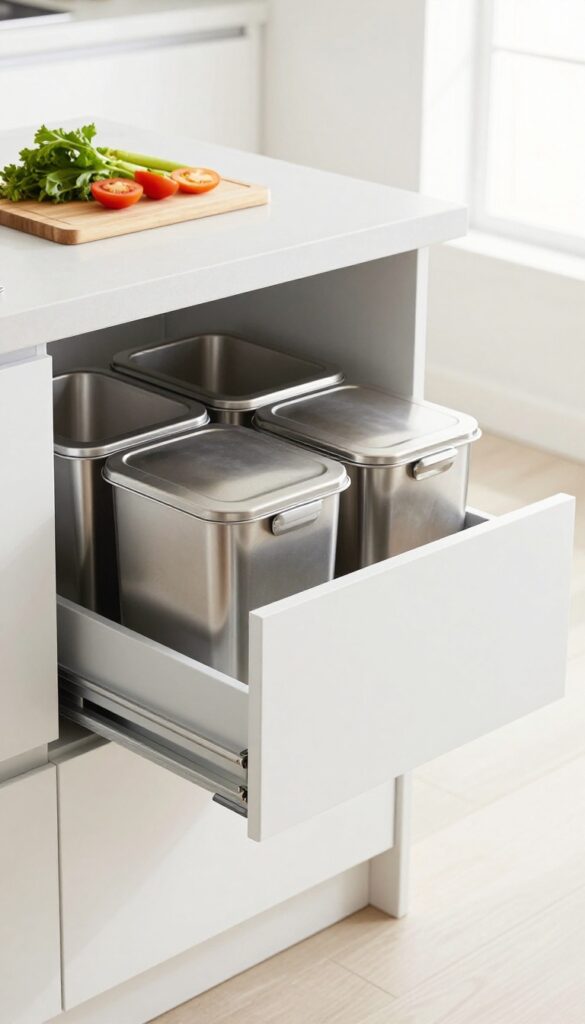
Trash bins are the one kitchen essential nobody wants to see. Tucking them into a slim pull-out drawer inside your island keeps the mess hidden and makes sorting second nature. It's a small change that instantly makes your kitchen feel more streamlined and intentional.
A dedicated pull-out drawer for waste and recycling is one of those upgrades you didn't know you needed until you have it. No more ugly bins taking up floor space or cluttering the counter. The drawer slides out smoothly, and you can separate trash from recyclables in one clean motion.
It's especially handy if you cook a lot and generate waste as you prep—just scrape scraps directly into the bin without bending over. For a weekend refresh, this is a relatively straightforward project if your island has a cabinet base. You can buy a pre-assembled pull-out unit or retrofit an existing drawer with a custom insert.
Either way, it's an instant win for both form and function.
Best Materials
- Go with a stainless steel bin inside a solid wood or plywood drawer box. Stainless resists odors and is easy to wipe down. The drawer front should match your island's cabinetry for a seamless look.
- Soft-close slides are non-negotiable—they prevent slamming and keep the kitchen quiet.
Layout Tip
Place the pull-out drawer on the side of the island where you do most of your food prep. That way you can scrape cutting board scraps directly into the bin without walking around. If you have a large island, consider a double-wide drawer with separate compartments for trash and recycling.
Finishing Touch
Add a small built-in compost bucket next to the trash drawer if you're eco-conscious. Or install a charcoal filter inside the drawer to absorb smells. A simple liner at the bottom of the drawer catches spills and makes cleaning a breeze.
6. Contrasting Legs in Brass or Black Metal
A kitchen island doesn’t have to sit on a heavy, cabinet-style base. Swapping out standard legs for sleek metal ones instantly changes the whole look. Brass brings warmth and a touch of luxury, while black metal adds an edgy, industrial feel.
Either way, the island feels lighter, more like a piece of furniture than a built-in. It’s a small swap that makes a big visual impact, especially in open-concept kitchens where the island is a focal point.
The beauty of this idea is how achievable it is. You don’t need a full renovation—just replace the existing legs or choose metal legs when building a new island. The contrast between the island body and the legs creates visual interest and breaks up the mass of a large countertop.
It’s a weekend-friendly project that instantly modernizes your kitchen without a major overhaul.
Best Materials And Finishes
- Brass legs work beautifully with warm wood tones, white cabinets, or navy blue islands. They add a subtle glow that feels inviting. Black metal legs pair well with concrete, butcher block, or any dark countertop for a more dramatic look.
- For a cohesive feel, match the leg finish to your cabinet hardware or light fixtures.
Placement And Proportion
The legs should be set in slightly from the corners to create a floating effect. Four legs are standard, but you can use two thicker legs for a more minimalist look. Make sure the legs are sturdy enough to support the island—especially if you plan to add seating or heavy appliances.
Styling Tip: Add A Shelf
If your island has open space between the legs, consider adding a slim shelf in a matching metal finish. It’s perfect for storing cookbooks, small baskets, or a few decorative items. This keeps the island functional while maintaining that airy, furniture-like feel.
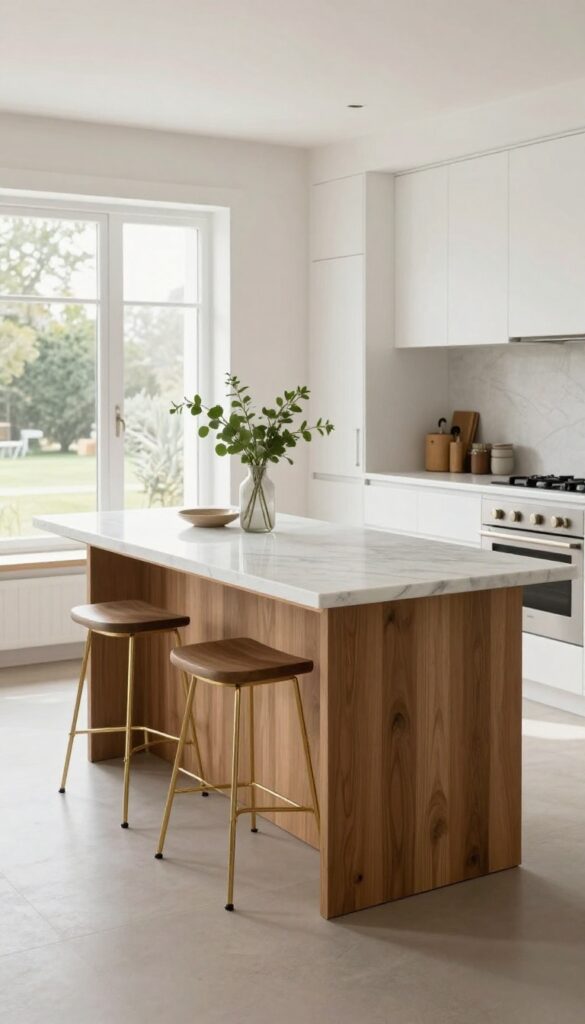
7. Butcher Block Top for Prep and Serving

A butcher block section on one end of your kitchen island brings warmth and function together. It’s the perfect spot for chopping veggies, slicing bread, or setting out a cheese board when guests drop by. Pairing it with a stone main surface gives you the best of both worlds: a durable workhorse for prep and an elegant area for serving.
Mixing materials on your island isn’t just practical—it creates visual interest without trying too hard. The contrast between warm wood and cool stone feels intentional and modern. This setup works especially well in open layouts where the island doubles as a gathering spot.
You get the durability of quartz or granite for everyday meal prep, plus a softer surface that’s gentler on knives and adds a rustic touch.
Best Materials
- Go with a solid hardwood butcher block like maple or walnut for the prep section. These woods are dense, resist knife marks, and can be sanded down if they get scratched. For the main surface, choose a low-maintenance stone like quartz or leathered granite.
- Avoid high-gloss finishes on the stone—they show fingerprints and water spots more easily. A matte or honed finish blends better with the natural wood.
Layout Tip
- Place the butcher block on the end closest to your stove or sink so it’s within easy reach during cooking. If your island is against a wall or open on one side, position the wood section on the side where you’ll do most of your chopping. Leave the stone area clear for hot pans or serving dishes.
- A 12- to 18-inch butcher block depth is plenty for prep without eating up too much counter space.
Finishing Touch
- Keep the wood conditioned with food-safe mineral oil every few weeks to prevent drying and cracking. Add a small cutting board on top if you want extra protection for heavy chopping. For serving, set out a wooden bowl of fruit or a small vase of herbs on the butcher block to highlight its natural warmth.
- A simple pendant light above the wood section draws attention to the contrast and makes the island feel like a dedicated prep zone.
8. Deep Drawers for Pots and Pans
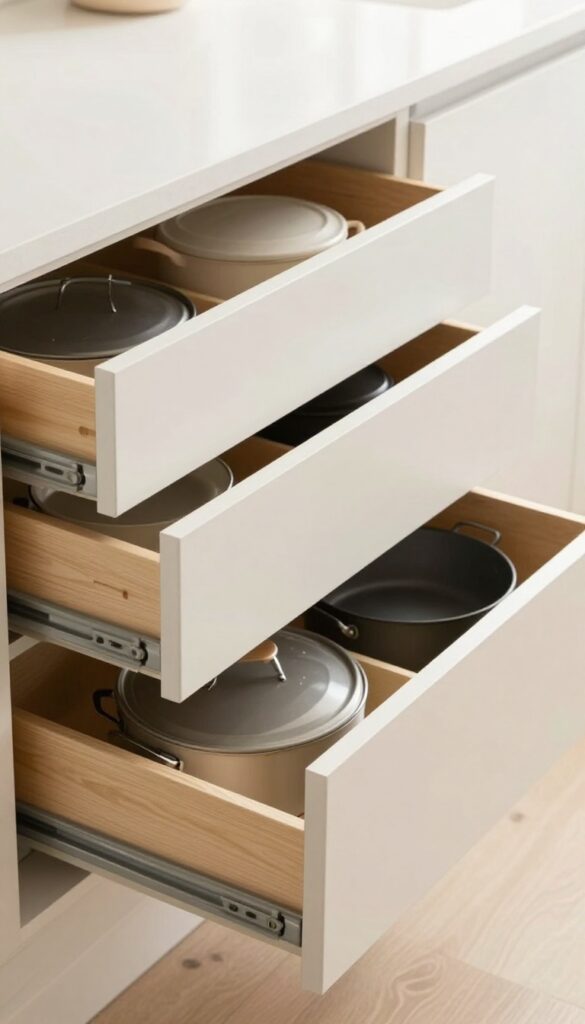
You know that frustrating moment when you're wrestling a stockpot out of a lower cabinet, only to have a lid clatter to the floor? Deep drawers are the simple upgrade that makes that a thing of the past. Instead of stacking and digging, everything glides out on smooth slides, so you can see and grab exactly what you need.
It's one of those kitchen tweaks that feels both luxurious and completely practical—especially when you're trying to keep your cooking flow smooth.
Swapping standard cabinets for deep, wide drawers transforms how you use your kitchen island. No more bending over or playing Tetris with heavy cookware. The best part?
You can organize by size: small saucepans in one drawer, large stockpots in another, and lids stored vertically in between. For a weekend-refresh, consider retrofitting an existing island base with heavy-duty drawer slides and custom inserts. It's a project that instantly upgrades your kitchen's function without a full renovation.
Best Materials
- Go with plywood boxes and dovetail joints—they're sturdy enough to handle the weight of cast iron or Dutch ovens. Soft-close slides are non-negotiable for that satisfying, silent close. For the drawer fronts, match your island's style: slab fronts for a modern look, or Shaker-style for a classic touch.
- A matte finish hides fingerprints better than gloss.
Layout Tip
- Position your deep drawers closest to the stove or prep zone. That way, you can grab a pan and start cooking without taking extra steps. If your island is also a dining spot, keep the drawers on the cooking side and leave the opposite side for seating.
- This keeps the workflow efficient and the social side clutter-free.
Storage Hack
Use adjustable dividers or peg systems inside the drawers to keep pots upright and lids separated. A bamboo or felt liner prevents scratching and dampens noise. For a budget-friendly upgrade, try adhesive cork sheets—they add grip and a warm texture.
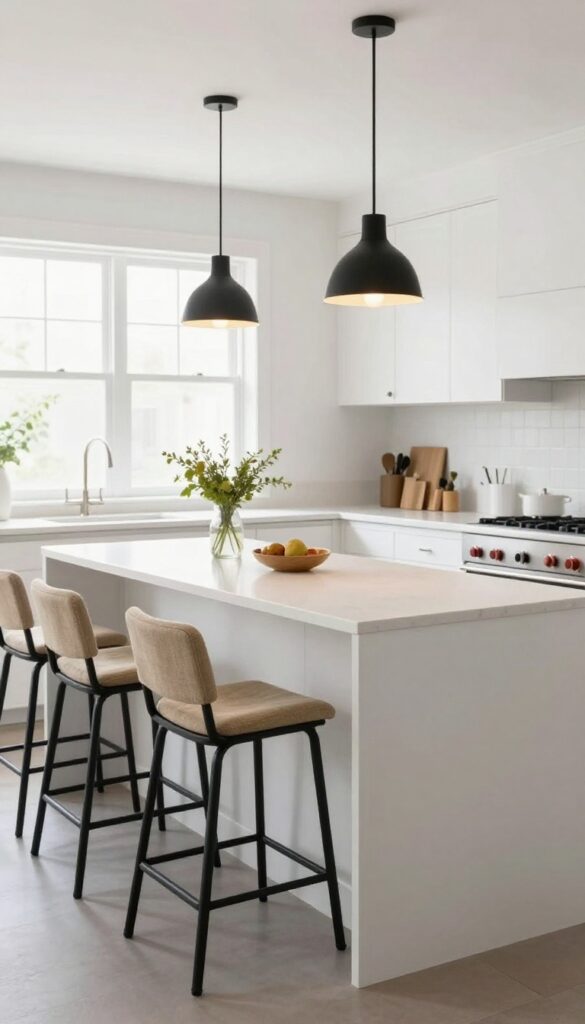
9. Pendant Lights With Warm Globes
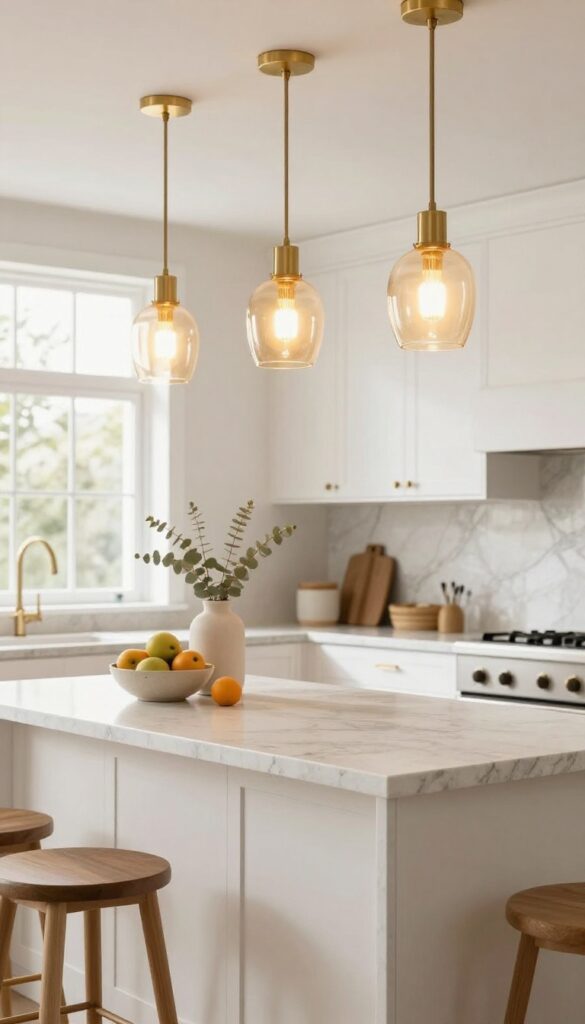
Lighting can make or break the mood of a kitchen island, and pendant lights with warm-toned globes are a weekend-friendly way to transform the space. Whether you choose glass or fabric shades, the soft glow they cast instantly makes the island feel like the heart of the room. This look is both practical and stylish—easy to install, easy to love.
Hang two or three pendant lights above your kitchen island to create a defined zone that feels intentional and inviting. Warm globes, like amber glass or cream linen shades, soften the overall brightness and add a cozy layer to an otherwise functional area. They work beautifully in open-plan kitchens where you want the island to stand out without harsh overhead lighting.
Best Materials
Look for glass globes in smoked amber, honey, or frosted white for a subtle glow. Fabric shades in linen or cotton diffuse light even more gently, perfect for a softer ambiance. Metal finishes like brushed brass or matte black keep the hardware sleek and modern.
Placement Tip
Space pendants evenly along the island, about 30 to 36 inches apart, and hang them 30 to 36 inches above the countertop. This height ensures they don't block sightlines while still casting focused light on the work surface.
Finishing Touch
Pair warm pendant lights with dimmer switches so you can adjust the brightness from task lighting to a relaxed evening glow. It's an easy upgrade that makes the island feel more versatile and inviting.
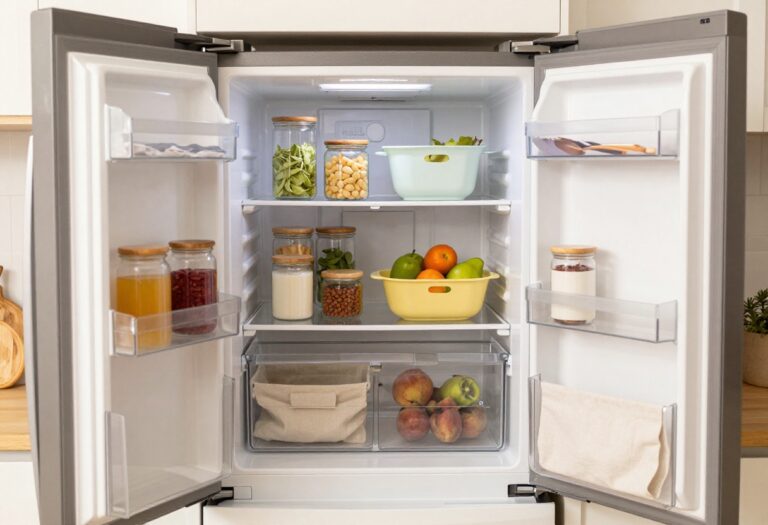
10. Slim Wine Fridge or Beverage Drawer
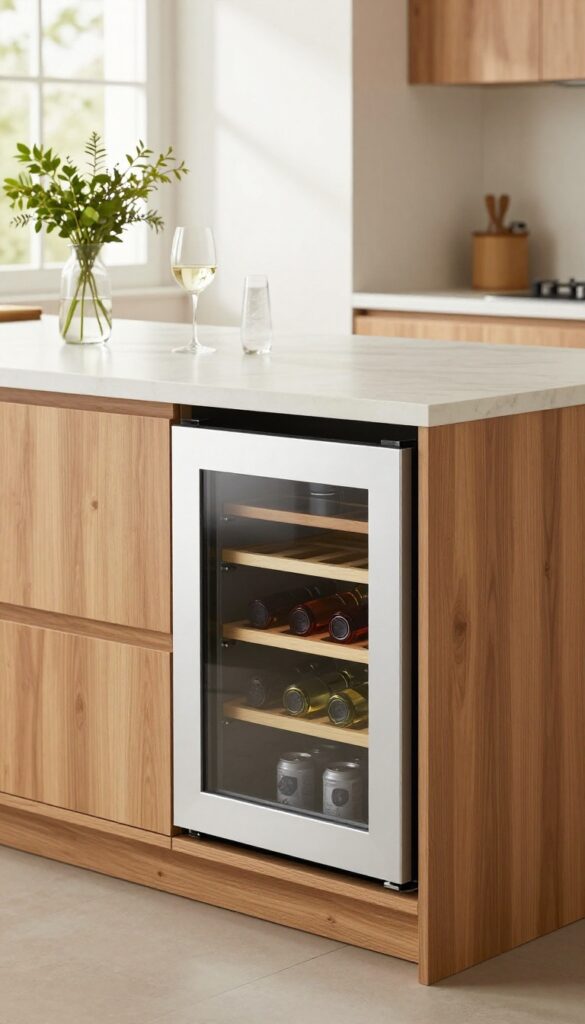
A kitchen island that keeps drinks close without crowding the room feels like a small luxury. Tucking a slim wine fridge or a beverage drawer into the base of your island gives you instant access to chilled bottles and cans, while keeping the footprint tight. It's the kind of detail that makes hosting feel effortless, whether you're pulling out a cold seltzer or a bottle of white wine for dinner.
Built-in beverage storage is one of those upgrades that quietly elevates your kitchen's function. Instead of a bulky standalone fridge taking up wall space, a narrow unit slides right into the island cabinetry. This works especially well if your island is on the larger side—say, 4 feet or more—but even compact islands can accommodate a 15-inch-wide drawer fridge.
The result is a cleaner, more integrated look that still delivers serious convenience.
Best Placement And Sizing
For a weekend-friendly refresh, look for under-counter beverage fridges that are 15 to 24 inches wide. Place them on the end of the island closest to your seating or dining area, so guests can grab their own drinks without interrupting meal prep. If your island doubles as a buffet for parties, this placement is a natural fit.
Styling Around The Fridge
Keep the surrounding cabinetry consistent with your island's finish—panel-ready fronts let the fridge blend in seamlessly. If you prefer a more industrial look, a stainless steel front adds a sleek contrast against warm wood or painted cabinets. Either way, the goal is to make the appliance feel like a built-in feature, not an afterthought.
Finishing Touch
Add a small tray on the counter above with a few wine glasses or a cute bottle opener. It signals to guests that the fridge is there to be used, and it keeps the area looking styled rather than purely utilitarian. A simple touch like this turns a practical addition into a conversation starter.
11. Mixed Materials: Wood and Marble or Concrete
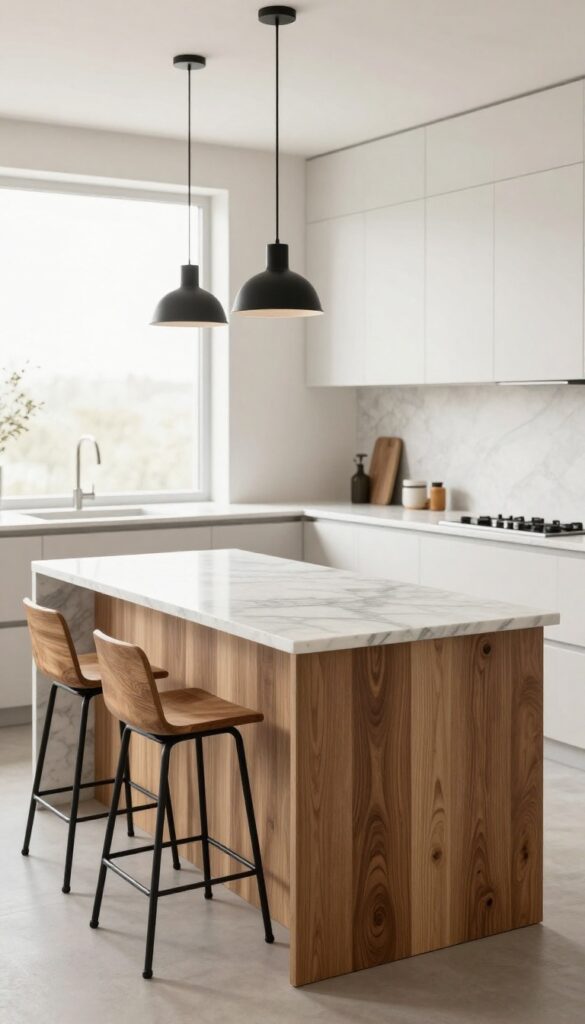
A kitchen island that mixes wood with marble or concrete strikes a perfect balance between warm and cool. The natural grain of the wood softens the sleek, industrial feel of stone or concrete, making the whole space feel more inviting. This combination works especially well in modern kitchens that might otherwise lean a bit too minimalist or cold.
The key to pulling off this look is choosing a wood base with visible grain—oak, walnut, or reclaimed wood all work beautifully—and pairing it with a marble or concrete top that has subtle veining or texture. The contrast keeps the eye moving and adds depth without clutter. For a weekend-refresh friendly approach, consider a butcher block countertop on a pre-made island base, or refinish an existing island with a wood wrap and add a marble slab or concrete overlay.
Best Materials
For the base, go with a medium to dark wood like walnut for warmth, or a lighter oak for a more Scandinavian feel. The top can be Carrara marble for classic elegance, or a poured concrete top for an edgy, industrial look. If real marble is out of budget, a marble-look quartz or a concrete-look laminate offers the same visual impact with less maintenance.
Layout Tip
Let the island float away from the counter by at least 36 inches to keep the space open. If your kitchen is narrow, choose a slim island with a wood base and a thin marble top—this keeps the mixed-material effect without overwhelming the room.
Finishing Touch
Add a few bar stools with wood frames and metal legs to echo the mix of materials. A pendant light with a brass or black finish above the island ties the look together and adds a polished, designer feel.
12. Hidden Charging Station in a Drawer
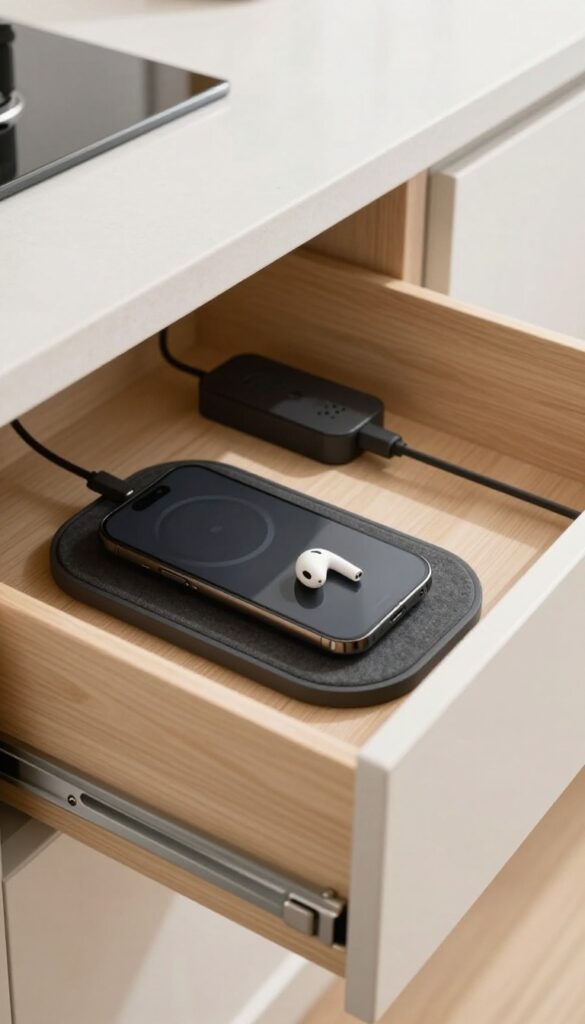
We all have that one kitchen counter spot that's become a permanent charging graveyard—cords tangling, devices scattered, and clutter piling up. A dedicated charging drawer tucks everything away while keeping your island looking clean and intentional. It's one of those upgrades that feels luxurious but is surprisingly easy to pull off, even on a weekend refresh.
The trick is to install a power strip or pop-up outlet inside a deep drawer, then add a wireless charging pad on the inner surface. Choose a drawer close to your main work zone so you can plug in phones, tablets, or even a laptop without reaching across the island. For a polished look, line the drawer with felt or a soft liner to prevent scratches and muffle any cord noise.
This idea works beautifully in kitchens where you want to reduce visual clutter without sacrificing functionality.
Best Materials
- Stick with a sturdy drawer that can handle the weight of devices and a power strip. Solid wood or plywood construction works best. For the charger, choose a slim wireless pad that sits flush or slightly recessed into the drawer bottom.
- A brushed nickel or matte black outlet cover keeps the look modern and ties into most kitchen hardware.
Layout Tip
Place the charging drawer on the side of the island where you naturally sit or stand while waiting for coffee or prepping meals. If your island has seating, position it near the seating side so guests can charge their phones too. Avoid putting it directly under a cooktop or sink to keep electronics safe from heat and moisture.
Finishing Touch
Add a small cable management clip inside the drawer to keep cords organized, and consider a soft-close drawer slide for a premium feel. A subtle LED strip along the drawer edge (activated when opened) adds a cool, high-end vibe and makes it easier to plug in devices in low light.
13. Angled or Asymmetrical Island Shape
Why settle for a plain rectangle when your kitchen island could have a little personality? An angled or asymmetrical shape breaks the monotony of straight lines and adds a custom, almost sculptural feel to your space. It’s not just about looks—this smart layout tweak can actually improve how you move around the kitchen, especially in tight or open-plan layouts.
An angled island works wonders for traffic flow. By cutting off a corner or curving one side, you create natural pathways that guide people around the island without bumping into each other. It’s a subtle shift that makes a big difference in how the kitchen feels during daily use or when you’re entertaining.
Plus, the unexpected shape becomes a conversation starter and gives your kitchen a designer touch without a full renovation. Keep the rest of the kitchen clean and minimal so the island remains the focal point.
Best Layout For Traffic Flow
- If your kitchen is a high-traffic zone, an angled island can be a lifesaver. Try a pentagon shape with one side cut at a 45-degree angle. This opens up the walkway on that side, making it easier to move between the sink, stove, and fridge.
- It also creates a natural spot for bar stools on the longer, straight edge without blocking the main work triangle.
Finishing Touch
To emphasize the unique shape, use a contrasting countertop material or a waterfall edge that follows the angle. A light quartz or marble on the top with a dark wood or painted base makes the geometry pop. Add under-cabinet lighting along the angled side to highlight the form and create a soft glow in the evenings.
14. Slim Profile With No Overhang for Tight Spaces
When your kitchen is more hallway than room, every inch counts. A slim island with zero overhang keeps the walkway clear while still giving you that coveted prep zone. It’s the kind of smart, space-saving move that makes a narrow kitchen feel intentional rather than cramped.
Plus, it’s a weekend-refresh friendly project—just measure twice, order a slim countertop, and you’re halfway there.
A flush island works best when it’s purely functional. Think of it as a landing pad for groceries, a spot to roll out dough, or a place to set down hot pans straight from the stove. Without an overhang, you lose the breakfast bar, but you gain precious floor space.
To make up for seating, tuck a slim rolling cart underneath or keep a couple of counter stools nearby that slide out of the way when not in use. The visual effect is clean and uncluttered—perfect for galley kitchens or any layout where every square foot matters.
Best Materials
Go with a light-colored quartz or butcher block to keep the island from feeling heavy. A pale oak or white marble-look surface reflects light and makes the space feel airier. Avoid dark, bulky materials that can visually shrink the room.
Small-space Fix
Add a slim rolling cart with a butcher block top that can slide under the island when not in use. Use it for extra prep space during cooking, then tuck it away to keep the floor clear. It’s a flexible solution that doesn’t compromise on style.
Finishing Touch
Hang a single, low-profile pendant light above the island to define the zone without overwhelming the room. Choose a slim, minimalist fixture in brushed brass or matte black for a subtle touch of warmth.
15. Painted Base in a Soft Earth Tone
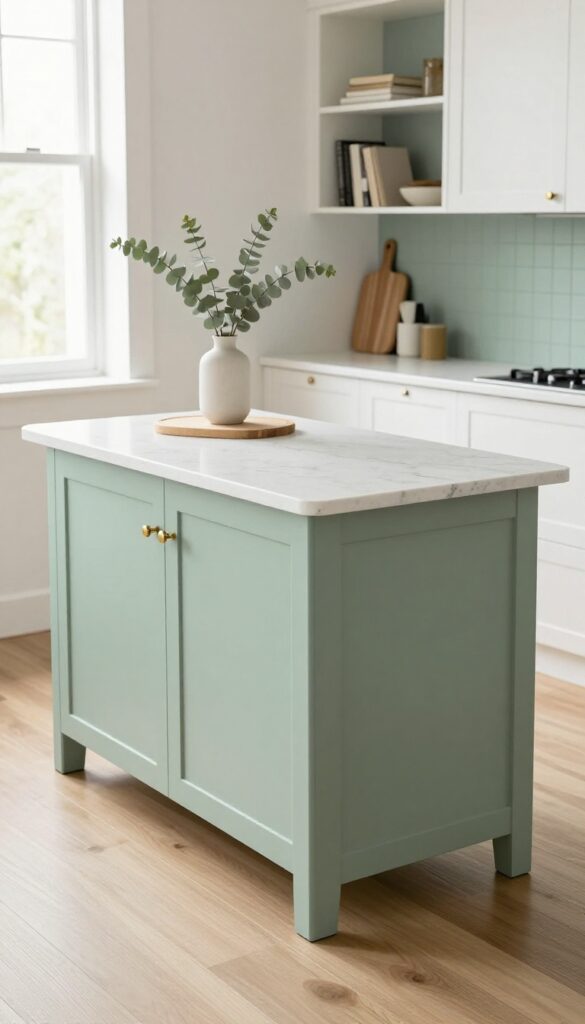
White kitchens are timeless, but sometimes you want a little warmth without committing to a full renovation. Painting just the base of your island in a soft earth tone—like sage green, dusty blue, or terracotta—adds personality and depth in a weekend-friendly project. It’s a subtle way to introduce color that feels grounded and inviting, not loud or trendy.
The key is choosing a hue that complements your countertops and flooring. Sage green pairs beautifully with butcher block and brass hardware, while dusty blue softens white marble or quartz. Terracotta brings warmth to gray or wood tones.
Keep the island top neutral to let the color pop without overwhelming the space. This approach works especially well in open-plan kitchens where the island anchors the room.
Best Colors For A Natural Vibe
Stick with muted, earthy shades that feel timeless. Sage green, dusty blue, warm terracotta, or even a soft clay pink are all excellent choices. Test samples on the base in different lighting—north-facing rooms may need a warmer tone to avoid looking flat.
Prep And Paint Tips
- For a durable finish, clean the surface thoroughly, sand lightly, and use a high-quality primer. A semi-gloss or satin paint holds up better to daily wear. Don’t forget to tape off edges and remove hardware for a crisp line.
- Two coats usually do the trick.
Styling The Painted Base
Let the color shine by keeping the countertop clutter-free. Add a wooden cutting board, a simple vase with dried eucalyptus, or a few cookbooks in neutral tones. If your island has open shelving, paint the back panel the same earth tone for a cohesive look.
FAQ
What size should a kitchen island be for a small kitchen?
For small kitchens, aim for an island that's at least 36 inches wide and 24 inches deep to allow for comfortable movement around it. A slim profile or a rolling cart can work in tight spaces.
How much overhang do I need for seating?
A 12-inch overhang is standard for counter-height stools, while 15 inches works better for bar-height seating. Make sure there's enough legroom—about 24 inches of clearance from the counter edge to the stool.
What's the best material for a kitchen island countertop?
Quartz is durable, low-maintenance, and comes in many styles. Butcher block is great for prep areas, and marble offers a classic look but requires more care. Choose based on your cooking habits.
Can I add an island to an existing kitchen without renovation?
Yes! A freestanding island or a butcher block cart can be added without construction. Look for one with storage and a surface that matches your kitchen's style.
How many pendant lights should I hang over an island?
For a standard 6- to 8-foot island, two pendants work well. For longer islands, three can be used. Space them evenly and hang them 30 to 36 inches above the countertop.
Conclusion
Updating your kitchen island doesn't have to be a huge project. With a few thoughtful changes—like swapping hardware, adding a new countertop, or rethinking storage—you can transform the look and feel of your kitchen in a weekend. Pick the ideas that fit your space and lifestyle, and don't be afraid to mix and match.
A modern kitchen island is all about blending sleek style with real-world function. Happy refreshing!