11 Camper Kitchen Ideas for Easy Cooking on the Road
Cooking in a camper doesn't have to mean sacrificing style or comfort. With a little creativity, you can turn that compact kitchen into a warm, layered space that makes every meal feel special.
The key is balancing practicality with personality—choosing pieces that work hard but also make you smile.
Whether you're a weekend warrior or a full-time traveler, these 11 ideas will help you create a camper kitchen that's both easy to cook in and a joy to come back to.
1. Layer a Soft Rug Underfoot
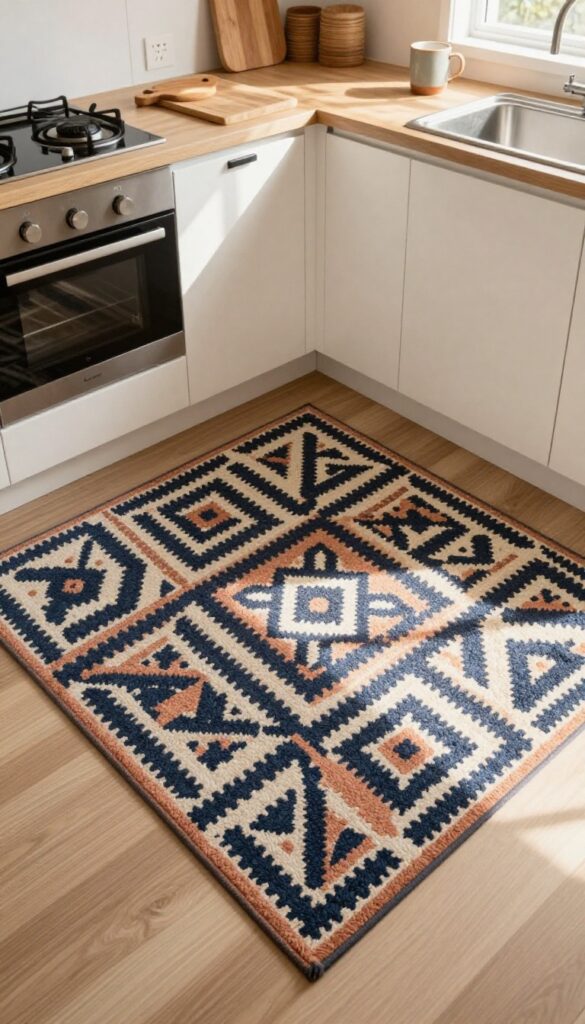
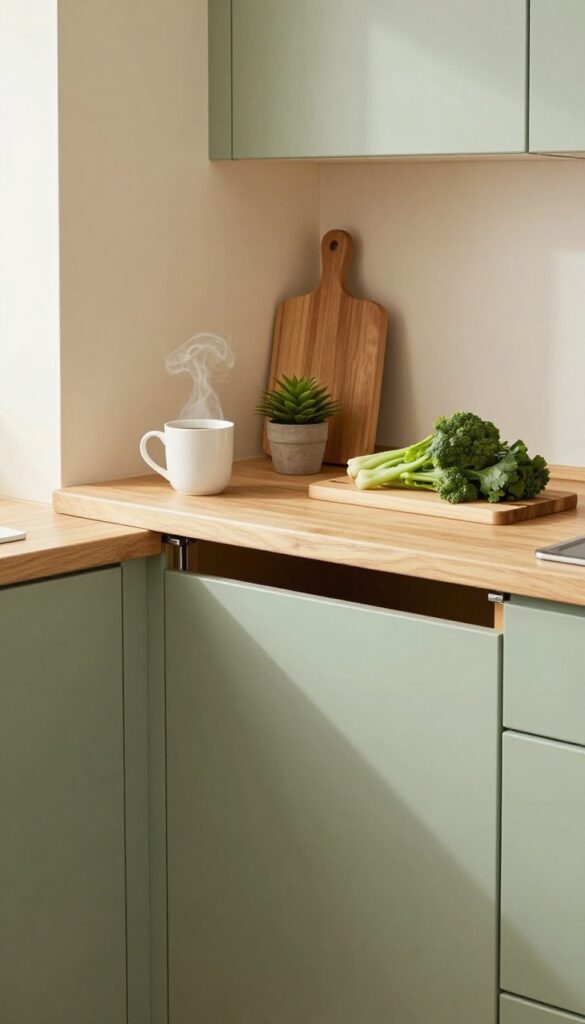
A camper kitchen can feel a little cold and utilitarian, especially with all that metal, laminate, and linoleum. Adding a washable, low-pile rug instantly warms up the space and brings in color and texture. It’s a small change that makes a big difference—both for your feet and for the overall vibe.
Think of your camper kitchen rug as the anchor that ties the whole look together. A patterned rug hides crumbs and spills better than a solid one, and low-pile construction means it won’t catch on cabinet doors or slide around. Plus, when you’re standing at the stove flipping pancakes or stirring soup, that extra cushioning is a game-changer for your back and knees.
Choose a rug with a non-slip backing or add a rug pad to keep it secure while you’re driving. The right rug makes your tiny kitchen feel more like a real home and less like a temporary setup.
Best Colors And Patterns
- Go for a pattern that hides dirt—think geometric prints, abstract florals, or classic stripes in earthy tones like terracotta, olive, or navy. These colors complement most camper palettes and won’t show every speck of dust. If your camper has a neutral interior, a bold rug can be the pop of personality you need.
- Just avoid high-pile shag; it traps crumbs and is hard to clean on the road.
Material And Care Tips
- Look for rugs made from polypropylene or recycled PET—they’re stain-resistant, fade-resistant, and can be hosed off or tossed in a washing machine. A flatweave or low-pile construction dries quickly and won’t hold onto moisture. For extra durability, choose an indoor/outdoor rug; they’re built to handle dirt and frequent cleaning.
- Keep a small handheld vacuum nearby for quick touch-ups.
Placement And Safety
- Place the rug in front of the stove and sink, where you stand the most. Make sure it doesn’t extend under cabinet doors or block the slide-out mechanism. Use a non-slip rug pad or double-sided carpet tape to keep it from shifting during travel.
- If your camper has a step-down into the kitchen, consider a runner that spans the length of the counter for a cohesive look.
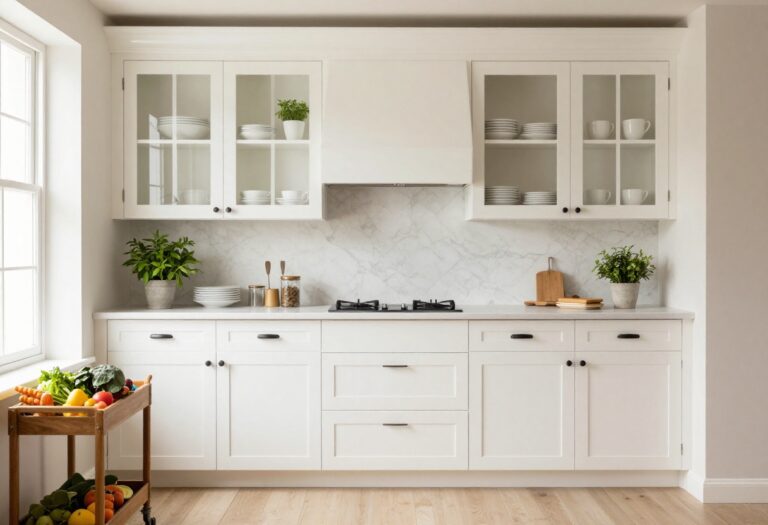
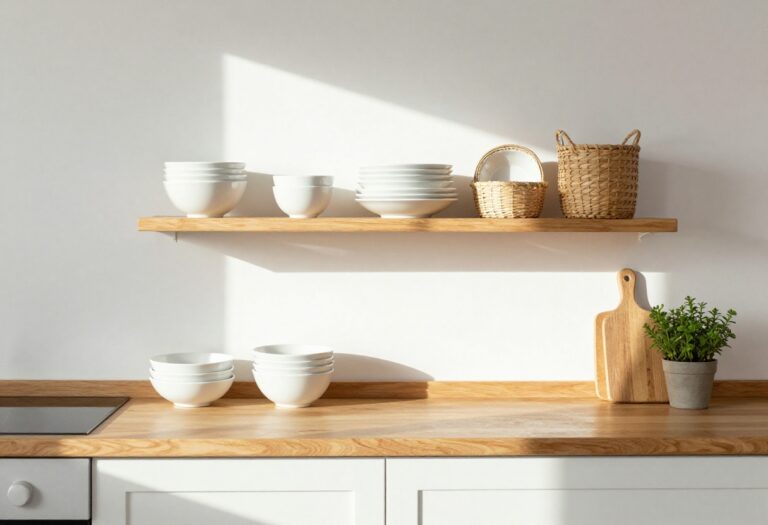
2. Use Open Shelving for Dish Display

Open shelving is a game-changer for camper kitchens. It swaps bulky cabinets for airy, accessible storage that makes your space feel twice as big. By keeping everyday dishes within easy reach, you cut down on rummaging and add a cozy, lived-in look that invites you to cook and relax.
The key is to keep it intentional—stack plates and bowls in neutral tones like creamy white or soft gray, then layer in texture with a small plant or a woven basket. This approach not only streamlines your morning coffee routine but also turns your dishware into decor that feels warm and personal.
Best Colors
Stick with earthy neutrals—think warm whites, beige, or soft terracotta—to keep the look cohesive and calm. Avoid bold patterns that can feel busy in a tight space.
Shelf Styling Tip
Mix heights by placing a small stack of plates next to a low bowl, then add a trailing plant or a single ceramic piece for visual interest without clutter.
Small-space Fix
Use floating shelves that are shallow—about 8 to 10 inches deep—so they don't eat into counter space. Install them above the sink or stove for easy access while cooking.
3. Install a Magnetic Knife Strip
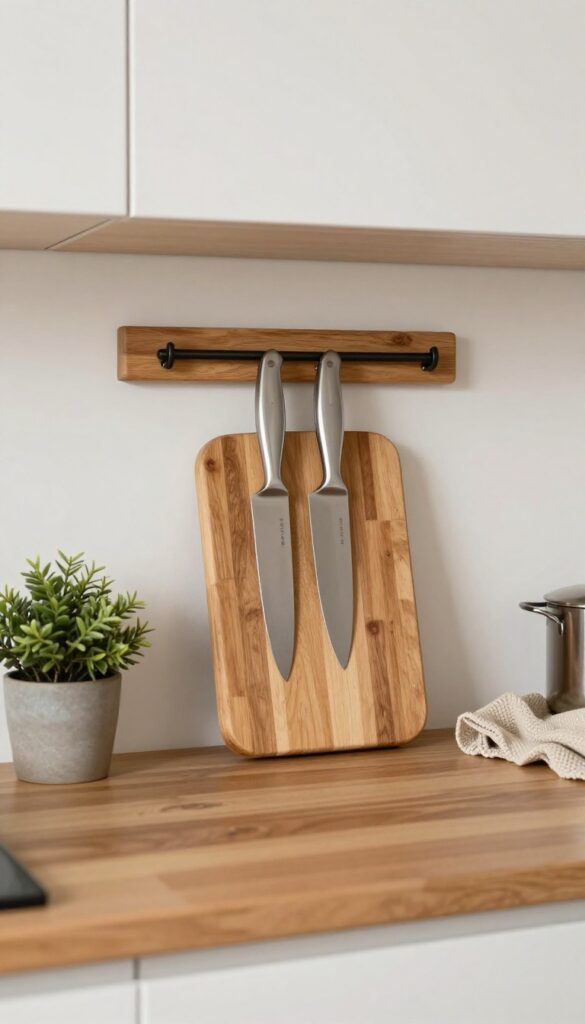
Counter space is precious in a camper kitchen, so getting knives off the counter is a smart move. A magnetic strip mounted on the wall or backsplash keeps your blades within easy reach while freeing up valuable workspace. Beyond the practicality, it adds a clean, industrial look that can feel surprisingly warm when you choose the right materials—like a wooden strip that softens the metal edge.
A magnetic knife strip is one of those upgrades that makes you wonder why you didn't do it sooner. It turns a cluttered drawer or crowded counter into an organized, visually appealing display. The key is to pick a strip that matches your camper's style.
For a cozy, layered feel, go with a bamboo or walnut strip—it brings natural warmth and blends nicely with other wood tones in your kitchen. Mount it near your prep area so you can grab a knife without reaching across the stove or sink. The result is a space that feels both efficient and thoughtfully styled.
Best Materials
- Stainless steel strips are durable and easy to clean, but they can feel cold in a small space. For a cozier look, opt for a wooden magnetic strip—bamboo, acacia, or walnut add texture and warmth. Some strips come with a dark finish that mimics black steel, which looks great against light-colored walls.
- If you want a pop of color, look for strips with a painted or powder-coated finish in muted tones like sage or navy.
Placement Tips
- Mount the strip on a wall that's easy to reach but out of the way of busy counter areas. A spot between the counter and upper cabinets works well, or on the side of a cabinet if you have a narrow galley. Make sure it's securely attached—use screws rather than adhesive for a camper that's on the move.
- Leave a few inches of clearance above the strip so knives slide on and off without hitting the cabinet above.
Styling The Look
- To keep it from feeling too utilitarian, pair the strip with a small wooden cutting board or a jar of wooden utensils nearby. The mix of metal and natural materials creates that layered, cozy vibe. If your camper has open shelving, position the strip near the shelves so the knives become part of the decor.
- Stick to a matching set of knives for a uniform look, or mix vintage and modern styles for more character.
4. Add a Fold-Down Counter Extension
Counter space is precious in a camper kitchen, and a fold-down extension is one of the smartest ways to get more without sacrificing floor space. A hinged wooden board attached to the wall gives you a sturdy surface for prepping meals, setting down a hot pan, or even enjoying a quick cup of coffee. When you're done, it folds flat against the wall and disappears—no bumping into it, no clutter.
It's the kind of practical solution that feels intentional and polished, especially when you choose a material and finish that complements your cabinets.
This simple addition can transform how you use your camper kitchen. Whether you're chopping vegetables, rolling out dough, or just need a landing spot for serving dishes, having that extra surface makes everything easier. The key is to install it at a height that works naturally with your existing counter, so it feels like an extension rather than an afterthought.
A fold-down counter also doubles as a breakfast bar if you add a couple of stools—perfect for cozy mornings on the road.
Best Materials
- Butcher block is a top choice for its warmth and durability. It's gentle on knives and adds a natural, organic feel that contrasts nicely with sleek cabinets. If you prefer a more uniform look, go with plywood finished with a clear sealant or painted to match your cabinetry.
- For a rustic vibe, reclaimed wood brings character and a story. Whichever material you pick, make sure it's sealed properly to resist moisture and stains.
Styling Tip
- Paint the fold-down board in a soft, muted color like sage green or warm beige to blend seamlessly with your cabinets. Or leave it natural and let the wood grain add texture. Add a small hook or magnetic strip underneath to hang a dish towel or lightweight utensils—it keeps essentials within reach without cluttering the surface.
- When folded down, the board becomes a subtle design element, so choose a finish that feels cohesive with the rest of your kitchen.
Small-space Fix
- If your camper has an awkward nook or a narrow gap between appliances, a fold-down counter can turn that dead space into a functional work zone. Install it above a trash can or a slim storage cart to maximize every inch. Use folding brackets that lock securely when open and release easily for storage.
- Test the height with your most common tasks—prepping veggies, using a small appliance—to ensure it's comfortable and practical.
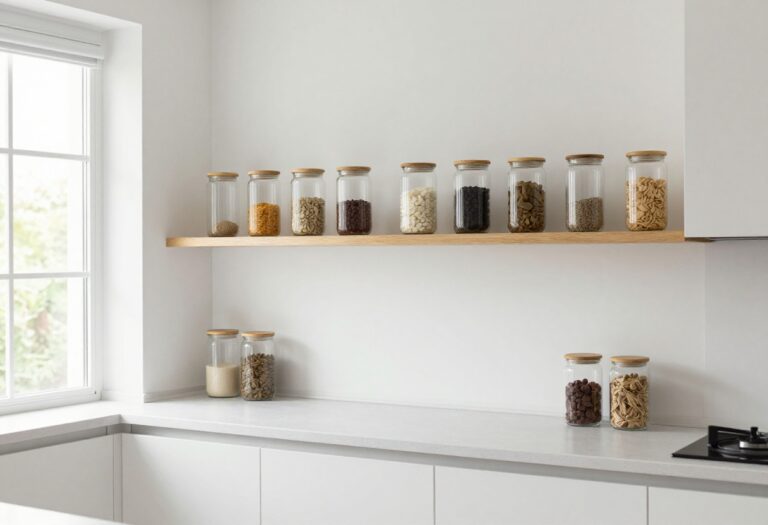
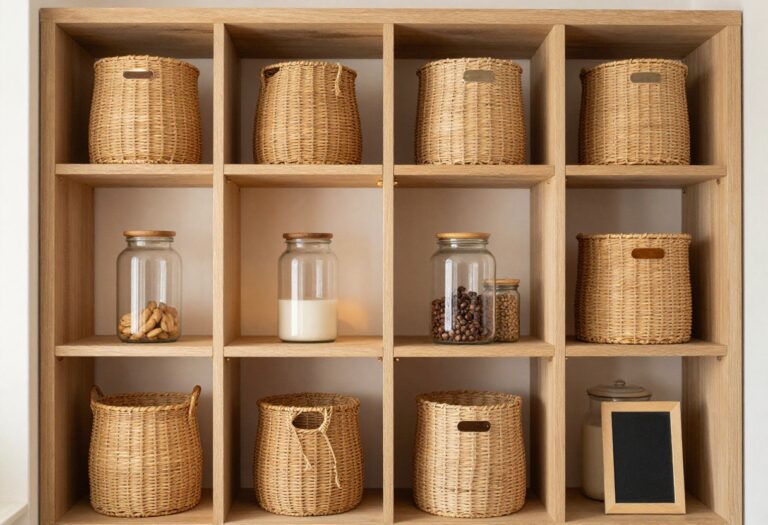
5. Incorporate Woven Baskets for Bulk Storage
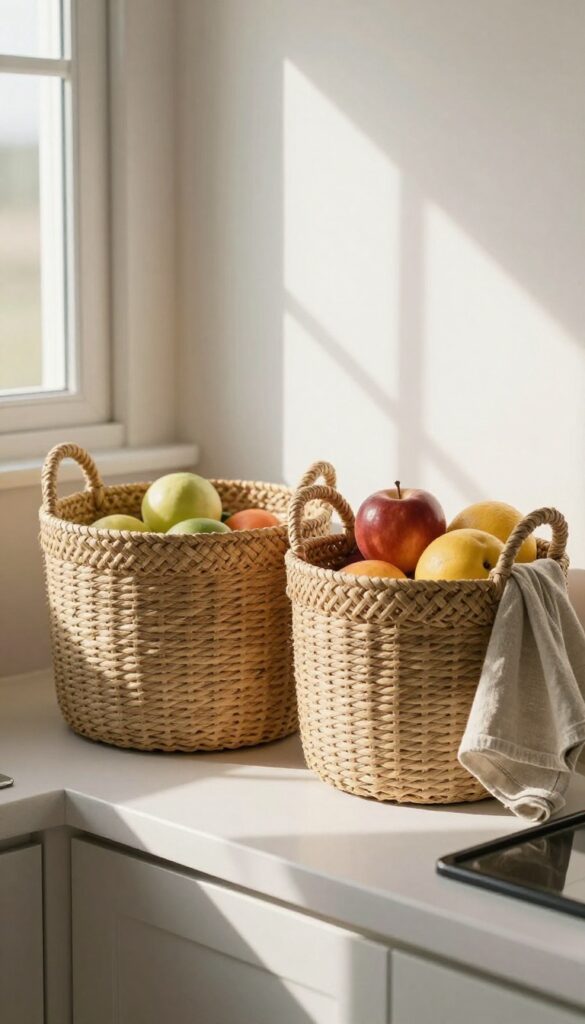
Baskets are the unsung heroes of camper kitchen organization. They corral loose items, hide unsightly packaging, and instantly warm up a space with natural texture. In a tiny kitchen where every inch counts, a well-placed basket can turn a cluttered shelf into a styled vignette.
The key is choosing a consistent material—like seagrass or rattan—to keep the look intentional rather than haphazard.
Woven baskets offer a simple way to add storage and style without a permanent commitment. Use them on lower shelves or under the sink to store produce, snacks, or linens. They hide clutter while introducing organic texture that softens the hard edges of a camper kitchen.
Stick to one or two basket styles in neutral tones to maintain a cohesive, layered look. For a cozy feel, line a basket with a cloth napkin or tea towel before filling it with bread or fruit.
Best Materials
- Seagrass and rattan are top choices for their durability and natural warmth. Seagrass has a tighter weave that holds up well to moisture, making it ideal under the sink. Rattan offers a more open, airy look that works beautifully on open shelves.
- Avoid overly dark or shiny finishes—stick to natural, earthy tones that blend with most color palettes.
Storage Tip
Use baskets to group like items together: one for snacks, one for produce, one for linens. This makes grabbing what you need quick and keeps the kitchen from feeling chaotic. In a camper, baskets with handles are extra handy because they can be lifted out easily to access items behind them.
Cozy Detail
Layer a small woven basket on the countertop to hold everyday utensils or napkins. It adds a touch of warmth and keeps essentials within arm's reach. For an extra cozy touch, tuck a sprig of dried lavender or eucalyptus into the basket—it smells lovely and looks effortlessly styled.
6. Hang a Pegboard for Utensils and Pots
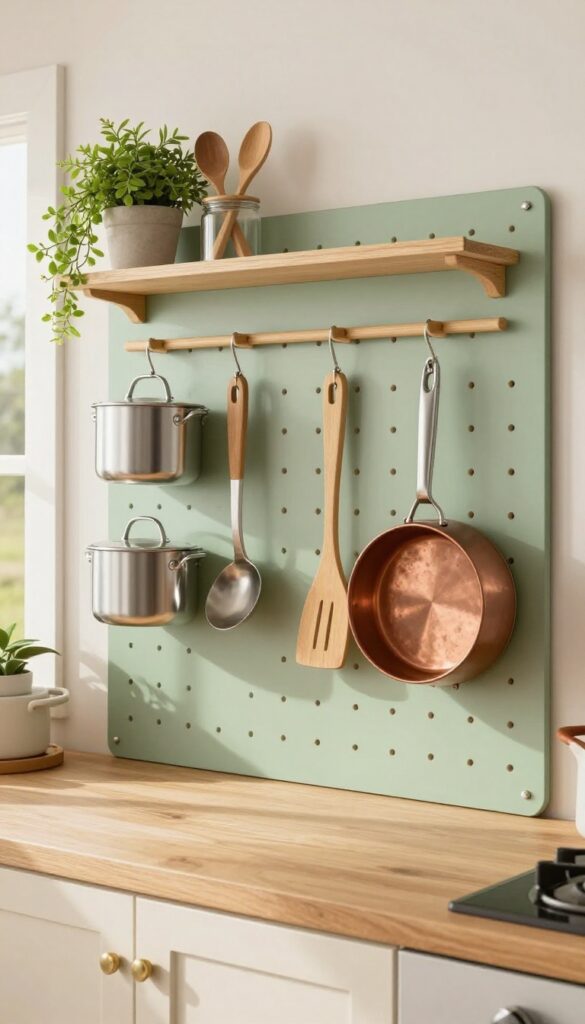
A pegboard might remind you of a garage workshop, but in a camper kitchen, it becomes a clever and charming storage solution. It turns an empty wall into a highly functional space where pots, pans, and utensils are always within arm's reach. The best part?
You can customize it to match your camper's vibe, whether that's cheerful and colorful or warm and rustic.
Pegboards are a game-changer for small kitchens because they use vertical space that would otherwise go to waste. In a camper, where every inch counts, hanging your most-used tools on a pegboard keeps counters clear and makes cooking feel more organized. Plus, it adds a decorative element that feels intentional and cozy.
Best Colors And Finishes
For a cozy and layered look, paint the pegboard a soft sage green, warm mustard, or creamy white to blend with your cabinets. If you prefer a rustic feel, leave it in natural wood and seal it with a matte finish. Dark charcoal or navy can also work if you want a bold contrast against lighter walls.
Layout And Hook Placement
Arrange hooks in a way that groups similar items together: spatulas and ladles on one side, small pots and lids on the other. Leave a little breathing room between hooks so nothing feels cramped. Consider adding a small shelf above the pegboard for spices or a tiny plant to soften the look.
Finishing Touch
To make the pegboard feel more like decor than a tool rack, frame it with thin wood trim painted the same color as your cabinets. This simple addition gives it a built-in look that elevates the whole kitchen. Add a small hook for a dish towel or a hanging herb bundle for extra charm.
7. Choose Stackable, Nesting Cookware
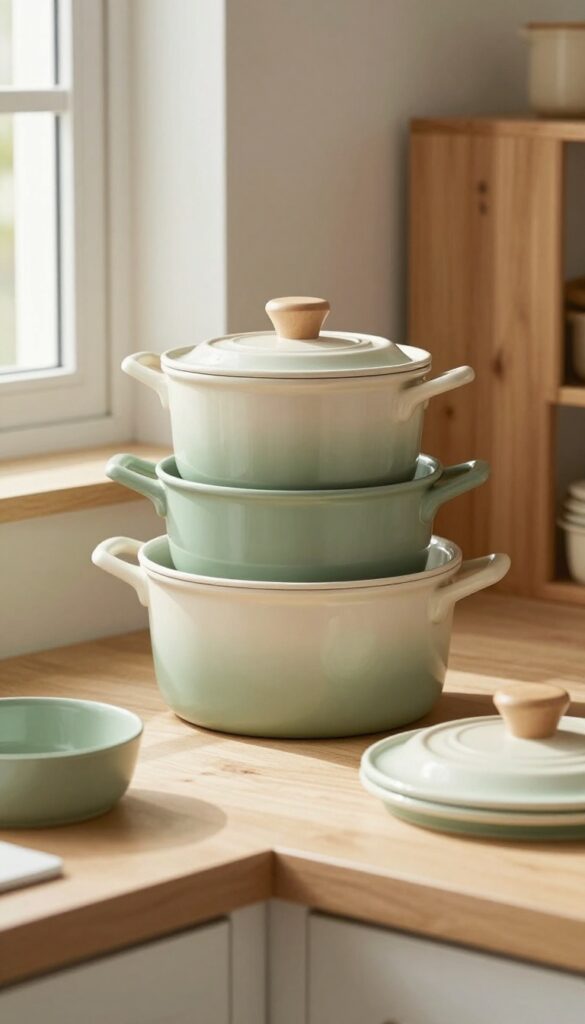
Pots and pans can be the biggest space hogs in a camper kitchen. A full set of traditional cookware will have you playing a frustrating game of kitchen Tetris every time you open a cabinet. That’s where nesting cookware comes in—a smart, space-saving solution that keeps your cooking gear tidy and accessible without the jumble.
Plus, when everything stacks neatly, your kitchen instantly feels more organized and calm, which is exactly the cozy, layered vibe we’re going for.
Investing in a set of nesting pots and pans is one of the smartest moves for a camper kitchen. These sets are designed to fit inside each other, so a saucepan tucks into a stockpot, and lids stack on top. This slashes the storage footprint in half, freeing up room for other essentials.
Look for non-stick finishes in muted, earthy tones like sage green or cream to keep the look soft and inviting. The practical benefit is huge—unpacking and packing become a breeze, and you won’t have to dig through a pile of mismatched lids to find the right one.
Best Materials And Finishes
- When choosing nesting cookware, prioritize lightweight materials like aluminum with a ceramic non-stick coating. Ceramic is durable, easy to clean, and free of harsh chemicals, which is great for small spaces where ventilation might be limited. The non-stick surface means you can cook with less oil, and cleanup is quick—perfect for camping.
- Avoid heavy cast iron sets, as they take up more weight and space. For the exterior, matte finishes in soft greens, warm grays, or off-whites add a cozy, layered look that feels intentional and stylish.
Storage And Organization Tip
- To make the most of your nesting set, store them in a deep drawer or a low cabinet with a pull-out shelf. Use felt pads or silicone trivets between each pot to prevent scratches and noise while driving. If your camper has limited vertical space, consider a hanging pot rack that fits the smallest pot on top—just make sure the rack is sturdy.
- Label the lids with a small sticker or marker so you can grab the right one instantly. This keeps your cookware organized and your kitchen feeling spacious.
8. Install Under-Cabinet Lighting
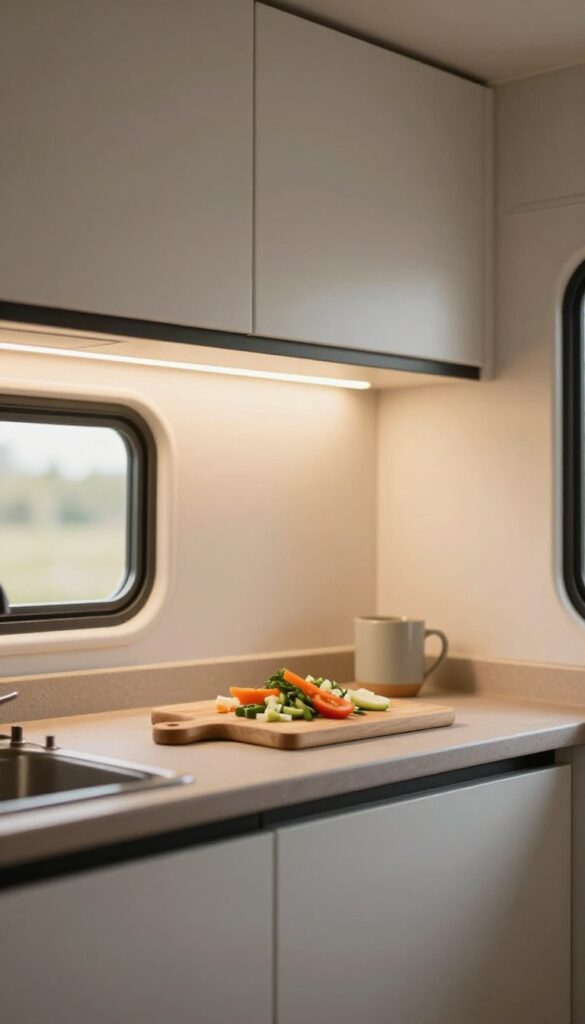
After sunset, your camper kitchen can feel a little dim, especially when you're trying to chop veggies or read a recipe. Battery-powered LED strip lights are an easy fix—no electrician needed, just peel and stick. They cast a warm, even glow across your countertops, making meal prep safer and instantly cozier.
Plus, you can adjust the brightness to set the mood for a late-night snack or a morning coffee.
Under-cabinet lighting transforms a cramped camper kitchen into a layered, inviting space. The soft illumination eliminates harsh shadows and highlights your countertop, making even a small prep area feel more spacious. Choose a dimmable, warm-white LED strip for maximum versatility—bright enough for cooking, soft enough for winding down.
Installation takes minutes, and because they're battery-powered, you can place them anywhere without worrying about wiring. For a polished look, hide the wires along the cabinet underside with adhesive clips.
Best Placement
- Focus on the area where you prep food most—usually the main counter near the sink or stove. If you have a narrow galley kitchen, run the strip the full length of the cabinets above the counter. For L-shaped layouts, use two shorter strips to cover both sections.
- Avoid placing lights directly over the stove or sink where steam or splashes might cause issues; instead, angle them slightly toward the workspace.
Cozy Detail
- To make the glow feel extra warm and layered, choose LED strips with a color temperature around 2700K to 3000K—similar to soft white bulbs. Pair them with a matte black or brushed nickel strip housing for a subtle, built-in look. If your cabinets have a lip or molding, mount the lights just behind it so they're hidden from view but still cast light downward.
- This creates a seamless, high-end feel without the hardwiring.
Battery And Control Tips
- Look for strips with a remote or app control so you can dim or turn them off without reaching under the cabinet. Rechargeable battery packs are more convenient than disposable ones—just charge them overnight. Place the battery pack in an inconspicuous spot, like inside a cabinet or behind a utensil holder, to keep the counter clutter-free.
- Some strips also have a motion sensor, which is handy when your hands are full.
9. Use a Rolling Cart as a Mobile Island
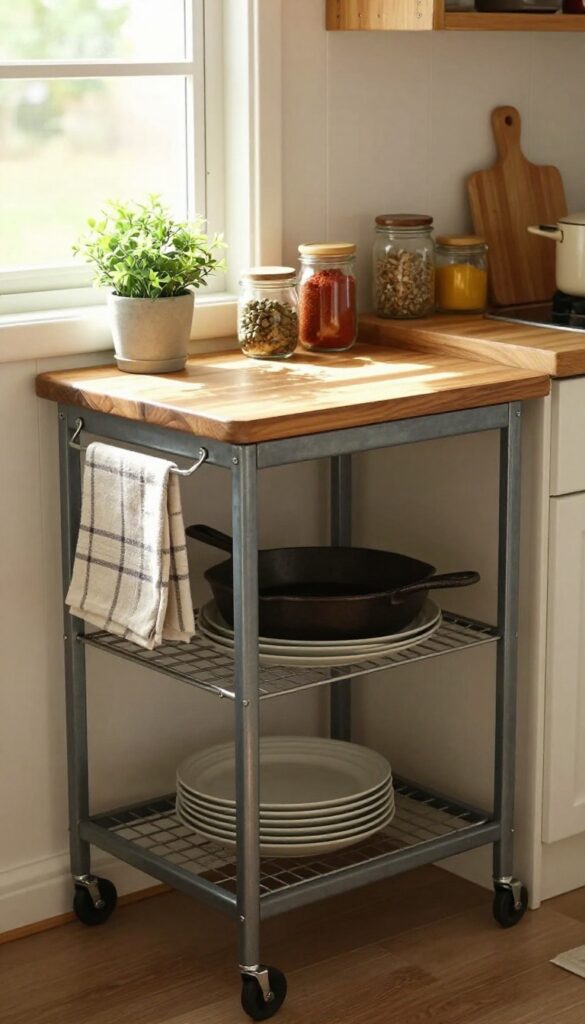
A narrow rolling cart is one of those pieces that just makes sense in a camper kitchen. It slides into tight spots, gives you extra counter space when you need it, and rolls out of the way when you don't. Think of it as a tiny island that follows you around—perfect for a coffee station, a spice rack, or just a spot to set down a hot pan.
A rolling cart brings both function and a cozy, layered feel to a small kitchen. Its mobility means you can tuck it beside the sink while prepping, then roll it outside for serving. The key is choosing one with a slim profile—around 12 to 18 inches wide—so it doesn't block traffic.
Look for a cart with shelves or a drawer to maximize storage. Style it with a wooden cutting board on top, a small plant, and a few jars of staples. The layered look comes from mixing materials: a metal frame with a wood top, or a wire cart with woven baskets.
This idea works especially well in campers where every inch counts, and it adds a warm, lived-in feel without crowding the space.
Best Materials
- Go for a cart with a sturdy metal frame and a wood or butcher-block top. The wood adds warmth and a natural texture that softens the industrial look of metal. Wire shelves keep things airy, while solid shelves hide clutter.
- Avoid plastic—it can feel cheap and won't hold up to heat or weight.
Storage Tip
- Use the bottom shelf for heavier items like a cast-iron skillet or a stack of plates. The middle shelf is great for everyday spices, oils, and a small knife block. Hang a hook on the side for dish towels or a pot holder.
- This keeps everything you need within arm's reach while cooking.
Cozy Detail
Add a small runner or a placemat on top of the cart to define the space and bring in color. A soft cotton runner in a warm tone—like mustard or rust—makes the cart feel like a real piece of furniture. Top it with a tiny vase of fresh herbs or a single candle for a cozy, lived-in touch.
10. Display a Small Herb Garden
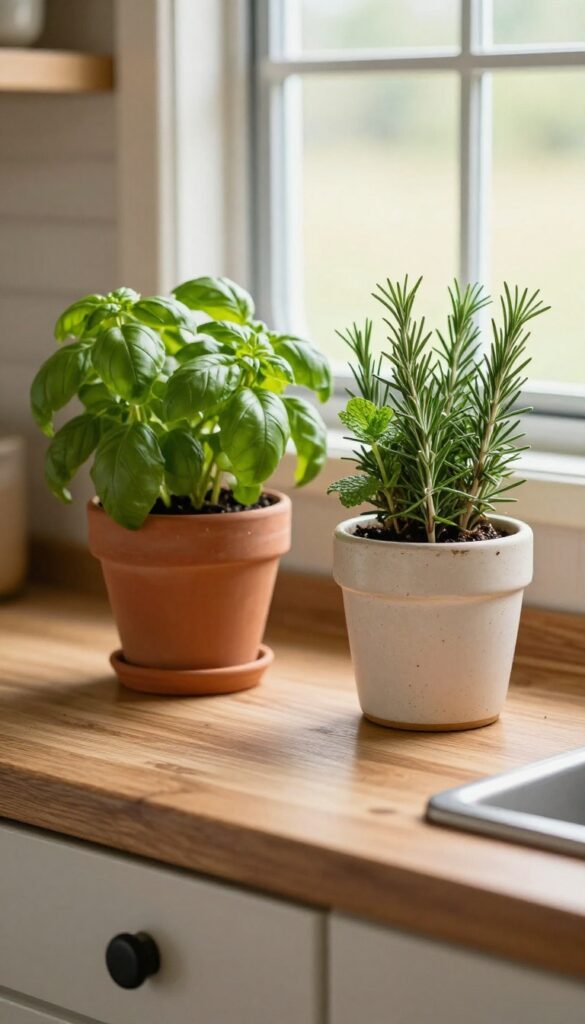
A tiny herb garden does more than just supply fresh garnishes—it transforms a compact kitchen into a cozy, layered space. The soft green leaves and subtle fragrance instantly make the area feel lived-in and warm, especially when you tuck them into a sunny corner or mount them on the wall. Even a single planter can soften the hard edges of cabinets and countertops, adding texture and life without taking up much room.
Herbs like basil, mint, and rosemary thrive in small pots and are incredibly useful for everyday cooking. Place them on a windowsill where they get plenty of light, or install a wall-mounted planter to free up counter space. The key is to choose containers that complement your kitchen's style—think matte ceramic, galvanized metal, or simple terracotta.
Grouping three or four pots together creates a mini garden effect that feels intentional and charming.
Best Containers
- Stick with materials that match your kitchen's vibe. For a cozy, rustic look, use terracotta pots or weathered wooden boxes. If your style leans modern, try sleek white ceramic or matte black planters.
- Self-watering pots are a smart choice for campers because they reduce maintenance and keep herbs happy even if you're away for a few days.
Placement Tips
Maximize natural light by placing herbs on a windowsill above the sink or on a counter near a window. If counter space is tight, install a magnetic spice rack on the wall and swap out the tins for small magnetic pots. Another option: hang a tiered planter from the ceiling or a cabinet handle to keep herbs within reach without cluttering surfaces.
Styling The Look
- Mix different leaf textures and heights for visual interest. Pair tall rosemary with trailing mint and bushy basil. Add a small watering can or a wooden scoop nearby to reinforce the garden feel.
- Keep the arrangement simple—overcrowding defeats the cozy, airy mood you're going for.
11. Add Curtains Under the Sink
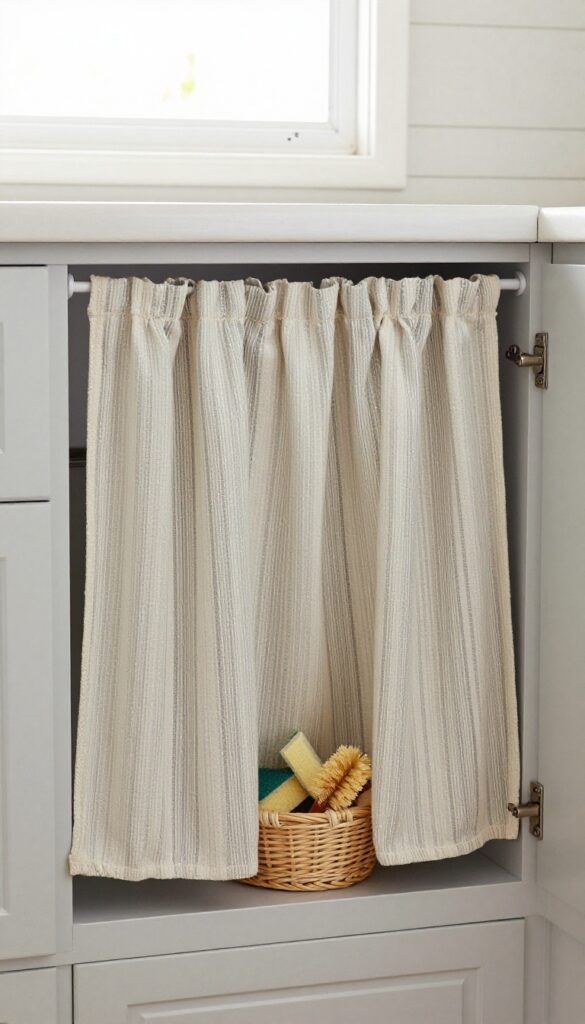
That cabinet under the sink can become a dumping ground for sponges, scrub brushes, and mystery bottles. Swapping the door for a short curtain on a tension rod instantly softens the space and hides the chaos. It’s a small change that brings a cozy, layered feel to your camper kitchen without sacrificing storage.
A curtain under the sink adds texture and a touch of homey charm. It’s also incredibly practical—you can access supplies by simply pushing the fabric aside, and there’s no door to swing open into a cramped aisle. Choose a fabric that coordinates with your rug or cushions to tie the whole look together.
Best Fabrics For Durability
Look for cotton or linen blends that are easy to wash and quick to dry. Avoid heavy drapes that absorb moisture or get in the way. A fun pattern like a subtle stripe or small floral adds personality without overwhelming the small space.
Installation Tip
Use a tension rod that fits snugly inside the cabinet opening. No drilling needed—just twist to secure. Keep the curtain short enough to clear any items stored below, and consider adding a small hook to tie it back when you need full access.
Finishing Touch
Add a small basket or bin on the floor of the cabinet to corral sponges and scrub brushes. The curtain hides the bin, keeping the look tidy. Match the basket’s material to your curtain’s color palette for a cohesive feel.
FAQ
How can I maximize storage in a small camper kitchen?
Use vertical space with pegboards and magnetic strips, choose nesting cookware, and add open shelving. Baskets and rolling carts also help keep things organized without taking up permanent counter space.
What are the best materials for a camper kitchen that feels cozy?
Natural materials like wood, rattan, and cotton add warmth. Combine them with soft textiles like rugs and curtains. Avoid too much plastic or metal, which can feel cold and uninviting.
How do I keep my camper kitchen looking stylish without sacrificing function?
Choose multi-purpose items that also look good, like a wooden knife strip or a colorful pegboard. Stick to a cohesive color palette and add layers with textiles and plants. Every piece should earn its spot.
Can I install under-cabinet lighting in a rented camper?
Yes, use battery-operated or rechargeable LED strips that stick on with adhesive. They don't require drilling and can be removed without damage. Look for warm white tones to keep the space cozy.
What's the best way to add personality to a tiny camper kitchen?
Incorporate small touches like a patterned rug, a few plants, or colorful dish towels. Swap out generic hardware for vintage knobs. Even a single piece of art on the wall can make the space feel like yours.
Conclusion
A camper kitchen can be both practical and full of character. By layering textures, choosing smart storage, and adding personal touches, you create a space that makes cooking on the road a pleasure rather than a chore.
Start with one or two ideas that resonate with your style, and build from there. The goal isn't perfection—it's a kitchen that feels like home, wherever you park.